
Understanding the Weapon Upgrade System
Arc Raiders gives you a basic free loadout when you start, but that won't cut it for long. If you want to survive encounters and extract successfully, you'll need to upgrade your weapons. The entire system revolves around the Gunsmith workbench, where you can boost weapon stats and craft better equipment. This guide walks you through everything from unlocking your first Gunsmith to maxing out your arsenal.

Unlocking the Gunsmith Workbench
Prerequisites and Requirements
The Gunsmith (also called the Weapon Workbench) unlocks after you finish the introductory quests. It's one of the core parts of your account and won't take long to get.
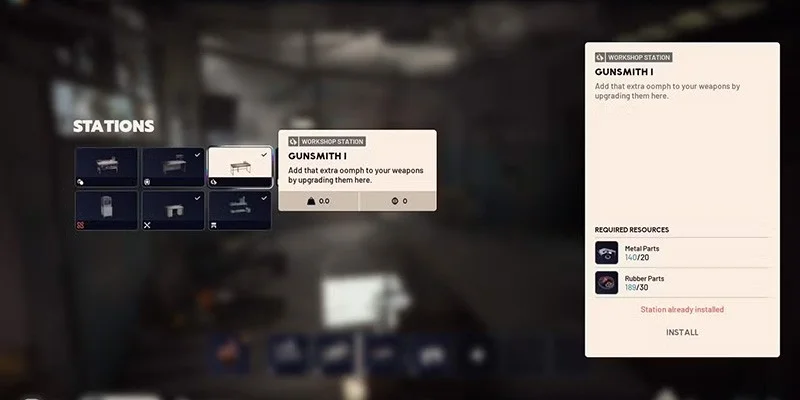
Installing your first Gunsmith (Gunsmith I) requires:
- Metal Parts x20
- Rubber Parts x20
Getting the Materials You Need
Metal Parts come from:
- Scavenging metal objects during drops
- Recycling ARC Tech items
- Breaking down metal scrap
Rubber Parts come from:
- Disassembling Chemical Containers
- Breaking down abandoned gear like Ruined Parachutes
- Recycling Destroyed Vests and similar equipment
Installing the Gunsmith
Head to your Workshop from the main lobby. Look for the Install option in one of the tabs next to Scrappy. Select Install and choose the Gunsmith I crafting recipe. Once you've got the materials, the station installs immediately and you're ready to go.
The Workshop also lets you install other crafting stations, so keep their resource needs in mind while you're scavenging.
How Weapon Upgrades Work
Opening the Upgrade Menu
Once your Gunsmith is installed, click on the crafting table inside the Workshop to open its interface. The Gunsmith shows as "Level 1" at first, which means you can upgrade it later. You'll see several tabs:
- Crafting Tab: Shows available recipes
- Weapon Upgrade Tab: Where you upgrade individual weapons
- Level Up Tab: For upgrading the Gunsmith itself
Upgrading Your Weapons
Click on the Weapon Upgrade tab to see every weapon you can currently upgrade. This menu shows all weapons in your inventory that can be improved. Weapons in your Stash automatically appear here too, so you don't need to pull them out first.
Pick a weapon from the list. The right side of the screen shows what you need for the upgrade. Click the Upgrade button to level up the weapon (Level 0 to 1, Level 1 to 2, and so on).
Each upgrade costs specific materials listed below the Upgrade button. If you've got the resources, you can track them and start the upgrade.
What Upgrades Actually Do
Every weapon upgrade increases these stats:
- Damage output
- Magazine size
- Reload speed
- Durability
There's no downside to upgrading weapons. It's one of the best ways to get powerful gear early without burning through too many materials. Each level makes a noticeable difference in combat.
Weapon Rarity and Upgrade Costs
Rarity Tiers Explained
Arc Raiders has multiple weapon rarity levels marked by color:
- White/Grey (Common)
- Green (Uncommon)
- Blue (Rare)
- Purple (Epic)
- Yellow (Legendary)
How Rarity Affects Upgrade Costs
Higher rarity weapons need matching quality materials for upgrades. Even at level one, these weapons require resources that match their rarity color. This gets expensive fast, especially when you consider how hard it is to find rare weapons in the first place.
Upgrading Common Weapons
Lower rarity weapons (white, green) need common materials for upgrades. For example, upgrading a basic weapon to the next tier might need:
- Mechanical Components
- Simple Gun Parts
These materials are easy to find through regular scavenging and recycling, making basic weapon upgrades perfect for early progression.
Upgrading the Gunsmith Workbench
Why Workbench Upgrades Matter
Your starting Gunsmith I station has limits on which weapons you can upgrade and what recipes you can access. Upgrading the Gunsmith unlocks better crafting recipes for accessories, weapons, and combat gear, while letting you upgrade higher-level equipment.
Finding the Upgrade Option
A lot of players can't find where to upgrade workbenches. Just click directly on the Gunsmith workbench you installed. An Upgrade option appears at the top of the interface. The Studding Workbench doesn't have this option, but that's intentional.
How to Upgrade Your Gunsmith
Example: Gunsmith Level 2 requires:
- Rusted Tools x3
The game helps you find materials. Rusted Tools drop in Mechanical and Industrial areas.
Locating Required Materials
Use the in-game map to find what you need. Open your map during a drop and check the location markers. Areas display logos showing their loot type:
- Mechanical area logo
- Industrial area logo
These markers tell you which locations drop Mechanical and Industrial loot, so you can farm specific materials more efficiently.
Once you have all required resources, select Level Up and your Gunsmith advances to the next tier. This works the same way for each level.
Upgrade Priority Guide
When to Upgrade Weapons
Deciding which weapons to upgrade depends on several factors:
- You have extra common materials
- The weapon is in your regular loadout
- You need better combat performance immediately
- The weapon is low rarity (easy to replace if lost)
- You need materials for other Workshop stations
- The weapon is extremely rare (high loss risk)
- You don't have team support for extraction
- You haven't tested the weapon enough
Managing Your Resources
Weapon upgrades give clear benefits with zero downsides, but you still need to manage resources carefully. Different Workshop elements compete for the same materials, so you'll have to make choices.
That said, weapon upgrades should usually come first. Better weapons directly improve your survival and extraction rates, which means more resources for future upgrades.
Your Upgrade Path
New players should follow this order:
- Complete introductory quests for starter materials
- Install Gunsmith I as soon as possible
- Upgrade your most-used common weapons first
- Focus on Gunsmith workbench upgrades to unlock better recipes
- Gradually move to upgrading higher rarity weapons as resources build up
- Reserve rare weapon upgrades for team play or critical drops
This approach maximizes early efficiency while building toward long-term power.
Common Questions
Weapon Storage and Upgrades
Weapons in your Stash show up automatically in the upgrade menu. You don't need to move them to your inventory first.
Material Tracking
The upgrade interface includes resource tracking. If you're missing materials, you can track them to get location hints during drops.
Crafting vs. Upgrading
The Gunsmith does two things:
- Craft new weapons and accessories from recipes
- Upgrade existing weapons to higher levels
Both use the same workbench but different tabs.
Workbench Levels and Weapon Caps
Your Gunsmith's level determines how high you can upgrade weapons. You'll need to level up the workbench to keep improving weapons past certain points.
Wrapping Up
The Gunsmith is your most important tool for surviving Arc Raiders. Understanding how to unlock it, upgrade weapons, and find materials will steadily improve your combat effectiveness.
Remember these points:
- Unlock Gunsmith I immediately using tutorial rewards
- Upgrade common weapons first for quick power gains
- Target specific map areas for the materials you need
- Upgrade the Gunsmith workbench to unlock better options
- Save rare weapon upgrades for high-stakes situations
- Prioritize weapon upgrades over most other Workshop investments
With upgraded weapons and a leveled Gunsmith, you'll see a major improvement in your extraction success and combat performance across all difficulty levels.