
The right attachments turn an average gun into something that consistently wins fights. In Arc Raiders, that margin between extracting loaded with loot and getting dropped mid-raid often comes down to how well your weapon is built for the situation. This guide covers the best attachment loadouts for every weapon in the game, with both premium best-in-slot setups and budget-friendly alternatives that still pull their weight. No matter your preferred playstyle, you'll find the right build path here.
Players still learning the attachment system can start with the overview below, while veterans can skip straight to any weapon section for the builds.
How Attachments Work
Every weapon has a set number of mod slots, and not every slot type shows up on every gun. Here's what each attachment category actually does:
Muzzle Attachments affect your bullet's behavior as it leaves the barrel. Compensators reduce per-shot dispersion (the random spread that builds up during sustained fire), keeping your shots tighter the longer you hold the trigger. Extended Barrels add 25% bullet velocity, so your rounds reach the target faster, which matters a lot at range. Silencers don't touch your weapon stats at all, but they muffle your gunfire, making it harder for other players and ARC enemies to track you. Shotgun Chokes are muzzle attachments exclusive to shotguns that tighten pellet spread, dramatically extending how far away you can land meaningful damage.
Underbarrel Grips handle recoil. Vertical Grips reduce the upward kick when you fire. Angled Grips specifically cut horizontal recoil, the unpredictable left-right sway that's almost impossible to control manually. Horizontal Grips reduce recoil in both directions at once, but they slow down your ADS (aim-down-sight) speed and give 10% less horizontal reduction than a dedicated Angled Grip.
Stocks change handling, stability, and sometimes fire rate. Stable Stocks improve dispersion recovery and recoil control, helping your crosshair settle back between shots. Padded Stocks offer recoil and dispersion reduction together, turning guns into laser beams, but at the cost of slower ADS, equip, and unequip speed. Lightweight Stocks do the opposite: faster ADS and quicker weapon swaps, but more vertical recoil. Kinetic Converters are rare stock-slot items that boost fire rate for a direct DPS increase.
Magazines increase ammo capacity. Higher tiers hold more rounds. Different weapon classes use different mag types (Light Mag, Medium Mag, Shotgun Mag).
Attachment Tiers run from Level 1 (green) through Level 2 (blue) to Level 3 (purple). Higher tiers give stronger bonuses but also introduce stat penalties that lower tiers don't have. Green attachments are worth calling out specifically because they provide pure bonuses with zero downsides, making them quietly strong for budget setups.
Weapon Upgrades are separate from attachments entirely. Most weapons can be leveled from 1 to 4, and these upgrades unlock things like bigger magazines, faster reload, improved fire rate, better bullet velocity, and tighter recoil. For several weapons in this guide, reaching Level 4 matters more than any single attachment you can slot in. When that's the case, it's called out in the weapon's section.
Premium vs. Budget Builds
Most weapons in this guide get two build tiers:
- Premium / Best-in-Slot: The absolute strongest attachment combination. These builds assume access to Level 3 (purple) attachments and sometimes a Kinetic Converter. Expensive, painful to lose, but they squeeze maximum performance from the weapon.
- Budget / Practical: A cost-efficient setup using Level 2 (blue) or Level 1 (green) attachments that still makes a real difference. Built for players who run the weapon regularly and don't want to sweat over replacement costs.
Pick the tier that fits your stash and your risk tolerance.
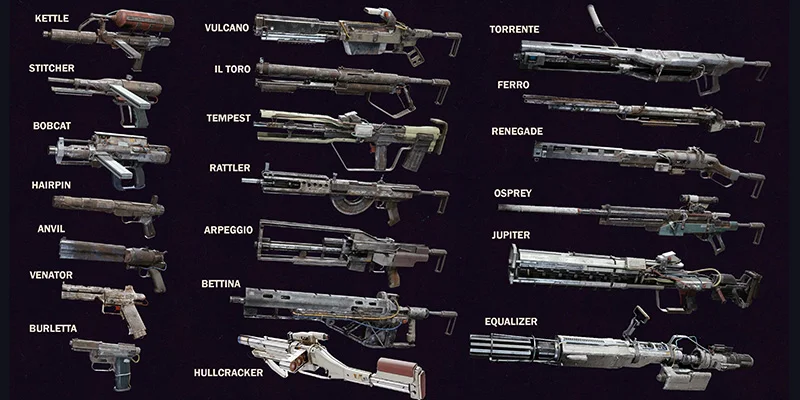
Every Weapon, Fully Built
Ferro
Weapon Type: Break-Action Battle Rifle | Ammo: Heavy | Slots: 3 (Muzzle, Underbarrel, Stock)
The Ferro hits hard. Really hard. It shows up in free loadouts and performs well above its rarity, making it a weapon every player should know how to build. Since it's break-action, you fire one shot and reload before the next.
Skip the Underbarrel Entirely
This trips a lot of players up. The Ferro fires a single shot and then reloads, so dispersion never has a chance to build between rounds. By the time your next shot is ready, everything has fully reset. Grips exist to manage sustained-fire recoil and accumulating spread, neither of which apply here. Putting anything in the underbarrel slot on a Ferro is a waste.
Muzzle: Extended Barrel or Silencer
The Extended Barrel is the single best attachment for the Ferro. That 25% velocity bump means your shot arrives faster, which makes a noticeable difference when you're tagging players at distance or trying to connect before someone ducks behind cover. Faster bullets also reduce how much you need to lead moving targets.
For a stealthier approach, any tier of Silencer works instead. You won't gain any stat improvements, but suppressed shots keep your position hidden from both players and ARC. It's a playstyle choice, not a raw performance upgrade.
Stock: Lightweight Stock
The Lightweight Stock is the only stock worth considering. It speeds up your ADS and reduces equip time, letting you pull the Ferro out faster and scope in quicker for that crucial opening shot. On a one-shot weapon where getting the first hit off fast is everything, that handling speed translates directly into more kills. Stable and Padded stocks don't offer meaningful value here.
You only need one or two attachments to get the most out of this weapon, regardless of your budget.
Stitcher
Weapon Type: Full-Auto SMG | Ammo: Light | Slots: 4 (Muzzle, Underbarrel, Magazine, Stock)
The Stitcher might be the best value weapon in the game. It's a common-rarity gray gun that performs way above its price point, and four attachment slots give you plenty of room to customize. Losing a Stitcher barely registers on your resource pool, which means you can run it raid after raid without hesitation.
Premium Build
- Muzzle: Compensator 3. On a full-auto weapon, dispersion is your biggest enemy. The Comp keeps your shots clustering tight during sustained fire.
- Underbarrel: Horizontal Grip. Cuts both vertical and horizontal recoil at once, making the Stitcher noticeably smoother to control. If you can't find Horizontal Grips (they're fairly rare), an Angled Grip 2 or 3 does great work as a substitute. Horizontal recoil is the priority because you can learn to pull down for vertical control, but random side-to-side sway is nearly impossible to compensate for by hand.
- Magazine: Light Mag 3. More bullets means longer sustained fire before you're stuck reloading.
- Stock: Kinetic Converter. The fire rate bump turns the Stitcher into a shredder. If you're going to invest a Kinetic Converter anywhere, the Stitcher is one of the best homes for it. Don't have one or don't want to risk it? The Padded Stock is an excellent alternative, adding recoil reduction and dispersion reduction that basically turns this gun into a laser.
Budget Build
- Muzzle: Compensator 2
- Underbarrel: Angled Grip 2
- Magazine: Light Mag 2
- Stock: Stable Stock 2 (Stable Stock 3 if available)
Cheap, easy to craft or buy, and still very effective. The Comp 2 and Angled Grip 2 combo on the Stitcher feels surprisingly clean. This is a setup you can lose five raids in a row and barely notice the resource hit.
Rattler
Weapon Type: Burst-Fire SMG | Ammo: Light | Slots: 3 (Muzzle, Underbarrel, Stock) | No Magazine Slot
The Rattler divides the community. It kicks hard, sprays wide, and doesn't accept magazine attachments, which means you're stuck with its base ammo count unless you upgrade. Some players swear by it. Others avoid it entirely.
Premium Build
- Muzzle: Compensator 3. Non-negotiable. The Rattler's dispersion is wild, and the Comp 3 does the most to rein it in.
- Underbarrel: Angled Grip 2 or 3. Strips away horizontal recoil so you only need to manage the vertical pull-down.
- Stock: Kinetic Converter for fire rate, or Padded Stock for a more practical choice that adds recoil and dispersion control the Rattler badly needs. The Kinetic Converter works here, but there are better weapons to invest it in.
Budget Build
- Muzzle: Compensator 3. Keep the Comp 3 even on budget. Dropping to a Comp 2 creates a noticeable accuracy loss on this particular weapon.
- Underbarrel: Angled Grip 2
- Stock: Stable Stock 2
The Rattler demands more investment than other common weapons to reach its potential, and even fully built, many players still get better results from the Stitcher or Kettle. If you commit to the Rattler, upgrade to Level 4 first and never skip the Comp 3.
Kettle
Weapon Type: Semi-Auto Assault Rifle | Ammo: Light | Slots: 4 (Muzzle, Underbarrel, Magazine, Stock)
The Kettle used to dominate the common weapon tier before a fire rate nerf brought it in line. It's still a strong pick, particularly on PC where you can click fast enough to approach its ceiling. Its attachment strategy overlaps with the Stitcher in many ways, but the semi-auto nature changes a few priorities.
Premium Build
- Muzzle: Compensator 3. Rapid semi-auto clicking builds dispersion fast. The Comp keeps successive shots landing where you aim.
- Underbarrel: Angled Grip 3. Same principle as always: kill the horizontal recoil since vertical is something you can manage yourself. The Horizontal Grip works well too (cuts both directions), but Angled Grips are easier to find and more practical to recommend.
- Magazine: Light Mag 3. More ammo for sustained semi-auto fire. That said, Light Mag 2 is often enough to down a single player. Go Mag 3 if you play trios and expect back-to-back fights without time to reload.
- Stock: Stable Stock 3. Helps with dispersion recovery between your rapid shots, keeping you accurate while spamming.
Budget Build (Honestly the Better Value)
You're not going to snipe with the Kettle. Its effective range doesn't justify purple attachments across the board, so a green build performs well for how this weapon actually gets used:
- Muzzle: Compensator 2
- Underbarrel: Angled Grip 2
- Magazine: Light Mag 2 (or Mag 3 for trios)
- Stock: Stable Stock 2
Save your purple attachments for weapons where the investment gap matters more. The green Kettle build is the practical recommendation for most players.
Il Toro
Weapon Type: Pump-Action Shotgun | Ammo: Shotgun | Slots: 4 (Muzzle, Underbarrel, Magazine, Stock)
The Il Toro is one of the most feared PvP weapons in Arc Raiders right now. Good aim and a properly built Il Toro will two-shot or three-shot through pretty much any shield in the game. Its pump-action design makes every trigger pull count, and the right attachments push its effective kill range further than most players expect.
The One Attachment That Changes Everything: Shotgun Choke
The Shotgun Choke tightens pellet spread, which means more pellets hit the target at any distance. This directly increases your damage per shot and extends the range where the Il Toro stays lethal.
Magazine
Any Shotgun Magazine helps. The Il Toro reloads one shell at a time, so running empty during a multi-target fight is a real problem. A bigger mag lets you take on multiple raiders without that painful per-shell reload gap. Tier matters less than simply having one equipped.
Grip and Stock (Optional but Useful)
These two slots aren't strictly necessary, but they improve the experience:
- Underbarrel: Vertical Grip 2 or 3. The Il Toro kicks hard between pump-action shots. If you're already comfortable dragging your aim back down manually, you can skip this. But it does make follow-up shots smoother.
- Stock: Lightweight Stock. Faster equip speed and faster ADS. The Il Toro is often a swap-to weapon: you spot someone, pull it out, and need to fire immediately. The quicker draw time from the Lightweight Stock matters in those moments. One tradeoff though: it increases vertical recoil, so pairing it with a Vertical Grip offsets that penalty nicely.
Burletta
Weapon Type: Semi-Auto Pistol | Ammo: Light | Slots: 2 (Muzzle, Magazine)
The Burletta sits in an awkward spot. Sometimes it's fun, sometimes you're wondering why you didn't just bring a Stitcher. Only two attachment slots limit what you can do with it.
Muzzle: Compensator. Since you're spam-clicking semi-auto shots, dispersion climbs fast. A Comp 2 or 3 keeps shots centered instead of ballooning outward. Alternatively, a Silencer works for staying quiet and avoiding ARC aggro.
Magazine: Biggest one you can find. More rounds, fewer reloads.
The Burletta is functional but outclassed at similar price points. It's a niche pick, not a primary recommendation.
Anvil
Weapon Type: Hand Cannon | Ammo: Heavy | Slots: 2-3 (Muzzle, plus unique Anvil Splitter Mod Slot)
The Anvil delivers massive per-shot damage and excels at long-range picks and cracking ARC armor. It fires the same heavy ammo as the Ferro but has slightly lower base bullet velocity, which makes your muzzle choice particularly important.
Standard Build (Most Players)
Without the Anvil Splitter, your main decision is the muzzle:
- Extended Barrel adds 25% velocity, compensating for the Anvil's slower projectile speed compared to the Ferro. This is the go-to for medium and long range, where faster bullets make landing shots noticeably easier.
- Compensator 3 (or Comp 2 on a budget) is better if you're firing follow-up shots quickly and want tighter dispersion between them.
Extended Barrel is generally preferred for ranged play. Compensator wins if you're pumping out rapid successive shots.
Anvil Splitter Build
The Anvil has a unique mod slot that only accepts one item: the Anvil Splitter. It transforms the weapon from a single-projectile cannon into a four-projectile spread weapon, with each projectile dealing 30% of base damage. Land all four and you're doing 120% total, a 20% damage increase over a standard shot.
The tradeoff is significant. The Splitter effectively turns the Anvil into a short-to-medium range pseudo-shotgun. Long-range precision goes out the window. It works well against ARC because the spread strips armor plating efficiently, but for general use, the standard Anvil is more versatile.
Arpeggio
Weapon Type: Full-Auto LMG/AR Hybrid | Ammo: Medium | Slots: 4 (Muzzle, Underbarrel, Magazine, Stock)
The Arpeggio is inconsistent. When it clicks, it deletes targets. When it doesn't, you're staring at the death screen wondering what happened. Significant bloom during sustained fire is the culprit, but the right attachments tame it considerably.
Premium Build
- Muzzle: Compensator 3. The Arpeggio's bloom during full-auto is harsh. The Comp is the most impactful single attachment for reining it in.
- Underbarrel: Vertical Grip. Unlike most weapons in this guide, the Arpeggio doesn't have much horizontal recoil. Its kick is mostly vertical, making the Vertical Grip the correct pick instead of an Angled Grip. Slap one on and it becomes noticeably more stable.
- Magazine: Medium Mag 3. The base ammo count is decent, so even a Mag 1 or 2 works fine. Mag 3 is ideal but not critical.
- Stock: Padded Stock. Clearly the best option here. The additional recoil and dispersion reduction stacks with the Comp and Vertical Grip to make the weapon dramatically more controllable. If you can't get a Padded Stock, a Stable Stock fills in as a cheaper alternative.
Budget Build
- Muzzle: Compensator 2
- Underbarrel: Vertical Grip (any tier)
- Magazine: Medium Mag 1 or 2
- Stock: Stable Stock 2
What to prioritize: Compensator first, then Vertical Grip, then Stock, then Magazine. The Arpeggio is flexible on tier levels but wants all four slots filled.
Venator
Weapon Type: Double-Barrel Rifle | Ammo: Medium | Slots: 2 (Underbarrel, Magazine)
The Venator is a PvP monster. It fires two bullets per trigger pull, delivering punishing burst damage that drops players fast. Only two attachment slots keep the loadout decisions simple.
Build
- Underbarrel: Angled Grip 3 (or Angled Grip 2 on a budget). The Venator has considerable horizontal spread during rapid fire. Vertical recoil isn't the problem here, which makes Angled the clear pick. The Horizontal Grip technically covers both recoil directions, but it gives 10% less horizontal reduction than the Angled and penalizes ADS speed, making it the worse option.
- Magazine: Medium Mag 3. Gives you 22 rounds, which keeps you in the fight longer. Use the highest tier you can afford.
No muzzle or stock slots exist on the Venator. Angled Grip plus Magazine is the complete loadout. Combine that with the Level 4 upgrade and you've got one of the most dangerous PvP setups in the game.
Renegade
Weapon Type: Semi-Auto DMR | Ammo: Medium | Slots: 3 (Muzzle, Magazine, Stock)
The Renegade hits hard but feels painfully slow at lower levels. Its upgrade path is critical.
Build
- Stock: Stable Stock 2 or 3. Dispersion recovery and recoil control are both needed for rapid semi-auto fire. Stable Stock 3 is stronger, but 2 still does the job. Skip the Padded Stock here, its ADS, equip, and unequip speed penalties are too steep, and the Stable Stock provides enough dispersion control on its own.
- Magazine: Any size increase. More rounds means more sustained pressure. Whatever tier you have access to, slot it in.
- Muzzle: Compensator 2/3 or Extended Barrel. This comes down to preference:
- Compensator pairs well with the Stable Stock for excellent dispersion management during rapid fire. Best for most engagement ranges.
- Extended Barrel is better for players who use the Renegade at medium-to-long distance, where the velocity boost helps connect shots.
Build Summary: Comp 3 (general) or Extended Barrel (long range), any Magazine, Stable Stock 2 or 3.
Osprey
Weapon Type: Bolt-Action Sniper Rifle | Ammo: Heavy | Slots: 4 (Muzzle, Underbarrel, Magazine, Stock)
The Osprey is the only true sniper in Arc Raiders. In practiced hands, it's devastating. It rewards patience and quick bolt-cycling, but there's a learning curve.
Build
- Muzzle: Extended Barrel. You're sniping at range, so the 25% velocity increase is the most valuable muzzle option. Faster bullets mean less lead on moving targets at distance. A Silencer (any tier) is a solid alternative for suppressed sniping, confusing enemies about your location and keeping ARC at bay.
- Underbarrel: Vertical Grip (optional). If you've upgraded to Level 4 and you're cycling the bolt fast, a Vertical Grip helps manage the kick between shots. Horizontal recoil doesn't matter on a bolt-action since each shot is individually aimed. You can leave this slot empty without losing much.
- Magazine: Any available. Extra rounds mean fewer reloads. On a sniper where one reload cycle can mean losing a kill, any extra capacity helps.
- Stock: Lightweight Stock. Faster ADS speed means quicker scoping between bolt cycles, which directly improves your ability to land successive hits. A Stable Stock is a viable alternative, but the handling speed from the Lightweight benefits aggressive sniping more.
Torrente
Weapon Type: LMG / Minigun-Style | Ammo: Light | Slots: 3 (Muzzle, Magazine, Stock)
The Torrente is a bullet hose. Massive magazine, extreme fire rate, and devastating in enclosed spaces. Its problems are equally extreme: terrible dispersion during sustained fire and a very long reload. It works best in specific situations rather than as an everyday primary.
Build
- Muzzle: Compensator 3. Needed. The Torrente's spray is all over the place, and even with Comp 3, it's still mostly a close-range weapon. Without a Comp, you're throwing bullets in every direction.
- Magazine: Medium Mag 3 (optional). The base magazine is already huge (around 80-90 rounds), and Level 3 only adds about 12 more for a total around 102. Twelve extra rounds on top of an already massive pool doesn't change much. You can skip this slot entirely and not miss it.
- Stock: Kinetic Converter is the top pick. More fire rate means more bullets downrange faster, playing to the weapon's strength. If you don't have one or don't want to risk it, the Lightweight Stock is the best alternative. The Torrente is very slow to swap in and out, so the reduced equip/unequip time from the Lightweight Stock matters more here than on most weapons. ADS speed improvement helps too. A Stable Stock is the budget third option.
Build Summary: Comp 3, skip Magazine if needed, Kinetic Converter > Lightweight Stock > Stable Stock.
Vulcano
Weapon Type: Semi-Auto Shotgun | Ammo: Shotgun | Slots: 4 (Muzzle, Underbarrel, Magazine, Stock)
The Vulcano is the Il Toro's expensive older sibling. Semi-automatic fire means faster follow-up shots than the pump-action Il Toro, but the higher crafting and maintenance costs keep most players from running it regularly. When you do bring one out, though, it's a good time.
Build
- Muzzle: Shotgun Choke 3. Same as the Il Toro, this is mandatory. The gap between Choke 2 and Choke 3 is too big to ignore. If you're already investing in a Vulcano, don't skimp on the choke.
- Underbarrel: Angled Grip 2 or 3. Between semi-auto shots, the Vulcano jolts horizontally. Angled Grips cut that lateral movement, leaving you to manage only the vertical kick. Go with Angled over Vertical here because horizontal disruption between shots is the bigger problem.
- Magazine: Shotgun Mag 3 (or 2). The Vulcano needs multiple shots to down a target, so more rounds before reloading matters. If you're already running a high-level Vulcano, Mag 3 is the natural match.
- Stock: Lightweight Stock. Faster ADS and quicker weapon swaps. If you're not spam-firing at absolute maximum speed, the Stable Stock's dispersion recovery doesn't do as much for you. The Lightweight handles better in typical engagements. A Kinetic Converter technically works (the fire rate increase does apply slightly), but it's a questionable investment on a semi-auto shotgun. Save it for a Bobcat or Stitcher.
Build Summary: Choke 3, Angled Grip 2/3, Shotgun Mag 3/2, Lightweight Stock.
Bettina
Weapon Type: Semi-Auto Rifle | Ammo: Medium | Slots: 3 (Muzzle, Underbarrel, Stock)
The Bettina is a weapon that most of the community agrees could use a buff. It works okay against ARC, but it chews through ammunition at a scary rate. If you're set on running it, proper attachments help patch its weaknesses, though it remains a niche choice.
Build
- Muzzle: Compensator 2 or 3. Needed for accuracy during sustained semi-auto fire. Dispersion climbs quickly on this gun, and the Comp is the most important slot to fill.
- Underbarrel: Angled Grip 2 or 3. Standard logic applies: cut the horizontal recoil and handle the vertical pull-down yourself.
- Stock: Padded Stock. Both the recoil reduction and dispersion reduction make a real difference on the Bettina, and the weapon needs both. The ADS/equip/unequip speed penalties are worth accepting here. A Kinetic Converter technically provides more DPS through fire rate, but that's not a practical recommendation for most players. The Comp + Angled Grip + Padded Stock trio is the setup that actually makes this gun feel usable.
Tempest
Weapon Type: Full-Auto Assault Rifle | Ammo: Medium | Slots: 3 (Muzzle, Underbarrel, Magazine)
The Tempest doesn't always justify its spot compared to other options in the current balance, but it performs well against ARC and it's genuinely fun to shoot. Solid choice for PvE farming runs even if it's not the top PvP pick.
Build
- Muzzle: Compensator 3. The Tempest sprays and blooms heavily during auto-fire. Comp 3 is the biggest single improvement you can make.
- Underbarrel: Angled Grip 2 (preferred over Angled Grip 3). Removing horizontal recoil lets you manage the weapon with a simple downward pull. Angled Grip 3 offers 10% more horizontal reduction, but the added ADS speed penalty doesn't feel worth it on this specific gun. Angled 2 strikes a better balance.
- Magazine: Largest available. It's a full-auto rifle, more bullets means more sustained damage per engagement.
All three slots are considered necessary to bring the Tempest up to where it needs to be. Without the full set, the weapon underperforms noticeably.
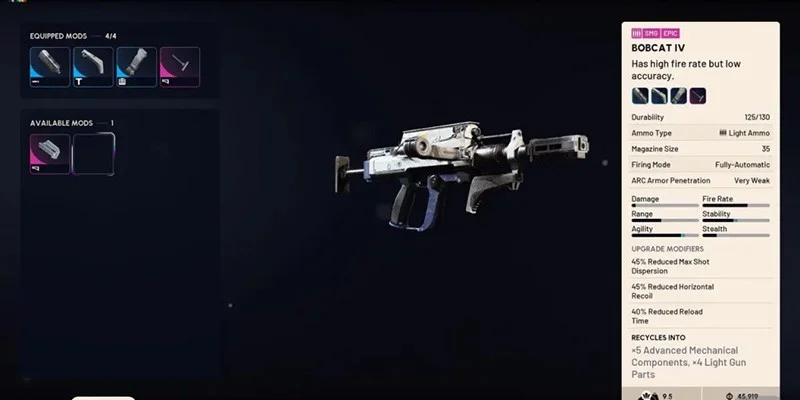
Bobcat
Weapon Type: Full-Auto Assault Rifle | Ammo: Medium | Slots: 4 (Muzzle, Underbarrel, Magazine, Stock)
The Bobcat is the gun everyone wishes they could bring to every raid. Powerful, versatile, dominant in both PvE and PvP. It's also expensive to build, upgrade, and equip with attachments. Losing a fully kitted Bobcat stings. But if you're investing in one, build it right.
Premium Build (Best-in-Slot)
- Muzzle: Compensator 3. Tightens the bloom during sustained auto-fire.
- Underbarrel: Horizontal Grip. Reduces both horizontal and vertical recoil, turning the Bobcat into a genuine laser. You lose some ADS speed, but on a weapon this expensive and powerful, the raw accuracy gain is worth it.
- Magazine: Medium Mag 3. Maximum capacity. If every round in one magazine connects, the target goes down.
- Stock: Kinetic Converter. If there's any weapon that justifies a Kinetic Converter, the Bobcat is one of the top candidates. The fire rate boost on an already powerful full-auto platform creates fearsome damage output. The Horizontal Grip compensates for the recoil penalties the Converter introduces. If you'd rather not risk a Converter, the Padded Stock is the next best option, adding dispersion and recoil control that further tightens accuracy.
Budget Build
- Muzzle: Compensator 2 or 3
- Underbarrel: Angled Grip 2 or 3
- Magazine: Medium Mag 2 or 3
- Stock: Stable Stock 2 or 3
An all-blue or all-green build is noticeably cheaper and still performs well. Green attachments deserve a special mention for the Bobcat: they provide pure bonuses with no negatives, making them a surprisingly competitive option for players who want a functional build without risking expensive items.
Attachment Principles
A few patterns emerge across every weapon in the game:
Green attachments are underrated. Level 1 gear provides honest bonuses with zero downsides. For budget builds, they're quietly strong.
Kinetic Converters belong on the right weapons. Best candidates: Bobcat, Stitcher, Torrente. Questionable on semi-auto weapons. Minimal benefit on the Arpeggio specifically.
Budget Weapon Pairings
Building a full loadout on a budget? These weapon combos cover the most common engagement scenarios without heavy investment:
The most popular budget pairing in Arc Raiders. Hit them with the Ferro's opening shot, swap to the Stitcher to finish with full-auto. The Ferro provides the punch, the Stitcher handles the cleanup, and both are dirt cheap to replace.
The Il Toro dominates up close while the Ferro picks targets at distance. This combo gives you strong stopping power at both ends of the engagement spectrum without much overlap.
The Kettle covers mid-range semi-auto work while the Stitcher fills the close-quarters full-auto role. Both use light ammo, which simplifies your inventory.
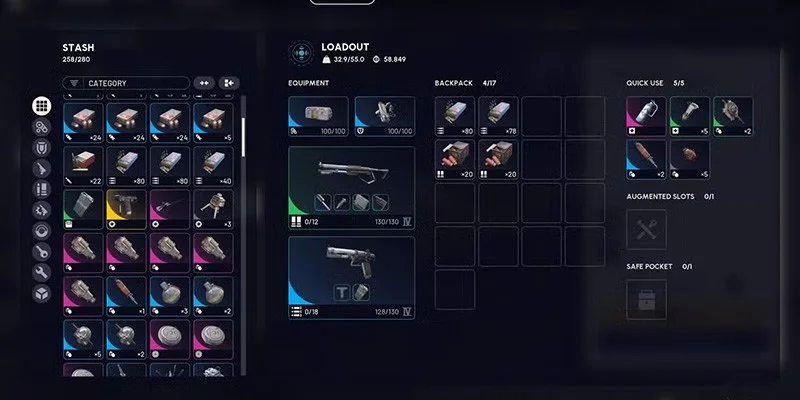
Raid Preparation Checklist
Weapons and attachments are only part of the picture. A complete loadout also needs:
Shield Rechargers. Shields don't regenerate on their own in Arc Raiders. You need to actively recharge them using Shield Rechargers or ARC Powercells found during raids. Never go in without at least one.
Bandages. Crafted from 5 cloth each, stacking up to 5 per inventory slot. Always craft the full stack of 5 since they take the same slot whether you're carrying 1 or 5. No reason not to max it out.
Adrenaline Shots. These boost your stamina, which dramatically improves your ability to disengage from bad fights. Stamina management is underrated, especially on budget runs where the goal is loot and extraction, not combat.
Utility Items. Gas Grenades block chokepoints, cover retreats, and flush enemies from cover. Smoke Grenades and Decoys give you escape options when things go sideways. Solo players in particular should always carry at least one piece of utility for getting out alive.
Shield Selection. Light Shields maximize mobility for quick runs and repositioning. Medium Shields balance protection and speed. Heavy Shields provide maximum survivability but slow you down. Match the shield to your objective for the raid.
Final Thoughts
That covers every weapon currently available in Arc Raiders, with builds that work at both premium and budget levels. Legendary weapons aren't included since most lack attachment slots or are too rare to justify bringing into raids regularly.
These builds represent the most effective setups for each weapon's intended role based on extensive testing. At the same time, personal comfort matters in a game like this. If a particular combo feels right for you even when it differs from the recommendation here, there's real value in that. Use this guide as your starting point and adjust from your own experience.
Good luck out there, Raider.