
Arc Raiders has burst onto the gaming scene as a refreshing take on the extraction shooter genre, and console players are diving headfirst into its intense gameplay. However, like many games in early access, the default settings aren't always optimized for the best experience. Console players using controllers need specific adjustments to compete effectively and enjoy the game to its fullest potential.
This comprehensive guide breaks down every essential setting adjustment you need to make for optimal performance on console, covering everything from visual enhancements to crucial accessibility tweaks that can mean the difference between victory and defeat.
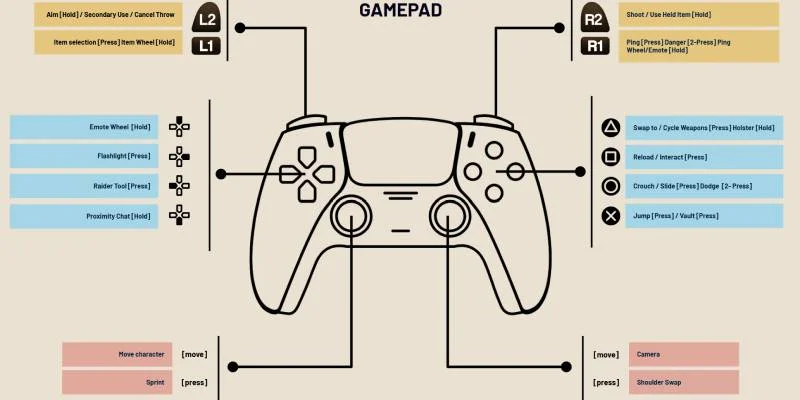
Essential Controls and Navigation
Before diving into settings optimization, familiarize yourself with key controller bindings that aren't immediately obvious:
- Ping System: Use RB (Right Bumper) to ping locations, enemies, or items for your team. This is crucial for team communication and coordination.
- Push-to-Talk: Default mapping is Down on the D-Pad for voice communication when push-to-talk is enabled.
These controls are essential for team-based gameplay and should be practiced alongside your settings optimization.
Getting Started: Accessing Your Settings
Before diving into the specific adjustments, you'll need to navigate to the settings menu. From the main hub, press the start button on your controller and look for the gear icon on the left side of the screen. Press A to access the settings menu, where you'll find several tabs containing various customization options.
The settings menu in Arc Raiders is currently simplified, reflecting the game's tech test status. While more options will likely be added in the full release, the current selection provides enough customization to make the game feel much better to play.
Essential General Settings for Better Information Flow
The first tab contains several fundamental settings that directly impact your situational awareness during combat. These options provide crucial information that can keep you alive in firefights.
Show Reload Progress
Recommendation: Enable
This feature displays a visual indicator of your reload progress, helping you time your movements and engagements more effectively. In a game where every second counts, knowing exactly when your weapon will be ready to fire again is invaluable.
Show Damage Direction
Recommendation: Enable
This feature provides visual cues indicating the direction from which you're taking damage. In chaotic firefights with multiple enemies, this information can be the difference between quickly identifying threats and getting overwhelmed.
Crossplay Settings
Recommendation: Disable for competitive advantage
You can disable crossplay entirely while on the main menu, which removes PC players from your matchmaking pool. Many console players prefer this option to ensure they're only competing against other controller users, as PC players with mouse and keyboard typically have aiming advantages. This is a standard recommendation for console players in competitive shooters.
Server Selection
Recommendation: Automatic
The server selection should remain on automatic unless you experience connection issues. The automatic setting defaults to the lowest ping servers, providing the best possible connection for competitive gameplay.

Graphics Optimization for Console Performance
The graphics tab contains several critical adjustments that can dramatically boost your performance and make the game feel more responsive.
Field of View
Recommendation: Maximum (80 degrees)
The game defaults to 60 degrees, but you should immediately increase this to the maximum of 80 degrees. A wider field of view provides significantly more peripheral vision, allowing you to spot enemies and threats that would otherwise remain hidden at the edges of your screen.
Motion Blur
Recommendation: Disable
This visual effect creates a blurring effect behind moving objects when you turn or move quickly. While it might look cinematic, motion blur can make it difficult to track targets during combat and can cause visual fatigue during extended play sessions. Disabling this setting provides clearer, more responsive visuals.
Idle Energy Saving
Recommendation: Disable
This feature limits frame rate and resolution when idle in the main menu to conserve energy. While the energy saving aspect might seem beneficial, there's potential for this setting to impact in-game performance, so disabling it ensures consistent performance across all areas of the game.
Audio Configuration for Competitive Advantage
Audio settings in Arc Raiders require careful balance, as the game's sound design is exceptionally detailed but can be overwhelming at default levels.
| Audio Setting | Recommended Value | Purpose |
|---|---|---|
| Master Volume | 35% | Comfort adjustment - game is mixed loudly |
| Effects Volume | 100% | Essential gameplay audio cues |
| Music Volume | Personal Preference | Consider disabling during competitive play |
| Dialogue Volume | 100% | Important story and communication elements |
Master Volume
Recommendation: 35% (adjust to comfort)
The game's audio is mixed quite loudly, potentially causing discomfort with headphones. Starting around 35% and adjusting based on your comfort level and audio equipment is recommended.
Effects Volume
Recommendation: 100%
Should remain at maximum as these sounds provide crucial gameplay information. Footsteps, weapon sounds, and environmental audio cues all fall under this category and are essential for competitive play.
Night Mode
Recommendation: Enable for quieter gaming sessions
Night Mode is an audio compression feature designed for gaming during quieter hours. It reduces the volume of loud sounds like gunshots, explosions, and grenades while boosting quieter audio cues such as footsteps and enemy movement. This allows you to maintain competitive audio awareness without sudden volume spikes that might disturb others. The setting effectively compresses the dynamic range, making loud sounds softer and quiet sounds more audible.
Voice Communication Setup
The voice communication options provide flexibility for team coordination and proximity chat.
Push-to-Talk
Recommendation: Enable
Generally recommended over open microphone settings. An always-open microphone means other players can constantly hear background noise from your environment, which can be distracting for teammates. Push-to-talk gives you control over when you communicate.
Controller Binding: On Xbox controllers, the default push-to-talk button is typically mapped to Down on the D-Pad.
If you prefer to avoid voice communication entirely, you can disable proximity chat completely, which removes all in-game voice communication features.
Critical Accessibility Adjustments
The accessibility tab contains several settings that can significantly impact your gameplay effectiveness, with some options that might initially seem minor but can cause major problems if not properly configured.
Move Crosshair When Path is Blocked
Recommendation: Disable
This setting causes significant frustration for many players and should typically be disabled. This feature automatically moves your crosshair away from obstacles when your weapon's path is blocked, such as when aiming through railings or around cover. While this might seem helpful, it creates confusion about where your shots will actually go, making precise aiming much more difficult. The floating crosshair can be particularly problematic in close-quarters combat where precise aim is crucial.
Override Crosshair Shape
Recommendation: Personal Preference
Provides customization for players who prefer consistency across different weapons. By default, different weapon types display different crosshair styles - SMGs, assault rifles, sniper rifles, and shotguns each have unique crosshair designs. Enabling this override allows you to choose one crosshair style that remains consistent regardless of your equipped weapon.
Crosshair Customization Options
The crosshair customization options are extensive, allowing you to modify:
- Length: Adjusts the size of the crosshair lines
- Thickness: Determines how bold and visible the lines appear
- Opacity: Controls how prominent the crosshair appears on screen
- Color: Uses RGB sliders to create your preferred crosshair color
Color Recommendations: Bright, contrasting colors like teal or cyan often work well because they stand out against most backgrounds. Red and green should be turned down while blue is increased for a bright blue crosshair, or adjust the combination to create colors that work best for your visual preferences.
Crosshair Outline
Recommendation: Test and Decide
Adds a border around your crosshair, which can improve visibility against complex backgrounds but may also add visual clutter. This feature is entirely preference-based and should be tested to see if it helps or hinders your aiming.
Controller Sensitivity and Response Optimization
The gamepad settings tab contains the most technical adjustments but also the most impactful for competitive play.
Aim Assist
Recommendation: Enable (for most players)
Can be toggled on or off based on personal preference. Most console players benefit from leaving this enabled, as it provides subtle assistance with target tracking.
Look Sensitivity
Recommendation: 120
This setting provides a good balance between responsiveness and control, allowing quick turns without becoming uncontrollable. This setting lets you rotate quickly when needed while maintaining precision for aiming.
Zoom Sensitivity Multiplier
Recommendation: 40%
The default 20% often feels too slow, making it difficult to track moving targets when zoomed in. Increasing this to 40% provides much better responsiveness when aiming, allowing you to follow targets more effectively during engagements.
Scope Zoom Sensitivity Multiplier
Recommendation: 40%
Works similarly to the zoom sensitivity but applies specifically to scoped weapons. Adjusting this to match your zoom sensitivity ensures consistency across different weapon types.
Look Response Curve
Recommendation: Linear (with caveats)
Linear response theoretically provides the most direct and responsive feel, where your input directly corresponds to camera movement without acceleration curves. However, the current implementation may not feel truly linear compared to other games, and some players report that Linear and Exponential curves behave similarly in the current build.
This setting requires adjustment time but should provide the most precise control once mastered. Players new to linear response might want to start with the default curve and gradually transition to linear as they become more comfortable. Expect potential improvements to curve behavior in future updates as the community has requested deeper controller customization options.
Dead Zone Settings
Recommendation: As low as possible (currently minimum ~10%)
Should be set as low as possible without causing stick drift. Dead zones prevent minor stick movements from registering as input, but larger dead zones can make fine aiming adjustments more difficult.
Look Boost
Recommendation: 0 (Zero)
Controls input acceleration, determining how quickly your sensitivity increases with larger stick movements. Setting this to zero provides consistent, predictable movement without acceleration curves. This creates a more direct relationship between your input and camera movement, though it requires adjustment time to feel natural.
Advanced Customization Philosophy
The key to optimizing these settings lies in understanding that every adjustment affects how information flows to you during gameplay. Each setting either provides more information, makes existing information clearer, or improves your ability to act on that information quickly and accurately.
When adjusting sensitivity and response settings, make small changes and test them in actual gameplay scenarios. What feels comfortable in the settings menu might feel different during intense firefights, so always validate your adjustments through actual play.
The crosshair customization might seem purely cosmetic, but visibility directly impacts your ability to aim effectively. A crosshair that disappears against certain backgrounds or becomes unclear in specific lighting conditions can cost you eliminations.

Future Considerations and Community Feedback
Arc Raiders is currently in its tech test phase, which explains the relatively limited selection of settings currently available. The development team is actively gathering community feedback, particularly regarding controller customization depth.
Expected Improvements
The community has specifically requested deeper controller customization options, including:
- Lower minimum deadzone settings (currently limited to ~10%)
- More precise aim curve customization with ramp-up timing controls
- Separate inner and outer deadzone adjustments
- Improved distinction between Linear and Exponential response curves
The full release will likely include additional customization options, potentially addressing these community concerns alongside more advanced graphics settings, additional audio options, and expanded controller customization.
As the game develops, these fundamental settings will remain important, but new options may provide even more opportunities for optimization. The settings covered in this guide represent the foundation of a properly configured Arc Raiders setup on console, with the expectation that future updates will provide even greater control over how the game feels and plays.
Quick Reference Settings Summary
- Field of View: 80 degrees (maximum)
- Motion Blur: Disabled
- Show Reload Progress: Enabled
- Show Damage Direction: Enabled
- Move Crosshair When Path is Blocked: Disabled
- Zoom Sensitivity Multiplier: 40%
- Scope Zoom Sensitivity Multiplier: 40%
- Look Sensitivity: 120
- Look Response Curve: Linear (with practice)
- Look Boost: 0
- Dead Zones: As low as possible
- Push-to-Talk: Enabled
- Effects Volume: 100%
- Master Volume: 35% (adjust to comfort)
| Setting Type | Setting | Recommendation |
|---|---|---|
| Personal Preference | Crossplay | Disable recommended for competitive advantage |
| Personal Preference | Crosshair Color and Style | Bright, contrasting colors recommended |
| Personal Preference | Music Volume | Adjust to taste, consider disabling during gameplay |
| Personal Preference | Override Crosshair Shape | Based on consistency preference |
| Personal Preference | Night Mode | Enable for quieter gaming sessions |
- Minimum Deadzone: Currently limited to ~10% (higher than ideal)
- Aim Curves: Linear and Exponential may behave similarly in current build
- Controller Customization: Community requesting deeper options in future updates
Conclusion
Optimizing your Arc Raiders settings transforms the game from a potentially frustrating ordeal into a competitive advantage. The combination of increased field of view, disabled motion blur, properly configured crosshair settings, and fine-tuned controller sensitivity creates a setup that maximizes your ability to gather information, track targets, and respond quickly to threats.
Remember that these settings serve as a starting point rather than absolute requirements. Every player has different preferences, reaction times, and visual acuity. Use these recommendations as a foundation, then adjust based on what feels right for you and your comfort level.
The most important aspect of any settings configuration is consistency. Once you find settings that work well for you, stick with them long enough to develop muscle memory and natural responses. Constantly changing settings prevents you from developing the consistent performance that competitive gaming requires.
With these optimizations in place, you'll be better equipped to handle the intense extraction shooter gameplay that Arc Raiders offers, giving you every possible advantage as you compete for valuable loot and fight for survival in this exciting new title.