
What You're Getting Into
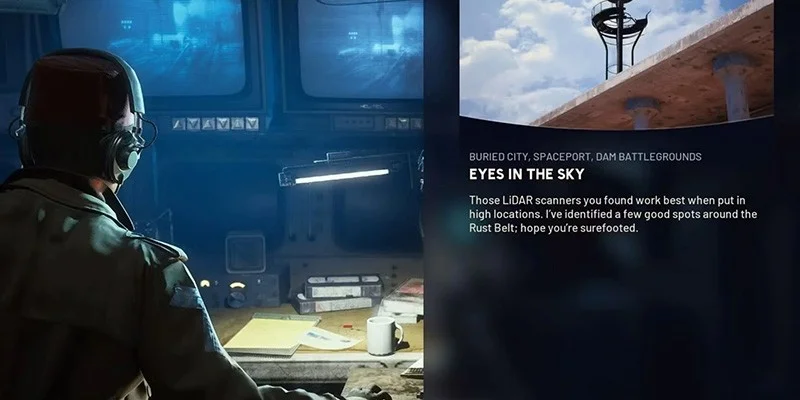
Eyes in the Sky is one of the longer missions you'll tackle in Arc Raiders. Shani wants you to deploy LiDAR Scanners across the Topside to spy on ARC activity. You'll need to hit three different maps and climb to some seriously high spots to get the job done.
Here's what you need to do: Install a LiDAR Scanner at the Control Tower on Dam Battlegrounds, install a LiDAR Scanner at the Communications Tower on Spaceport, and install a LiDAR Scanner on the Galleria Sign in Buried City.
You'll need a zipline gadget for the last objective. Shani gives you one when the quest starts, so you're covered there.
This quest sits somewhere between moderate and challenging difficulty. The objectives tell you exactly where to place each scanner, which helps. The real work is getting to those spots, especially the third location where you'll need to use that zipline properly or risk a nasty fall.
Before You Head Out
Load up your usual combat gear and supplies before jumping into the first map. You might run into ARC enemies along the way, so pack enough ammo and healing items to handle whatever shows up.
Dam Battlegrounds: Control Tower Scanner
Finding the Control Tower
The Control Tower is a named POI just south of Dam Battlegrounds' center. Your map marks it clearly, so getting there is straightforward.
Getting to the Roof
Start at the main entrance and take the left path through the building. You'll pass the locked Dam Staff Room door, but you don't need to go in there for this quest.
Turn right and keep moving down the walkway. Go through the door in front of you, then look left for a door you can breach. This opens into an elevator shaft with a rope you can climb.
Before you go up, shoot the turrets above you. If you don't clear them first, they'll shred you while you're climbing. After dealing with the turrets, interact with the rope to zip upward.
At the top, take the stairs on your right. They lead to another locked door that needs breaching to reach the roof. Once you're outside, cross the blue metal stairs.
Dealing with Enemies
ARC forces patrol this area, so clear the area as you move up. The rooms inside make good cover if you need to fight. Sometimes it's smarter to stay quiet and let patrols pass rather than starting a firefight that draws more attention.
Placing the Scanner
Head to the left corner of the roof (the east corner). You'll see a yellow prompt marking the tripod spot. Interact with it to install the first scanner. That's objective one down.
Spaceport: Communications Tower Scanner
Why This One's Easy
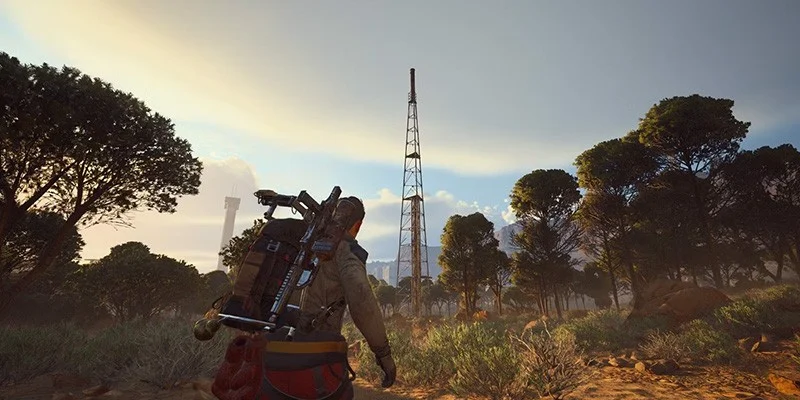
The second scanner is the simplest part of this whole quest. The Communications Tower sits on the eastern edge of Spaceport, away from most of the action. Fewer enemies spawn out here, so you can usually get in and out without much trouble.
Reaching the Platform
Travel to the Communications Tower POI in eastern Spaceport. It's a metal tower with a yellow ladder on the side.
Climb the ladder to reach the upper platform. Nothing complicated about it.
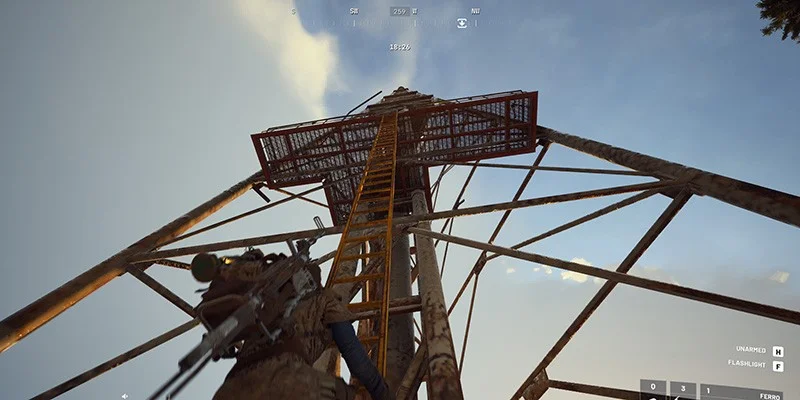
Once you're up there, go right along the walkway. The tripod for the second scanner sits at the right corner of the metal platform. Interact with the spot to place the scanner.
Most players won't hit any snags here. Just climb up, place the device, and move on.
Buried City: Galleria Sign Scanner
The Tricky Part
This final scanner gives most players trouble. You need to use a zipline to reach a metal platform way up on the Galleria Sign. If you mess up the zipline placement, you'll fall and take a lot of damage.
About the Zipline
Shani gives you one zipline when the quest starts. You can buy more from vendors, but there's a limit of three available. This might be a daily restriction, so don't waste them. Getting the placement right on your first try matters.
Finding the Galleria
The Galleria sits in the east center of Buried City. Look for the big pillar with a symbol that looks like the letter Q on top. The building is right next to the Space Travel building.
Getting Up There
Approach from the south side, coming from the Buried Properties POI. The sand piles up here and creates a natural ramp you can climb to reach the roof.
Once you're on the first roof section, head north. You'll see small scaffolding on your right. Climb it to get to the higher part of the roof.
Look for the broken wooden plank sticking out. Jump across using this plank to land on the Galleria building's actual rooftop.
Setting Up Your Zipline
Move to the southeast side of the roof, near that tall pillar with the Q symbol. This is where you need to deploy your zipline.
The zipline has to connect to the very top of the tower where the metal platform is. Aim it at the upper walkway on the pillar. You want your character to travel straight up and land safely on the platform.
Once you've got your aim right, deploy the zipline. It should create a clean line from where you're standing to the platform above.
Interact with the zipline to ride it up to the metal platform.
Installing the Final Scanner
The last tripod sits on this metal platform at the top of the Galleria Sign. Interact with the marker to place the third scanner. You're done.
Quest Complete
After installing all three scanners across Dam Battlegrounds, Spaceport, and Buried City, the quest wraps up. Shani now has eyes on ARC movements across the region.
Tips for a Smooth Run
You're jumping between three separate maps for this quest. If you've got other stuff to do in each area, knock it out while you're there. Saves time backtracking later.
At the Control Tower, think about whether fighting is worth it. Sometimes waiting for patrols to move on beats getting into a shootout that attracts more enemies.
You've got limited ziplines (three max, possibly per day). Take your time lining up that shot in Buried City. Rushing the zipline placement and having to redo it wastes a valuable resource.
Watch your step on roofs and platforms. The fall damage in this game hurts, and dying up high means doing the whole climb again.
Why This Quest Matters
These scanners give Shani surveillance coverage across multiple regions. The intel from these elevated positions helps track ARC operations and movement patterns on the Topside.