

Stella Montis arrived as ARC Raiders' fifth map and brought a close-quarters experience that feels completely different from the other locations. Tight corridors and vertical layouts mean intense PvP fights around every corner, but this compact design also packs an exceptional concentration of high-rarity loot for players who know where to look.
Most raiders head straight for the red-flagged High-Tier Loot zones shown on the in-game map. Experienced looters know better. Those contested areas often result in more firefights than actual extractions. The five locations in this guide offer impressive rewards with far less competition, making them perfect for farming end-game materials, Blueprints, and valuable crafting components.

Understanding Stella Montis Before You Loot
Enemy Threats to Expect
Stella Montis has a distinct enemy composition compared to other ARC Raiders maps. You won't encounter any of the larger ARC enemies here, but the threats present can still overwhelm unprepared raiders.
Pops and Fireballs are the primary cannon fodder throughout the map. Both go down quickly to light ammo weapons, making them more of an annoyance than a genuine threat when you come prepared.
Shredders represent the main PvE danger on Stella Montis. These enemies are remarkably tanky and require substantial heavy ammo investment to take down. They patrol various areas and will pursue you relentlessly once they detect you. Shredders do have a useful weakness, though: you can avoid them entirely or lock them behind doors, letting smart raiders bypass them without wasting ammunition.
Loadout Recommendations
Given the enemy composition on Stella Montis, dedicated anti-ARC weaponry provides less value here than on other maps. Pops and Fireballs die easily, and Shredders can usually be avoided. Your best approach is bringing lighter PvP-focused weapons. You'll be able to defend yourself against other raiders in close-quarters combat, and the reduced weapon weight lets you carry out more loot per extraction.
Fuel Cell Mechanics
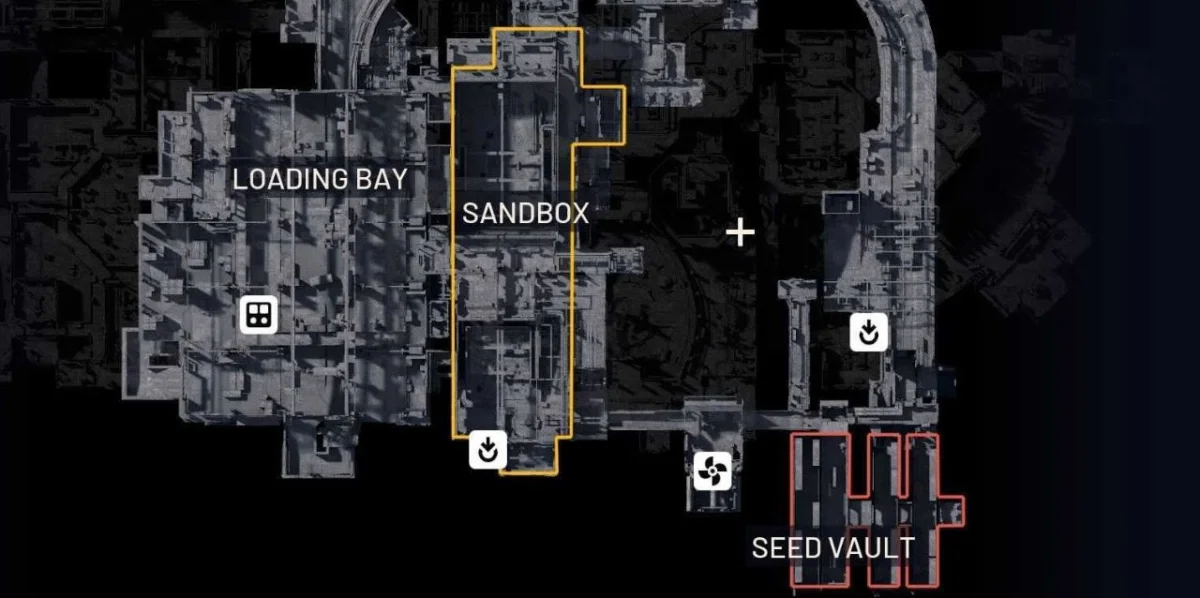
Several locked storage rooms throughout Stella Montis require fuel cells for access. These rooms typically demand four fuel cells to open, which might seem like a big investment. Certain areas like the Lobby and Sandbox frequently have fuel cell slots with all four cells already positioned nearby, just waiting for someone to grab them.
The Archives
Layout and Access Points
The Archives consists of two distinct vertical layers. The upper level features two separate access points, one from the north and one from the south. This upper level functions as a common ambush point where PvP-minded players wait for unsuspecting looters. The top layer contains the highest concentration of lootable objects, including multiple crates and cabinet files ready for plundering.
The Archives sits near the Business Lounge, which connects the Cultural Archives to the Auditorium. Many raiders avoid this general zone, creating opportunity for those willing to venture in.
Loot Distribution
Scattered luggage throughout the Archives contains important items, including trinkets and Survival Items. These containers are easy to overlook but contribute significantly to your overall haul.
Grenade and Weapon Crates can spawn in multiple positions:
- Both sides of the main area
- Behind wooden crates on the northern side, near the Zipline
- The southern area, where Shredder patrols are common
The Archives Locked Storage Room
The main attraction here is the Locked Storage Room, which requires an Epic Tier Keycard to access. This single room contains a ridiculous amount of loot, making the keycard investment worthwhile for serious farmers. A Shredder typically guards this zone, so you'll need to either take it down or carefully avoid it.
Escape Routes
If you have a Raiders Hatch Key, you can access an underground layer that connects to a Raiders Hatch on the opposite side of the Storage Room. This route provides a quick getaway after looting, plus you'll find additional crates positioned around the hatch itself.
The Seed Vault
Access Requirements
The Seed Vault sits in a tucked-away position in the far right corner of Stella Montis' Bottom Layer. This location frequently serves as a spawn zone for raiders, giving those who spawn nearby an immediate advantage.
Getting into the Vault requires a specific action: find a Fuel Cell in the area, move it to the interruptor box mounted on the wall, and insert it to open the metallic rolling curtain blocking entry.
Why Players Avoid This Location
Two factors keep most raiders away from the Seed Vault. Shredder spawns in this area patrol regularly, with their route extending as far as the Airshaft Extraction point. The location's obvious map marker also attracts other players, creating PvP risk.
These deterrents actually work in your favor once you understand the location's true value and learn to move efficiently.
Loot Breakdown
Opening the Seed Vault reveals rewards that justify the effort:
Crate Spawns: Two possible crate spawn locations exist inside, and these almost always produce one Weapon Crate and one Utility Crate.
Seeds: The Vault lives up to its name with at least 70 Seeds available per round. Seeds serve multiple purposes in ARC Raiders. You can trade them with Celeste, use them to complete Quests, and they're required for the Expeditions Project. This makes the Seed Vault a key stop for players pursuing these progression paths.
Raider Bags: High-value Raider Bags can spawn in this area, adding to the potential haul.
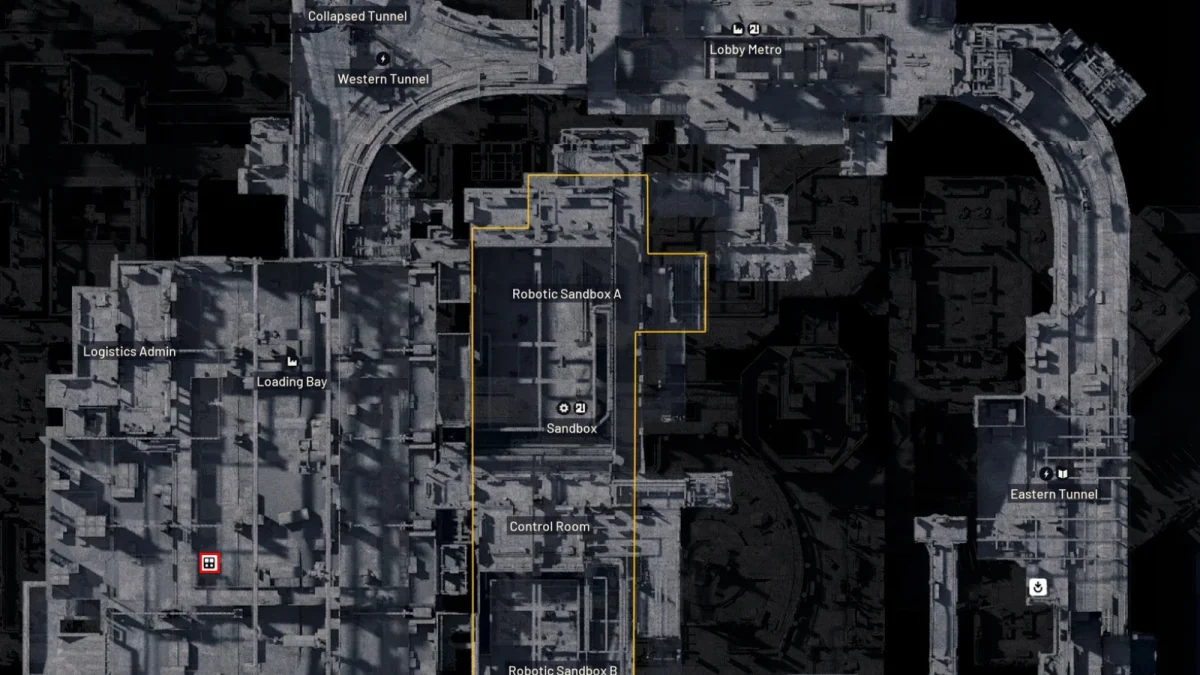
Logistics Admin
Why This Location Gets Overlooked
Logistics Admin sits in a peculiar spot in terms of player traffic. Located in the Bottom Layer with a view over the Loading Bay, this area serves as both a spawning zone and sits close to a Metro Extraction Point. Most raiders bypass it entirely, rushing through the underground tunnels to reach the Sandbox area instead.
The Sandbox attracts heavy competition due to its quality loot and smaller ARC enemy patrol groups. Players fight intensely for the Epic Grade Crafting Mats found there. Meanwhile, Logistics Admin offers comparable rewards with a fraction of the risk.
Access Route
You can reach Logistics Admin by traveling west through the underground tunnels. Exercise caution during this approach, as a Bastion roams the tunnel system and must be carefully avoided.
Loot Opportunities
The area contains an impressive variety of lootable objects:
- Exodus Modules: Scattered throughout the area, these expensive Epic Grade materials can be exchanged for money or used to craft powerful weapons like the Jupiter. Prioritize collecting as many as possible.
- Lockers: Multiple lockers throughout the area contain various supplies.
- Breachable Machinery: Interactive machinery that can be breached for additional loot.
- Supply Backpacks: These containers offer quick, valuable loot.
- Android Remains: Searchable remains that yield crafting materials.
- Crates and Containers: General loot containers fill the area.
Extraction Advantage
Logistics Admin's proximity to a Metro Entrance means you're always just a short distance from a safe extraction. This positioning makes it one of the safest farming loops on Stella Montis. Loot efficiently, then extract before other players even realize someone has been working the area.
The side rooms around the Loading Bay also tend to be ignored as players rush through to extractions or other map sections, making them relatively safe to check during later stages of a raid.
The Auditorium
Location Context
The Auditorium sits right next to the Cultural Archives and the Lobby, positioned at the south end of what players call the business center. This central location provides easy access through multiple entrances. That's a double-edged sword: you can get in quickly, but so can other players, potentially creating chaotic encounters.
Why the Auditorium Delivers Value
Despite its smaller footprint compared to other farming locations, the Auditorium contains a concentrated treasure trove of containers and lootable objects that many players underestimate.
Near the Reception Area:
- Raider's Backpack spawn point
- Grenade Cache spawn point
Near the Benches:
- Multiple backpack spawn locations
- Weapon Crate spawn possibility
Ideal Use Case
The Auditorium serves as an excellent alternative for players who want to avoid the heavily contested zones on Stella Montis. If your goal is gearing up quickly, even when deploying with the Free Loadout, this location provides everything you need without the intense competition found in red-flagged areas.
Move through the Auditorium methodically, check all spawn points, and either continue to adjacent areas like the Cultural Archives or extract with your haul.
Assembly
The Hidden Value of an Unmarked Zone
Assembly is probably the most underrated location on all of Stella Montis because it doesn't carry a Mid-Tier or High-Tier Loot designation on the map. Players who rely solely on map markers to guide their farming routes completely miss what this area offers.
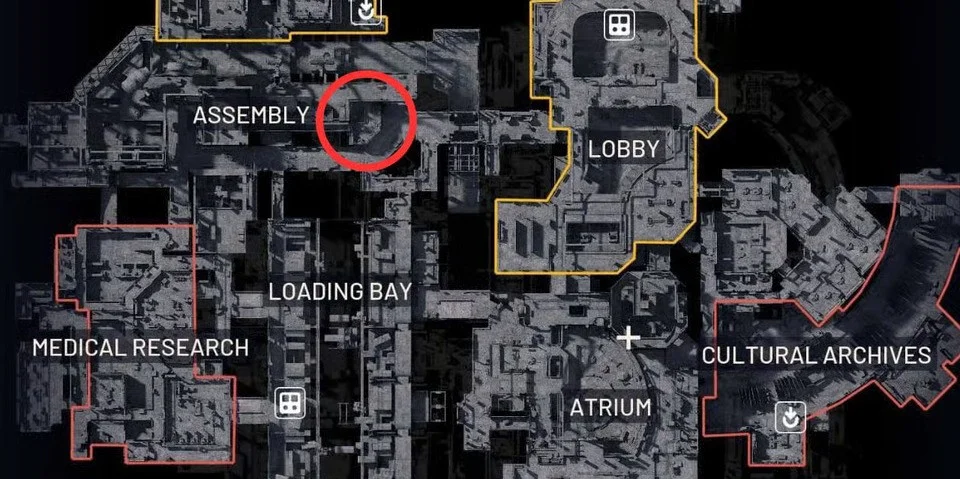
Layout Overview
The Assembly Line area has multiple loot opportunities distributed across its structure:
- Parallel Catwalks: Two catwalks run parallel above the main assembly area, overseeing the zone below. Small containers tucked along these catwalks contain valuable materials.
- Main Assembly Floor: A straight line filled with rocket parts and other futuristic components that ended up incomplete. Multiple looting spots exist throughout.
- Workshop Rooms: Two workshop rooms can be quickly searched while moving through the area.
- Turbines: Two major turbines exist in the assembly workshops. One requires vaulting onto to access, while the other sits on the ground and features a distinctive black and yellow frame.
- Hanging Rocket Thrusters: The interior of these thrusters can spawn incredibly valuable loot.
- Admin Room: A locked room that can be opened using the Stella Montis Assembly Admin Key.
Expected Loot Returns
In optimal conditions, a thorough sweep of the Assembly area can yield at least 9 Exodus Modules and at least 3 Power Rods, sometimes even more of both.
The area specifically drops Exodus and Technological loot that's difficult to find elsewhere on the map, making it a priority for players pursuing end-game crafting goals.
The Perfect Farming Loop
Because the hatch is so close and other players skip over this area entirely, you can often complete multiple successful runs in the time it takes others to fight through a single contested area.
Recommended Farming Routes
Lower Floor Route
Start at the Seed Vault if you spawn nearby. Quickly grab seeds and check for Weapon Crates and Raider Bags, then move toward Logistics Admin through the underground tunnels (watch for the Bastion). Clear Logistics Admin of Exodus Modules and other materials, then extract via the nearby Metro Entrance.
Upper Floor Route
Begin at the Assembly area. Systematically clear the catwalks, workshops, turbines, and rocket thrusters for Exodus Modules and Power Rods, then move toward the Auditorium for additional quick loot. If time and safety allow, continue to the Archives for its substantial loot concentration. If you have an Epic Tier Keycard, you can also access the Locked Storage Room.
General Principles
Uncontested loot extracted safely beats contested loot lost to PvP deaths every time.
These five underrated locations on Stella Montis offer serious farming potential for raiders willing to look beyond the obvious High-Tier zones. Master these spots, and you'll consistently extract with valuable materials while other players fight over the same contested areas, raid after raid.