
The Expedition requires a hefty 5 million in combined stash value and coin balance to unlock all skill points. That's a steep goal, but you don't need to grind endlessly to hit it. This guide covers every proven money-making strategy in ARC Raiders, from low-risk farming routes to advanced crafting systems that multiply your profits.
Understanding the Expedition Goal
Your 5 million target combines stash value with your coin balance. You don't need to hoard items or fill your storage with gear. Selling loot and stacking currency works just as well, and it's often the smarter play.
The methods below suit different playstyles, schedules, and risk tolerances. Pick what works for you and stick with it.
Stop Losing Money Before You Start Making It
Before worrying about income, take a hard look at how wealth bleeds away through sloppy play. Every shot you fire, every bandage you pop, and every broken shield chips away at your profits. Going into raids hoping to come out rich while burning through expensive supplies just undermines the whole point.
The Snowball Strategy
Start with nothing and build from there:
- Enter raids with an empty loadout or only free/cheap equipment
- If you survive, bring that same gear into the next raid
- Only upgrade to weapons you find during runs
- Never pull valuable items from your stash for regular farming
The logic is simple. If you die with found gear, you've lost nothing from your reserves. After a few successful raids, you'll have a full loadout that cost you zero coins from your original stash.
Resource Sinks to Avoid
The Queen and Matriarch: These boss fights drain your resources hard. They require tons of ammo, medical supplies, heavy armor, and typically yield almost nothing valuable. Queen Cores might drop occasionally, but the resource cost far exceeds any potential gains.
Intentional PvP: If you're entering raids specifically to hunt other players for profit, think again. At this point in the game's lifecycle, most players run free or dirt-cheap loadouts. The Stitcher, literally the best PvP weapon, costs almost nothing to craft. If your loadout exceeds 10,000 in value and you're hunting for PvP loot, you'll consistently lose money. Everyone you kill probably carries Stitchers and basic gear anyway.
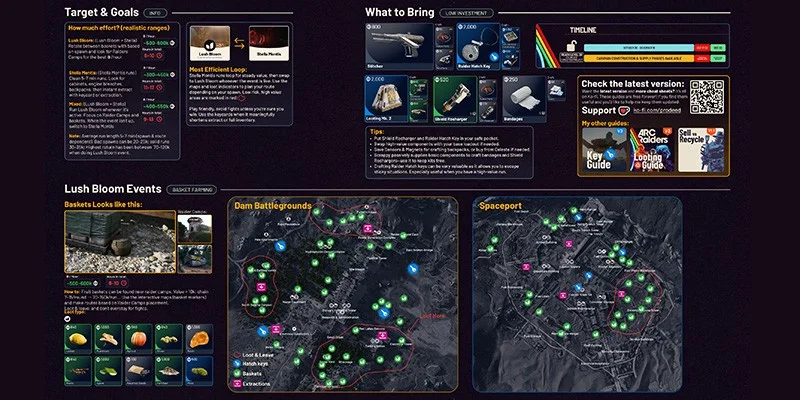
Stella Montis High-Value Looting
Why It Works
Stella Montis is always available regardless of when you log in. The map packs concentrated high-value loot into specific buildings, which makes rapid extraction runs possible even during peak hours.
The Zero-Risk Approach
Bring almost nothing into these runs:
- Hatch key in safe storage pocket
- No weapons
- No medical supplies
- No shields
That's it. Nothing else.
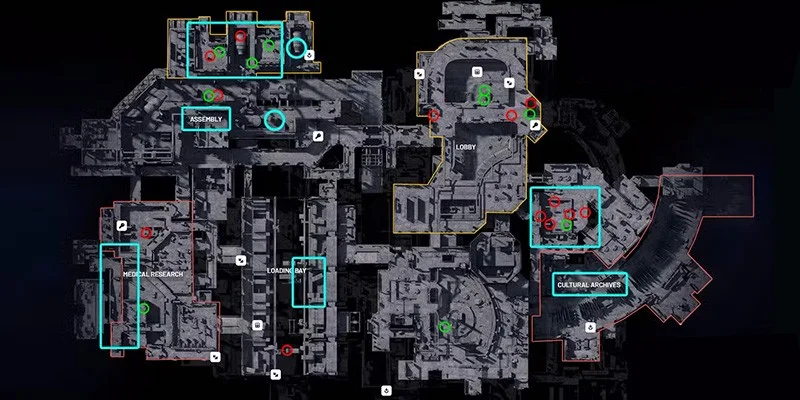
Target Locations
Rush one of these areas immediately after spawning:
- Assembly Workshop: Dense lootable containers and a hatch key spawn inside for quick extraction
- Medical Research: High concentration of valuable containers
- Lobby: Multiple lootable containers clustered together
How to Run It
- Spawn and rush your target location
- Loot all containers as fast as possible
- Grab any weapons from player bodies if you find them
- Extract via hatch
Each successful run pulls 50,000 to 80,000 in just a few minutes. If you die, you've lost only a minute or two. If you survive, you've gained solid value plus potentially usable weapons for your next run. The hatch key gets you out quickly and helps you dodge extract campers.
Buried City Farming Routes
Why Buried City Works
Buried City offers much better safety compared to other high-value maps. As long as you carry a hatch key, extraction points stay close throughout your route. The loot density is high enough that you'll fill your inventory even with maximum-capacity augments.
Western Spawn Route
Use this route when you spawn on the western side of the map.
- Enter the initial building at the western edge and clear all lootable containers
- Open the window and jump down to transition
- Enter the adjacent structure and clear all three floors
- From the third floor, jump out to the neighboring roof
- Enter Santa Maria Houses through the right-side window
- Clear all containers inside Santa Maria
- Open windows and rotate directly to the nearby hatch for extraction
Eastern Spawn - Hospital Route
When you spawn on the eastern side, rush the Hospital instead.
- Upon entering the Hospital, immediately check containers on your entry side for blue-rarity items
- Check all drawers in the entry room before going deeper
- Clear drawer spawns in connecting rooms where scanners sometimes spawn
- The central main room typically has four drawer spawns
- Adjacent side rooms contain additional drawers and container spawns
- Once cleared, extract via the nearby hatch
Fast extraction trick: From the Hospital's upper level, you can sprint and grapple to a car below, then reach the hatch quickly without making noise from the standard route.
The Hospital route consistently pulls 45,000 to 50,000+ in roughly 3 minutes.
Spawn Timing Matters
Your results depend partly on when you spawn:
- Early-game spawns: Best results since locations stay unlooted
- Late-game spawns: Riskier because other players may have already cleared prime spots
Don't get discouraged by late spawns. The route stays profitable even with partial looting, and favorable spawns will come.
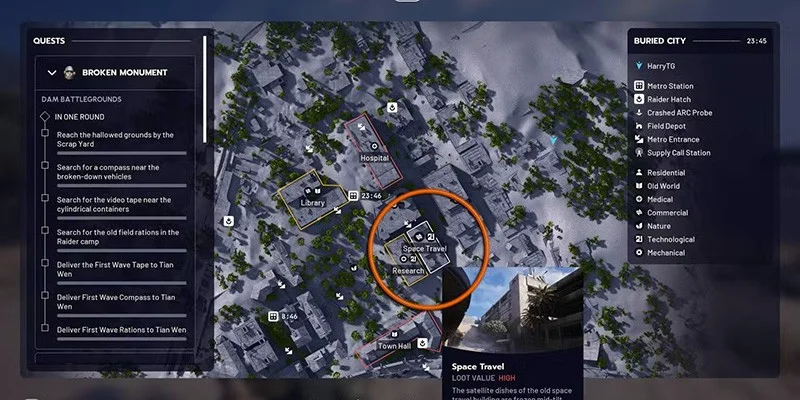
Other High-Value Spots in Buried City
Beyond the main routes, these areas pack excellent loot:
- Plaza Rosa: One building sweep fills your backpack
- Grandioso Apartments: Dense container spawns
- Space Travel and Research: Extremely high container count. If nobody contests you, you're guaranteed a full inventory
Lush Blooms Event Farming
How Lush Blooms Works
During Lush Blooms events, fruit baskets spawn scattered around the map's edges. These fruits stack in your inventory, letting you carry substantially more value per slot compared to standard loot runs.
Best Map: Spaceport
Spaceport gives the best Lush Blooms experience for a few reasons:
- Larger map means more fruit basket spawns
- Spawn locations follow predictable patterns near the outskirts
- Baskets typically appear near raid encounter areas
Farming Strategy
- Learn spawn patterns using Metaforge's community maps
- Enter during Lush Blooms events
- Follow the map perimeter, collecting fruit baskets
- Stack fruits to get the most value per inventory slot
- Extract once full or after covering the spawn route
Alternative Maps: Spaceport performs best, but Buried City and Bluegate also support Lush Blooms events. These maps tend to be less profitable due to smaller sizes or less predictable spawn patterns.
Energy Cell Crafting (Advanced)
The Profit Mechanics
Energy Cell crafting is the only crafting process in ARC Raiders that actually generates profit instead of losing value. The recipe calls for 1 Advanced ARC Power Cell and 2 Batteries, which combine into 5 Energy Cells (one full stack). Those raw materials sell for roughly 1,000 combined, but the Energy Cell stack sells for 5,000. That's a 5x return on your material investment.
Unlocking the Blueprint
To craft Energy Cells, you first need to learn an energy weapon blueprint. The Equalizer, Jupiter, or Aphelion all work. Learning any of these weapon blueprints automatically unlocks the Energy Cell ammo recipe.
The easiest way to get one is completing the Harvester puzzle during Queen events. You don't need to fight the Queen at all. Go into the Harvester chamber and locate the canisters inside, then place them in the central mechanism. Shoot the glowing nodes around the room's perimeter, loot the containers that emerge from the center, and secure the blueprint in your safe pocket before extracting.
Farming Batteries: Stella Montis Control Room
The best battery farming spot sits in the raised control room in the northern section of Stella Montis's Sandbox area, overlooking the main floor below. Breach containers in the room's corners yield up to 10 batteries each, and one full room clear can produce 20 to 30+ batteries. You don't need weapons or gear since there's no combat involved, and batteries stack to 15, fitting efficiently in safe pocket slots.
Bring only items with at least two safe pocket slots, clear the control room's breach containers, and extract via the nearest hatch. Repeat this until you've built up enough battery reserves for a big crafting session.
Farming Advanced ARC Power Cells: Bluegate
Advanced ARC Power Cells drop from larger ARC enemies, specifically Bastions and Bombardiers. Bluegate has four reliable spawn locations for these enemies, and you'll recognize the spawn points quickly as you learn the map.
Impact grenades work best for taking them down and cost almost nothing. You can craft them with just Chemicals and Plastic Parts, or buy them from the vendor. Expect to use 20 to 25 grenades per Bastion or Bombardier. Find a spawn, get behind nearby cover, and peek-throw grenades until the enemy dies. Loot everything and put Advanced ARC Power Cells in your safe pocket. The blues and greens from these same enemies sell for an extra 30,000 to 60,000 per run.
This works solo, duo, or in trios. More players means faster kills, but solo runs are completely viable.
Queen Harvester Puzzle
The Concept
This approach uses the Harvester puzzle during Queen events without actually fighting the Queen. You're after the breachable containers and their contents, not Queen Cores.
Best Map: Dam Battlegrounds
Dam Battlegrounds works best because a Raider hatch sits nearby, making extraction quick and easy.
- Enter during a Queen event with a modest loadout
- Navigate to the Harvester location
- Complete the puzzle (insert canisters, shoot glowing nodes, loot containers)
- Collect ARC Parts and Energy Ammo from containers
- Optional: Shoot off the Queen's legs and loot them before she fully aggros
- Extract via the nearby Raider hatch
This method provides solid returns but won't match Stella Montis or Lush Blooms profitability. Consider it a good supplementary option when other methods start feeling stale.
Electro Storm Event Farming
Target Enemies
During Electro Storm events, ARC Husks and ARC Probes spawn around map edges. These enemies drop valuable components, with the Rocketeer Driver being the most valuable drop.
Best Locations
Spaceport: Works best overall due to extensive open space around the map edges where these enemies spawn.
Dam Battlegrounds: The swamp area is good for Electro Storm farming. Look for smoke plumes marking Courier and ARC Probe positions.
Finding Spawns
- Smoke plumes indicate Courier and ARC Probe locations
- ARC Husk spawns follow consistent patterns you can check on Metaforge community maps
- Spawns vary between runs, but the patterns stay recognizable
Expected Returns
- Per run: 60,000 to 100,000 depending on Rocketeer Driver luck
- Hourly: 200,000 to 300,000 with consistently good runs
Even without Rocketeer Driver drops, runs still pull 60,000 to 80,000 in value.
High-Density Container Runs
Prime Locations
Spaceport:
- Departure Building: 2 to 3 floors packed with lootable containers
- Arrival Building: Similar density
Buried City:
- Plaza Rosa: One building sweep fills your inventory
- Grandioso Apartments: Dense container spawns
- Space Travel and Research: Highest container count. Guaranteed full inventory if nobody contests you
Other Maps:
- Research and Administration: Extensive container availability
Day Raids vs. Night Raids
This might sound backwards, but day raids often give better looting opportunities than night raids.
The reasoning is straightforward. Dedicated loot farmers overwhelmingly pick night raids hoping for rare blueprint drops. This concentration leaves day raids with fewer competing looters, more players focused on quests and other activities, and higher chances of finding unlooted containers.
If pure value accumulation is your goal, consider running day raids instead of night raids.
Method Comparison
| Method | Hourly Profit | Risk Level | Availability | Best For |
|---|---|---|---|---|
| Stella Montis | 300k to 500k | High | Always | Consistent grinding |
| Buried City Routes | Variable | Low to Medium | Rotation | Safe, methodical runs |
| Lush Blooms | 500k to 600k | Medium | Event | Maximum hourly profit |
| Energy Cell Crafting | 100k+ per session | Low | Always (after setup) | Long-term wealth |
| Queen Harvester | 100k to 200k | Medium | Event | Variety |
| Electro Storm | 200k to 300k | Low | Event | Relaxed farming |
| High-Density Containers | Variable | High | Always | Experienced players |
General Tips
Hatch Keys Are Worth It
Regardless of which method you run, hatch keys make everything smoother. They enable faster extraction than standard exits, help you avoid extract campers, and give you flexibility to leave whenever your inventory fills up. Always keep hatch keys in safe storage.
Adrenaline Shots for Speed
When running contested routes, Adrenaline Shots give you mobility advantages for escaping danger and reaching loot faster than other players.
Inventory Management
- Drop lower-value items when full to make room for purples and high-value blues
- Check everything thoroughly. Chairs, drawers, and shelves all contain loot
- Weapon cases sometimes contain blueprints with solid sale value
The Core Philosophy
Players who accumulate wealth fastest share one principle: minimize what you bring in, maximize what you bring out. Every coin of value you carry into a raid is profit you're risking. The gap between your entry value and exit value determines your real earnings.
Wrapping Up
Hitting 5 million for the Expedition sounds intimidating, but it's absolutely doable with focused farming. Pick one or two methods that fit your playstyle and schedule, then stick with them. Stella Montis and Buried City work for consistent daily grinding, Lush Blooms and Electro Storm events offer big paydays when they're available, and Energy Cell crafting rewards players who put in the setup work.
The players hitting their goals fastest aren't necessarily the ones with the most time. They're the ones who stopped bleeding value on unnecessary risks and started treating every raid like a business transaction. Bring less, loot smart, extract clean, and watch your balance climb.