
In extraction shooters like ARC Raiders, players tend to fixate on top-tier legendary gear. But experienced players know the "meta" isn't just about owning the most powerful weapon. It's about what you bring to each run based on your resources and risk tolerance. The Renegade fits perfectly for players who want a lethal option without the financial sting of losing expensive gear.
The Renegade is a lever-action Battle Rifle that shares its name with the game itself. Many players try this weapon, miss a few shots due to its deliberate fire rate, and write it off as "clunky" or "slow." That take misses what makes this gun special. When properly upgraded and modded, the Renegade transforms from a humble mid-tier rifle into one of the best all-rounders currently available in ARC Raiders.
This guide covers everything you need to know: the weapon's core characteristics, its strengths and weaknesses, the upgrade system that unlocks its true potential, attachment configurations based on testing data, and recommended builds for both high-investment and budget-conscious players.
Core Characteristics
Weapon Classification and Rarity
The Renegade sits at Rare (Blue) tier as a Battle Rifle. This status puts it in an advantageous middle ground within ARC Raiders' loot economy:
- It's not a Common (Grey) weapon you'd toss immediately
- It's not an Epic (Purple) or Legendary weapon that hurts to lose
- It hits a sweet spot where the weapon stays both expendable and effective
This makes the Renegade ideal for players dealing with "gear fear," that hesitation to risk valuable equipment. You can take it into raids confidently, knowing that losing it won't devastate your resources.
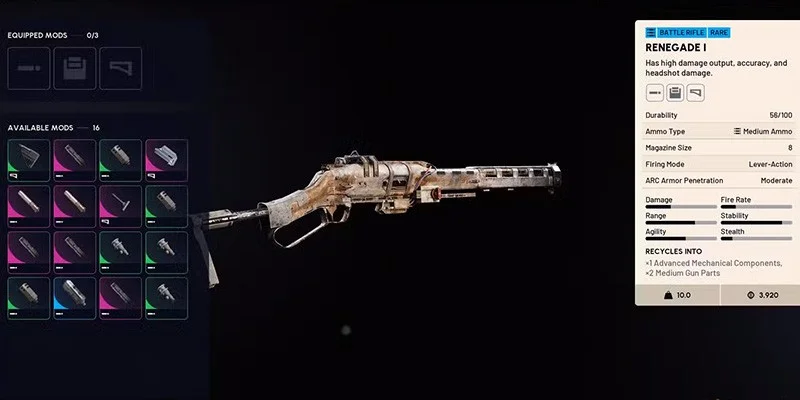
Ammunition Type
The Renegade uses Medium Ammo, which provides "Moderate" armor penetration. This ammo type works as a hybrid:
- It won't shred high-level ARCs as effectively as Heavy Ammo
- It won't plink uselessly against armored targets like Light Ammo sometimes does
- It damages both players and ARCs effectively
This versatility means you can engage rival players and immediately turn to clear ARC enemies without switching weapons. Handling both threat types with a single weapon saves inventory space and simplifies loadout decisions.
Firing Mechanism
The Renegade operates as a single-shot lever-action rifle. After each shot, your character works the lever before you can fire again. This has real gameplay implications:
- It's not a full-auto "spray and pray" weapon
- It rewards methodical, deliberate shooting
- It punishes missed shots severely, especially at base level
- The fire rate improves through the upgrade system (detailed below)
Strengths
- Exceptional first-shot accuracy
- High alpha damage per shot
- Effective against both ARCs and players
- Hybrid combat role with Medium Ammo
- Satisfying mechanical feel
- Economically sustainable for regular use
- Slow base fire rate
- Close-quarters combat liability
- Limited magazine capacity
- High skill requirement
- Requires upgrades to reach potential
- Punishing for missed shots
Exceptional First-Shot Accuracy
The Renegade's base accuracy is outstanding. Your first shot fires exactly where you aim, making it reliable for opening engagements. The weapon shines at the 50-100 meter range, distances where many assault rifles start experiencing damage falloff but where the Renegade performs best.
High Alpha Damage Per Shot
Each shot from the Renegade hits hard. Against unshielded players, it can land two-shot kills to the chest. Headshots are devastating and create immediate advantages in mid-range fights. This high damage-per-shot rewards accurate shooters.
Effective Against ARCs
Testing confirms the Renegade's effectiveness against ARC enemies:
- It removes drone fans (weak points) in a single shot
- It handles basic drones with one-shot efficiency
- It knocks off weak points reliably
This PvE effectiveness combined with PvP capability makes the Renegade genuinely versatile across all content types.
Weaknesses
Slow Base Fire Rate
The lever-action mechanism creates a noticeable delay between shots at base level (Renegade I). This is the weapon's biggest drawback and needs mitigation through the upgrade system. At base level, if you miss your opening shot against an aggressive opponent, the slow follow-up often gets you killed.
Close-Quarters Combat (CQC) Liability
Don't use the Renegade for building clearing or close-range fights. Players with fast-firing weapons will drop you before you can cycle a second shot.
Limited Magazine Capacity
The base Renegade holds a limited number of rounds. Frequent reloading creates vulnerability windows where aggressive opponents can push your position. The reload involves loading rounds individually rather than swapping magazines, which affects timing considerations.
High Skill Requirement
Unlike fully automatic weapons that let you correct aim during sustained fire, the Renegade offers no safety net for missed shots. Every trigger pull must count. This high skill ceiling makes the weapon punishing for players still developing their aim.
Upgrade System
Why Upgrading Matters
The Renegade genuinely needs upgrades to reach its potential. Unlike weapons where upgrades just bump damage numbers, upgrading the Renegade fundamentally improves handling, specifically addressing its biggest weakness: the slow fire rate.
You can upgrade the Renegade at the Gunsmith bench using materials, progressing through four tiers:
- Renegade I (Rare): Base model with slow, clunky lever-action
- Renegade II (Rare+): Noticeably faster lever-action cycling
- Renegade III (Epic): Much faster fire rate; the weapon starts feeling like a rapid-fire platform rather than a clunky rifle
- Renegade IV (Legendary): Shockingly fast fire rate with smooth handling
Upgrade Statistics Breakdown
Each upgrade tier provides specific improvements:
| Upgrade Level | Fire Rate Increase | Dispersion Recovery Time Improvement |
|---|---|---|
| Renegade I | Baseline | Baseline |
| Renegade II | +25% | +16% |
| Renegade III | +50% | +33% |
| Renegade IV | +75% | +50% |
Testing Observations: Level 1 vs. Level 4
Practical testing reveals stark differences between upgrade tiers:
- Level 1: Slow enough between shots that the weapon naturally re-centers before the next shot, creating an illusion of stability
- Level 4: Fires so rapidly that without attachments, shots start climbing because the increased fire rate outpaces the base dispersion recovery
Level 4's apparent "less accuracy" actually reflects its faster fire rate. The weapon shoots faster than it can naturally re-center without attachment support.
Acquisition Methods
You can get the Renegade through multiple channels:
- Crafting: Available at the Gunsmith bench for reasonable material costs once you have the blueprint
- Vendor Purchase: One Renegade can be purchased daily from the vendor for approximately 21,000 credits
- In-Raid Loot: Found reliably once you progress past initial gameplay stages
Attachment System
Available Modification Slots
Sources provide conflicting information about available modification slots. One indicates four slots (Optic, Barrel, Stock, Grip), while testing data references only three (Muzzle, Magazine, Stock). Verify current slot availability in-game, as this may vary based on game version or upgrade tier.
The following analysis covers attachments with available testing data.

Muzzle Attachments: Testing Results
Testing was conducted at 15 meters with no recoil control (spam-clicking) to isolate attachment performance differences.
Compensator (Recommended)
- Compensator 3 (Blue): Provides the best overall performance for the Renegade
- Compensator 2 (Green): Decent budget alternative
- Reduces per-shot dispersion, helping the weapon re-center more quickly between shots
- Delivers the best "feel" during rapid follow-up shots
Muzzle Brake
- Muzzle Brake 3: Produces a slightly tighter shot grouping than the Compensator
- Provides both horizontal and vertical recoil control
- The weapon doesn't "feel as good" between shots though. Re-centering seems slower despite the tighter spread
- The marginal spread improvement doesn't make up for the handling difference
Silencer
- Reduces audio signature, keeping you off the "audio radar"
- Useful for ambush-oriented playstyles where landing the first shot from concealment is the priority
- Drawback: Testing shows the silencer causes shots to climb higher, making sustained accuracy harder
- Trade-off between stealth benefits and accuracy penalties
Extended Barrel
- Increases bullet velocity, beneficial for longer-range fights
- Major Drawback: Testing reveals it performs similarly to the Silencer in terms of vertical climb, while also adding horizontal recoil
- The bullet velocity benefit doesn't offset the accuracy penalty for most engagement ranges
- Not recommended unless you're specifically chasing extreme long-range shots
Stock Attachments: Testing Results
Stock selection creates the most dramatic performance differences among all attachment categories.
Stable Stock (Highly Recommended)
- Stable Stock 3 (Blue): Creates a massive improvement in shot grouping and follow-up accuracy
- Stable Stock 2 (Green): Much worse than Stable Stock 3; testing showed shots spreading wide and nearly missing targets at 15 meters
- The upgrade from Stable Stock 2 to Stable Stock 3 is one of the largest single-attachment improvements you can make on this weapon
Lightweight Stock (Not Recommended)
Despite looking attractive on paper with its 50% vertical recoil reduction, recoil recovery time bonus, and massive ADS time improvement, testing revealed severe problems:
- Shots climb into the sky during rapid fire
- The weapon takes forever to re-center between shots
- The stat bonuses don't translate to practical accuracy
- The lack of dispersion recovery time (despite having recoil recovery time) creates the handling problem
Kinetic Converter (Not Recommended)
- Provides increased fire rate, letting you shoot faster
- Suffers from the same fundamental problem as the Lightweight Stock
- Shots climb and take forever to re-center
- The fire rate bonus gets negated by the inability to place accurate follow-up shots
Magazine Attachments
- Extended Medium Mag 3 (Blue): Best choice for maximum ammo capacity
- Medium Mag 2 or 1 (Green/Grey): Acceptable budget alternatives
- Because the Renegade reloads rounds individually rather than swapping magazines, capacity is less critical than on other weapons
- Extra rounds reduce reload frequency but the impact is less dramatic than on magazine-fed weapons
Optic Attachments
A 2x "Marksman" Sight works best as the optic choice:
- The Renegade's iron sights are "clean" and usable
- 2x magnification provides ideal target acquisition at the 50-100 meter sweet spot
- Higher magnification scopes create tunnel vision problems for the weapon's intended use
- The 2x balances precision with situational awareness
Recommended Builds
High-Tier Build
This configuration maxes out the Renegade's potential for players willing to invest resources:
Why This Build Works: The Level 4 upgrade gives you 75% increased fire rate and 50% dispersion recovery. Compensator 3 further improves per-shot dispersion for faster re-centering. Stable Stock 3 tightens shot groupings massively. Together, these components turn the Renegade from a slow lever-action into a rapid, accurate platform that can compete at the highest levels.
Budget-Friendly Build
For players managing resources carefully or still acquiring blueprints:
Trade-offs: This build costs much less to craft and loses less value if you die in a raid. Performance is noticeably worse than the high-tier build, particularly with Stable Stock 2 creating substantial accuracy reduction compared to Stable Stock 3. The weapon still remains functional and competitive for players prioritizing economic efficiency.
Alternative Stealth Build
For players prioritizing ambush tactics and first-shot advantage:
Trade-offs: The silencer reduces audio signature, letting you engage from concealment without immediately giving away your position. Testing confirms accuracy penalties though. Shots climb higher during rapid fire. This build suits players who prioritize landing devastating opening shots from advantageous positions rather than winning extended firefights.
Combat Strategy and Playstyle
Optimal Engagement Range
The Renegade excels at 50-100 meters. At this distance:
- First-shot accuracy is excellent
- High alpha damage creates immediate advantages
- Most assault rifles start experiencing damage falloff
- You maintain enough distance to exploit the weapon's accuracy advantage over automatic weapons
Positioning Principles
The Renegade rewards deliberate positioning:
- Seek elevated positions with clear sightlines to medium-range engagement areas
- Avoid enclosed spaces where CQC-oriented enemies can close distance
- Maintain escape routes since the slow fire rate makes fighting out of bad positions difficult
- Use natural cover to break line of sight between shots if needed
Engagement Discipline
The weapon demands shot discipline:
- Prioritize headshots whenever possible for maximum damage
- Don't spam shots unless you have a highly upgraded weapon with good attachments
- Disengage from CQC rather than trying to win close-range fights
- Let opponents come to you at your preferred engagement range
Dealing with Aggressive Opponents
If an opponent pushes aggressively into close range:
- Create distance immediately if terrain allows
- Switch to a secondary weapon suited for CQC if you carry one
- Accept that the Renegade isn't the right tool for this situation
- Don't try to "clutch" CQC fights with a lever-action rifle
PvE Applications
Against ARCs:
- Use the Renegade to one-shot drone fans and weak points at safe distances
- The weapon's accuracy makes targeting specific weak points reliable
- Medium Ammo's armor penetration handles most standard ARC enemies effectively
- Reserve other weapons for situations requiring sustained automatic fire
The Renegade Journey
The Renegade represents a unique progression path within ARC Raiders' weapon ecosystem. It rewards players who invest time and resources into developing a single platform:
- Starting Point: A slow, unforgiving lever-action that punishes missed shots
- With Upgrades: Progressively faster fire rate that transforms handling characteristics
- Fully Developed: A rapid-fire, accurate platform that competes with weapons of higher base rarity
This progression makes the Renegade work as both a weapon and a training tool. It teaches positioning, shot discipline, and aim precision. Players who master the Renegade at lower tiers develop skills that transfer to all weapons.
The journey from Renegade I to Renegade IV, building your own legendary-tier weapon from mid-tier beginnings, captures what extraction shooters are all about: starting with limited resources and creating something powerful through persistence and skill.
Key Takeaways
- Don't dismiss the Renegade based on initial impressions of slow fire rate. This improves through upgrades
- Upgrade to at least Level 3 to access meaningful fire rate improvements; Level 4 is best
- Stable Stock 3 is crucial for accurate follow-up shots; this single attachment creates the largest performance improvement
- Compensator 3 is the best muzzle attachment based on testing data; Muzzle Brake 3 is acceptable based on personal preference
- Avoid Lightweight Stock and Kinetic Converter despite appealing stats. Testing confirms they create severe accuracy problems
- Respect the weapon's intended range of 50-100 meters; don't attempt CQC engagements
- The budget build remains viable for resource-conscious players, though Stable Stock 3 should be prioritized if possible
- Treat the Renegade as both weapon and skill development tool. Mastering its deliberate playstyle improves overall shooting fundamentals
The Renegade stands as one of the best-designed weapons in ARC Raiders for players seeking a balance of accessibility, effectiveness, and skill expression. For those willing to invest in its upgrade path and learn its deliberate playstyle, it delivers performance rivaling much rarer weapons while staying economically sustainable for regular use.