
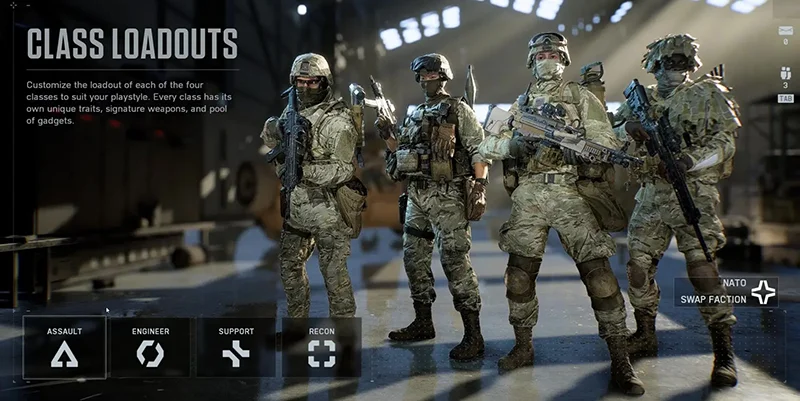
How the New Class System Works
The current meta splits classes into different difficulty levels and effectiveness:
- Assault: Medium difficulty, handles any situation
- Support: Easy difficulty, keeps your team alive
- Recon: Hard difficulty, long-range killing and intel
- Engineer: Medium difficulty, destroys vehicles
Engineers feel weaker than other classes right now, but you still need them on vehicle-heavy maps. Think of them as necessary team players rather than solo carry potential.
Assault Class: The All-Around Fighter
Best For: Pushing hard, adapting to any fight
Difficulty: Medium
What You Do: Stay mobile and switch between weapons as needed
Your Main Passive: Better ADS Mobility
Assault's biggest strength is moving faster while aiming down sights. This works with every weapon type, not just assault rifles. You'll really notice it with SMGs, shotguns, and marksman rifles. It makes Assault the most flexible class for different ranges.
Leveling Up Your Abilities
Your Main Gadget: Adrenaline Injector
- Makes you move faster temporarily
- Reduces explosive damage
- Makes enemy footsteps easier to hear
- Protects against flashbangs
Soft Landing Trait
You take less fall damage and don't get slowed down after dropping from heights. This lets you vault over stuff, jump off rooftops, or drop into fights without losing momentum. Pretty useful for aggressive plays.
Assault Rifle Mastery
When you use assault rifles, you get:
- Faster transition from sprinting to shooting
- Quicker weapon swaps
- Faster pistol draws
The benefits aren't huge, but they work well with Assault's aggressive style. SMGs give you similar mobility without needing this specific bonus, so consider those too depending on your engagement range.
Dual Primary Weapons
Assault is the only class that can carry two primary weapons instead of a gadget. Popular setups include:
Popular Dual Primary Setups
This system lets you adapt without respawning. Close-quarters players can bring long-range backup, while marksman-focused players have emergency close-combat options.
Gadget Choices
Assault Gadget Options
| Gadget | Purpose | Best Use |
|---|---|---|
| Explosive Grenade Launcher | Direct damage | Infantry and light vehicles |
| Thermite Grenade Launcher | Area denial | Chokepoint control |
Support Class: The Team Keeper
Best For: Keeping your squad alive, controlling objectives
Difficulty: Easy
What You Do: Heal, revive, resupply, and provide covering fire
What Support Does
Support works like a super-medic with extra tools. You revive people faster, top off health, give out ammo, drop portable cover, and lay down suppressive fire with LMGs. The defibrillator lets you instant-revive teammates, turning losing trades into even fights.
You'll mostly hang back a bit, mixing suppressive fire with team support. Keep everyone supplied and healthy while controlling lanes with your LMG.
Your Abilities
These abilities pair great with the defibrillator since you can revive people super fast and get some health back.
Medical Supply Box
Your main gadget gives both ammo and health to anyone in its radius. The key difference from regular healing is that it works even when players are suppressed. That's huge during long firefights.
LMG Specialist
You move at normal speed with light machine guns equipped. Other classes get slowed down, but you don't. LMGs still aim slower, but the mobility keeps aggressive support play viable by letting you reposition while laying down fire.
Support Gadgets
Support Gadget Options
Defibrillator: Tap for instant revives or hold to give more health. You can also charge it up and kill enemies with it, which is pretty fun.
Deployable Cover: Creates a portable shield you can shoot over. Great for holding lanes, reviving teammates safely, or stabilizing pushes.
Recon Class: The Sniper and Scout
Best For: Long-range kills, gathering intel, marking targets
Difficulty: Hard
What You Do: Stay hidden, mark enemies, and eliminate key threats
How Recon Works
Recon combines traditional sniping with modern intel gathering. You use vision tools to spot threats, mark high-value targets, and disrupt enemy coordination before fights start. You can delete important players with headshots from far away or sneak behind lines to sabotage with C4.
Stay hidden, mark targets for your squad, soften defenses from distance, and pick smart flanks. Avoid direct fights when possible.
Your Progression
You automatically mark enemies you see. When you hit someone, they get tagged longer, heal slower, and show up in 3D even through cover.
Headshot kills can't be revived. This shuts down revive chains and removes anchor players from objectives during big pushes.
UAV Drone
Your signature gadget flies a drone around you that continuously scans for enemies and feeds their locations to your team's minimap. This enables coordinated picks, flanks, and objective plays.
Auto-Spotting Trait
You automatically spot enemies through observation with 3D tracking. Tagged enemies stay visible through cover with slowed healing, perfect for coordinated team eliminations.
Bolt-Action Mastery
This makes sniping actually viable:
- Better scope steadying when you hold shift
- Faster bolt cycling for higher fire rate
- Less time between shots
Recon is the only class where long-range sniping reaches its full potential thanks to these bonuses plus the tracking abilities.
Recon-Only Gadgets
C4 is great for sabotage and objective denial. Spawn Beacon is one of the best gadgets in Battlefield history since it lets your team maintain pressure on distant objectives and enables flanking operations.
Engineer Class: The Vehicle Specialist
Best For: Destroying vehicles, supporting armor, controlling transportation
Difficulty: Medium
What You Do: Blow up enemy vehicles and keep friendly ones running
Vehicle Warfare Focus
Engineer handles both sides of vehicle combat. You disable enemy armor while keeping friendly vehicles operational. You're also responsible for controlling key transportation routes.
Your Progression
Engineer Abilities
Passive: Explosive Resistance
You take less damage from grenades, rockets, and vehicle explosions. Pretty important when you're working near combat vehicles.
Repair Torch
Your main gadget rapidly fixes allied vehicles. This can turn vehicle fights around completely by keeping armor in the battle longer. You can even save vehicles from near-destruction.
SMG Hipfire Specialist
You get better hipfire accuracy with SMGs. While Battlefield 6 usually favors aiming down sights, this helps in chaotic close-range fights near vehicles where you don't have time to aim.
Engineer Gadgets
Engineer Loadout Options
Pick gadgets based on the map. Urban areas favor RPG versatility, while open maps benefit from Stinger anti-air coverage.
Picking Your Class
What Works Best
Class Effectiveness Rankings
- Support gives the most consistent value across all situations through team sustainability and flexible combat support.
- Assault offers the most individual flexibility with dual primary weapons and enhanced mobility.
- Recon dominates when you can get good positioning and have long-range engagement opportunities.
- Engineer remains necessary despite feeling weaker individually, especially on vehicle-heavy maps where armor control decides matches.
How to Choose
Base your decision on three things:
- Map Type: Vehicle density, engagement ranges, and objective layouts
- Team Needs: Fill gaps in your squad's capabilities and support the overall strategy
- Your Playstyle: How you prefer to fight and what role feels most natural
- Picking based on weapon preference alone
- Ignoring team composition
- Choosing high-skill classes without practice
- Not adapting to map requirements
Each class can single-handedly change match momentum when used properly and positioned according to battlefield conditions and team requirements.