
Pre-Launch System Setup
Getting Battlefield 6 running smoothly starts before you even launch the game. Several system-level tweaks can make the difference between choppy gameplay and buttery smooth performance.
Essential BIOS Configuration
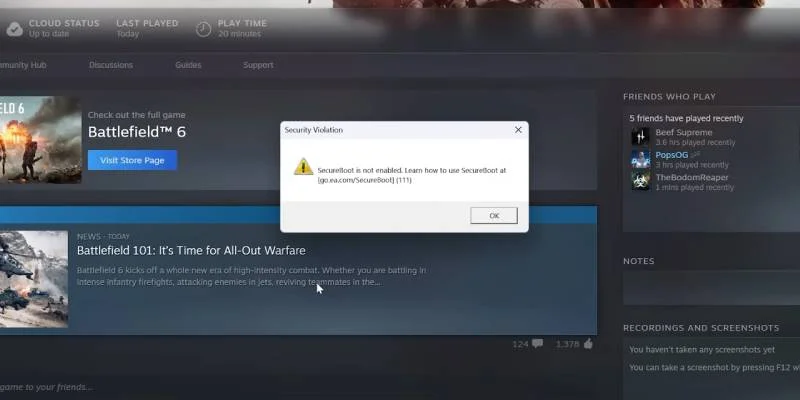
Battlefield 6 won't even start without the right BIOS settings. The game's anti-cheat system requires Secure Boot, and there's no way around it.
Setting Up Secure Boot:
- Restart your PC and hit F2 or Delete to access BIOS during startup
- Find the Security or Boot section (location varies by motherboard brand)
- Enable Secure Boot
- You might also need to turn on Trusted Platform Module (TPM)
- Save your changes and exit
Memory and CPU Setup
Make sure your system is running at full potential:
- Turn on XMP (Intel) or DOCP (AMD) profiles in BIOS for your RAM
- Download the latest chipset drivers for your CPU
- Update your BIOS to the newest version
- Check that Windows has all its updates
Critical System Requirements
Anti-Cheat Impact
Battlefield 6 uses a new anti-cheat system called "Javelin" that's pretty strict about system security:
- Secure Boot must be enabled
- Works with Windows 10 and 11
- Can interfere with some overclocking software
Hardware Performance Expectations
The game is surprisingly well-built for different hardware levels, but it's heavily CPU-dependent, especially in those massive 128-player battles.
GPU Performance in 128-Player Conquest
Windows Performance Setup
Power Management
Head to Windows Settings > System > Power & Battery (Windows 11) or Power Options (Windows 10):
Gaming Settings in Windows
Game Mode Setup:
- Go to Settings > Gaming > Game Mode
- Turn it on (it's actually good now, unlike the Windows 10 days)
- This makes sure your game gets priority over other system processes
Game Bar Configuration:
- Navigate to Settings > Gaming > Game Bar
- Exception for Ryzen users: If you have a 7900X3D or 7950X3D, keep Game Bar enabled because it helps with CCD scheduling
- Everyone else should turn it off to free up resources
Graphics Settings:
- Go to Settings > Display > Graphics
- Enable "Hardware-accelerated GPU scheduling"
- This setting is crucial for good performance
Capture Settings:
- Settings > Gaming > Captures
- Turn off all the background recording stuff
- Disable "Record what happened" and similar features
Graphics Driver Configuration
NVIDIA Control Panel
Global Settings That Matter:
G-Sync Setup:
Enable G-Sync if your monitor supports it. Make sure you also turn it on in your monitor's settings menu. The difference in smoothness is night and day.
Display Properties:
- Max out your refresh rate
- Use your monitor's native resolution
- Set digital vibrance to 55% (up from the default 50%) for better enemy visibility
Power Management:
Set power management to "Prefer Maximum Performance" at 133%. This isn't overclocking your card, but it lets it maintain higher boost clocks for longer. Most well-cooled systems see a 5-7% performance bump.
AMD Radeon Settings
Display Setup:
Turn on FreeSync if your monitor has it. This syncs your GPU with your monitor's refresh rate for smoother gameplay.
Graphics Profile:
Use custom settings instead of the presets. Make sure you're actually selecting your dedicated GPU, not the integrated one (this trips up laptop users and some desktop setups).
Anti-Lag and Features:
Enable Radeon Anti-Lag for lower input latency. Skip Anti-Lag+ though, it's not recommended for this game.
Frame Rate Control (Radeon Chill):
Set your minimum FPS to your monitor refresh rate minus 3. For a 170Hz monitor, that's 167 FPS max. This keeps your GPU under 100% utilization, which actually reduces input lag and keeps you in the FreeSync range.
Image Sharpening:
Turn this on if you're not using in-game sharpening. Set it between 60-70% for clearer visuals, especially helpful when TAA makes everything look soft.
Shader Cache:
If you're getting random stuttering, reset your shader cache. The game will rebuild it automatically next time you play.
In-Game Settings Guide
Display Setup
Display Mode: Always use Fullscreen. This gives you the lowest input lag and best performance compared to Borderless or Windowed modes.
Resolution and Refresh Rate:
- Use your monitor's native resolution
- Max out the refresh rate
- Double-check the aspect ratio matches your monitor
V-Sync: Turn it off. This adds input lag for no good reason. Use your graphics driver to limit frames instead.
Camera and Visual Tweaks
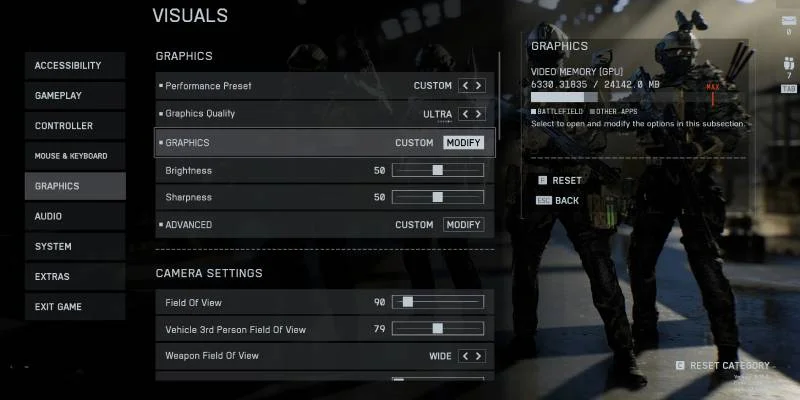
Field of View (FOV):
For competitive play, go with 90-110 (105 is a solid starting point). Higher FOV lets you see more of the battlefield but costs a few frames. Console players especially should bump this up from the default 75 to at least 90.
- World Motion Blur: Off
- Weapon Motion Blur: Off
- Camera Shake: Set to minimum (20, or 0 if you edit config files)
- Chromatic Aberration: Off
- Vignette: Off
- Film Grain: Off
Graphics Settings Breakdown
Graphics Setting Profiles
| Setting Category | Competitive (Performance) | Balanced | Visual Quality |
|---|---|---|---|
| Texture Quality | High | High | Ultra |
| Mesh Quality | Low (6% FPS boost) | Medium | High |
| Effects Quality | Low | Medium | High |
| Volumetric Quality | Low (12% improvement) | Medium | High |
| Shadow Quality | Low (15% more FPS) | Medium | High |
| Reflection Quality | Low | Medium | High |
Advanced Graphics Options
DLSS (NVIDIA RTX Cards):
- Quality mode: 10% FPS boost
- Balanced mode: 15% FPS boost
- Balanced actually looks better than the old DLSS3 at Quality
- Use Quality for 1080p, Balanced works fine for 1440p and up
FSR (All GPUs):
- Currently using FSR 3.1
- FSR4 might get added later but only works on the newest AMD cards
- For older AMD hardware, XeSS 2.1 often looks better
XeSS (All GPUs):
- Version 2.1 delivers better image quality than FSR 3.1
- Works on any graphics card
- Great choice for non-RTX users
Interface Tweaks
HUD Settings:
- Turn off HUD motion effects
- Disable vehicle motion effects
- Reduces screen shake during explosions
Icon Tweaks:
Lower the opacity on various icons (objectives, friendlies, squad, enemies, neutrals, ping markers). This lets you see through them better when you're aiming and gives cleaner spatial awareness.
Crosshair Setup:
- Default white crosshair works fine
- You can customize colors for different actions (headshots, kills, armor hits)
- Turn off damage numbers if you find them distracting
Audio Setup
War Tapes:
This is basically aggressive loudness equalization. Some players swear by it for competitive audio awareness, others hate it. Try it and see what works for you.
Advanced Performance Techniques
Smart Frame Rate Limiting
Why Limit Your FPS:
- Prevents 100% GPU usage (which actually increases input lag)
- Keeps variable refresh rate working properly
- Frees up resources for other programs
| Monitor Refresh Rate | Recommended FPS Limit | Reason |
|---|---|---|
| 240Hz | 237 FPS | Maintains G-Sync range |
| 144Hz | 141 FPS | Optimal VRR performance |
| All rates | -3 to -4 FPS | General rule for any refresh rate |
VRAM Management
Monitoring Usage:
Keep your VRAM usage about 10% below maximum capacity. High texture settings barely hurt performance if you have the VRAM for them.
Identifying Bottlenecks
- GPU usage below 90%
- FPS drops in big multiplayer matches
- Inconsistent frame times
- Lower Mesh Quality
- Reduce Effects Quality
- Drop Volumetric Quality
- Consider slightly lower FOV
- Turn on upscaling (DLSS/FSR/XeSS)
- Lower resolution scale
- Drop Volumetric Quality first
- Then reduce Shadow Quality
- Finally adjust Effects Quality
Network Setup
Connection Basics:
- Use wired ethernet
- Make sure you have open NAT
- Restart your router before gaming sessions
- Close background apps that use internet
Troubleshooting Common Issues
Launch Problems
Game Won't Start:
- Check that Secure Boot is enabled in BIOS
- AMD users: Look for driver version registry conflicts
- Turn off Windows Security's Mandatory ASLR feature
DirectX Function Errors:
- Turn off Screen Space AO & GI in graphics settings
- Try adding -dx11 to launch parameters
- This is a Frostbite engine issue with DirectX 12
Driver Version Problems:
- Laptop users: Disable integrated GPU in Device Manager
- Edit registry ReleaseVersion values if needed
- Common with RX 580 and Vega cards
Performance Issues
- Turn on EA App or Steam overlay (can double framerate due to bug)
- Set Windows power plan to Balanced or High Performance
- Turn off Windows Game Mode if it's causing problems
- Make sure graphics drivers are current
Stuttering and Inconsistent Performance:
- Clear shader cache (both Windows and game folders)
- Verify game files through launcher
- Close unnecessary background programs
- Check for thermal throttling
Infinite Loading Screens:
- Verify game file integrity
- Clear launcher cache
- Restart networking equipment
- Flush DNS cache
Known Issues
Super Bullets Bug: Known netcode issue that affects hit registration and damage. The developers have acknowledged this problem and are working on a fix.
DLSS Frame Generation: Doesn't work in current builds. Might get fixed in updates. Use FSR Frame Generation instead if you need it.
Hardware-Specific Setup
Best Settings:
- Use DLSS Quality mode for the best balance
- Turn on NVIDIA Reflex Low Latency
- Set Low Latency Mode to Ultra in Control Panel
- Skip Frame Generation until it's confirmed working
Driver Profile:
The game might not have a dedicated profile initially. Add the game executable to the Battlefield 2042 profile manually and use similar settings from previous Battlefield games.
Recommended Setup:
- Turn on Radeon Anti-Lag
- Use Radeon Image Sharpening at 50-80%
- FSR3 Frame Generation works properly
- Consider XeSS over FSR for better image quality
Driver Notes:
Keep drivers updated and watch for game-specific releases.
XeSS Performance:
Use the latest XeSS 2.1 implementation. It often looks better than FSR 3.1 and works as a solid universal upscaling option.
Controller Setup
Sensitivity and Response:
- Field of View: 90-100 (console default is around 75)
- Uniform Infantry Aiming: Turn it on
- USA Coefficient: 133% (try 178% for faster tracking)
- Soldier Aim Sensitivity: 90-110
- Response Curve: Linear for precision, Dynamic for snappiness
Aim Assist Setup:
- Aim Assist: 100%
- Zoom Snap: 60-80% (lower for more manual control)
- Adjust based on whether you play competitively or casually
Physical Settings:
- Stick Deadzones: 5-13 (as low as possible without stick drift)
- Trigger Deadzones: 0
- Vibration: Off for competitive, low for immersion
Config File Tweaks
Manual Setting Adjustments
Some tweaks can't be done through the game menus but can be changed in config files:
// Weapon Depth of Field Removal
Go to Documents > Battlefield 6 Open Beta > settings > PROFSAVE_PROFILE
Search for "WeaponDOF" and change the value to "0"
Removes depth of field effect on weapons

// Camera Shake Reduction
Default value is 20 with the lowest in-game setting
Can be set to 0 through config files
Gives you a completely stable camera during explosionsShader Cache Management
Windows Cache Location:
Found in your AppData\Local folder structure. You can delete this manually to force regeneration.
Game Directory Cache:
Located in the game installation folder under data\cache. Might be empty right after clearing but rebuilds automatically during gameplay.
When to Clear Cache:
- After major graphics setting changes
- When you start getting new stuttering issues
- Following game updates or driver changes
Final Setup Checklist
- Secure Boot enabled in BIOS
- Latest graphics drivers installed
- Windows fully updated
- XMP/DOCP memory profile enabled
- Power plan set to Balanced or High Performance
- Game Mode turned on
- Hardware-accelerated GPU scheduling enabled
- Game Bar configured properly (off unless Ryzen X3D)
- Background recording disabled
- Overlay enabled (EA App/Steam)
- Low latency mode set up
- Frame rate limiting configured
- G-Sync/FreeSync enabled and working
- Shader cache size increased
- Power management set up
- Fullscreen mode selected
- Native resolution and max refresh rate set
- V-Sync turned off
- Motion blur and visual effects disabled
- Graphics preset chosen and tweaked
- Anti-aliasing and upscaling configured
- VRAM usage monitored and within limits
- Consistent framerate achieved
- Input lag feels responsive
- No stuttering or hitching
- Temperatures normal
- Network connection stable
This setup should give you significant performance improvements and smoother Battlefield 6 gameplay across different hardware configurations. Remember that you might need to adjust settings as the game gets updated and your hardware changes.