
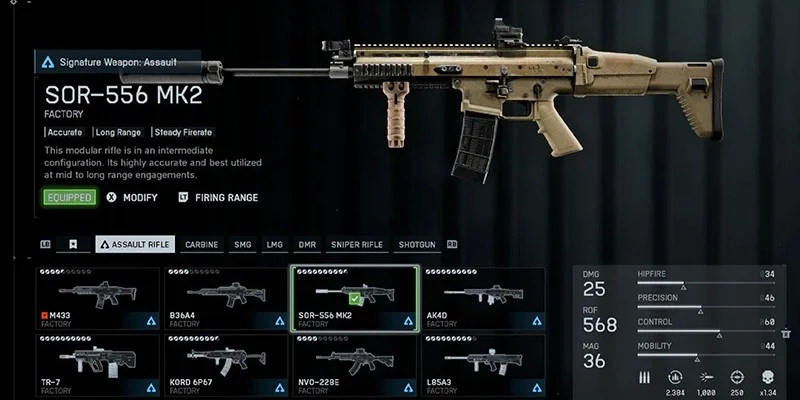
The SOR-556 MK2 (or the SCAR, as most players call it) is one of the more misunderstood assault rifles in Battlefield 6. A lot of players write it off after looking at the damage numbers. The rate of fire seems low, the TTK looks underwhelming on paper, and it gets labeled as weak. But those players are missing the point.
This rifle isn't trying to compete on raw DPS. It's a precision weapon. Build it correctly and you'll have one of the most consistent guns in the game at medium range, capable of dropping enemies at distances where other assault rifles start to fall apart.
This guide covers the weapon's stats, the attachments that matter, and several builds for different playstyles. The SOR-556 MK2 unlocks at Rank 25.
Core Statistics and Damage Profile
Before picking attachments, you need to understand what makes this rifle different from other assault rifles in Battlefield 6.
Base Stats
The SOR-556 MK2 fires at 568 rounds per minute with 25 base damage to the body. That puts it below most competing assault rifles in fire rate, but the weapon makes up for it with exceptional accuracy, easy recoil control, and bullet velocity that hits 1,000 meters per second with the right barrel. Even without attachments, this gun is easy to keep on target.
Damage Across Range
As an assault rifle, the SOR-556 MK2 uses a three zone damage model. This means it holds its damage values at range better than carbines, SMGs, and several other weapon categories. You won't see the same steep damage falloff that makes other guns feel weak at distance.
| Range | Body Damage | Shots to Kill | Time to Kill |
|---|---|---|---|
| Close (0-21m) | 25 | 4 | 316ms |
| Mid (21.5-75m) | 20 | 5 | 422ms |
| Long (75m+) | 17 | 6 | 528ms |
These TTK numbers look unimpressive in isolation. But TTK calculations assume every bullet lands. Real gunfights involve bloom, recoil, movement, and missed shots. The SOR-556 MK2 excels because its stability means you actually land your shots while your opponent is fighting their own recoil.

Precision vs Stealth
Before building your loadout, you need to pick a path. The community genuinely disagrees on this, and both approaches work.
Going All In on Precision
One school of thought says the SOR-556 MK2 is a precision rifle, not a stealth rifle. Suppressors and flash hiders trade away accuracy for radar concealment, and that trade hurts this weapon more than most. The SCAR's whole identity is accuracy. Giving that up doesn't make sense.
When you stack precision and control attachments, your bullets cluster tight around where you aim. No wandering, no drift. The gun becomes a laser, especially in that 20 to 75 meter window where it really shines.
In most Battlefield 6 modes outside of REDSEC, enemies knowing your position doesn't help them kill you faster. You might be trading real accuracy for just the feeling of safety.
Prioritizing Stealth
The other side argues that staying off the minimap is a real tactical advantage. A suppressor lets you drop multiple enemies before anyone figures out where you are. Flanking becomes way easier when you're not lighting up the radar with every trigger pull.
For players who rely on positioning and picking their fights carefully, suppressors still make sense. The weapon performs fine with one equipped, even if it doesn't hit its ceiling.
Attachment Breakdown
This section covers every slot with options ranging from early unlocks to high mastery gear.
Muzzle
Your muzzle choice sets the direction for your whole build.
For Maximum Precision:
The Chambered Compensator reduces recoil buildup and speeds up recoil recovery. You'll show up on the minimap when you fire, but testing shows this attachment makes a noticeable difference in how the gun handles. Combined with the right ammo and grip, this turns the SCAR into something special.
For Recoil Control:
- Double Port Break (10 points): Cuts down on weapon bounce significantly. Solid accuracy at range without a big point investment.
- Linear Comp/Converter (10 points): Reduces horizontal recoil, so you only need to pull down, not side to side.
- Single Break (5 points): Works like the Double Port but adds some weapon sway. Good if you're short on points early.
For Stealth:
- Standard Suppressor (20 points): Keeps you off the minimap beyond 15 meters and quiets your shots. You lose some accuracy, but the gun still works.
- Long Suppressor (25 points): Costs more but actually helps with recoil buildup and recovery while still hiding you. Better handling than the standard option.
Barrel
The barrel slot matters a lot on this gun because it affects bullet velocity, one of the SCAR's biggest strengths.
Best Option (High Mastery):
The 18" Custom Heavy Extended Barrel (10 points) pushes precision from 48 to 57 and keeps bullet velocity at 1,000 meters per second. Your sustained fire accuracy improves noticeably. This unlocks around level 28.
Progression Options:
- 18" Extended Barrel (around 15 points): Bumps velocity from 800 to 1,000 m/s and gives you faster ADS. Available early and works great until you unlock better options.
- AR Heavy Barrel: Focuses on accuracy. Good if you haven't hit the mastery level for the Heavy Extended yet.
Underbarrel
Grips affect recoil control, mobility, and ADS accuracy. Different players swear by different options here.
Maximum Control Options:
- Classic Vertical Grip (35 points): Best overall control for fights at range. Expensive but effective.
- Stippled Stubby (35 to 45 points): Similar control to the Classic Vertical but with better mobility. Good for aggressive players.
- 6H64 Vertical Grip (20 to 25 points): Cuts both vertical and horizontal recoil significantly. Comes with movement speed and moving ADS accuracy penalties, but the recoil reduction usually makes up for it.
Mid Level Options:
- Ribbed Vertical (20 points): Slightly less control than the 6H64 but gives you a mobility boost. Saves 5 points for something else. Does reduce your accuracy while moving though.
- Folding Stubby: Better for players who like getting in close.
Budget Option:
- Alloy Vertical: Slight recoil reduction with zero downsides. Great starting grip while you unlock better options. Since Battlefield 6 has you moving constantly, grips that penalize moving accuracy can hurt more than they help, making the Alloy a safe choice.
Magazine
Your magazine affects capacity and sometimes factors into point budgeting.
- 40 Round Magazine: Unlocks early (around level 5). Costs about 10 points more than the 36 round option but gives you meaningful extra capacity without slowing reloads.
- 36 Round Magazine: Frees up 10 points for something like a laser if you want better hipfire.
- 45 Round Extended Magazine: Expensive but works well with suppressed builds where you might engage several targets before moving.
- 30 Round (Default): No point cost. Lets you spend elsewhere.
Ammunition
Ammo choice can dramatically change how this weapon performs, especially for players who land headshots consistently.
Synthetic Tips (Precision Build):
This ammo turns the SOR-556 MK2 into a headshot machine. Testing showed these damage values:
| Range | Headshot Damage | Kill Potential |
|---|---|---|
| Close (0-21m) | 44 | 2 headshots + 1 body, or 3 headshots (~211ms) |
| Mid (21-75m) | 35 | 3 headshots, or 2 headshots + 2 body |
That 211 millisecond kill time is extremely fast, and it's available out to 75 meters on a gun stable enough to actually land those shots. Even when you miss some headshots, you still have reliable four shot body kills as backup. This ammo type alone fixes most of the "weak gun" complaints.
Hollow Points (20 points):
Boosts your headshot multiplier without committing as hard as Synthetic Tips. Good at medium to long range.
Other Options:
- Lightweight Polymer Rounds: Faster ADS for more responsive handling.
- Frangible Rounds: Delays enemy health regen. Useful in drawn out fights.
- Standard Ammunition: No cost. Frees up points and the gun works fine without special ammo.
Optics
Optic choice is mostly personal preference. The SCAR works with lots of magnification levels.
Good Options:
- Baker 3x: Solid medium zoom that fits the weapon's intended range. Most players don't need more than 3x on a fully automatic gun.
- BF-2M 2.5x to 3.0x: Nice all around pick for medium range.
- 1.7x Optics: Lower zoom for faster target acquisition.
- PVQ-31 4.0x (10 points): Higher magnification for longer engagements. Pairs well with a Basic Sight accessory so you can switch between zoom levels.
- Reflex Sights/Mini Flex: Low zoom for closer range play.
- RO-M (unlocks around level 19): Popular choice once you have it.
Skip the iron sights. They don't do you any favors on this weapon.
Accessories
If you have points left over:
- Green or Red Laser: Better hipfire for those surprise encounters up close. Running the 36 round mag instead of 40 frees up points for this.
- Basic Sight (5 points): Pair with a higher magnification scope to switch between zoom levels on the fly.
Complete Builds
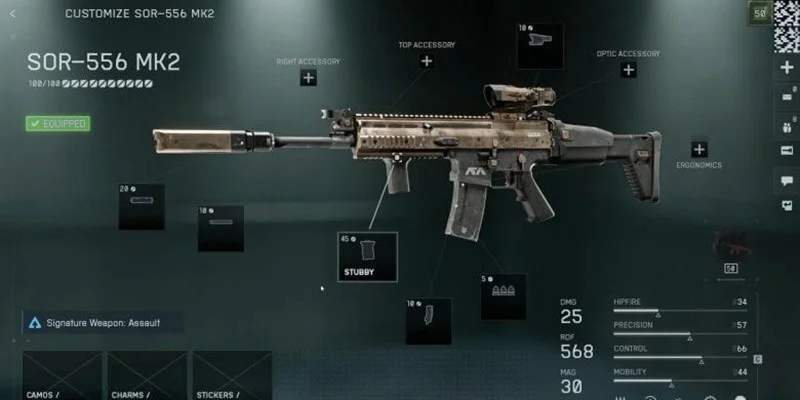
Build 1: Maximum Precision (Unsuppressed)
This build goes all in on what the SCAR does best. Testing shows this is where the weapon really shines.
Reported Final Stats: 57 Precision, 66 Stability, 1,000 Velocity
Playstyle: You're not sneaking around. You're taking fights, pushing objectives, holding lanes, defending points. This build rewards accuracy and punishes mistakes. Land your headshots and you'll drop people before they can react. You can hold down the trigger and stay on target in ways other rifles can't match.
You will show up on the minimap when firing. In standard multiplayer modes, that usually matters less than winning the actual gunfight.
Build 2: Suppressed Stealth
For players who value positioning, flanking, and staying hidden.
Reported Stats: Around 52 Precision, 57 Control
In practice: The gun still works and stays accurate enough to compete. You can drop multiple enemies before they find you, which suits flanking playstyles perfectly.
You won't hit the same peak performance as the precision build. This is the best suppressed SCAR you can make, but it doesn't fully commit to what the weapon does best.
Build 3: Budget/Early Progression
For players still leveling the weapon who want to be competitive right away.
This works because the SOR-556 MK2 gets solid attachments at low mastery levels. You don't need to grind to level 20+ before the gun feels good.
Build 4: Adaptable with Dual Optics
For players who want flexibility across different engagement distances.
In action: Switch between 4x magnification for longer fights and the Basic Sight up close. The Linear Comp cuts horizontal recoil so you just pull down to compensate.
Class Setup
The SOR-556 MK2 fits well with Assault thanks to the class's flexibility.
| Slot | Selection |
|---|---|
| Class | Assault |
| Field Spec | Breacher |
| Secondary | ES 5.7 |
| Gadget One | M87A1 |
| Gadget Two | M320A1 HE |
| Throwable | Frag Grenade |
| Melee | Sledgehammer |
The setup: The ES 5.7 gives you a reliable sidearm and the M87A1 covers different engagement scenarios. The Sledgehammer lets you break through walls and create new angles, and the M320A1 HE handles enemies in cover.

Tips for Getting More Out of the SCAR
Bloom and Precision
Bloom is the random spread that makes your bullets land slightly off from where you're aiming. The precision stat controls how tight that spread is. Higher precision means your shots cluster closer to your crosshair.
The SOR-556 MK2 starts with good precision and becomes excellent with the right attachments. On a proper precision build, your first three bullets go exactly where you aim. Follow up shots stay accurate too, so you can hold down the trigger and maintain control in ways faster firing rifles can't.
About Headshot Ammo
Synthetic Tips and Hollow Points reward accuracy, but they only pay off if you're actually landing headshots. If you find yourself hitting bodies more than heads, standard ammo might give you more consistent results.
The weapon's stability makes it one of the best guns in the game for headshot ammo though. The 20 to 75 meter range is where this setup really pays off.
Similar Weapons
If you like how the SOR-556 MK2 plays, check out the AK and KTS. They share the same design philosophy: accurate platforms that benefit from precision builds instead of generic meta setups. All three work well with Synthetic Tips ammo.
Mistakes to Avoid
Building it like every other rifle: Slapping on a suppressor and flash hider without thinking about it sacrifices what makes this gun good. Consider if you actually need the stealth.
Ignoring ammunition: Synthetic Tips or Hollow Points can dramatically cut your kill times if you're accurate. Don't overlook this slot.
Using high penalty grips without understanding the cost: Grips that hurt your moving ADS accuracy can be a problem in a game with this much movement. The Alloy Vertical has no downsides and works fine while you figure out what you like.
Expecting instant results: This gun demands precision. If you're missing shots, attachments won't save you.
Final Thoughts
The SOR-556 MK2 isn't weak. It's demanding. The weapon rewards players who commit to its identity as a precision tool instead of forcing it into a generic assault rifle template. Build it right and you get one of the most consistent guns in Battlefield 6 at medium range, capable of dropping enemies with accuracy that makes up for its moderate fire rate.
Lean into what the weapon wants: precision, control, and velocity. You'll find a rifle that performs better than its raw stats suggest. The slower rate of fire becomes an advantage when you're landing every shot while your opponent fights their own recoil.
Pick the precision path or pick the stealth path, but understand what you're giving up either way. The SOR-556 MK2 asks a lot from its users, and it rewards those who deliver.