
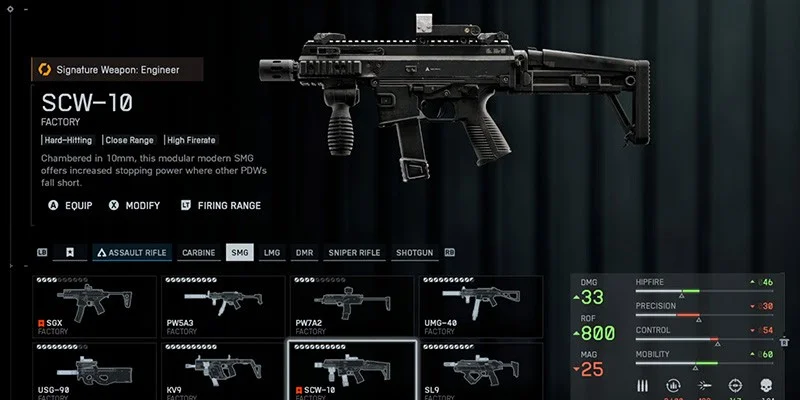
The SCW-10 submachine gun is one of the most lethal close-range weapons in Battlefield 6. This thing achieves what few others can: a three-shot kill at close range with an 800 RPM fire rate, creating one of the fastest TTK values among all automatic weapons. The magazine is extremely limited though, demanding careful positioning and smart reload timing.
Most SMGs start with four-shot kills and drop to five. The SCW-10 begins at three and only scales to four at medium ranges. This damage profile, combined with SMG movement speed and superior base control stats, makes it feel like a lightweight assault rifle that forgot it was supposed to have weaknesses.
You'll need to complete the Close Quarters 1 assignment to unlock this weapon: 300 close-quarter kills with SMGs and 10,000 damage while aiming with SMGs. It's a grind, but the weapon's performance makes it worthwhile.
- Highest body shot damage in the SMG class at 33-34 per shot
- Three-shot kill capability within 9.5 meters
- Fastest-killing automatic weapon at close range (excluding shotguns)
- Excellent base recoil control and precision stats
- Full SMG movement speed and handling
- Default 15-round magazine severely limits engagements
- Magazine upgrades cost significant attachment points
- Punishing if you miss shots or face multiple enemies
- Requires careful reload timing and target isolation
- Limited effectiveness beyond 30 meters
Damage Profile and Effective Ranges
The SCW-10 uses a five-zone damage falloff system. Knowing these ranges helps you play to the weapon's strengths.
Damage Breakdown by Range
From 0 to 9.5 meters, you're dealing 33-34 damage per shot for a three-shot body kill. This is where the SCW-10 absolutely dominates. The TTK here is unmatched by any automatic weapon except shotguns. Land three body shots on someone within this distance and they're dead. Period.
From 9.5 to 21.5 meters, you need four body shots or three critical hits. The 0.225 second TTK ranks sixth among all weapons in the game. Even at ranges where most SMGs struggle, the SCW-10 stays extremely competitive.
From 21.5 to 36.5 meters, damage drops to 20 per shot, requiring five bullets for a kill. The 0.3 second TTK is still solid for the distance, which is impressive for an SMG.
From 36.5 to 75 meters, you're down to 17 damage per shot creating a slower 0.375 second TTK. Still usable if you can control the recoil, but you should generally avoid fighting at this range.
Beyond 75 meters, damage continues dropping. At these distances, the SCW-10 becomes ineffective and you should reposition closer.
Recommended Loadouts
The SCW-10 offers several viable configurations depending on your playstyle and point budget. Each build addresses different aspects of the weapon's performance while working within the attachment system.
Maximum Versatility Build
The 25-point Long Suppressor is the foundation here. Long Suppressors and Lightened Suppressors both reduce recoil buildup and improve recoil recovery. Since the SCW-10 burns through ammo rapidly due to its high fire rate, it reaches maximum benefit from these recoil-reducing properties faster than nearly any other weapon. The moment you start firing, the weapon becomes a laser beam even without other attachments.
The Extended Barrel significantly improves bullet velocity, making the weapon more forgiving at the outer edges of its effective range and improving hit registration on moving targets. The 25-Round Magazine costs 45 points but provides the largest capacity available. This extra ammo is critical because even with a three-shot kill, the default 15-round magazine only allows 3-5 kills per reload depending on accuracy.
Maximum Control and Precision Build
This configuration is ideal if you prefer absolute laser-like accuracy and don't rely on flanking tactics that require suppression. The Compensated Brake reduces both horizontal and vertical recoil by roughly 10%, and when combined with a high-stat underbarrel grip, the weapon becomes exceptionally smooth. The faster 133ms ADS time compared to the 167ms standard allows quicker snap shots and better performance in sudden close-quarter encounters.
Headshot-Focused Configuration
0-9.5 meters: Two-headshot instant kill
9.5-21.5 meters: Two headshots + one body shot kill
21.5-36.5 meters: Two headshots + two body shots kill
Hollow Point ammo increases the headshot multiplier, and since the SCW-10 already has high base damage (33), this multiplier provides exceptional value. The weapon's 800 RPM fire rate makes landing multiple headshots in quick succession realistic, especially within the optimal engagement range. This configuration trades the five extra bullets of the 25-round magazine for significantly improved killing potential through critical hits.
Hip-Fire Specialist Build
The CQB Suppressor is unique among suppressors because it doesn't penalize hip-fire accuracy. Paired with the 50MW Green Laser, this build achieves excellent hip-fire performance while maintaining stealth through suppression. Hip-firing is particularly effective with the SCW-10 because you only need three body shots within 9.5 meters. In tight indoor spaces, building interiors, and during aggressive flanking rotations, hip-firing lets you maintain full movement speed and better situational awareness.
Alternative Suppressed Configuration
This build provides a middle-ground option if you want suppression and reasonable magazine capacity but need to allocate points differently. The 30-point Suppressor costs less than the Long Suppressor but maintains hip-fire accuracy better than the 20-point Suppressor alternative. The Light 6.8" Fluted Barrel improves ADS speed and accuracy while moving, supporting a more mobile playstyle.

Attachment Deep Dive
Understanding each attachment category helps you make informed decisions when building your loadout. The SCW-10's attachment economy requires strategic point allocation to maximize effectiveness.
Muzzle Attachments
| Attachment | Cost | Primary Benefit | Best For |
|---|---|---|---|
| Long Suppressor | 25 points | Recoil reduction + suppression | All-around performance |
| Lightened Suppressor | Varies | Similar to Long Suppressor | Alternative to Long |
| Compensated Brake | Points vary | 10% recoil reduction | Maximum precision builds |
| CQB Suppressor | Points vary | Suppression + hip-fire | Hip-fire configurations |
| 30-point Suppressor | 30 points | Balanced suppression | Point-efficient builds |
Long Suppressor and Lightened Suppressor provide substantial recoil buildup reduction and recoil recovery improvement. Since the SCW-10's high fire rate causes rapid recoil buildup, these attachments reach maximum effectiveness almost immediately upon firing. The suppression benefit keeps you off the minimap, critical for a weapon that excels at flanking and close-range ambushes.
Barrel Attachments
Extended Barrel increases bullet velocity from 428 m/s to 535 m/s. This improvement makes the weapon more effective at the outer edges of its engagement range (20-35 meters) and improves hit registration on moving targets. The velocity increase reduces the time bullets spend in flight, making your shots connect more reliably.
Light 6.8" Fluted Barrel (20 points) improves ADS speed and accuracy while moving. Excellent for highly mobile, aggressive playstyles. The movement accuracy bonus helps when strafing during firefights, letting you maintain accuracy while dodging incoming fire.
Basic/Standard Barrel is a zero-point option that provides no bonuses but costs nothing, freeing up points for other attachments. Perfectly functional for close-range builds where velocity and movement accuracy are less critical.
Magazine Options
25-Round Magazine (45 points) is the largest capacity available and the most expensive attachment in terms of point cost. Provides 10 additional rounds over the default 15, dramatically improving engagement sustainability. With accurate shooting, this magazine allows 6-8 kills per reload instead of 3-5. The high cost is justified by the substantial increase in combat effectiveness.
20-Round Magazine (20 points) is a more affordable capacity upgrade that provides five extra rounds. This increase is significant enough to improve combat reliability without breaking the point budget. Most builds settle on this magazine as the sweet spot between cost and benefit.
Ammunition Types
Standard FMJ Rounds (0 points) is the default ammo that provides consistent, predictable performance with no special properties and zero point cost.
Hollow Point (20 points) increases headshot damage multiplier. Extremely valuable on the SCW-10 due to its high base damage and fast fire rate. Creates breakpoints where two headshots can kill at close range, and dramatically reduces bullets-to-kill at all ranges when landing critical hits. Best for accurate players who can consistently land headshots.
Penetration Rounds provides minor recoil reduction and allows shooting through thin cover. Reduces precision slightly. Generally inferior to Hollow Point or Standard rounds for most applications.
Optics
Mini Flex 1.00x (10 points) is the cleanest red dot sight in the game. The 1x magnification means it doesn't reduce your field of view while aiming, allowing better peripheral awareness. Excellent for SMG usage where situational awareness is critical.
OSA7 1.00x is another high-quality 1x red dot sight with similar benefits to the Mini Flex in terms of maintaining field of view and clean sight picture.
Iron Sights (0 points) on the SCW-10 are functional and not terrible. If point budget is extremely tight, you can skip an optic entirely and use the saved points on more critical attachments like magazine capacity or suppressors.
Accessories
50MW Green Laser (20 points) provides significant hip-fire accuracy improvement. Necessary for hip-fire builds. The laser is visible to enemies, potentially giving away your position, but the SCW-10's killing speed typically eliminates opponents before they can react to seeing the laser.
120MW Blue Laser provides moderate hip-fire accuracy improvement plus accuracy bonus while moving during ADS. A more balanced option for players who hip-fire occasionally but also value strafe-shooting ability. Slightly less visible than the Green Laser.
Mag Catch (5 points) improves reload speed from 2.6 seconds to 2.4 seconds. A minor improvement but worthwhile if you have exactly 5 points remaining in your build budget. Faster reloads reduce vulnerability windows and allow quicker re-engagement after kills.
Underbarrel Grips
Due to the SCW-10's excellent base recoil characteristics and the substantial recoil reduction provided by Long/Lightened Suppressors, underbarrel grips are typically unnecessary. The weapon already behaves like a laser with the proper muzzle attachment.
35-point Stippled Stubby or Classic Vertical provides maximum recoil control if you're building the max precision/control configuration. Combine with Compensated Brake for the tightest possible recoil pattern. Only necessary if you're avoiding suppressors entirely or specifically building for maximum stability.
10-point Folding Vertical is a budget-friendly option that provides minor recoil assistance. Suitable for the Hollow Point build where you want some additional stability without major point investment.
Recoil Characteristics and Control
Testing at 20 meters with no additional stat-boosting attachments reveals the following pattern: the SCW-10 starts firing straight, then moves upward and slightly to the top-right. To compensate, land your first 2-3 bullets directly on target, then gently pull your aim toward the bottom-left. The required compensation isn't extreme and the pattern is highly repeatable, making recoil control learnable and consistent.
The Long Suppressor and Lightened Suppressor fundamentally change how the SCW-10 behaves. Both attachments reduce recoil buildup and improve recoil recovery. The SCW-10's combination of high rate of fire (800 RPM), low magazine capacity (burns through ammo quickly), and high damage per shot (fewer bullets needed per kill) means the weapon reaches maximum recoil very quickly within each magazine, but also depletes the magazine rapidly.
Within the weapon's optimal 9.5-21.5 meter engagement envelope, recoil is barely a consideration. At close range, you're firing 3-4 bullets and the engagement ends before recoil accumulation becomes meaningful. At 20-30 meters, light recoil compensation keeps shots on target. Beyond 30 meters, tap-firing or short bursts maintain accuracy, though you should generally reposition closer rather than taking extended-range fights.
Playstyle and Tactical Application
The SCW-10 is built for pure close-quarters aggression. Your goal is to dominate the 0-21.5 meter space, particularly the 0-9.5 meter zone where the weapon's three-shot kill makes you nearly unstoppable. Everything about your positioning, movement, and target selection should support controlling this engagement distance.
Optimal Use Cases
- Hallway pushes and room clearing operations
- Tight flanking maneuvers around building exteriors
- Close-quarters objective captures and defenses
- Rapid elimination of isolated targets
- Fast rotations through indoor spaces
- Punishing enemies who push aggressively into your effective range
Situations to Avoid
- Long-range duels with assault rifles or marksman rifles
- Open-field crossing where you're exposed at distance
- Holding angles against enemies at 40+ meters
- Sustained suppressive fire (due to limited magazine)
Target Isolation and Engagement Selection
The SCW-10's limited magazine capacity (even with the 25-round upgrade) means you can't simply run into groups of 3-4 enemies and spray them all down. Unlike higher-capacity weapons, you need to force one-on-one encounters or very quick sequential kills with minimal wasted ammo.
Use angles and cover to limit how many enemies can see and shoot you simultaneously. Enter rooms through side doors rather than main entrances. Flank around building exteriors instead of pushing directly up contested main lanes. Position yourself so that even if multiple enemies are in the area, they can't all engage you at once due to walls, corners, and obstacles.
Reload Discipline
Reload after every 1-2 kills unless you absolutely know you can take the next fight with your remaining ammo.
Never enter a new room or push around a corner with fewer than 10 bullets remaining.
Always reload in cover, behind walls, or during movement between positions.
If you kill an enemy and know more are nearby, immediately assess your magazine. If you have 15+ bullets (with 25-round mag) or 12+ bullets (with 20-round mag), you can take another quick engagement. If ammo is lower, prioritize reaching cover for a reload over chasing additional kills.
Map Selection and Zone Control
The SCW-10 performs best on smaller maps with significant indoor spaces, tight lanes, and limited long sightlines. Maps focused on close-quarters objectives where engagements naturally occur at 5-25 meters are ideal.
On bigger maps, stick to building interiors, urban zones, and tighter lanes between objectives. Avoid open fields and long approach routes. Use the map's structure to force enemies into your preferred engagement range. If you must traverse open areas, do so quickly and deliberately. The SCW-10's SMG movement speed allows rapid repositioning.
Class Synergies
The Engineer class provides a signature weapon bonus to hip-fire control. This stacks with the 50MW Green Laser or 120MW Blue Laser, creating exceptional hip-fire accuracy. When combined with the SCW-10's three-shot kill at close range, you can hip-fire enemies down before they complete their ADS animation.
On maps or modes without significant vehicle presence, the Assault class offers the assault sling equipment. This lets you carry a carbine as a secondary weapon (M4A1, AK-205, etc.). A carbine provides medium-range capability to cover the SCW-10's weaknesses, allowing you to engage enemies at 40-80 meters effectively before switching back to the SCW-10 for closer work.
Counter-Play Against Different Weapon Types
| Enemy Weapon Type | Your Advantage | Optimal Strategy |
|---|---|---|
| Other SMGs | Superior damage per shot | Engage aggressively within 15 meters |
| Assault Rifles | Faster TTK at close range | Force engagements under 20 meters |
| Shotguns | Range flexibility | Maintain 8-12 meter distance |
| LMGs | Superior mobility and TTK | Close distance quickly, shoot first |
| Marksman/Sniper Rifles | Close-range dominance | Avoid long sightlines entirely |
Against shotguns, the 8-12 meter distance is critical. Too close and they one-shot you, too far and you don't leverage your three-shot kill advantage. Dance at the edge of shotgun one-shot range while landing your three bullets faster than they can fire twice.
Against marksman/sniper rifles, avoid long sightlines entirely. Use cover and indoor routes. If caught in the open, sprint erratically and reach cover rather than trying to return fire at range.
Advanced Techniques
Headshot Efficiency
For players who can consistently land 30-40% headshots or higher, Hollow Point ammo provides exceptional value. The increased headshot multiplier on an already high base damage weapon creates breakpoints where you save 1-2 bullets per kill, effectively increasing magazine efficiency. A player landing 2 headshots on every kill with Hollow Points effectively turns their 20-round magazine into something closer to 25-30 rounds worth of killing power due to reduced bullets-per-kill.
Pre-Aiming and Sound Awareness
Given the SCW-10's nearly instantaneous TTK at close range, pre-aiming common angles and doorways provides enormous advantage. If you hear footsteps approaching and pre-aim the corner, you can land all three killing shots before the enemy even sees you. Sound awareness becomes critical with limited magazine capacity. Knowing an enemy's position before they appear lets you prepare the engagement on your terms rather than being surprised with low ammo.
Burst Fire at Range
Beyond 25-30 meters, fire in 4-5 round bursts rather than full-auto. This maintains accuracy and conserves ammo while still allowing reasonable effectiveness. Tap-firing single shots works at 35-50 meters if absolutely necessary, though you should generally reposition closer rather than taking these fights.
Movement and Strafing
The Light 6.8" Fluted Barrel improves accuracy while moving, making strafing during firefights more effective. Combined with the fast TTK, you can often eliminate enemies while side-stepping their return fire. This is particularly valuable in one-on-one duels at 10-20 meters. Even without the Light Barrel, brief strafing between short bursts (strafe 2-3 steps, fire 3-4 bullets, strafe again) disrupts enemy aim while maintaining your own accuracy.
First-Shot Advantage
Since the SCW-10 kills so quickly, first-shot advantage is even more valuable than with slower-killing weapons. The difference between shooting first and shooting second is often the difference between killing the enemy in 0.15 seconds versus dying before you can fire your fourth bullet. Use angles, corners, and positioning to ensure you see enemies before they see you.
Common Mistakes to Avoid
- Equipping 2x or higher magnification optics
- Taking medium-to-long range fights (40+ meters)
- Not upgrading from the default 15-round magazine
- Engaging multiple enemies simultaneously
- Reloading in the open without cover
- Ignoring suppressor benefits for flanking
- Over-investing in recoil control attachments
- Never utilizing hip-fire at close range
The default 15-round magazine is severely limiting. While expensive, the 20 or 25-round magazine is necessary for reliable performance. Budget your attachment points to accommodate magazine upgrades. You don't have the magazine capacity to spray down 3-4 enemies at once. Isolate targets, kill them individually, and reload between engagements.
With the proper suppressor, you don't need heavy underbarrel grips or every recoil-reducing attachment. The weapon already controls well. Invest points in magazine, suppression, and velocity instead. Hip-fire is genuinely valuable at 5-15 meters, allowing faster engagement and full movement speed. Practice hip-firing in close quarters rather than always aiming down sights.
Final Recommendations
The SCW-10 represents one of the strongest weapons in Battlefield 6 when used within its intended role. Its combination of high damage, fast fire rate, and excellent control creates a close-quarters monster capable of consistently achieving 70+ kill conquest matches for skilled players.
New players should start with the Maximum Versatility build. The 25-round magazine and Long Suppressor combination provides the most forgiving experience while you learn the weapon's characteristics. Focus on forcing engagements under 20 meters and reloading frequently.
Experienced players should experiment with all recommended builds to find which matches their playstyle. If you have excellent aim, the Hollow Point configuration rewards headshots dramatically. If you play extremely aggressively in tight spaces, the hip-fire build may suit you better.
Point Budget Priority
- Magazine capacity (20 or 25 rounds) - most critical upgrade
- Suppressor (preferably Long or Lightened) - stealth and recoil control
- Laser accessory (if hip-firing) or Extended Barrel (if not) - range/accuracy
- Optic (Mini Flex 1.00x or OSA7 1.00x) - sight picture quality
- Mag Catch (if points remain) - faster reload speed
Avoid spending points on underbarrel grips unless specifically building the maximum control configuration. The suppressor provides sufficient recoil management for most situations.
While the SCW-10 excels on small maps, it remains viable on larger maps if you stick to building interiors and tight lanes. Pair it with a carbine (via Assault class) for maps with mixed engagement ranges, using the carbine at distance and swapping to the SCW-10 for close work.
When configured correctly, the SCW-10 stops fighting you and becomes one of the most effective weapons in the game. Players who master reload timing, positioning, and attachment selection will find themselves consistently dominating close-quarters combat and achieving kill counts that feel unfair to opponents. Learn its damage breakpoints, understand how attachments synergize with its unique characteristics, and position yourself within the 0-21.5 meter sweet spot. Do these things, and you'll discover why experienced players consider the SCW-10 among the best weapons in Battlefield 6.