
The Necrofluid Gauntlet is the Wonder Weapon for Ashes of the Damned, Black Ops 7's first Zombies map. Unlike the old Mystery Box routine where you spin until luck favors you, getting this weapon means working through a proper quest chain. You'll fight an elite boss, complete a timed scanning challenge, and solve a symbol puzzle. It's worth the effort though, since you'll need this weapon for high round survival and the main Easter egg.
What You Need Before Starting
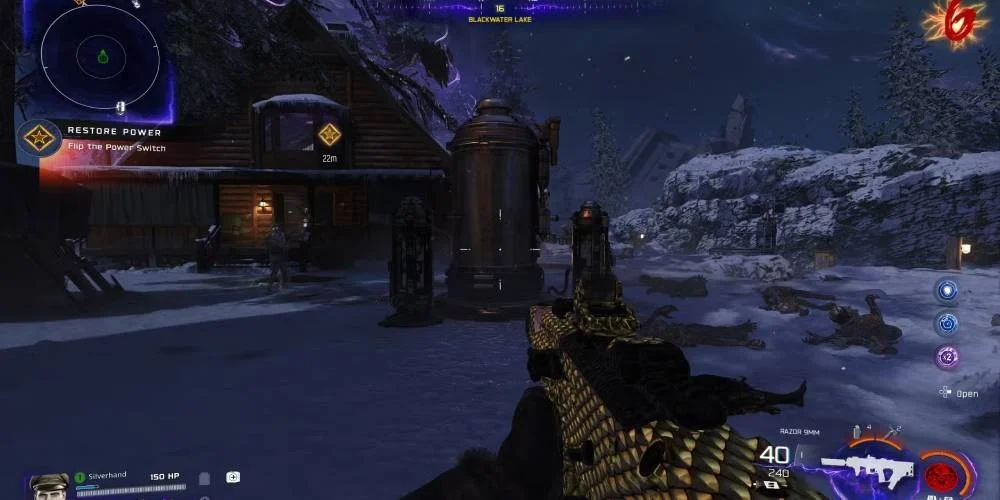
You can't even begin the Necrofluid Gauntlet quest until you've activated power at all three map locations: Ashwood, Blackwater Lake, and Vandorn Farm.
Turning On the Power
Head to the Server Room inside Janus Towers Plaza first. Melee the grate to grab T.E.D.D.'s Head, then install it on Ol' Tessie (the truck). Drive to either Blackwater Lake or Vandorn Farm.
At each power station:
- Shoot the orange bulbs infecting the Power Pump
- Go inside the nearby building (Cabin at Blackwater Lake, Barn at Vandorn Farm)
- Flip the Power Switch
Once you've done both locations, drive to Ashwood. Take the zipline up to the Power Pump and repeat the process. Getting power running at Ashwood also unlocks Pack-a-Punch for Ol' Tessie, which helps with the combat ahead.
Gear Up
Stun Grenades: You'll need 3-4 of these to wake Klaus. Craft them at any Crafting Table for 250 Salvage each. Either make them beforehand or save up enough Salvage.
Combat Loadout: Pack solid weapons and decent armor before fighting Uber Klaus. The Napalm Burst Ammo Mod wrecks him and other elite enemies like Zursa.
Field Upgrade for Solo Players: Equip Aether Shroud if you're playing alone. It helps during the scanning section, though it won't actually contribute to scan progress.
Zombie Distractions: Grab Cymbal Monkeys and Decoys for the scanning phase. You'll be standing still while zombies spawn endlessly, so these buy you breathing room.
Open the Sheriff's Office
Go to Ashwood's Market Square on the east side. You'll find the Sheriff's Office left of the Vulture Aid Perk Machine. Buy the door for 500 Essence. Inside, Klaus sits locked in a jail cell. You'll be coming back here soon.
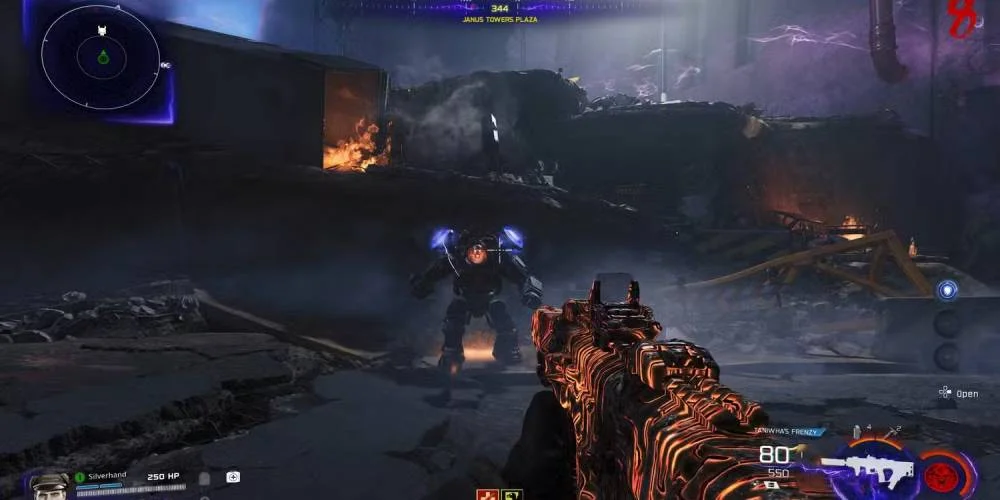
Fight Uber Klaus
Head back to Janus Towers Plaza with your combat gear ready. You're about to spawn a boss, so don't walk into this unprepared.
Move toward the Blackwater Lake entrance on the west side. A large crate sits near the exit. Get close to it and Uber Klaus will burst out, starting the fight. Use your best weapons and that Napalm Burst Ammo Mod to take him down. When he dies, he drops a Stabilizer Chip. Grab it.
Wake Up Klaus
Bring the Stabilizer Chip back to the Sheriff's Office. Interact with the terminal next to Klaus's cell to install it. This starts an update sequence.
Now comes the tricky part. You need to throw Stun Grenades into the cell to wake Klaus, but there's a specific technique:
Throw 3-4 grenades using this method. You'll see white dots circling his head when it's working. Klaus will wake up and become your ally.
Using Klaus: He replaces your Tactical Equipment slot when active. Press Up on the D-Pad or L1 to command him. Click the left bumper to move him wherever you need. Remember he'll eventually leave if you take too long, so use that radio to call him back if needed.
Get the Aether Barrel
Take Klaus to Zarya Cosmodrome on the southeast road from Ashwood. Once there, go down the stairs across from the Wisp Tea Perk Machine to reach the Support Systems room.
Check the northwest wall for a locked canister behind glass with a computer terminal beside it. Look at the screen and command Klaus over by pressing left bumper. He'll start typing and activate a green button.
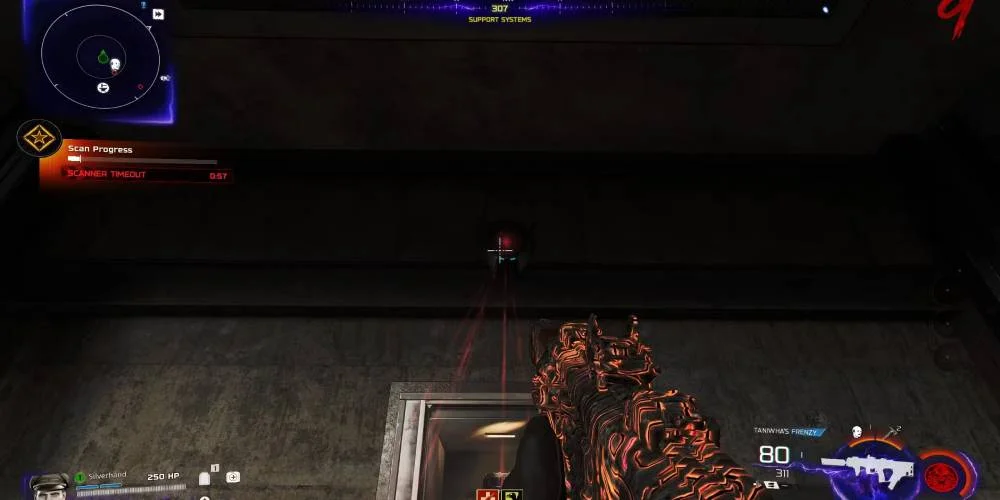
The Scanning Challenge
When you're ready, hit that green button. You've got 60 seconds to complete a scan, and this is easily the hardest solo section of the quest.
Here's what you're dealing with:
- Stand in the red circle in front of the canister
- Look up at the scanner camera and keep your eyes on that red light
- Stay in the circle and maintain eye contact the entire time
- Step out or look away? Progress stops
- Get hit by a zombie? Progress stops
- Zombies spawn infinitely during this
- Aether Shroud doesn't help with scan progress (though it keeps you alive)
- In co-op, whoever pressed the button must do the scan
Drop Cymbal Monkeys and Decoys to pull zombies away. Keep a fast-firing weapon equipped to blast any that get through. If you fail, you'll have to wait for the next round to try again.
Complete the scan and the glass opens. Pick up the Aether Barrel. Here's where movement gets annoying: you can't run while holding it, and jump pads will make you drop it. You need Ol' Tessie to move between locations.
Charge the Barrel at Each Power Station
You've got to take the barrel to all three Power Pump locations where you turned on power earlier. Go Ashwood, then Blackwater Lake, then Vandorn Farm. That order puts you at Vandorn for the next step.
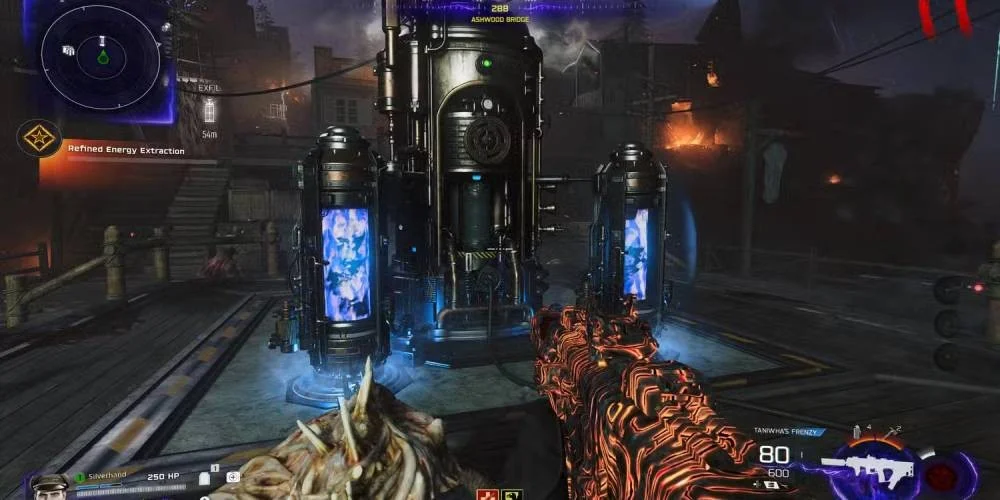
How Charging Works
At each pump:
- Drive Ol' Tessie there
- Place the barrel in the empty slot at the center
- Kill zombies nearby to fill the charge meter
- Wait for the progress bar to complete
- Pick up the barrel immediately
Run through all three stations: place barrel, kill zombies, grab barrel, rush to next location. After finishing at Vandorn Farm, take the barrel straight to the Barn.
Deliver the Barrel to the Box
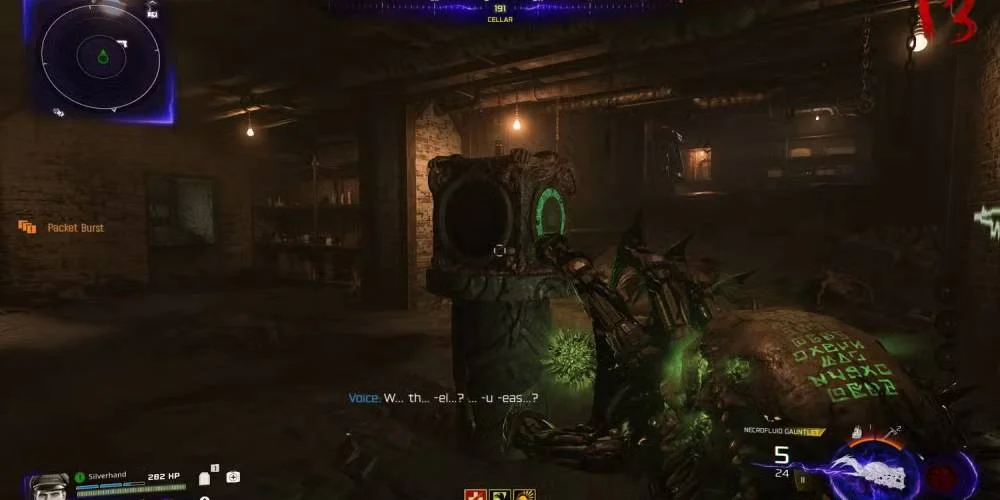
Inside Vandorn Farm's Barn, head down to the Cellar. There's a weird cube-shaped box down there. Interact with it while holding the charged barrel. The barrel goes into the box, which starts glowing. Time for a puzzle.
Find and Input the Symbols
Three symbols appear randomly on building roofs around Vandorn Farm. They're different every game, so you'll need to spot them fresh each time. They show up on:
- The Barn roof
- The Farmhouse roof
- The Silo roof
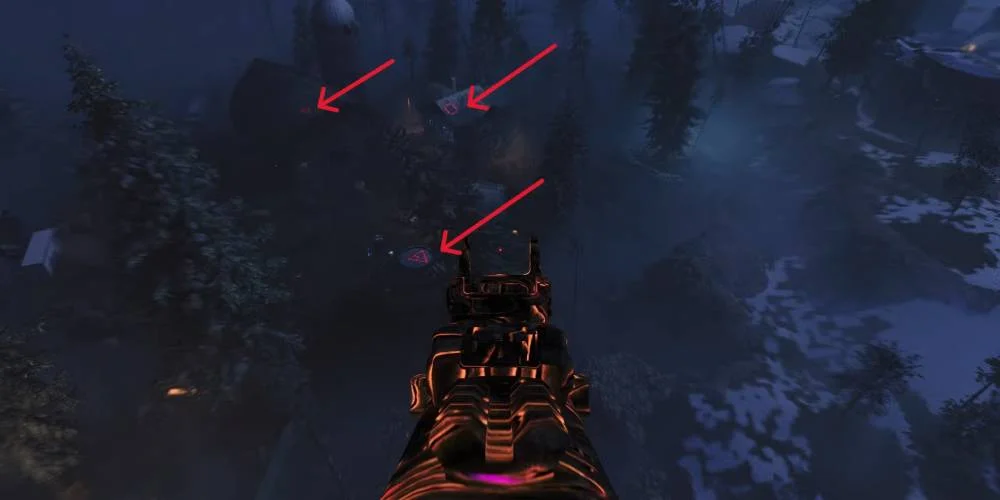
Finding Them Easily
Go to Janus Towers Plaza and find the Jump Pad that launches you toward Vandorn Farm. Hit that pad and watch carefully during your flight. The three red symbols are clearly visible on the roofs as you fly over. You can repeat this as many times as needed. Take a screenshot or memorize them.
Solving the Puzzle
Back in the Cellar, approach the box. Each side has a panel you can interact with, and each panel shows different symbols (no duplicates between panels).
Keep interacting with each side. The symbols cycle every time you click. Your job is to get all three roof symbols showing somewhere on the box. Order doesn't matter, just get all three visible.
Once all three symbols are displayed, go to the back of the box where there's an eye symbol. Interact with it. If you got the symbols right, the box opens and reveals the Necrofluid Gauntlet.
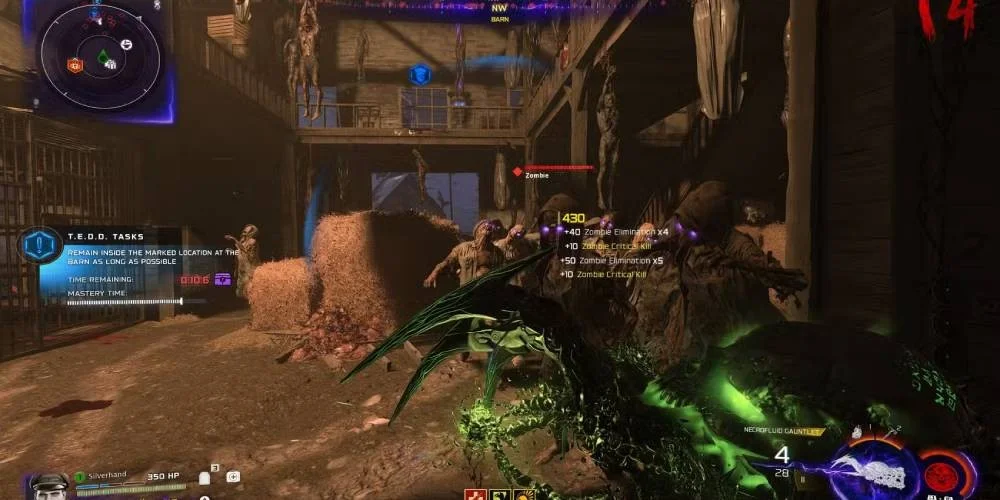
Clear the Lockdown
Grabbing the Necrofluid Gauntlet triggers an immediate lockdown. The area around the box glows green, purple-eyed zombies spawn, and green orbs appear throughout the Cellar.
To finish this:
- Shoot each green orb with the Necrofluid Gauntlet (R2/RT/Left-Click)
- Press your reload button (Square/X/R) to retract the shots
- The reload pulls the destroyed orb energy back to you
- Repeat for every orb in the room
Clear all the orbs and the lockdown ends. The Necrofluid Gauntlet is yours.
How the Necrofluid Gauntlet Works
This weapon has three attacks that give you both offense and defense:
Spike Shot (R2/RT/Left-Click)
Your primary fire. It deals solid damage to single targets and groups. The spikes stick in surfaces and enemies after you shoot, which matters for the next ability.
Spike Recall (Square/X/R)
Here's where this weapon gets ridiculous. Reloading calls back every spike you've fired. As they fly back to you, they pierce through zombies and overheal you. You can push your health past the normal cap to 350+ HP as long as you keep shooting and reloading. This defensive capability makes the weapon incredible for survival.
Claw Attack (R3/V)
Replaces your normal melee. Does decent damage but swings slower than a standard melee attack.
Upgrading the Weapon
You can Pack-a-Punch the Necrofluid Gauntlet at Ol' Tessie (unlocked after getting power at Ashwood). It upgrades from Tier 1 to Tier 3, boosting damage for higher rounds.
Pack-a-Punching improves performance for both the Easter egg quest and general survival.
Extra Notes
- Completing this quest gives you Zombies intel with lore about the map and story
- The Necrofluid Gauntlet is required for the main Easter egg, so you'll need to grab it if you're going for full completion
- In co-op, remember that specific players need to do certain steps. During the scan, whoever clicks the button must stand in the circle. Coordinate with your team on these parts