
Magik dishes out massive damage in Marvel Rivals Zombie Mode when you build her correctly. This guide covers the red path build through all difficulty tiers, including Nightmare 4.
Red vs Blue Build Path Overview
Magik has two build paths in Zombie Mode. The red path focuses on normal form Soulsword attacks, while the blue path uses her Darkchylde transformation.
Red Path (Recommended): Focuses on sustained Soulsword damage in normal form. At higher difficulties, this significantly outperforms the blue path.
Blue Path: Works fine for lower difficulties but falls noticeably behind in Nightmare 4, even after recent buffs.

Power Curve
Magik scales differently than other characters. She starts weak but snowballs hard. You'll probably place last on damage during the first five waves, and that's normal. Other characters will outperform you early. Once you hit 120 red cards, her damage explodes.
Ability Configuration
Magik has three ability slots with multiple upgrades unlocking at different levels. For red path, your ultimate choice matters most since you'll mainly stick to basic attacks.
Ultimate Ability Slot (Critical Choice)
Mortal Will (Level 5 - REQUIRED): Removes your Darkchylde transformation but gives permanent health and damage boosts. This is mandatory for red path. You can't use your ultimate, but the stat bonuses significantly boost your performance since you'll spend the entire match using basic attacks.
Don't use Darkchylde (default) or Demonic Will.
Shift Ability Slot (Stepping Discs)
Demonic Barrier (Level 25 - RECOMMENDED): Your Limbo Demons get way more health. This isn't for damage, it's for aggro control. Drop demons strategically to pull enemy attention, especially from those big Sentinel enemies with shields and clubs. When you drop a demon, enemies cluster around it, making them easier to hit with your primary attack.
Reaper's Revolve exists but isn't recommended for this build.
E Ability Slot (Dash)
Your dash choice doesn't matter much since you won't use it offensively in Nightmare 4. It's purely for repositioning.
Tactical Use: In lower difficulties, the dash works as an attack. In Nightmare 4, save it exclusively for repositioning. A solid technique: kite enemies into corners, back yourself against the wall to funnel them toward you, then dash straight up over their heads. While airborne, look down and keep attacking. Your sword fires projectiles downward without interrupting your DPS.
Critical Ability Usage Warning
Trait Point Distribution
Magik's traits split into two paths: red side (Normal Form Soulsword) and blue side (Darkchylde Form). Put all your points into red side only.
Red Side Traits (Normal Form Soulsword)
These traits improve your Soulsword in normal form, which is your entire damage output.
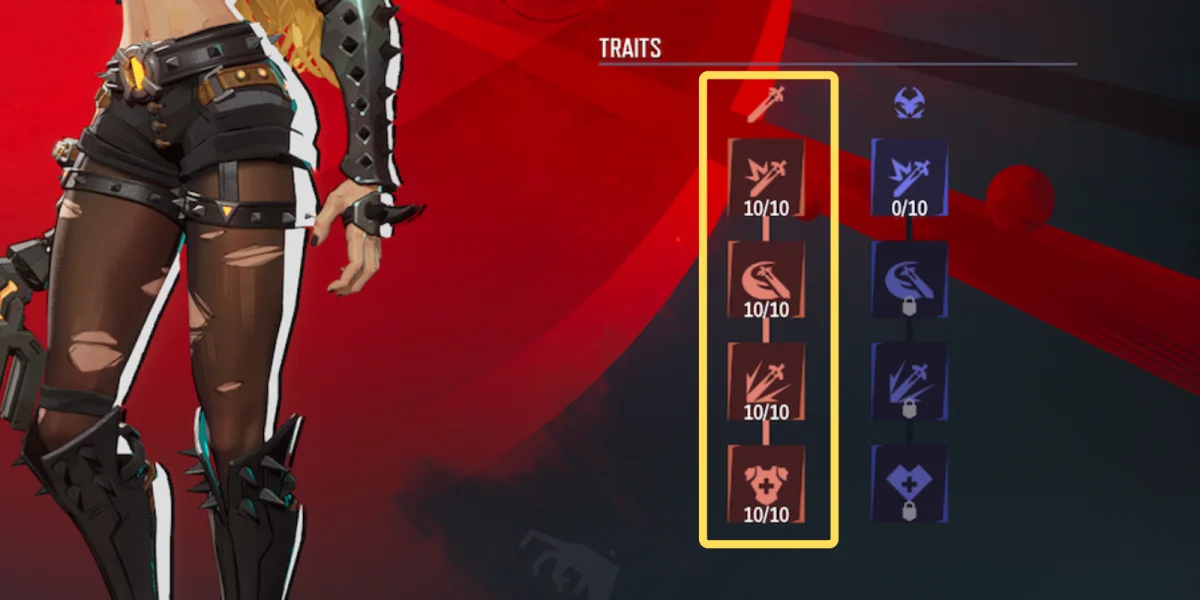
Damage, attack range, and attack speed directly multiply your effectiveness. The conversion trait turns damage dealt into temporary health for extra survivability.
Blue Side Traits (Darkchylde Form)
Don't spend points here. These only affect Darkchylde form, which you can't access with Mortal Will equipped.
Khonshu's Blessings: Shop Priority System
Getting the right blessings determines whether you breeze through content or struggle. This section breaks down every blessing category with specific purchase guidance.
Critical Universal Blessings (Always Buy)
These stack. Reducing all incoming damage is the most important defensive stat. This is one of two mandatory blessings for surviving Nightmare 4.
This is your primary healing source. With high damage output, 10% life steal (two cards) returns you to full health with every sword swing.
Full Moon (Moon Power Bonus)
Purchase Rule: Buy early (first 5-6 waves) or skip entirely
Why: Increases moon power gained, which funds all purchases. Get it early and it compounds, paying for itself. Hit wave 10 without seeing it? Skip it, too late for value
Timing: Early investment equals excellent value. Late investment wastes currency
Health Management Blessings
Vitality Boost: Buy only legendary rarity (450 health). In desperate situations approaching final waves, purple rarity (185 health) works
Target Health: Aim for 9,000-10,000 health by wave 20 for double Scarlet Witch
Why This Target: With proper damage reduction from Moonlight Protection and Devouring Sigil, this health pool works fine. You'll naturally get enough legendary Vitality Boosts without buying lower rarities
Damage Blessings to AVOID
Blessings to COMPLETELY IGNORE
Frost and Thunder Elemental Blessings: Never buy these. You have AOE crowd control built into Magik's kit through Soul Mark detonations. These don't provide enough value compared to investing in primary attack damage.
Restorative (Out of Combat Healing): Never buy this. You'll be in combat constantly, and Vampiric Vitality provides better in-combat healing. This wastes currency.

Red Blessings: Understanding the Damage Core
Red blessing mechanics are crucial. At 20, 60, and 120 red cards purchased, you unlock new trait tiers that fundamentally change how Magik works.
Red Card Tier System (Soul Mark Mechanics)
Soul Mark Evolution
Tier 1 (Default - Soul Mark Application): The Demonic Soulsword attack applies a Soul Mark to enemies. Initially, you must use an ability first (like the air slash right-click), then immediately left-click to trigger a Demonic Soulsword attack. This fires a piercing wave that marks everything it hits.
Soul Mark Effect: Marked enemies deal less damage to you and take more damage from you. This is free damage reduction that stacks with Moonlight Protection, particularly important for boss fights against Scarlet Witch and Namor.
Tier 2 (60 Red Cards - Wave Fragmentation): The piercing wave from Demonic Soulsword breaks apart and fans out, hitting multiple targets. This increases your marking efficiency.
Red Blessing Purchase Strategy
Phase 1 (0-120 Red Cards - BUY EVERYTHING): Buy every red blessing until you hit 120 total red cards. This unlocks Phantom Edge (Tier 3), which activates Magik's full potential.
Phase 2 (After 120 Red Cards - Selective Buying): Once at 120 cards, shift to selective purchasing based on the priority list below.
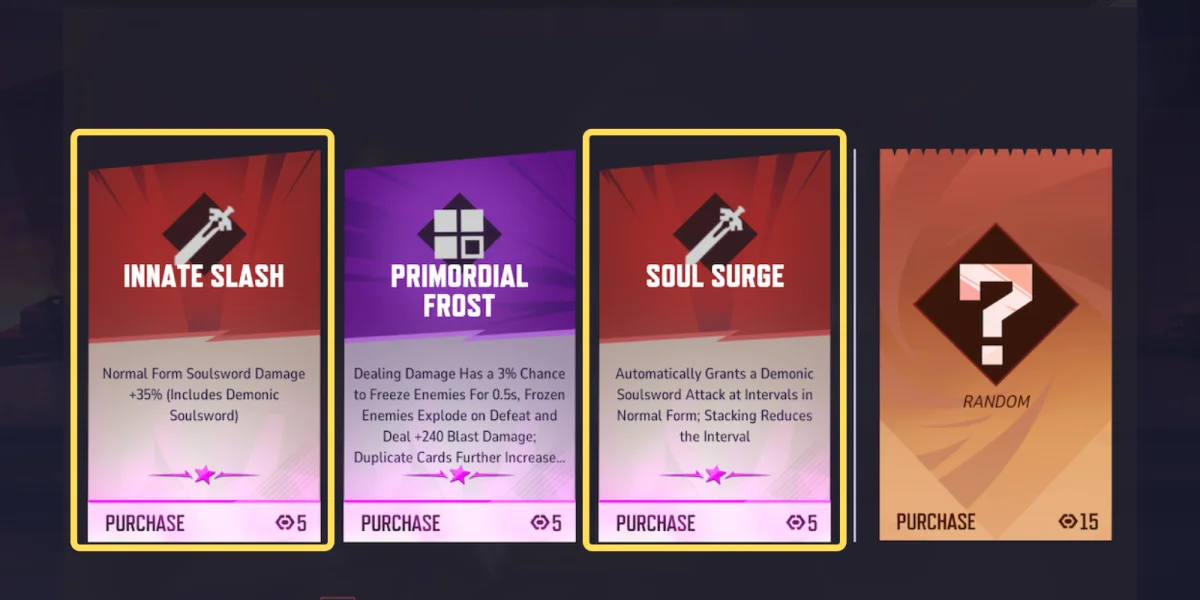
Specific Red Blessing Priority (After 120 Cards)
Removes the requirement to use abilities before getting Demonic Soulsword attacks. With multiple Soul Surge cards, roughly one out of every three normal attacks becomes a Demonic Soulsword that fires a piercing wave.
These are multiplicative damage bonuses that stack with each other. Three legendary Innate Slash cards in sequence create a massive damage spike.
Additional Priority Red Blessings
Arcane Sword Dance (BUY EVERY ONE): Increases attack speed. Attack speed directly translates to DPS. Faster attacks mean more Demonic Soulsword procs from Soul Surge, more Soul Mark detonations, and higher overall damage.
Devouring Sigil (BUY EVERY ONE): Increases both damage dealt to Soul Marked enemies and reduces damage received from them. Value: 3% reduced incoming damage per card. This is a two-for-one blessing providing both offense and defense.
Arcane Armor (BUY EVERY ONE): Increases bonus health and improves Limbo's Might conversion rate. Larger health pool plus better damage-to-temporary-health conversion. This offsets not buying lower-tier Vitality Boost cards.
Mark Detonation (BUY 3-4 COPIES, THEN STOP): Increases Soul Mark blast range by 50% and damage by 120%. After 3-4 copies, extra purchases provide less value than stacking more Innate Slash.
Soul Domain (BUY UNTIL 120 RED CARDS, THEN STOP): Increases normal form Soulsword attack range. By 120 red cards, your range is enough to hit most enemies on screen. Extra range creates a problem during double Scarlet Witch fights where you might accidentally damage both simultaneously.
Combat Strategies and Positioning
Good combat requires understanding positioning, target priorities, and hazard management.
Arena Positioning Rule: Avoid the Spawn Corner
Solution: Never stay in the spawn corner. Pass through if needed, but don't hold position there. Keep this area clear of enemies and hazards.
Target Priority: Acidic Zombies First
In Nightmare 4, acidic (green) zombies create the most dangerous situations. They leave damaging pools on the ground that persist.
Kill Strategy: Take out acidic zombies immediately when they spawn while they're grouped in tight clusters. Let them spread across the arena and the ground becomes covered in hazard zones, severely restricting movement and making combat significantly harder.
Wave Priority: Facing two simultaneous enemy waves, one with acidic zombies and one without? Go for the acidic wave completely before engaging the other.
Boss Fight Strategies
Namor Fight
Stand close to Namor (hug him). Attack through Namor to hit the squids surrounding him. Your area damage naturally hits both Namor and adds. This is the most efficient approach.
Scarlet Witch Fight (Single Target)
Focus damage on one Scarlet Witch at a time. Controlling which Scarlet Witch reaches final stand phase first makes the encounter more manageable.
Scarlet Witch Fight (Double Target - Advanced)
You can damage both Scarlet Witches simultaneously and have them merge into a "super Wanda" for final stand. This is significantly harder, especially solo. If playing solo, stick to single-target strategy.
The Problem: If you stacked too many Soul Domain cards (range), you can't avoid hitting both Scarlet Witches simultaneously. Solution: Position directly against one Scarlet Witch and aim downward at her feet. This causes excess range to hit the ground below rather than the second Scarlet Witch.

Movement and Dash Usage
Dash Direction: Always dash upward into the air, never downward through enemy crowds. Dashing through enemies risks collision with acidic zombies or exploding zombies, resulting in instant death.
Kiting Pattern: Back yourself into corners to create chokepoints, forcing enemies to funnel toward you. When overwhelmed, dash straight up, look down, and keep attacking while airborne.
Stepping Disc Follow-up: After every Stepping Disc use, immediately drop a Demon spawn (right-click). Never use the whirlwind attack (left-click). The demon draws aggro while you keep dealing damage.
Complete Build Summary: Quick Reference
Abilities Configuration
| Slot | Selection | Purpose |
|---|---|---|
| Ultimate | Mortal Will | Permanent bonuses, can't transform |
| Shift | Demonic Barrier | Demon health for aggro management |
| E (Dash) | Any option | Repositioning tool only |
Trait Distribution
Spend all points on red side (Normal Form Soulsword). Ignore blue side completely.
Blessing Priority Order
- Every Moonlight Protection (all rarities)
- Vampiric Vitality until 2-3 copies
- Every red blessing until 120 total red cards
- Soul Domain (after 120 red cards)
- Power Surge (except legendary)
- Frost or Thunder
- Restorative
- Any blue blessings for Darkchylde form
After 120 Red Cards (Selective Buying)
- Soul Surge (every one)
- Innate Slash (every one)
- Arcane Sword Dance (every one)
- Devouring Sigil (every one)
- Arcane Armor (every one)
- Mark Detonation (3-4 copies, then stop)
- Vitality Boost (legendary only, until 9,000-10,000 health)
- Full Moon (only if it appears in first 5-6 waves)
- Power Surge (legendary only if it appears)
Combat Checklist
- Avoid spawn corner (front-right)
- Prioritize acidic (green) zombies immediately
- Use dash for repositioning only (upward, not through enemies)
- Drop Demon spawns after Stepping Disc for aggro management
- Target Soul Marks on bosses for damage reduction
- Aim at Scarlet Witch's feet if fighting one at a time
Difficulty Expectations and Character Assessment
Magik performs well across all difficulty levels with the red path build. She ranks between A-tier and S-tier depending on group composition and player execution.
Solo Capability: Magik handles solo situations reasonably well once properly built. She requires life steal to sustain through waves.
Team Role: Works well in team compositions. Can carry matches when necessary, though clearing Nightmare 4 requires slightly more effort compared to Blade.
Player Preference: For players who enjoy melee combat characters, Magik provides a solid and rewarding experience. Her snowball scaling creates satisfying power growth throughout matches.
Comparison to Blade: Blade remains the most dominant character for Nightmare 4 content, visible on solo leaderboards. Magik requires more precise blessing management and slightly longer clear times but remains highly viable.