
Map Overview and Strategic Foundation
Empire Of Eternal Night: Midtown presents players with a haunting battlefield where Dracula's vampiric forces have plunged the city into perpetual darkness. This Convoy-type map transforms familiar Marvel locations including the Baxter Building and Grand Central Terminal into strategic warfare zones where heroes must navigate treacherous urban terrain while escorting their payload to victory.

Core Map Mechanics:
- Map Type: Convoy
- Objective Structure: Three distinct checkpoints
- Scoring System: One point awarded per checkpoint reached before time expiration
- Strategic Depth: Multiple route options for varied tactical approaches
The convoy follows a predetermined path through the darkened cityscape, but teams have numerous alternative routes available to outmaneuver opponents and create strategic advantages. Understanding these pathways is crucial for both offensive pushes and defensive positioning.
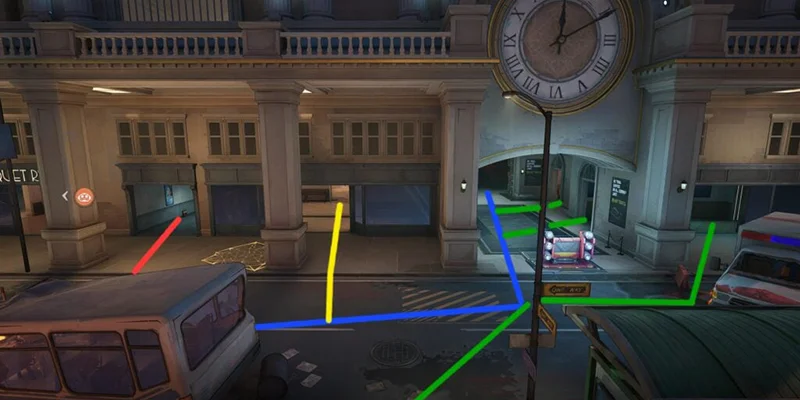
Baxter Building Departure
Primary Convoy Route and Spawn Positioning
The assault begins at the foundation of the iconic Baxter Building, where the convoy initiates its journey through the corrupted city streets. The payload follows a designated route that winds around urban infrastructure, but smart teams will utilize the numerous alternative pathways to gain tactical superiority.

Advanced Route Analysis
Upper Level Dominance Strategy
The elevated route system begins directly from the attacking team's spawn area. Players can access the upper floors of surrounding structures through the leftmost spawn door, which connects to a sky bridge leading into neighboring buildings. This elevated positioning offers several strategic advantages:
- Commanding sight lines over ground-level defenders
- Ability to displace enemies holding high-ground positions
- Alternative access points through building windows and external ramps
- Superior positioning for long-range engagements
Mid-Level Flanking Corridors
A highly effective intermediate route runs through building interiors parallel to the main convoy path. This pathway features numerous windows providing firing angles toward the payload while offering protection from direct enemy engagement. The reduced exposure compared to ground-level advancement makes this route particularly valuable for sustained pressure tactics.
Ground-Level Flanking Maneuvers
The lower floor of the central building complex provides exceptional flanking opportunities. This route enables teams to apply pressure from across the roadway and execute surprise attacks from behind enemy positions. As the convoy progresses deeper into this zone, this pathway becomes the most efficient respawn route for maintaining objective pressure.
Stealth Infiltration Route
An often-overlooked pathway cuts through building interiors, allowing for covert flanking maneuvers behind the objective rather than direct confrontation. This route includes strategically placed health restoration points both within the building and at the terminus near the bus stop area, making it valuable for sustained engagements.
Tactical Coordination Recommendations
Optimal team composition for this zone involves deploying one to two mobile assault specialists using either elevated or ground-level flanking routes to target enemy support personnel. This pressure forces opposing tank characters to retreat or risk losing their backline support. Once teams reach the midpoint of this section, assault specialists should transition to the stealth infiltration route for continued backline harassment without detection.
Subway Station Complex
Spawn-to-Objective Transition Strategies
Upon securing the first checkpoint, attacking teams respawn with immediate access to multiple entry points into the subway station complex. The convoy's path leads directly into the building's central area, creating opportunities for diverse tactical approaches.
Initial Building Penetration Routes
Secured Corridor Approach
A protected hallway provides direct access to the building's central area, offering a safe but potentially predictable advancement option. This route intersects with the convoy path approximately halfway through the building's interior.
Standard Advancement Path
The most commonly utilized route provides straightforward access to the convoy once it enters the building's central chamber. While predictable, this path offers reliable positioning for payload escort duties.
Cross-Flanking Strategy
A less conventional route enables teams to position themselves on the opposite side of the convoy from the standard approach. This pathway also provides access to additional route options deeper within the complex.
Central Complex Navigation
The building's central area features an interactive structural element that creates internal passages for player movement. Characters with vertical mobility can utilize the structure's upper surface for aerial reconnaissance and engagement opportunities.
Advanced Flanking Networks
Elevated Platform Strategy
An extended flanking route culminates in an elevated platform overlooking common defensive positions. This positioning provides significant tactical advantage but requires careful approach timing to avoid detection.
Concealed Infiltration Path
A more discreet flanking option avoids the obvious elevated platform, instead providing extended infiltration opportunities while maintaining stealth. This route offers multiple branching options for continued tactical flexibility.
Secondary Complex Areas
Platform Oversight Position
The elevated flanking route terminates at a platform position with direct oversight of convoy positioning. While highly effective, the obvious nature of this position requires careful timing and team coordination.
Discrete Alternative Routing
Extended flanking capabilities continue through less obvious pathways, providing sustained harassment opportunities without revealing team positions. These routes connect to additional room access points throughout the complex.
Interior Access Systems
Small staircase systems provide access to interior rooms connected to the extended flanking network. These areas offer protected movement and alternative positioning options for sustained engagements.
The subway station complex provides the most diverse routing options of any map section, making route familiarity essential for both offensive advancement and defensive counter-strategies.
Final Assault - Tower Delivery
Transition Phase Dynamics
After securing the second checkpoint, the convoy ascends a ramp system into the tower complex before returning to street-level advancement. This transition creates unique strategic opportunities as the battlefield shifts from interior combat to open urban warfare.
Primary Alternative Routes
Elevated Bypass Strategy
Rather than advancing through the narrow, heavily defended main corridor, teams can utilize an alternative elevated route that circumvents direct confrontation. This pathway features a raised platform area and terminates at a staircase system leading to street level, providing both tactical flexibility and reduced exposure to defensive crossfire.
Repurposed Defensive Corridors
The previous section's defensive pathways now serve as additional offensive routes, creating unexpected tactical options for attacking teams. These corridors provide alternative angles of approach that defenders may not anticipate.
Extended Infiltration Continuation
The concealed infiltration route from the previous section extends into this area, emerging near the attacking team's spawn doors for this phase. Mobile assault specialists can utilize this pathway to maintain pressure on defensive positions at the top of the ramp system.
Final Stretch Combat Zone
Urban Warfare Dynamics
The concluding portion of the convoy route features more limited flanking options compared to the subway complex, but includes crucial environmental elements that can be manipulated for tactical advantage.
Structural Manipulation Opportunities
A collapsed building forms a natural ramp system leading to elevated positions. Environmental restoration mechanics can transform this ramp into a walk-through passage, fundamentally altering the tactical landscape and providing new approach vectors.
Multi-Level Access Systems
Parallel pathways provide both elevated and street-level access options, culminating at interactive building structures. These buildings offer both interior passage opportunities and rooftop positioning for strategic oversight.
Terminal Engagement Strategies
Branching Tactical Options
The final approach features a three-pronged pathway system:
- Elevated Reconnaissance Route: Climbing access to building rooftops for superior sight lines and engagement angles
- Bypass Infiltration Path: Movement past the main objective route toward interactive building structures
- Direct Escort Return: Reconnection with the convoy for final payload advancement
Environmental Asset Utilization
Multiple interactive building structures throughout the terminal area provide both interior movement options and elevated positioning opportunities. Mastering these environmental assets significantly improves tactical flexibility during the crucial final phase.
Victory Condition Optimization
Since this area represents the convoy's terminal destination, thorough familiarity with building layouts and the three-pronged pathway system dramatically increases successful completion probability. Mobile assault specialists should prioritize the bypass infiltration route for sustained backline pressure while maintaining stealth positioning.
Advanced Strategic Considerations
Team Composition Optimization
Mobile Assault Specialists
Characters with high mobility excel at utilizing the complex routing systems throughout all three zones. These specialists should focus on backline harassment and creating space for payload advancement.
Tank Line Coordination
Understanding route diversity allows tank characters to position more aggressively, knowing that mobile teammates can apply pressure from multiple vectors simultaneously.
Support Network Positioning
The numerous alternative routes require support characters to maintain flexible positioning and awareness of multiple potential threat vectors.
Map-Specific Tactical Principles
Route Diversity Utilization
Never rely solely on primary pathways. The map's design rewards teams that master alternative routing and can execute multi-vector attacks.
Environmental Asset Integration
Interactive building structures and restoration mechanics create dynamic battlefield conditions. Teams must adapt their strategies based on current environmental states.
Phase-Specific Strategy Adaptation
Each zone requires different tactical approaches. Success depends on adapting team coordination and individual positioning to match the unique challenges of each phase.
Information Warfare
The complex routing systems mean that information control becomes crucial. Teams with superior map knowledge can execute surprising flanking maneuvers while maintaining awareness of enemy movement patterns.
Defensive Counter-Strategies
While this guide focuses on offensive advancement, defending teams can utilize these same routing systems for counter-flanking operations and position rotation. Understanding attacker route preferences enables more effective defensive positioning and resource allocation.
Conclusion
Empire Of Eternal Night: Midtown rewards teams that invest time in mastering its complex routing systems and environmental mechanics. The map's three distinct phases each require different tactical approaches, making adaptability and map knowledge crucial for consistent success. Teams that can effectively coordinate multi-vector attacks while maintaining objective focus will find themselves dominating this challenging battlefield in Dracula's eternal night.