
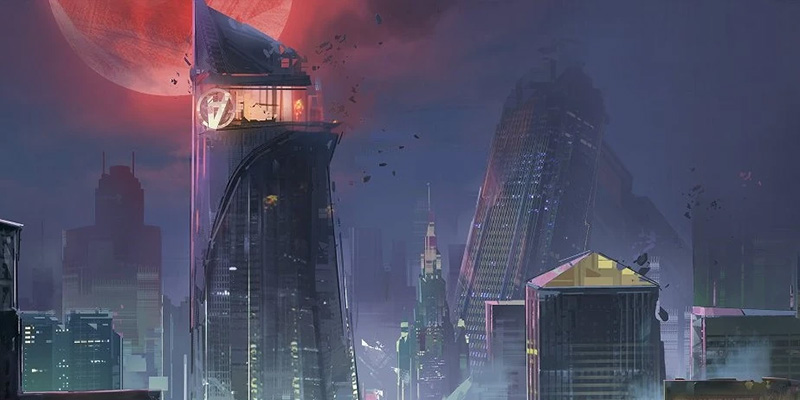
Welcome, heroes, to the darkened streets of Midtown Manhattan, a battleground transformed by Dracula's nefarious scheme into an Empire of Eternal Night. This guide will illuminate the path through the shadows, offering tactical breakdowns of its vampire-infested alleys, treacherous subway tunnels, the notorious Grand Central chokepoint, and the climactic push to Stark Tower. Prepare to master the darkness and lead the convoy to victory!
Welcome to the Eternal Night: Convoy Crash Course
Before diving into the specifics, understanding the lay of this blighted land and the fundamental rules of engagement is paramount.
Midtown's Dark Embrace: Map Overview
Midtown is a Convoy map where attacking teams must escort a payload through three distinct checkpoints, starting near the Baxter Building and culminating at the iconic Avengers Tower (Stark Tower). The entire cityscape is under the pall of an "Empire of Eternal Night," a direct consequence of Dracula's machinations, lending a unique, ominous atmosphere to landmarks like Grand Central Terminal. This thematic overlay isn't just for show; it hints at unique environmental factors and potential hazards tied to the vampire lord's growing influence. Knowing this is a three-checkpoint map helps teams manage their ultimate abilities and strategic pacing, as each successfully captured point shifts the battle lines and objectives.
The Convoy Commandments: General Success Strategies
Success in any Convoy mission, including Midtown, hinges on core principles. Teams must either escort the payload to its destination or prevent the opposing team from achieving this goal. This mode inherently blends open combat areas with tight, narrow pathways, a characteristic very evident in Midtown's design. Effective team coordination, a deep understanding of map-specific routes and chokepoints, and the wise use of terrain are non-negotiable.
A crucial mechanic to remember is that only a single defender needs to be near the payload to halt its progress. Conversely, if attackers are near an uncontested payload, they will receive a healing effect of 10 HP per second, incentivizing aggressive objective control.
Midtown's Menace: Is it Attacker-Favored?
There's a prevailing sentiment among players that Midtown can be "incredibly attacker favored". Defenders often report struggling due to perceived disadvantages in spawn distances relative to the objective and the sheer number of flanking routes available to the attacking team. Some players feel that unless the attacking team is decisively stopped at their initial spawn, holding subsequent points becomes exceedingly difficult.
An attacking team, by its very nature, holds the initiative to probe and exploit these numerous avenues. Defenders, on the other hand, are faced with the daunting task of reacting to and attempting to cover a multitude of potential threats. This can lead to defensive lines being stretched thin, outmaneuvered, or picked apart from unexpected directions, cultivating that "attacker-favored" experience. The defensive challenge on Midtown, therefore, becomes less about establishing an unbreakable static line and more about agile prediction, rapid interception, and controlling key junctions before attackers can leverage the map's complexity against them.
Fangs in the Dark: Vampire NPC Hazards
The "Empire of Eternal Night" is more than just a thematic backdrop; Dracula's vampiric legions are an active presence.
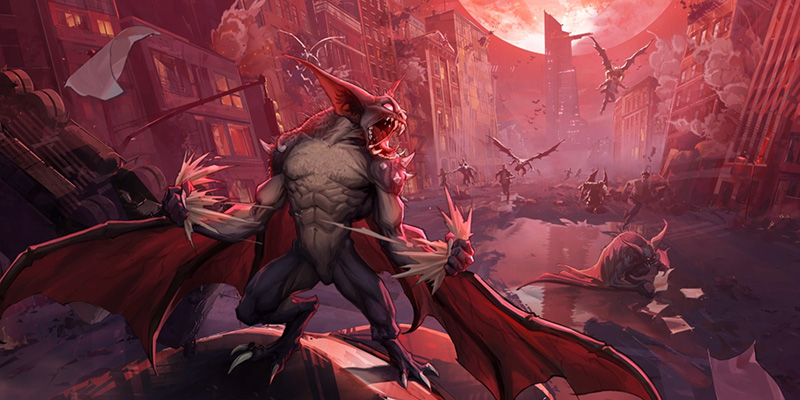
Dracula's Influence: The Threat on Midtown
The overarching narrative of this season centers on a vampire invasion of New York City, orchestrated by Dracula himself. The Midtown map, in particular, is described as having "evolving hazards and shifting landscapes as Dracula's power grows stronger". While specific gameplay details about vampire Non-Player Characters (NPCs) on Midtown are not extensively documented in available intel, the connection to the theme is undeniable. Furthermore, the related "Empire of Eternal Night: Central Park" map explicitly features "dynamic events such as sudden moonlight shifts and vampire ambushes". This makes it highly probable that Midtown incorporates, or is designed to incorporate, similar PvE elements that can disrupt the flow of battle. The lore also hints at internal conflicts among hero and villain factions regarding how to deal with the vampire threat, adding another layer to the unfolding chaos.
What to Expect: Potential Vampire NPC Encounters
Given the strong thematic ties and information from the connected Central Park map, players should be prepared for encounters with vampire NPCs. These could manifest as minor "trash mob" vampires spawning at predetermined locations, perhaps triggered by the convoy reaching certain points, or appearing as part of the "evolving hazards" mentioned earlier. They might serve as environmental dangers, distractions, or even minor objectives. The "Empire of Eternal Night" storyline involves Doctor Doom gifting Dracula Chronovium to stop the moon and create an eternal night, unleashing an army of vampires. This suggests a pervasive and active vampiric force.
Strategic Implications: Dealing with the Undead
The presence of vampire NPCs, even if they are not elite threats, introduces several strategic considerations.
- Prioritization: Teams will need to make split-second decisions on whether to engage encroaching NPCs or focus fire on enemy players. Ignoring NPCs could lead to chip damage or being overwhelmed at a critical moment, while focusing too much on them could leave players vulnerable to enemy hero attacks.
- Resource Management: Engaging NPCs will consume ammunition and potentially ability cooldowns. Conversely, some games feature NPCs that drop health packs or provide ultimate ability charge upon defeat, turning them into a contested resource.
- Awareness: Heightened situational awareness will be key. Players should listen for distinct audio cues or look for visual indicators that signal NPC spawns or incoming attacks.
The introduction of these PvE elements, however minor, can subtly shift the balance of hero viability on Midtown. Heroes possessing strong Area of Effect (AoE) damage capabilities may find themselves at an advantage, as they can clear groups of weaker NPCs more efficiently than heroes focused on single-target damage. This allows them to neutralize the PvE threat quickly and return their attention to the PvP battle. Similarly, heroes with inherent sustain (self-healing or damage mitigation) or those who can provide consistent team healing will be better equipped to handle the persistent chip damage that unexpected NPC attacks might inflict.
Furthermore, the description of "evolving hazards and shifting landscapes as Dracula's power grows stronger" suggests that the NPC threat may not be static throughout the match. It's conceivable that the intensity or type of vampire encounters could escalate as the convoy progresses towards its final destination. For instance, the areas around the later checkpoints, like Stark Tower, might feature more numerous or more resilient vampires. Such an escalation would make the late-game pushes even more chaotic and demanding. Teams that have effectively managed their resources, particularly their ultimate abilities for decisive team fights, and include heroes who scale well into prolonged engagements or can handle increased pressure, would likely find themselves better positioned to overcome these compounded challenges.
Down the Rabbit Hole: Mastering the Subway Tunnel Flanks
As the convoy rumbles towards its second checkpoint, it descends into the claustrophobic confines of the Subway Station. This section is a labyrinth of tight corridors and flanking routes.
Entering the Underbelly: Overview of the Subway Station
The second phase of the Midtown convoy mission sees the payload navigate into a subway station building. This area is defined by a prominent central structure and a multitude of branching paths that offer opportunities for both attackers and defenders. Many players find this second point to be "very claustrophobic," characterized by "long hallways". This sentiment is echoed by analyses describing the area as feeling "cramped". This tight, enclosed environment contrasts sharply with the longer sightlines typically found in the first and third sections of the map, demanding a shift in tactics.
Attacker's Playbook: Exploiting the Labyrinth
Attackers are presented with a wealth of flanking options to bypass defensive strongholds and apply pressure from multiple angles:
- Red Path: A "secluded hallway" that provides a direct cut towards the center of the building.
- Yellow Path: The "most common route" that players typically use to converge on the convoy once it's inside the station's core.
- Green Path: A "lesser-used path" allowing attackers to flank to the opposite side of the convoy. This route can also open up further branching paths deeper within the station.
- White Path: An elevated flanking route that positions attackers on a platform overlooking a "common defensive holding area," ideal for dislodging entrenched enemies.
- Pink Path: A more "discreet flank" that avoids the more obvious elevated platform accessed by the White Path. It offers extended flanking opportunities for a surprise attack.
- Teal Path: This route leads to a small staircase that grants access to a room, providing an underutilized avenue to attack the enemy's backline.
- Central Structure (Marked 'X'): This structure in the center of the subway area is interactable and can be opened to reveal an interior passage. Heroes with wall-climbing or flight abilities can also position themselves on top of this structure for an advantageous aerial view of the surrounding area.
These varied routes mean attackers are not forced into a single chokepoint and can coordinate multi-pronged assaults to overwhelm defenders.
Defender's Standpoint: Locking Down the Tunnels
Defenders cannot afford to simply cluster around the payload path in this section; proactive control of the numerous flank routes is essential. These same paths can be turned against attackers, with the Teal Path being specifically noted as a viable flanking option for defenders as well. Awareness of the "common defensive holding area" that the White Path overlooks is crucial, as defenders positioned there must be wary of attacks from above.
This high-information-load environment elevates the importance of heroes who can provide reconnaissance, such as those with abilities that reveal enemy positions. Knowing where an attack is developing allows the defensive team to shift resources and react preemptively. Similarly, heroes with high mobility become invaluable, as they can rapidly reposition to reinforce a threatened flank or to counter-flank attackers who have overextended. It's a dynamic game of cat and mouse, rather than a static hold.
The interactable central structure (marked 'X' in guides) presents its own unique tactical considerations. While opening it can provide a new pathway or sightline for the team that activates it, such an environmental change is a double-edged sword. The alteration of the battlefield geometry can inadvertently expose teammates who were relying on that structure for cover, or it might open up new firing angles for the opposing team. Characters known for "spammy" abilities, like Squirrel Girl, Moon Knight, or Hela, can also excel here, filling the narrow hallways with sustained damage.
Grand Central Gridlock: Breaking Through the Choke
Grand Central Terminal stands as a formidable barrier, often becoming a critical chokepoint where attacking momentum can shatter against a determined defense.
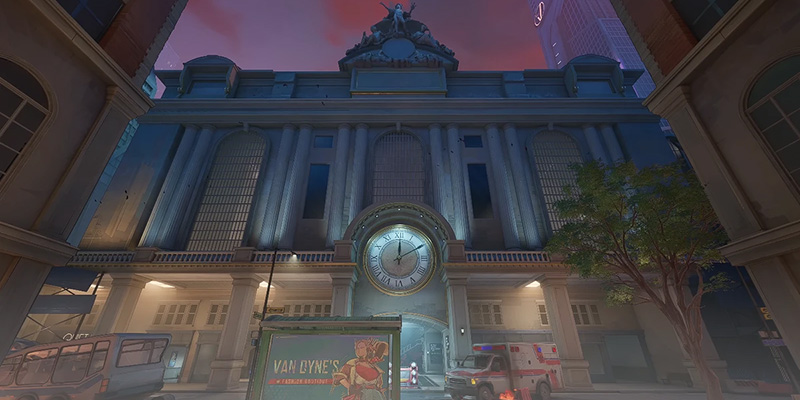
The Eye of the Storm: Identifying the Grand Central Chokepoint
Grand Central Terminal is not just an iconic landmark on the Midtown map; it's a strategic linchpin. The area is characterized by collapsed ground beneath the main station, revealing parts of the dilapidated subway system below. This detail is crucial, as it suggests the chokepoint isn't merely a straightforward corridor. Chokepoints, by definition, are areas with minimal maneuvering space, forcing teams to funnel through high-risk zones. The Grand Central area likely serves as a transition from the relatively more open streets of Section 1 into the tighter, more complex environment leading to or encompassing the Subway Station (Section 2).
The "collapsed ground beneath Grand Central Station" implies a significant vertical dimension to this chokepoint. Instead of a simple, flat corridor, teams might encounter a multi-level engagement zone. This could manifest as defenders positioned on the upper street level firing down onto a ramp or into a hole that leads towards the subway entrance, or attackers utilizing the collapsed sections as covered or alternative passages to bypass the most direct line of fire.
Attacking Strategy: Creating Momentum
To overcome the Grand Central gridlock, attackers must avoid direct, predictable assaults. Key strategies include:
- Flanking: Utilizing any available side paths or routes from Section 2 that might lead around or into the flanks of the Grand Central defensive setup.
- Dive Heroes: Employing heroes with dive capabilities to break through the frontline and disrupt defensive formations, targeting key defenders like Strategists.
- Environmental Destruction: Some chokepoints can be widened or bypassed by destroying specific environmental elements, if available in this area.
- Coordinated Ultimates: Saving and synchronizing powerful ultimate abilities for a decisive, overwhelming push can shatter even the most entrenched defense.
Defensive Strategy: Holding the Line
For defenders, Grand Central is a prime location to bleed the attacking team's resources and time. Effective defensive tactics include:
- Strategic Positioning: Many experienced teams opt to set up their defense slightly behind the immediate choke, rather than at the very edge of the attackers' likely approach, to create a deeper kill zone and avoid being easily picked off.
- High Ground Control: Leveraging any available high ground around Grand Central provides superior sightlines and defensive advantages.
- Area Denial: Using abilities that can control space, deny entry, or deliver consistent damage into the chokepoint can make it incredibly costly for attackers to advance.
- Flank Awareness: Constantly monitoring for attackers attempting to use side paths or destroy environmental cover to bypass the main choke.
Towering Takedown: The Stark Tower Final Push
The final leg of the journey takes the convoy to the doorstep of Avengers Tower (often referred to as Stark Tower), where the ultimate confrontation unfolds.
The Final Frontier: Approaching Avengers Tower
The convoy's ultimate destination is the gleaming Avengers Tower. This third and final section of the map generally features fewer dedicated flanking options compared to the labyrinthine subway of Section 2. The payload's path includes an ascent up a ramp into a structure before moving onto the road again. The immediate area around the final delivery point is characterized by several buildings that can be strategically utilized by both teams.
Attacker's Blueprint: Securing the Win
Attackers must leverage specific routes and mechanics to break the final defensive line:
- Green Path: This route offers a way to push the objective without funneling down a narrow, exposed hallway. It includes an elevated area and concludes at a staircase leading to street level.
- Yellow Path: Originally a defender route in Section 2, this now serves as an additional option for attackers. It's highlighted as an ideal path for divers, providing discreet access to the defending backline. This path further branches, offering options to climb to rooftops for vantage points, move past the objective route towards specific buildings, or reconnect with the convoy.
- Pink Path: If attackers maintained control of this discreet flank from the subway, it can be used to apply pressure on defenders positioned at the top of the ramp leading into this final section.
- Red Path (Fallen Building): A fallen building creates a natural ramp. A map interaction referred to as "building rewind," if triggered, can alter this path, potentially allowing players to walk through the base of the building instead of climbing over it.
- The Stark Sentinel: A unique achievement called "Factory Setting" involves attackers, after reaching the second checkpoint, interacting with a "Stark Sentinel" to trigger its "Reverse-Destruction" and then destroying it. This implies a significant environmental object or potential hazard/ally that must be dealt with.
Defender's Last Stand: Denying the Delivery
Defenders must make a desperate stand, utilizing the environment to their advantage:
- Building Utilization: The buildings near the final point offer crucial vantage points and cover.
- Sightlines and Chokes: The third point features long sightlines, which are advantageous for ranged heroes. However, it's also interspersed with corners that create natural chokepoints, leading to close-quarters engagements.
- Strategic Retreats and Holds: Defenders are advised to hold the first chokepoint of this section as long as possible and avoid conceding open ground too easily. However, the initial open path leading to the final area can be difficult to defend due to attacker spawn advantages. In such cases, it may be strategically sound to give up some initial space and consolidate the defense around the final two chokepoints closer to the delivery zone.
The combination of "long sightlines" and "corners acting as chokepoints" in this final section, especially when coupled with "fewer flanking options" compared to Section 2, suggests that the endgame on Midtown often transitions into a series of highly calculated, high-stakes engagements. Rather than a sprawling, chaotic brawl across multiple fronts, the battle may consolidate around these key geographical features. Teams will need to meticulously manage sightlines, use available cover with precision, and win critical duels that erupt around these corner chokes.
Masters of the Skyline: Top Hero Picks for Vertical Control
Midtown's urban environment, with its towering buildings and layered pathways, makes vertical control a significant tactical advantage.
The Importance of High Ground on Midtown
Midtown is replete with "multiple side rooms and high-ground paths," which are excellent for creating flanking opportunities and establishing off-angles to attack unsuspecting enemies. Utilizing high ground is a widely recommended tactic for gaining an advantage in engagements. However, the map's design means that the impact of verticality can vary between sections. The second checkpoint, within the subway, is often described as "claustrophobic," an area where "spammy characters excel". In these tighter confines, the benefits of extreme verticality might be somewhat diminished compared to direct damage output and area control at ground level. Conversely, the first and third sections of the map are noted for their "long sightlines", environments where heroes positioned on high ground can truly dominate, especially those with ranged capabilities.
Recommended Heroes for Vertical Dominance
A diverse roster of heroes possesses abilities that allow them to seize and control the high ground:
General recommendations for heroes with strong mobility and vertical capabilities include Spider-Man (Duelist), Hulk (Vanguard), Star-Lord (Duelist), Luna Snow (Strategist, via higher jumps from Smooth Skate), Iron Man (Duelist), Psylocke (Duelist), Storm (Duelist), Thor (Vanguard), Loki (Strategist, through strategic clone placement), Venom (Vanguard), and Rocket Raccoon (Strategist, with his jetpack).
For Midtown specifically, some analyses point towards Thor, Psylocke, and Loki as particularly effective. Psylocke is frequently highlighted for her exceptional mobility and precision, allowing her to scale buildings with ease, secure dominant elevated positions, and disrupt enemies along extended sightlines. One video analysis specifically praises Psylocke's strength on Midtown's third point due to the numerous flank angles and high-ground access points available to her. Heroes like Iron Man and Storm, with their flight capabilities, are well-suited for maps with many small buildings they can position above to rain down fire from unexpected angles. Hulk's "Incredible Leap" not only grants him access to high ground but can also be used to knock airborne enemies out of the sky. Spider-Man's unmatched web-swinging and wall-crawling abilities allow for rapid repositioning and attacks from unpredictable vectors.
Top Vertical Control Heroes for Midtown
| Hero | Role | Key Vertical Ability | Midtown Utility Notes |
|---|---|---|---|
| Psylocke | Duelist | Telekinetic Leap, Wall Climbing | Excels at accessing Point 1 & 3 sightlines, flanking onto Subway high platforms, strong for final push building control |
| Iron Man | Duelist | Flight (Repulsor Boots) | Dominates open areas of Point 1 & 3, provides aerial fire support, can quickly reposition to various rooftops |
| Spider-Man | Duelist | Web-Swing, Wall-Crawling | Unparalleled mobility for flanking, reaching unexpected angles across all sections, especially useful for dives |
| Storm | Duelist | Flight, Hover | Controls airspace, effective on Point 1 & 3 with ranged attacks from above, can bypass ground-level chokes |
| Thor | Vanguard | Mighty Flight | Can access high ground for powerful engages or to peel for teammates, good for initiating on elevated targets |
| Loki | Strategist | Decoy Projection | Can place healing/damaging clones on ledges for area denial/support, offering unique utility from vertical positions |
| Luna Snow | Strategist | Smooth Skate | Can reach moderate high ground for better positioning and escape, offering survivability and support angles |
| Hulk | Vanguard | Incredible Leap | Can access high ground for surprise attacks or to dislodge enemy snipers/fliers, area denial upon landing |
| Rocket Raccoon | Strategist | Jetpack | Allows quick repositioning to high ground for deploying healing turrets or escaping danger |
| Venom | Vanguard | Venom Swing | Can swing to rooftops and ledges for flanking maneuvers or to engage isolated targets |
The true effectiveness of a vertical hero on Midtown, however, extends beyond merely their ability to fly or climb. It's about how their entire kit—their weapons, abilities, and even ultimate—synergizes with holding an elevated position. For instance, a hero who can reach high ground but possesses only close-range attacks will naturally gain less offensive advantage from that height than a flying sniper or a hero with long-range projectiles. Loki's ability to place a healing or damaging clone on a hard-to-reach ledge offers a different kind of utility (strategic area control or support) compared to Iron Man using his aerial superiority to deliver direct fire with his repulsors. Spider-Man leverages verticality for ambushes and swift movement between engagement points, rather than static positional advantage.
Parting Shots: Conquering Midtown's Eternal Night
Mastering Midtown requires adapting to its unique challenges, from vampiric interference to its complex, multi-layered environments.
Key Takeaways Recap
- Vampire NPCs: Be aware of potential PvE threats. Prioritize targets wisely and consider heroes with AoE or sustain. The threat may escalate as the match progresses.
- Subway Tunnels (Checkpoint 2): This claustrophobic section demands control of numerous flank routes. Recon and high mobility are key for defenders; attackers should coordinate multi-pronged assaults.
- Grand Central Choke: This critical chokepoint often involves verticality due to collapsed ground. Defenders should aim for attrition and time-wasting; attackers need coordinated breaches.
- Stark Tower Final Push (Checkpoint 3): Fewer flanks mean more direct engagements. Understand key routes like the Yellow Path, deal with the Stark Sentinel, and win crucial duels around corner chokes.
- Vertical Control: Leverage high ground, especially on Points 1 and 3. Choose heroes whose entire kit synergizes with elevated positions for maximum impact.
Final Encouragement
The shadows of the Eternal Night are deep, and the streets of Midtown are treacherous. But armed with this knowledge, strategic thinking, and sharp reflexes, any hero can rise to the challenge. Coordinate with the team, exploit the map's intricacies, and push that convoy through the heart of Dracula's domain. May the light of victory pierce through the darkness!