
Map Overview and Tactical Foundation

The Tokyo 2099: Spider-Islands battlefield represents one of Marvel Rivals' most strategically complex convoy maps, set within the mystical Web of Life and Destiny. This aerial network of suspended islands floats high above the futuristic Tokyo cityscape, where the Master Weaver works tirelessly to repair temporal rifts while maintaining this extraordinary floating archipelago.
This ancient guardian has carefully preserved traditional Japanese architectural elements throughout the islands, including serene zen gardens and his personal sacred tenshu tower, where he safeguards a crucial fragment of the Web of Life and Destiny. The mission centers on assisting Spider-Zero return to action while navigating this intricate web of pathways and strategic positions.
Convoy Mechanics and Victory Conditions
Tokyo 2099: Spider-Islands operates as a Convoy-type battlefield where tactical coordination determines success. The attacking team must escort the Spider Convoy along its designated path while the defending team attempts to halt its progress through strategic positioning and superior firepower.
In casual matchmaking, teams experience only one round without role reversal, making every strategic decision critical. Competitive matches feature a dual-phase structure where both teams alternate between attacking and defending roles, with victory awarded to the team achieving the greatest convoy advancement distance.
The map's design heavily favors teams with comprehensive route knowledge, as multiple flanking opportunities and alternative pathways can dramatically shift momentum when properly executed. While this guide emphasizes offensive strategies, defensive teams can equally benefit from understanding these same routes for counter-flanking and positioning advantages.
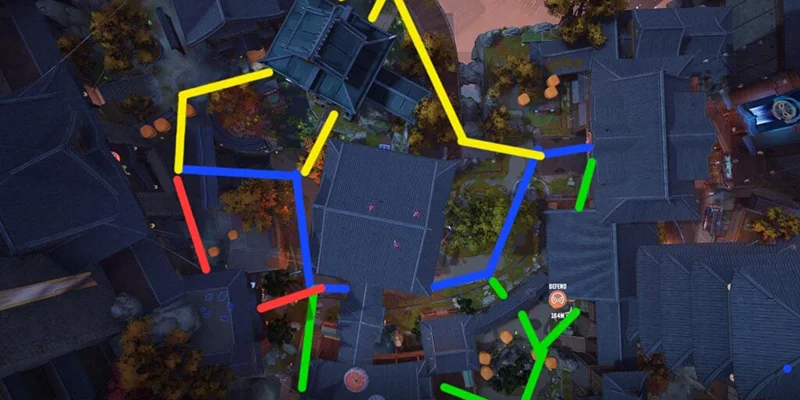
Spawn Area Tactical Analysis

Primary Route Network
The opening zone establishes the foundation for the entire convoy push, featuring four distinct pathway options that offer varying levels of risk and reward. Understanding these routes enables teams to coordinate multi-pronged advances while keeping defenders guessing about incoming pressure points.
Standard Convoy Path (Primary Blue Route)
The main thoroughfare follows the convoy's natural progression and serves as the backbone for most team compositions. This route provides the most direct engagement with defensive positions while offering consistent cover options and team coordination opportunities. The majority of players will utilize this pathway throughout the match, making it essential for establishing team cohesion and maintaining convoy momentum.
Upper Flanking Corridor (Yellow Route)
Accessible through the elevated spawn exit, this pathway provides crucial flanking opportunities through a protected corridor system. The route grants access to the rear areas behind the main convoy path, enabling teams to circumvent initial defensive setups positioned at the second major bend.
Characters with enhanced mobility can utilize a secondary branch within this route, crossing open terrain to reach a concealed pathway that significantly reduces travel time to key defensive positions. Defensive teams should monitor this route carefully, as it provides excellent counter-flanking opportunities against overextended attackers.
Side Building Infiltration (Red Route)
The least frequented spawn exit leads directly into the side building complex, offering rapid access to entrenched defensive positions without engaging primary chokepoints. This route excels at catching defensive teams off-guard, particularly when they concentrate too heavily on the main convoy path. Teams utilizing this approach can establish rear pressure points before defenders recognize the flanking threat.
Secondary Pressure Path (Green Route)
This branching pathway becomes increasingly valuable as the convoy approaches the zone's conclusion. The route enables teams to apply pressure against the primary convoy path from alternative angles, creating crossfire opportunities and forcing defenders to split their attention across multiple approach vectors.
Garden Area Strategic Breakdown
Environmental Advantages and Route Dynamics
The Garden zone presents unique environmental hazards and tactical opportunities that skilled teams can exploit for significant advantages. The area's design incorporates water hazards, elevated positions, and multiple pathway convergence points that create dynamic engagement scenarios.
Main Convoy Progression (Blue Route)
The primary pathway maintains its role as the central axis for team movement while introducing new tactical elements. The route features a prominent bridge structure that creates natural chokepoints and elevation advantages for defensive positioning.
A significant water hazard borders the left side of the pathway, presenting environmental elimination opportunities for characters with displacement abilities. Invisible Woman players can utilize this feature effectively, positioning themselves at zone initiation to push defenders into the water using her force displacement capabilities.
Underutilized Flanking Corridor (Green Route)
This rear pathway represents one of the map's most overlooked strategic advantages, providing excellent flanking potential during the initial convoy push. The route connects seamlessly with the attacking spawn area while offering discrete access to dual ground-level entry points.
During later push phases, teams can transition through the building complex to access the central bridge or redirect toward the primary convoy route. The pathway includes stairway access to elevated positions, enabling teams to continue flanking maneuvers or cross the central bridge to reach the core building structure.
Terminal Zone Flanking (Yellow Route)
This pathway becomes particularly valuable during the final convoy advancement phase, enabling teams to establish rear positions behind defensive setups positioned at the route's bend. Additionally, the route provides direct access toward the defenders' spawn area, creating opportunities for spawn camping and respawn interruption tactics.
Defensive Spawn Infiltration (Red Route)
This compact route cuts directly through the defenders' initial spawn chamber, providing immediate access to elevated platforms that typically guard the primary convoy route. The pathway also enables flanking attacks against the main route's terminal sections, catching defensive teams between convoy pressure and rear harassment.
Building Complex Tactical Overview

Multi-Level Navigation System
The final zone presents the map's most complex navigation challenges, requiring division into multiple sections for comprehensive analysis. The building's interior design creates numerous pathway intersections and elevation changes that reward teams with superior spatial awareness and coordination.
Primary Building Entry
Standard Convoy Advancement (Blue Route)
The main convoy path continues through the building complex while maintaining its role as the primary team coordination axis. This route provides consistent progression toward the objective while offering multiple branching opportunities for tactical flexibility.
Common Secondary Path (Green Route)
This frequently utilized alternative branches from the main convoy route while providing access to rear chamber systems. The pathway enables teams to establish flanking positions in small rooms behind primary defensive setups, creating additional tactical options for coordinated advances.
Jump Pad Elevation Route (Red Route)
This pathway leads to an elevated jump pad system and raised doorway access, providing direct transportation to the convoy's finish line and defenders' spawn area. The route excels for establishing rear pressure against defensive teams while offering defenders counter-flanking opportunities against Zone 3 attackers.
Aerial Flanking Position (Yellow Route)
Characters with sufficient aerial mobility can utilize this elevated flanking option, though it requires specific character abilities for access. Many defensive teams position themselves on this ledge for overwatch advantages, but attacking teams can use it to apply convoy pressure from unexpected angles or rapidly reach the finish line for objective securing.
Hidden Underground Path (Pink Route)
This concealed pathway travels beneath the main convoy route, emerging at the rear area where the Green route terminates. The entry point features a health kit placement, creating an excellent emergency retreat position for damaged team members. The route's concealed nature makes it valuable for surprise flanking maneuvers.
- Multiple vertical layers for positioning
- Hidden routes for surprise attacks
- Health kit placements for sustain
- Jump pad systems for rapid movement
- Complex navigation requires map knowledge
- Easy to get separated from team
- Multiple chokepoints favor defenders
- Aerial mobility characters have advantage
Terminal Building Areas
The building's second section continues the established route network while introducing new branching opportunities. All pathways from Section One maintain their connectivity and strategic value, with the Pink route offering an additional lateral branching option from either the main convoy path or Green route toward the objective's perimeter.
Defensive Spawn Strategic Positions
Understanding the defenders' spawn configuration provides crucial intelligence for both attacking and defending teams. Upon exiting the spawn chamber, defensive teams have access to multiple route options that connect to the established pathway network.
Three primary exit strategies enable defensive teams to vary their pressure points and avoid predictable positioning. The leftmost and central options connect to the Pink pathway network, while the rightmost exit links to the Red route system. This knowledge allows attacking teams to anticipate defensive rotations while helping defensive teams plan optimal positioning strategies.
The Red route connection from the defensive spawn provides particularly valuable flanking opportunities, enabling rapid repositioning to counter attacking team advances or establish crossfire positions with teammates holding other strategic locations.
Advanced Strategic Applications
Team Composition Synergies
Different route combinations favor specific character archetypes and team compositions. High-mobility characters excel at utilizing the Yellow and Red routes for rapid flanking, while characters with area denial abilities can control chokepoints along the Blue route effectively.
Timing and Coordination Principles
Successful convoy advancement requires precise timing between multiple route advances. Teams should coordinate their pathway selections to create simultaneous pressure points that overwhelm defensive positioning while maintaining enough flexibility to adapt to counter-strategies.
Map Control Philosophy
Understanding Tokyo 2099: Spider-Islands requires recognizing that map control extends beyond the immediate convoy vicinity. Teams that establish presence across multiple pathway networks can dictate engagement terms while maintaining strategic flexibility for objective completion.
"It seems that weaving the Multiverse back together is difficult for one spider, so let's get Spider-Zero back in action!"
This comprehensive understanding of the Tokyo 2099: Spider-Islands map provides the foundation for tactical excellence in Marvel Rivals convoy matches. Master these route networks and strategic principles to dominate both attacking and defending scenarios while helping Spider-Zero return to action in the Web of Life and Destiny.