The Vaal Temple is the central league mechanic of Path of Exile 2's 0.4 "Fate of the Vaal" update. It's a dungeon you build room by room across dozens of runs, growing more profitable the more effort you put into it. Unlike most ARPG content that resets after each session, your Temple persists and compounds over time, making it one of the most scalable reward systems in the game. This guide covers everything from your first beacon activation to the most advanced farming layouts the community has developed.
Unlocking the Vaal Temple
During the Campaign (Acts 1 Through 3)
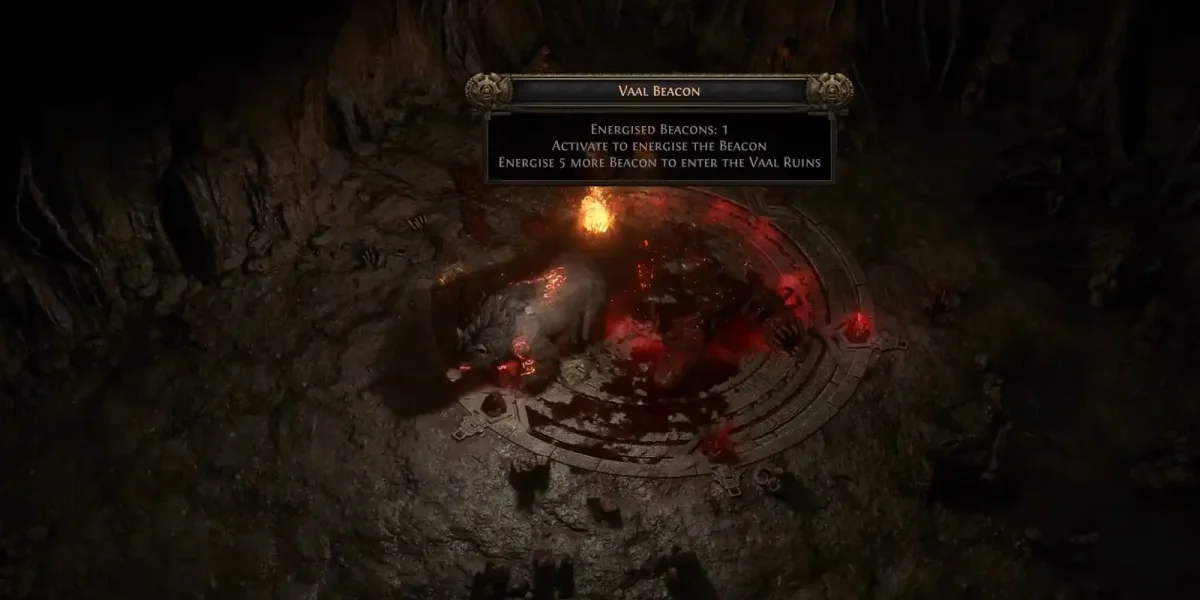
Vaal Beacons are scattered throughout every zone in Wraeclast. They appear as circular structures made of red stone with intricate markings, visible on the minimap as a triangular Vaal Temple icon.
Activating a beacon works like this:
- Find it on your minimap and approach it.
- Kill all the corrupted monsters nearby. These monsters are empowered by the beacon's corruption aura, and sometimes the beacon spawns additional waves after you clear the first group, similar to a Strongbox. Occasionally a Unique monster rises on top of the beacon itself, dropping a pile of loot when killed.
- Step directly onto the beacon after clearing it. It won't register as complete until you physically stand on it.
After activating six beacons, a portal to the Vaal Ruins opens, giving you access to the Temple. You can also reach it at any point through the Temple icon on any Waypoint.
During Acts 1 through 3 you're exploring a "Present" version of the Temple, which has limited room variety, reduced crafting rewards, and no Pinnacle Bosses.
Unlocking the Full Temple (Act 4+)
Once you reach Act 4, Doryani joins you and unlocks the ability to travel back in time, shifting the Temple into its "Past" form. The Past version is where the full range of rooms, bosses, and crafting rewards becomes available, and where all serious endgame farming takes place.
Accessing the Temple at Endgame
At endgame you can stack up to 10 Temple entries before actually clearing them, so you can farm Waystones continuously and run your Temples whenever it suits you.
Farming Energized Crystals
Every Temple run consumes Energized Crystals, gathered from Vaal Beacon encounters. Two farming methods are worth knowing:
- Campaign Method: Characters on the lower end of the level range can revisit campaign areas to find Crystal encounters. It works for characters within 10 levels of the area, with The Blackwood and Holten Estate in the Prelude being the recommended spots.
- Endgame Method: Tier 15 maps with six modifiers give you two Crystals per encounter, with a rare chance at three. You don't need to kill the map boss. Just enter, clear the beacon, grab the crystals, and leave. Aim to stockpile at least 40 before committing to a serious building session so you're not stuck farming crystals while trying to build.
- Light Radius Tip: Stacking the Light Radius stat on your gear expands how much terrain your minimap reveals, making beacon encounters much easier to spot at a distance. The cap is 150% increased Light Radius.
The Core Loop
Each time you access the Temple, the process follows the same pattern:
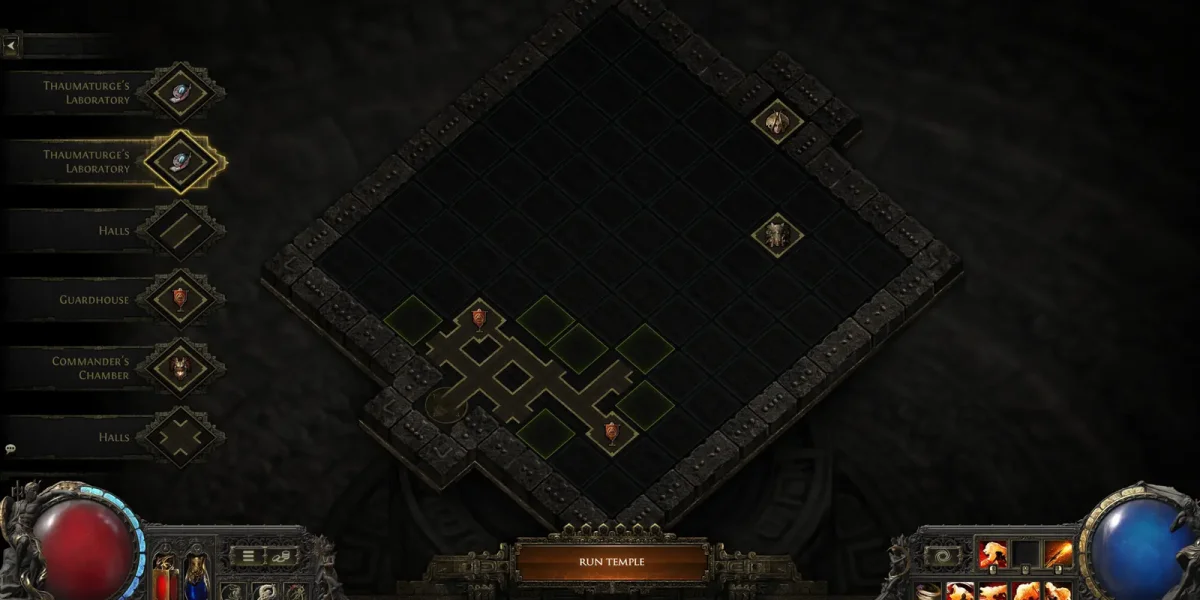
- Visit the Temple Console in the antechamber, which also has a Stash if you need it.
- Receive six Room Cards to place on the grid. These include Paths (corridors that connect rooms) and Named Rooms (which add monsters, rewards, or modifiers that affect the whole Temple).
- Place your cards to build out or extend your layout, connecting rooms with paths.
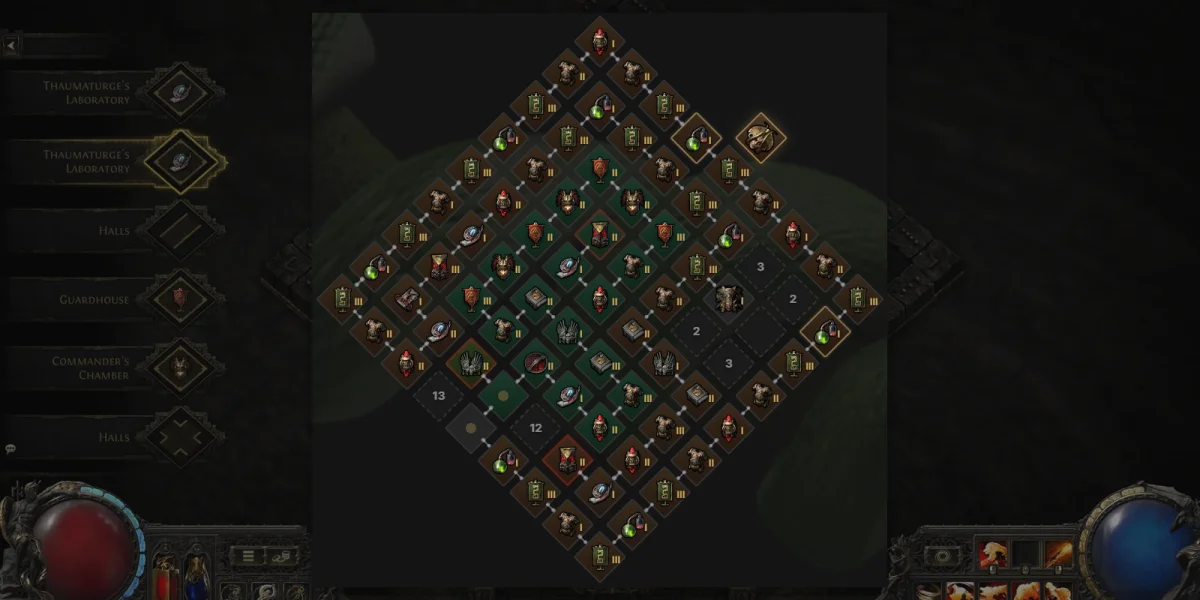
- Run the Temple, clearing rooms one by one. Once you enter a room you can't leave until all monsters are dead. Cleared rooms unlock any crafting benches inside.
- Close the Temple, triggering Decay (covered in the next section).
- Repeat. Each cycle adds more rooms, generates more medallions, and pushes your temple closer to its finished state.
Placing certain rooms next to each other triggers tier upgrades, increasing the power of that room's modifier. Valid upgrade positions glow bright green in the interface when you're placing rooms.
You can portal out of the Temple at any time, but you'll come back in at the entrance rather than where you left. The Temple has checkpoints that let you get back to deeper sections faster if you need to leave partway through a run.
Temple Decay
Closing the Temple after a run triggers Decay, a random process that permanently destroys several rooms. On a normal run this is just a few rooms. Fighting the Architect or Atziri causes a much larger Decay event, wiping out a large portion of your layout.
Decay never leaves rooms stranded. Any paths connected to surviving rooms are preserved, and Reward Rooms placed through Xipocado's Console aren't affected by Decay at all.
The Snake Method
Virtually every serious temple builder uses the same structural solution: the snake. This means connecting your rooms in a single, unbroken chain with no branching paths that reconnect. Decay always destroys from the end of the chain first and works backward. It can't skip to rooms in the middle unless your layout gives it two different ways to reach the end of the chain.
Placing a Juatalotli's Medallion (the lock medallion, dropped by Spy Master rooms) on the final room of your snake stops Decay from ever touching it. Since Decay always starts from that end, locking it locks the whole chain indefinitely. That's the foundation every serious temple build rests on.
The Medallion System
Medallions drop from the boss Rare or Unique monsters inside rooms. They work as extra Room Cards you can apply at the Temple Console before or after your run, so a good medallion drop can go in immediately before Decay has a chance to set you back.
Your default medallion storage is 3 slots, upgradeable to a maximum of 6. Getting to 6 slots should be one of your first goals.
| Medallion | Effect | Primary Source |
|---|---|---|
| Juatalotli's Medallion (Lock) | Prevents a room from decaying. Place on the final room of your snake to protect the entire chain. | Spy Master's Study (scales with tier) |
| Quipolatl's Medallion (Upgrade) | Upgrades any room by one tier without adjacency requirements. | Golem Works (Tier 3) |
| Uromoti's Medallion | Adds a bonus Room Card to your hand at the Console. | Commander's Chamber (scales with tier) |
| Zantipi's Medallion | Adds a random Waystone modifier to your Temple. Stack up to 8 at once for maximum efficiency. | Various rooms |
| Puhuarte's Medallion (Reroll) | Rerolls all Room Cards in your hand, excluding Reward Rooms. | Various rooms |
| Azcapa's Medallion | Raises Medallion Storage by +1, up to a cap of 6 slots. | The Architect (more common) |
| Xopec's Medallion | Increases Maximum Temple Crystal Capacity by +6, up to a cap of 60. | The Architect (more common) |
All Temple Rooms
Rooms Available in Both Present and Past
| Room | Effect |
|---|---|
| Commander's Chamber | Rare Monsters have 8% increased Effectiveness. Higher chance of Uromoti's Medallion, scaling with tier. May contain an equipment modification bench. |
| Sealed Vault | Contains many chests. Destructs once you open the central vault. |
| Bronzeworks | Chests have 8% more Item Rarity. Contains a Masterwork Forge to improve equipment quality. Tier 3 allows quality improvements above the normal 20% cap. |
| Workshop | Tier 3 has a high chance of dropping Quipolatl's Medallion. May contain an equipment modification bench. |
| Dynamo | Construct Monsters have 8% increased Effectiveness. May contain an equipment modification bench. |
| Thaumaturge's Laboratory | Contains a Gemcutting Workbench. Tier 3 enables further Corruption of Gems, opening the door to 6 socket or +1 level skill gems. |
| Guardhouse | 10% increased number of Monster Packs. May contain an equipment modification bench and a Regal Workbench. |
| Depot | Humanoid Monsters have 8% increased Effectiveness. Contains Equipment drops. |
Rooms Exclusive to the Past
| Room | Effect |
|---|---|
| Prosthetic Research | Monsters grant 5% increased Experience. |
| Chamber of Souls | 8% increased Rarity of Items dropped by Monsters. Tier 3 allows Soul Core Corruption. |
| Spymaster's Study | Higher chance of dropping Juatalotli's Medallion (lock), scaling with tier. Spy Master rooms can assassinate other Spy Masters to level up. |
| Surgeon's Ward | Unique Monsters have 5% increased Effectiveness. Tier 3 allows Limb Modification. |
| Corruption Chamber | Rare Monsters have an 8% chance to have an additional modifier. Contains a device to Corrupt items. Tier 3 allows further Corruption of Equipment. |
Xipocado's Console Exclusive Rooms
These rooms are unlocked after defeating the Architect and are not affected by Decay.
| Room | Effect |
|---|---|
| Ancient Reliquary Vault | Contains a Unique Item. Destructs once complete. |
| Kishara's Vault | Contains a large stash of Currency. Destructs once complete. |
| Jiquani's Vault | Contains a random High Level Rune. Destructs once complete. |
| Extraction Chamber | Contains a device to Salvage Socketed Augments by destroying the equipment. Destructs once complete. |
Best Rooms for Temple Farming
Spymaster's Study generates the lock medallions that hold your entire temple together. Without it producing Juatalotli's Medallions at a reliable rate, you can't sustain the chain. Every serious build needs these.
Golem Works drops Quipolatl's Medallions at Tier 3 and amplifies connected rooms. Patches that introduced diminishing returns on stacking single room types have made Golem Works much more valuable compared to earlier in the league.
Corruption Chamber at Tier 3 is one of the best crafting outputs in the game, letting you further corrupt gear that's already corrupted.
Sacrificial Chamber holds the Vaal Cultivation Orb and lets you modify Corrupted Vaal Uniques. Most players consider this the most valuable crafting room you can get.
Thaumaturge's Laboratory becomes a gem crafting powerhouse at Tier 3, enabling deeper Gem Corruption with a chance at 6 socket or +1 level skill gems.
Alchemy Lab adds item rarity, which directly means better loot. Also a strong target for Quipolatl's Medallion upgrades for the same reason.
The Snake Strategy
Every functional temple farming approach shares the same structural backbone: the snake. Rooms connect in a single unbroken chain with no branching paths that loop back into each other. Decay destroys from the end first and works backward. Locking that final room stops it cold, protecting everything behind it. As you extend the snake over more runs, the stacked room modifiers multiply together. Players have reached 1,900% increased effectiveness with thousands of percent item quantity and rarity stacked across a single run.
Room composition inside the snake has shifted though. Pure Spy Master stacking suffers from diminishing returns on repeated room types, so the current approach treats Golem Works and Commanders as the primary value rooms. Spy Masters stay in the chain for lock generation rather than as the sole farming engine.
The most common room rotations for the main snake chain are:
- Armory > Garrison > Spymaster > Garrison > Armory - Legacy, still functional
- Armory > Commander > Garrison > Commander > Garrison > Armory - Current recommended
- Armory > Alchemy Lab > Thaumaturge > Alchemy Lab > Armory - Crafting variant
Spy Master Mechanics
Spy Master rooms are what make temple farming with long chains possible. Even in the current meta built around Golems, you still need them. At Tier 3 they produce Juatalotli's Medallions consistently, which keeps the chain protected as you extend it. Once you have several Tier 3 Spy Masters in your chain, the temple generates enough locks per run to protect itself going forward without careful planning every cycle.
How to Level Up Spy Masters
Quipolatl's Medallion - Apply one directly to a Spy Master room to raise its tier by one. Straightforward and reliable. Prioritize this method whenever you have them available.
Spy Master Assassination - This is the main progression method during the early build phase. When two Spy Master rooms exist in the temple and one is unprotected, the protected Spy Master consumes the unprotected one and gains a tier level. To use this deliberately:
- Place an extra Spy Master somewhere in the temple's center, completely detached from your main chain with no adjacent protective rooms.
- Run the Temple normally, clearing your main chain Spy Master first.
- When Decay triggers, it consumes the unprotected central Spy Master, and one of your chain Spy Masters upgrades.
If you have extra locks available, you can place one on the unprotected central Spy Master right before closing the Temple. This keeps the room alive while still triggering the tier upgrade on your chain Spy Master, which saves you a lock while getting the level up.
The Snowball Effect
Early on, Spy Masters are low tier and produce few locks, making the initial build phase slow and demanding. Every placement needs careful thought. Once they start leveling up and locks become plentiful, everything accelerates. By the time you have multiple Tier 3 Spy Masters running, you're generating enough locks each run to protect the chain almost automatically.
Temple Layout Guides
The following layouts cover the full range from beginner-friendly to min-max endgame setups. Each is detailed in an accordion below.
Best for: Most players. This aligns with where the current meta sits.
Diminishing returns on repeated room types shifted the meta away from stacking many Spy Masters. Golem Works rooms amplify the effectiveness of Garrisons, Commanders, Armories, Smithies, and Legion Barracks. Running Commanders throughout the chain raises monster effectiveness and loot output further. Mixing room types sidesteps the diminishing return problem that hurts setups built around a single room.
Setup:
- Place a Golem Works at the start of your main chain.
- Place a second Golem Works in the middle.
- Place a third Golem Works near the end, where you can lock it.
- Fill remaining chain slots with connecting rooms. Armories, Garrisons, and Commanders all work well.
- Dump anything that doesn't fit the chain into the center as filler. These rooms absorb Decay so your main chain doesn't have to.
Building Order:
- Start with a Generator room. It buffs Golem Works and becomes especially impactful given the current room scaling rules.
- Add an Armory, Alchemy Lab, and Legion Barracks in sequence.
- Continue placing rooms as your draw allows.
- Anything that doesn't fit the main chain goes in the center.
Lock the final room of your chain after every single run without exception.
Best for: Players building on an existing temple built around Spy Masters, or those who prefer the classic approach. If you're starting fresh, the Triple Golem layout above is the better starting point.
Step 1 - Get to Six Medallion Slots: Before anything else, defeat the Architect repeatedly. He drops Azcapa's Medallions that raise your Medallion Storage. Six slots makes the rest of the build much simpler to manage. You can reposition the Architect near the entrance or the opposite side of the temple to make repeated runs faster.
Step 2 - Establish the Main Chain: Start placing rooms in the Garrison > Armory > Spy Master rotation, snaking around the perimeter of the temple. Build outward from the entrance before curving back inward to maximize chain length. Lock the final room after every run.
Step 3 - Protect Early Spy Masters Without Locks: Locks are scarce early on. Two techniques help you protect rooms without spending them. Branch blocking means connecting extra rooms off the side of your chain at the point you want to protect - Decay must destroy those branch rooms first before reaching your key rooms. Double protection means placing a duplicate Garrison or Armory directly adjacent to a vulnerable room, so Decay needs to eat through two rooms before reaching the one you care about. Just make sure those branches don't loop back and connect to another part of the chain.
Step 4 - Use the Center as Bait: Fill the center with random rooms that don't fit your chain. Golem Works are particularly useful here since they produce Quipolatl's Medallions regardless of where they sit.
Step 5 - Level Up Spy Masters: Place unprotected Spy Masters in the center, clear your chain Spy Masters first each run, and let Decay consume the unprotected ones to push your chain versions up a tier.
Step 6 - Start the Second Chain: Don't open a second chain until your main chain is nearly complete and you're consistently pulling two or more locks per run. That usually means six or seven Tier 3 Spy Masters in place. The second chain needs zero connection to the first. No shared paths, no shared rooms. Any connection between them creates a loop, gives Decay two entry points, and can take down both chains at once. Leave Spy Masters out of the second chain too.
Step 7 - Conserve Your Medallions: Hold Garrison and Armory medallions until a Spy Master appears in your room draw. Once you place the Spy Master, immediately use those medallions to build away from it in both directions. The further the chain extends past a Spy Master, the more buffer it has, and the fewer locks you need to spend protecting it.
Best for: Experienced players who've completed several successful temples and are comfortable with the risk of losing progress.
Named after the community members who developed it, the Russian Tech achieves room combinations that standard snake placement rules don't allow.
Core Concept: You place a "bridge" of temporary rooms, lock the ones you want to keep, and let the unwanted bridge rooms decay away. You end up with room pairings that couldn't be achieved through direct placement, such as Golem Works sitting next to Smithies without intermediate filler, or Corruption Chambers combined with Thaumaturge rooms in configurations the normal rules don't allow.
Generator First Approach: This layout starts with a Generator room. It multiplies Golem Works output, which in turn multiplies Commander and Armory outputs. Room composition leans heavily into Golems and Commanders rather than Spy Masters, which avoids the diminishing returns problem entirely.
Practical Starting Point:
- Build a perimeter chain of alternating Garrisons, Armories, and Spy Masters.
- Add Legion Barracks throughout to raise medallion drop rates.
- Include Golem Works and Commanders for the monster effectiveness gains.
- Lock the chain end every run.
- Use the center for bait and medallion farming until you're ready to commit to the more complex room deletions.
Risk Warning: One wrong bridge placement that accidentally connects to your main chain, or failing to lock rooms before Decay fires, can destroy key rooms or force a full restart. Don't attempt this until you've completed several successful standard snake temples.
Best for: Players willing to invest serious time for the highest possible loot output. A completed example yielded 59 divine orbs, a Headhunter, and additional valuable drops on the very first run, from a temple with a relatively low area rarity number.
Layout Overview: Two distinct chains are built around a centrally positioned Architect.
- Chain 1 (Spy Master into Champion Conversion): A Spy Master chain running along one edge of the temple, transitioning into a Champion chain near its end.
- Chain 2 (Golem Works into Corruption Chamber): A Golem Works line running separately, merging into a Corruption Chamber path. Both chains end with a Corruption Chamber, which is the preferred finishing room for this layout.
Architect Placement: The Architect sits in the center with exactly three empty slots adjacent to it, connected by a single path. More than three connected empty rooms increases the risk of bricking the setup.
Advanced Room Linking: Sacrificial Chamber rooms break the normal ABA rotation restrictions, and specific Room Cards combined with Sacrificial Cards delete unwanted rooms at precise moments. That's what lets you pair Corruption Chambers with Thaumaturge rooms (not normally connectable) and run Golem Works next to Smithies with minimal filler between them.
Medallion and Lock Management: Don't stress about locks in the early phases before Spy Master rooms are available. As the build develops, save Spy Master medallions for corner transitions and tricky turning points. Use Garrison medallions or Sacrificial Cards to clear Armory rooms when they're in the way. The most demanding moments require accumulating multiple locks at once (known as triple lock situations), so build up your resources before trying those sections.
Finishing and Results: Once the major chains are secure and the Sacrificial Chamber closes the final loop, lock out the remaining rooms to complete the layout. Expect multiple cycles of room additions and deletions throughout. A fully built version of this temple produces more loot per run than anything else currently available.
Key Strategies & Common Mistakes
Protecting Spy Masters Above Everything Else
In the early build phase, every decision should feed into one goal: keeping your Spy Masters alive. Practically, this means holding Garrison and Armory medallions until a Spy Master appears in your room draw, then playing them immediately on both sides of it. Don't place medallion rooms carelessly without checking whether a Spy Master is coming soon. Only use Puhuarte's Medallion after a Spy Master is already placed and you need a Garrison or Armory to protect it. Using it before locking down a Spy Master wastes the reroll. Once your Spy Masters are all Tier 3 and locks are flowing, you can be more relaxed about this.
Using Puhuarte's Medallion
Puhuarte's Medallion rerolls every Room Card in your hand. Save it for situations where a Spy Master is placed and exposed, not as a general fishing tool. Once locks are flowing consistently, timing becomes much less critical.
Golem Works in the Center
Even as filler, Golem Works rooms in the center of the temple still generate Quipolatl's Medallions. Getting a tier upgrade on a Spy Master and immediately pushing it to Tier 3 via the assassination method accelerates the whole snowball. Put them to use rather than leaving them idle.
Creating Checkpoints
If you have an extra Garrison or room that doesn't fit cleanly into the main chain, place it as a side branch at a midpoint. This creates a checkpoint. On runs where you pick up more medallions than your 6 slots hold, portal out, manage your inventory, return to that checkpoint, collect the remaining medallions, and then close. No medallions go to waste.
Common Mistakes
- Creating a loop. Connecting two separate parts of your chain gives Decay two paths to the end room and lets it destroy rooms out of sequence. This is the most common way players wreck a temple they've spent hours building.
- Approaching unprotected Spy Masters before clearing chain Spy Masters. Always clear your chain Spy Masters first. Getting the order backwards causes the assassination to run in reverse, and you lose your chain Spy Master instead of the expendable one.
- Starting a second chain too early. If your main chain isn't producing two or more locks per run, you don't have the resources to protect a second chain. Rushing this step can cost you both chains at once.
- Spending Quipolatl's Medallions on the wrong rooms. These are rare early on. Every one spent on a Guardhouse or Depot is one not spent on a Spy Master or Alchemy Lab.
Bosses: The Architect and Atziri
The Royal Architect (Xipocado)
The Architect's Chamber is always placed in your Temple from the start. Unlike regular rooms, it can connect to any adjacent room rather than just Paths, so you can reach it without needing a dedicated path route built toward it.
Defeating the Architect in a level 75 or higher Temple grants a Medallion that places the Royal Access Chamber, which you need to open the door to Atziri. He also drops Azcapa's Medallions (storage capacity) and Xopec's Medallions (crystal capacity).
After the fight and closing the Temple, a large Decay event fires. Following that, interacting with the Temple Console opens Xipocado's Console, letting you place exclusive Reward Rooms (Reliquary Vault, Kishara's Vault, Jiquani's Vault, Extraction Chamber) in unconnected tiles that you then build paths toward in future runs.
Most players skip the Architect's room during active building phases and only engage once they're ready to move into the Reward Room phase. Fighting him early just costs you a large chunk of your layout for minimal gain.
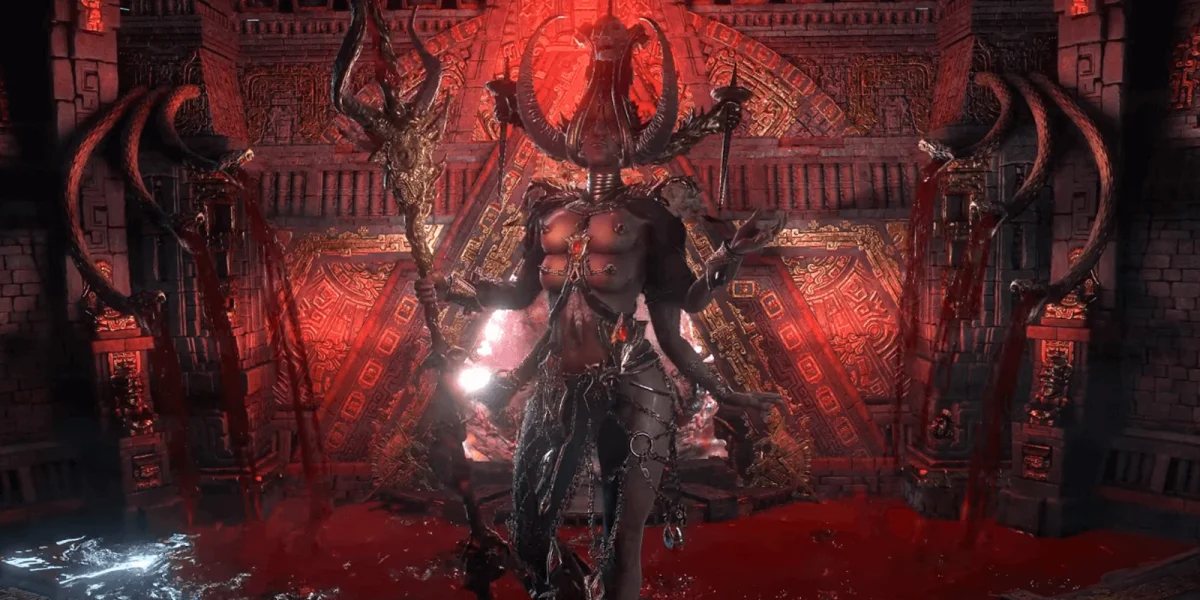
Queen Atziri (the Red Queen)
Atziri's Chamber sits at the far end of the Temple from the entrance. To reach her, you need both the Royal Access Chamber and Atziri's Chamber connected in the Temple simultaneously. The Royal Access Chamber then unlocks the door.
Defeating Atziri triggers the biggest Decay event in the Temple, destroying a large portion of your layout. After this you'll need to defeat the Architect again to regain access to her.
Atziri drops a Medallion on death that opens Atziri's Vault. Inside you'll find the best crafting currency from Tier 3 rooms throughout the Temple, plus the exclusive Vaal Siphoner currency item. The Vaal Siphoner can be used on a corrupted rare Ring or Amulet. It attaches a kill threshold to the item, and once that threshold is reached, a random modifier is removed while the values of all remaining modifiers increase.
Resetting the Temple
If your layout is in bad shape and you want a clean start, the fastest approach is to build a direct path to the Architect and fight him repeatedly. Each fight triggers a major Decay event that clears most placed rooms. After resetting, don't immediately start placing rooms again. Clear out what's left first, then build fresh. Starting a new character also resets Temple progress entirely.
Tier 3 Crafting Rewards
Several rooms unlock powerful crafting devices at Tier 3. Each device can be itemized into a currency orb you take with you, so you don't need to haul gear into the Temple to use the crafting. These currency orbs are also fully tradeable on the Currency Exchange.
Lets you corrupt an item a second time after it's already been corrupted, making it Twice Corrupted. There's a 50% chance the item is destroyed outright. A successful double corruption applies two corruption outcomes instead of one, which can produce item combinations that aren't achievable any other way.
Lets you replace one of your limbs with a mechanical prosthetic. Each replacement rolls random passive modifiers and disappears on death. As long as you survive, these work as permanent passive boosts, and replacing all four limbs stacks four separate sets of bonuses.
Modifies corrupted Unique items in one of two ways depending on the item type. Standard Uniques are replaced with a random corrupted Unique of the same Item Class. Vaal Uniques have up to two modifiers replaced with random modifiers from a pool that includes standard modifiers, modifiers specific to this method, and modifiers that can only appear on particular Unique items. Results are completely random - you can end up with something extraordinary or something unusable depending on which modifiers get swapped in and out.
Lets you corrupt a Tablet. Corrupted Tablets can gain additional uses or additional modifiers, making it possible to run Tablets with more than four modifiers at once.
Destroys a piece of equipment to recover the Socketable Augments inside it.
Converts Soul Cores into new types. The full range of possible outcomes isn't fully documented yet.
Temple Planners
Planning your layout before committing to it in game prevents a lot of painful mistakes. These two tools built by the community let you test room placements, verify no loops exist, and experiment with different chain configurations without risking your actual temple.
Atziri Temple Planner by Sulo
A drag and drop interface for visualizing your full temple layout available at sulo.tools. It's simple, fast, and responsive. Use it for sketching chains, testing room rotations, and catching loops before your actual run.
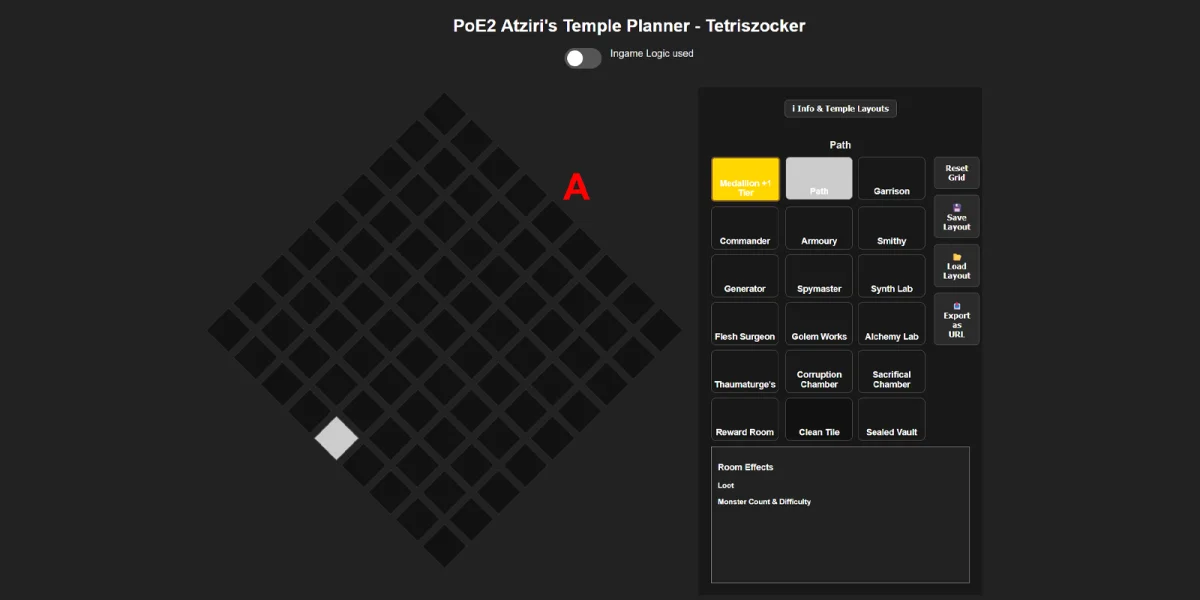
Atziri Temple Planner by Tetriszocker
Comes with two modes: an in game mode that follows PoE 2's actual placement rules, and a manual mode with no restrictions for creative or experimental planning. It includes a placement guide, easy reset, and the ability to save and share layouts. The manual mode is especially handy for working out Russian Tech configurations without putting your real temple at risk.