
Introduction and Overview
Scarlet Monastery Challenge Mode is one of the shorter, tighter dungeon challenges in Mist of Pandaria Classic. You'll spend about seven minutes just fighting bosses, which makes single-target DPS incredibly important. The rest of your time goes into carefully planned trash pulls that can make or break your Gold run.
- Finish in 13 minutes or less
- Kill 40 enemies total
- Defeat all three bosses: Thalnos the Soulrender, Brother Korloff, and High Inquisitor Whitemane
Finding and Accessing Scarlet Monastery
Location: Tirisfal Glades at coordinates /way 85.0 30.0
Look for the first portal on your left when you enter the larger Scarlet Monastery building.
Travel Routes:
- Horde: Multiple flight paths work here. Use Brill, The Bulwark, or Undercity.
- Alliance: You're stuck approaching from Andorhal in the Western Plaguelands.

Challenge Mode Mechanics and Scaling
Challenge Modes use the same dungeon layout as Heroic but introduce two major changes that completely alter how you approach combat.
Hit Percentage Exception: If you're Hit capped before entering, you'll stay Hit capped after scaling. The system adjusts your other secondary stats to maintain this.
Pre-Dungeon Preparation
Consumables and Buffs
The starting area is cramped and annoying to work with. Get your buffs sorted before you start:
- Rune of Fortitude scroll (mandatory if nobody has Fort)
- Pre-potions for DPS on the first pull
- Invisibility Potions for everyone (you need one for the courtyard skip)
Ability Prep
If you've got a Druid and Elemental Shaman, put Symbiosis on the Shaman. Solar Beam is useful throughout the dungeon. Review your interrupt assignments now, not during combat.
Group Composition
Tanks: Monk tanks work well here because Leg Sweep is perfect for stunning large trash packs. Death Knights bring Control Undead, which you can use strategically on Frenzied Spirits or Empowered Zombies.
Opening Pull: First Trash Pack
You start in an extremely cramped space that makes positioning awkward.
Pack Composition
- One Pile of Skulls
- One Scarlet Flamethrower
- Two Scarlet Centurions
This is the only time you'll see Centurions and Flamethrowers in the entire dungeon.
Hallway Navigation and Frenzied Spirits
After the first pack dies, follow the tank down the hallway. Hug the left wall. You'll pull at most one zombie from the left side, which is harmless. Pull too far right and you'll aggro Centurions across the hallway, forcing a reset.
Frenzied Spirit Mechanics
These mobs have a stacking buff that increases their damage while reducing their movement speed as they take damage. After enough hits, they're rooted but hit like trucks.
DPS can start hitting the spirits now. After a few stacks of their buff, they won't move but they'll deal massive damage.
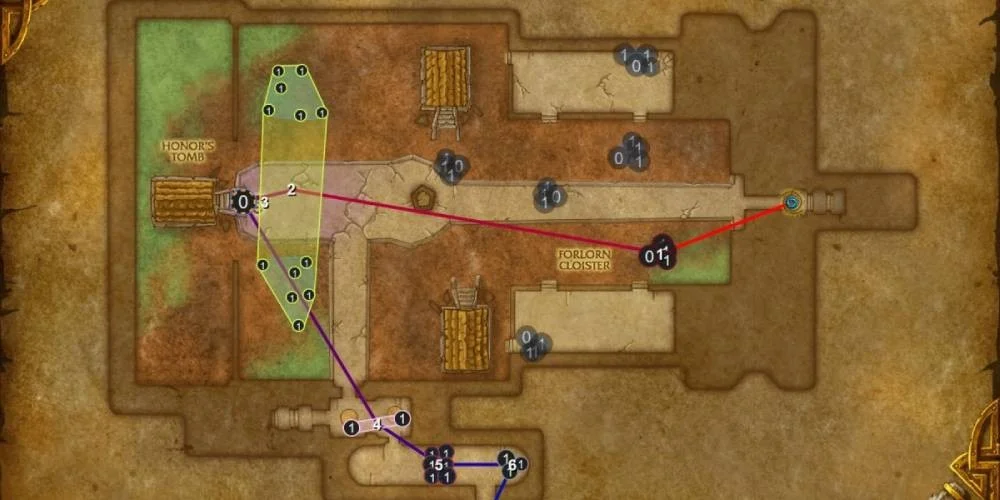
Boss Encounter: Thalnos the Soulrender
Encounter Context: Thalnos was known for brutal torture methods during his time in the Scarlet Crusade. After contracting the plague of undeath, he became a skeletal entity commanding zombified creatures.
Critical Mechanic - Evict Soul
Thalnos casts Evict Soul on cooldown, hitting a random player. The debuff deals moderate Shadow damage every 3 seconds for 6 seconds. Each tick creates an Evicted Soul add that attacks nearby allies.
Healers need to watch for this cast and dispel before the first tick. If you dispel it before any damage goes out, no adds spawn. Your group can keep full DPS on the boss without dealing with adds.
Other Abilities
- Raise Fallen Crusader: Thalnos summons Fallen Crusaders for 5 seconds, one per second. They leave bodies when they die.
- Mind Rot: Fallen Crusader attacks apply a stacking Shadow DoT lasting 6 seconds.
- Spirit Gale: Thalnos launches a spirit at his target's location. When it lands, it creates a Spirit Gale that deals heavy Shadow damage within 2 yards, then moderate Shadow damage per second to anyone standing in it. Interrupt this.
- Empowering Spirit: Thalnos creates spirits that try to inhabit Fallen Crusader corpses, turning them into Empowered Zombies. These are way tougher than regular adds.
Paladin: You can fear Fallen Crusaders with Turn Evil.
Healer Strategy: This fight doesn't require much healing when done right. Druids should keep Faerie Fire on the boss and DPS during downtime. Heart of the Wild works well here for extra damage.
Post-Thalnos: Scarlet Judicator Pulls
Right past the door after Thalnos, two Scarlet Judicators are waiting.
Pulling Strategy
Kill both Judicators at the door completely, even though it takes extra time. Pull them one at a time to manage their stuns safely.
After killing these two, wait for the patrol to move into position. This patrol has another Judicator plus other mobs. Use an Earth Elemental to tank the Judicator separately from the main pack.
Alternative Approach: Groups learning this pull can CC half the pack, but it takes significantly longer. The stun rotation is more efficient once you nail the timing, though it needs practice.
Potion Timing: DPS shouldn't use DPS potions during this trash if they used one on Thalnos. The potion cooldown from Thalnos ends about 5 seconds before you reach the Invisibility Potion spot. Using a DPS potion here means you won't have your Invisibility Potion ready when needed.
Courtyard Skip: Invisibility Potion Usage
Skip Execution: Use Invisibility Potions before entering the courtyard. This lets you skip the entire lower floor. Run up the stairs and get on the fountain.
Healer Positioning: Healers should stay within a few steps of the group during the Invisibility Potion. If someone breaks stealth early, the tank or hunter should immediately pull Brother Korloff if it's safe, with the healer getting there in time to support.
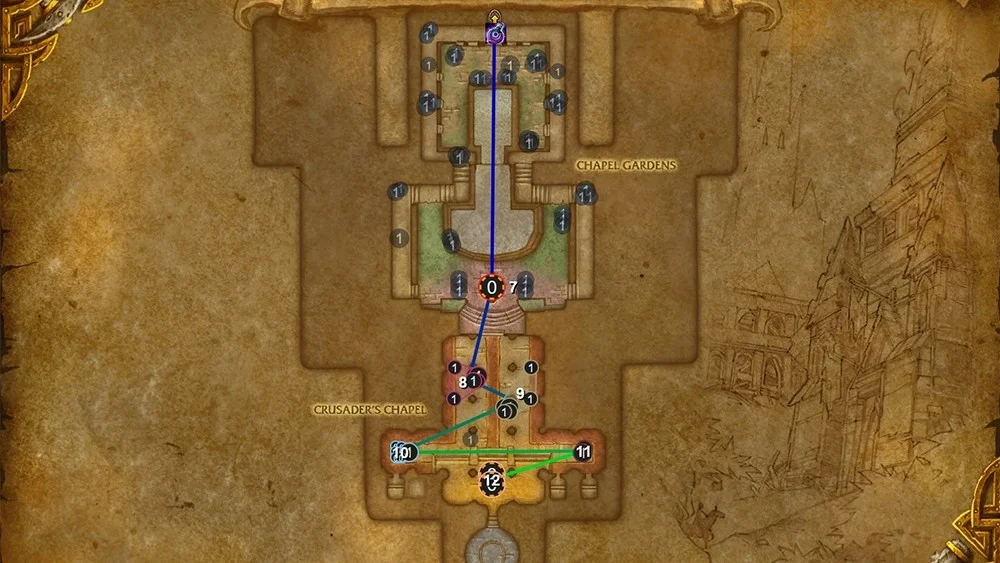
Boss Encounter: Brother Korloff
Encounter Context: Brother Korloff learned monk martial arts from Pandaren ambassadors traveling through Azeroth. He then trained an entire generation of Scarlet Crusade initiates in these techniques.
Patrol Timing
Wait for Brother Korloff to patrol to the center between the two monk packs. Pulling him here prevents the monks from joining the fight.
Firestorm Kick Mechanic
This always targets the furthest player. Assign one DPS to stand at the back of the area to consistently take this ability. The tank should position near the waterfall to aim Blazing Fists safely while keeping enough room to move out of range when needed.
This setup lets the rest of your group stack in one spot without moving.
Key Abilities
- Blazing Fists: Brother Korloff channels fiery strikes that deal 40% of normal melee damage as Fire damage to targets in front of him every second for 6 seconds. Tanks can handle it but should aim the attack away from the group.
- Rising Flame (Passive): Every time Brother Korloff loses 10% health, his fire damage increases by 10%. This stacks throughout the fight, making his abilities progressively more dangerous.
- Scorched Earth (50% Health Trigger): At 50% health, Brother Korloff starts leaving a fire trail wherever he moves. This Scorched Earth deals heavy Fire damage per second.
With proper positioning (tank at waterfall, designated DPS at back for kicks), the fire trail only appears in two spots. Everyone else can stand still in a clean area.
Burn Strategy: Kill this boss as fast as possible. The longer the fight goes, the harder the damage gets.
Healer Strategy: Heart of the Wild is probably on cooldown from Thalnos. Keep Faerie Fire on the boss for DPS contribution. Healers have a lot of downtime since tanks take minimal damage throughout. You could consider having the healer stand at the back to handle Firestorm Kick given all the downtime, though this needs practice.
Post-Korloff Navigation: Run carefully between the two Fanatic trios when moving from Brother Korloff into the cathedral. Use the fountain geometry as a guide. A corner marks the exact center, and the stairs have a similar center marker. Running between these points prevents accidental pulls.
Final Cathedral: Trash Clearing Strategy
Room Layout: The cathedral has about five Scarlet Purifiers around the edges, two four-packs with double Fanatics plus other enemies, and two easier pulls in the back corners.
Starting Pull
Start by immediately pulling the two static Purifiers on the left. If a third Purifier is patrolling nearby, grab it too.
Purifier Mechanics: These enemies are annoying in larger packs but straightforward alone.
- Purifying Flames: 3-second cast, heavy single-target damage
- Flame Strike: 2-second cast, AoE damage
Groups that fall behind on interrupts will stand in Flame Strikes. You can heal through this with Tranquility if necessary.
Four-Pack Composition
Each four-pack has:
- Two Scarlet Fanatics
- One Scarlet Judicator
- One Scarlet Zealot
- One Scarlet Purifier (pulled from nearby)
Enemy Abilities
Crowd Control Strategy
CC one Fanatic where it stands. Retribution Paladins can use Repentance. Druids should use roots. You can use pillars with Silencing Shot to line-of-sight pull the Purifier toward your group for better positioning.
Pulling Sequence: Position near the pillar without moving too far from where you killed the initial Purifiers. Use the pillar to pull enemies toward you. As the pack approaches, CC one Fanatic immediately.
The Earth Elemental can tank the Judicator separately (same as the earlier Judicator pull).
Corner Packs
Between the main four-packs, pull the easier groups from the back corners. One has a Zealot plus Initiates (lower health Zealots). These can be chain-pulled or killed during transitions.
- Zealots from previous packs stay alive and keep casting heals
- Multiple enemies need interrupts simultaneously
- You're spending time on interrupt management for enemies that should already be dead
Spawning Judicators: Scarlet Judicators keep spawning and walking down the cathedral center. Groups that pull too slowly accumulate extra Judicators beyond what's needed for the enemy count. The total enemy count isn't perfectly consistent because of these spawns.
Combat Break Decision: Whether to drink mid-room or skip it depends on healer mana and time remaining. Chain-pulling from the start works if healer mana holds. Groups short on time should skip the mid-room break.
The typical break happens right before the final boss. Start drinking while the tank pulls. This gives you about 10 seconds of mana regen since the boss isn't dangerous at the start.
Final Pack Before Boss: You can chain-pull the last pack into the boss, or pull the boss when only one pack remains to auto-aggro it. This saves time but needs careful management so Spirit of Redemption (spawned when Zealots die) doesn't freely heal the boss.