
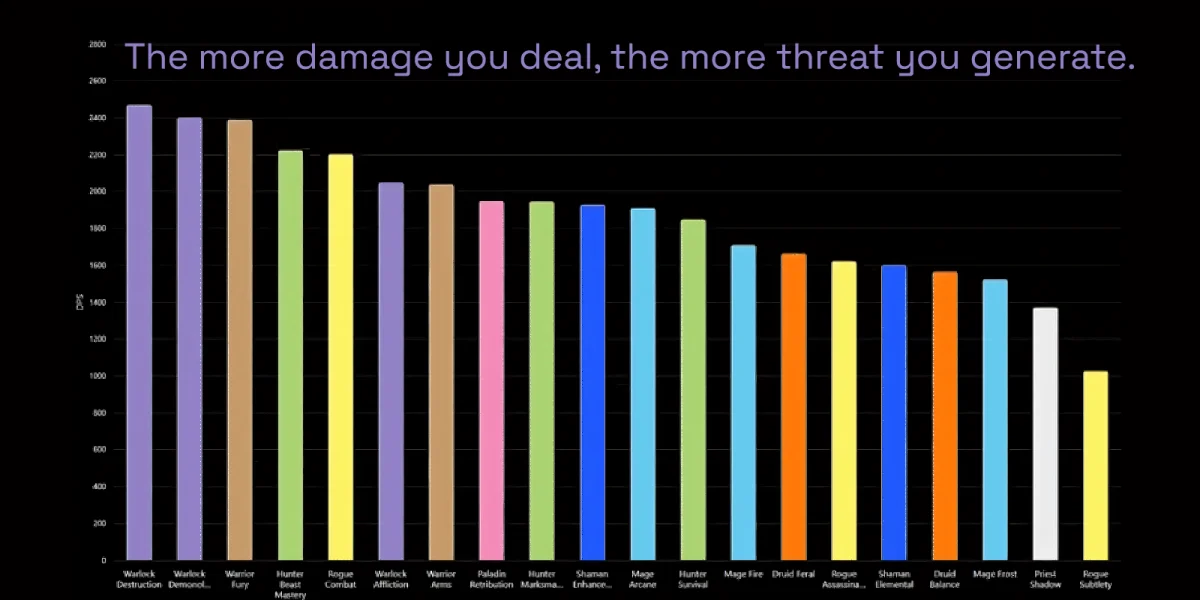
Destruction Warlocks rank among the top damage dealers throughout The Burning Crusade. The spec focuses on devastating Fire and Shadow magic, trading some utility and survivability for raw damage output. A straightforward rotation makes Destruction easy to pick up, and the spec gets stronger with each gear upgrade as you progress through content phases.
Raids commonly bring multiple Destruction Warlocks, often three or more in caster-heavy compositions. This makes the spec one of the most reliable choices if you're looking for a raid spot. You can go with the classic Shadow-focused approach or the Fire variant that pairs with Fire Mages, and both deliver consistent performance across virtually any encounter.
What Makes Warlocks Unique
Warlocks channel Fel magic, drawing power from the forces of Life and Death. Several class-defining mechanics set Warlocks apart from other casters.
Soul Shards work as a secondary resource exclusive to Warlocks. You capture enemy souls by channeling Drain Soul as targets die, storing these souls as Soul Shards in your bags (as long as you have inventory space). Many Warlock abilities consume Soul Shards: demon summoning, creating Healthstones and Soulstones, Soulshatter for threat reduction, and Ritual of Summoning all require them. You'll need to farm shards before raids and dungeons to stay prepared.
Life Tap gives Warlocks effectively unlimited mana by converting health into mana. This removes the mana management concerns that plague other casters, though it does require coordination with healers and careful timing around incoming damage.

Strengths and Weaknesses
Knowing where Destruction Warlocks shine and where they struggle helps you play to your advantages and avoid common frustrations.
- Consistently High Damage Output: Destruction Warlocks put out top-tier damage regardless of the encounter type. The spec performs well on both single-target fights and cleave situations, maintaining competitive numbers throughout all raid tiers.
- Excellent Scaling: As you acquire better gear through progression, Destruction Warlocks become proportionally stronger. The spec benefits tremendously from additional Spell Damage, Critical Strike, and Haste.
- Infinite Mana Sustainability: Life Tap eliminates mana concerns entirely, provided your healers can sustain you.
- Strong Self-Healing and Survivability: Drain Life and the ability to self-sustain through Life Tap make Warlocks tankier than other ranged DPS classes.
- Valuable Raid Utility: Curses, Healthstones, Soulstones, Ritual of Summoning, and crowd control through Fear and Banish.
- Accessible Gameplay: The rotation requires minimal button presses and has a low skill floor.
- Severe Threat Generation: Warlocks struggle with threat. The 5-minute cooldown on Soulshatter means you can't rely on it for every threat situation.
- No Mobility Tools: Destruction Warlocks lack inherent movement speed abilities, and most damage spells require standing still to cast.
- Expensive Initial Gearing: Much of the pre-raid and early raid Best-in-Slot gear comes from Tailoring, requiring significant gold investment.
- Soul Shard Management: The need to farm Soul Shards before content adds preparation time that other classes avoid.
- Group Composition Dependencies: Shadow Destruction performs best with at least three Warlocks. Fire Destruction requires a Fire Mage maintaining Improved Scorch.
- Repetitive Rotation: The simple rotation may feel monotonous over extended sessions.
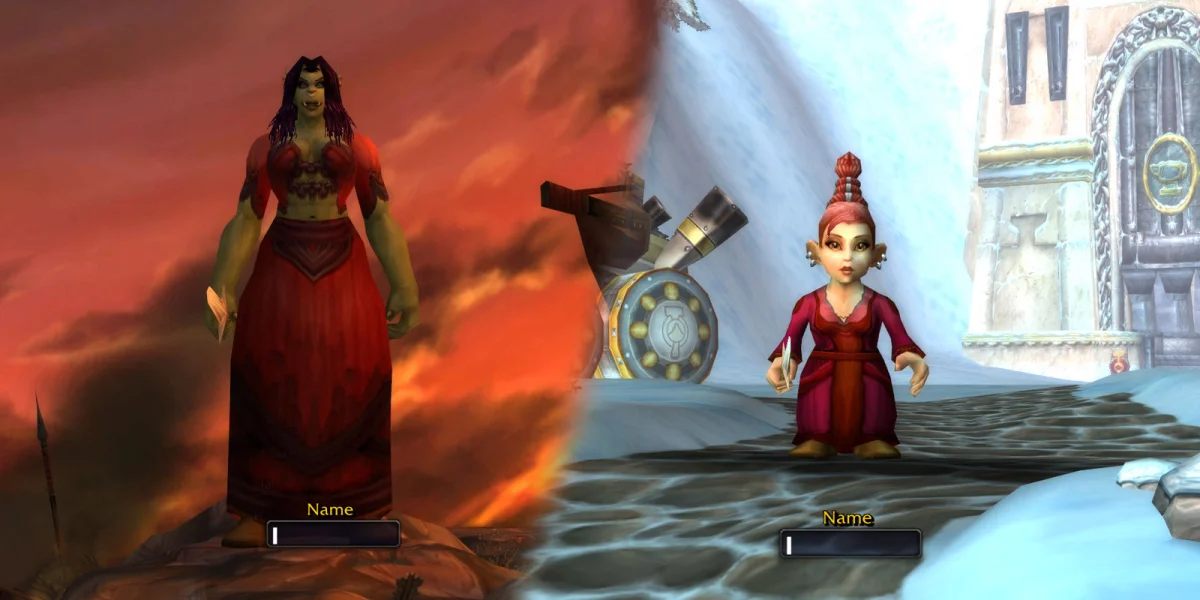
Choosing Your Race
Race selection provides minor but meaningful advantages. If you're not concerned with min-maxing, choose whichever race appeals to you aesthetically. The differences are small enough that skill and gear matter far more.
Alliance Races
Gnome (Recommended)
Gnome is the best Alliance choice for PvE content. Expansive Mind increases your Intellect by 5%, boosting both your mana pool and spell critical strike chance. While the Intellect scaling is modest, it's the only PvE-relevant racial available to Alliance Warlocks.
Other Gnome racials include Escape Artist (useful for breaking roots and snares, with occasional PvE applications), Engineering Specialization (+15 Engineering skill), and Arcane Resistance (+10 arcane resistance).
Human
Human racials provide no direct DPS benefits for Warlocks. Diplomacy accelerates reputation grinding by 10%, saving time on faction grinds. Perception helps with stealth detection in PvP situations. The weapon specializations (Mace and Sword) offer no value to casters. The Human Spirit increases Spirit by 10%, but Warlocks have minimal Spirit and gain negligible benefit from this stat.
Horde Races
Orc (Recommended)
Orcs are the strongest Horde option by a significant margin. Blood Fury provides 143 Spell Damage on a cooldown, translating to approximately 1% overall DPS increase. This on-demand burst aligns perfectly with other cooldowns and trinket procs for maximum damage windows.
Command increases pet damage by 5%, which benefits Demonology Warlocks substantially but provides no value for Destruction since you sacrifice your demon. Hardiness grants 15% stun resistance, useful primarily in PvP. Axe Specialization has no caster application.
Undead
Undead racials are primarily utility-focused. Cannibalize helps reduce downtime while leveling or soloing by regenerating health from humanoid or undead corpses. Shadow Resistance (+10) provides minor benefit for tanking situations or specific encounters. Underwater Breathing is convenient but largely redundant since Warlocks learn Unending Breath at level 16. Will of the Forsaken breaks Charm, Fear, and Sleep effects, making it excellent for PvP with occasional PvE applications.
Blood Elf
Blood Elf racials offer limited PvE value. Arcane Affinity (+10 Enchanting) provides no combat benefit. Magic Resistance (+5 to all resistances) is negligible. Mana Tap and Arcane Torrent restore small amounts of mana, but the values are insignificant at level 70 for PvE purposes, and Mana Tap triggers the global cooldown, costing you damage. Arcane Torrent has PvP applications for silencing and breaking crowd control.
Profession Selection
Professions provide meaningful power increases for Destruction Warlocks. Prioritize Tailoring above all other options, then select your second profession based on your goals.
Primary Profession: Tailoring (Required for Raiding)
Tailoring is a must-have for raiding Warlocks. The profession provides access to some of the most powerful gear available, with items that remain competitive deep into the expansion.
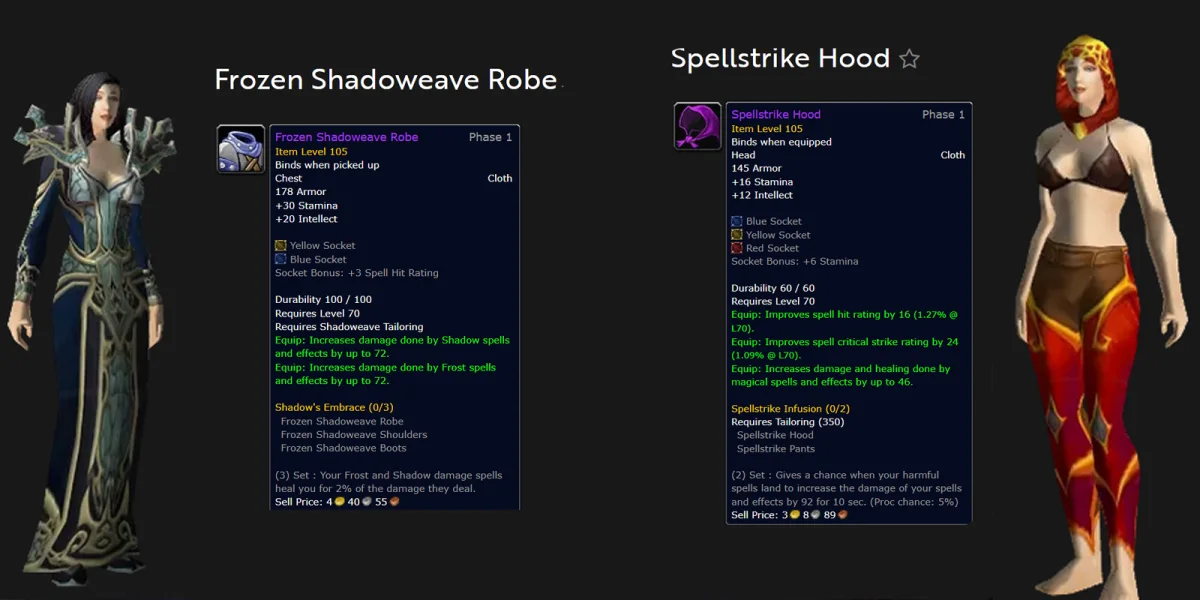
Frozen Shadoweave Set: This three-piece set (Shoulders, Robe, Boots) offers exceptional stats for Shadow-focused Destruction Warlocks. The pieces can be crafted early in the expansion and remain among the strongest options available through multiple content phases.
Spellstrike Set: The two-piece Spellstrike set (Hood and Pants) is desired by virtually every caster class, providing a powerful set bonus. Competition for materials is fierce, so expect high prices or lengthy farming.
Wrath of Spellfire Set: Fire Destruction Warlocks pursuing the Fire variant will want this set instead of Frozen Shadoweave.
Additional Tailoring crafts include Bracers of Havok, Girdle of Ruination, and other powerful items. While some of these are Bind on Equip and can be purchased or crafted by others, having Tailoring ensures you can craft them yourself and benefit from Tailoring-specific set bonuses.
Secondary Profession Options
Enchanting (Recommended)
After Tailoring, Enchanting provides the largest DPS increase. The exclusive Enchant Ring - Spellpower enchant adds 12 Spell Damage per ring, totaling +24 Spell Damage when both rings are enchanted. Since Spell Damage is a Warlock's most valuable stat, this represents a substantial and permanent power increase.
Leatherworking
Leatherworking's primary benefit is access to Drums of Battle, which provides 80 haste to your party. The Tinnitus debuff prevents perfect drum uptime, eliminating the advantage of stacking multiple Leatherworkers. If your guild requires drums, Leatherworking becomes valuable; otherwise, Enchanting offers more consistent personal benefit.
Greater Drums of Battle become available in Phase 4 with an increased radius for easier usage.
Jewelcrafting
Jewelcrafting allows early access to epic gems before they become widely available. Don Julio's Heart is the preferred caster gem. These gems are unique-equipped (limited to one of each type), which diminishes the overall benefit compared to Enchanting.
Engineering
Engineering provides utility rather than direct DPS increases. Notable items include Field Repair Bot 110G and Goblin Jumper Cables XL for raid support, Arcanite Dragonling for a useful buff (particularly for Fire Destruction), and Rocket Boots Xtreme Lite to help offset Warlocks' mobility weakness. Destruction Holo-gogs become available in Phase 3 with Black Temple release.
The transporters to Gadgetzan and Toshley's Station provide quality-of-life convenience. Engineering pairs naturally with Mining for material gathering.
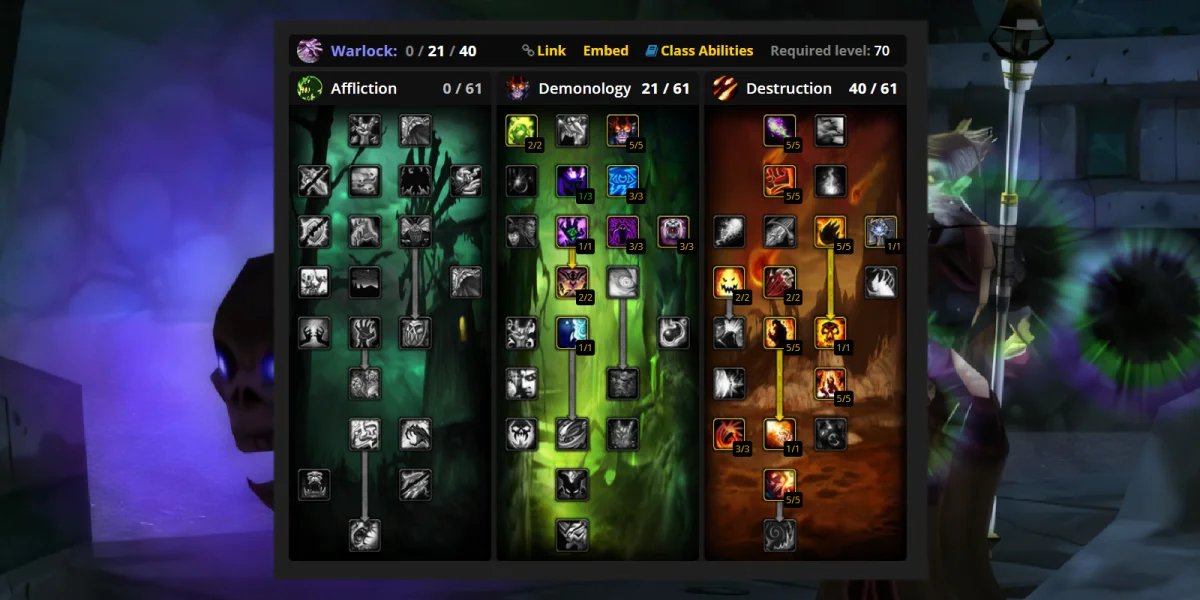
Talent Builds
Standard Destruction Build (0/21/40)
The standard Destruction build invests 21 points in Demonology to reach Demonic Sacrifice, then places the remaining 40 points in Destruction for maximum damage output.
The Demonology investment provides:
- Access to Demonic Sacrifice, which is core to the build
- Fel Intellect and Fel Stamina, which now benefit the Warlock directly even when sacrificing your demon
- Improved health and mana pools for survivability
The Destruction tree provides:
- Increased critical strike damage and chance
- Reduced cast times and improved Shadow Bolt/Incinerate damage
- Destructive Reach for extended range and the crucial 10% threat reduction
- Emberstorm for improved Fire damage (benefits Immolate for all variants, and is a must-have for Fire builds)
Shadow vs. Fire Destruction
Shadow Destruction uses Shadow Bolt as the primary filler spell. This variant:
- Requires at least 3 Warlocks in the raid to maximize curse coverage and synergies
- Uses the Frozen Shadoweave gear set
- Sacrifices the Succubus for increased Shadow damage
Fire Destruction uses Incinerate as the primary filler spell. This variant:
- Requires a Fire Mage maintaining Improved Scorch on the target
- Uses the Wrath of Spellfire gear set
- Sacrifices the Imp for increased Fire damage (no Soul Shard required)
- Benefits from faster cast time on Incinerate compared to Shadow Bolt
- May need to swap to Succubus sacrifice when using Seed of Corruption for AoE, since it deals Shadow damage
Your Demon: Succubus and Demonic Sacrifice
Unlike other Warlock specs that rely on their demons for damage or utility, Destruction Warlocks sacrifice their demon using Demonic Sacrifice to gain a personal damage buff.
For Shadow Destruction: Summon your Succubus and sacrifice it with Demonic Sacrifice. This provides increased Shadow damage, boosting your Shadow Bolt and Seed of Corruption damage.
For Fire Destruction: Summon your Imp and sacrifice it with Demonic Sacrifice. This provides increased Fire damage for your Incinerate and Immolate. An advantage of this approach is that summoning an Imp doesn't require a Soul Shard, reducing your shard consumption.
You won't have a pet active during combat after using Demonic Sacrifice. Plan accordingly if you normally rely on pet abilities for specific situations.
Damage Rotation
Destruction Warlocks have one of the simplest rotations in TBC, which lets you focus on positioning, threat management, and encounter mechanics rather than complex ability priorities.
Single-Target Rotation
- Maintain Your Assigned Curse: Apply and refresh whichever curse your raid leader assigns. Curse of the Elements is commonly assigned to one Warlock to boost all magic damage, while others may use Curse of Doom or Curse of Agony for personal damage.
- Maintain Immolate: Keep Immolate active on the target at all times. For Fire Destruction, this is especially important as Incinerate deals bonus damage when Immolate is present.
- Spam Your Filler Spell: Cast Shadow Bolt (Shadow Destruction) or Incinerate (Fire Destruction) repeatedly. This makes up the vast majority of your rotation.
- Life Tap as Needed: Convert health to mana when your mana drops low. Ideally, time Life Tap during movement phases or when you'd otherwise be unable to cast. Aim to end fights with minimal mana remaining rather than tapping to full constantly.
Multi-Target / AoE Rotation
Seed of Corruption: Cast Seed of Corruption on multiple targets when fighting three or more enemies. This spell has the highest AoE cap in the game, can critically strike (critical damage ignores the AoE cap), has a 15-yard explosion radius, and can be cast from safe range.
Hellfire: Use Hellfire when you're safely within melee range of enemies. Hellfire damages yourself, so coordinate with healers and avoid using it when incoming damage is high.
Seed of Corruption is your primary AoE tool and excels at dealing massive damage to grouped enemies. It makes Warlocks among the best AoE damage dealers in TBC.
Stat Priority and Hit Cap
Understanding stat priorities helps you evaluate gear upgrades and make informed decisions about gems and enchants.
Spell Hit Cap
Equipment Overview
Destruction Warlocks can equip the following item types:
| Slot | Equipment Types |
|---|---|
| Armor | Cloth only |
| Main Hand | Daggers, One-Handed Swords, Staves |
| Off Hand | Held in Off-hand items |
| Ranged | Wands |
For weapon selection, you typically want a Main Hand weapon with high Spell Damage plus an Off-Hand, rather than a Staff, though compare the total stats when evaluating upgrades.
Pre-Raid Best-in-Slot Gear
This gear list represents the best items available before entering raid content. Many pieces come from Tailoring, Heroic dungeons, and reputation vendors.
| Slot | Item |
|---|---|
| Head | Spellstrike Hood |
| Shoulders | Frozen Shadoweave Shoulders |
| Chest | Frozen Shadoweave Robe |
| Wrists | Bracers of Havok |
| Hands | Manaspark Gloves |
| Waist | Girdle of Ruination |
| Legs | Spellstrike Pants |
| Feet | Frozen Shadoweave Boots |
| Neck | Brooch of Heightened Potential |
| Back | Sethekk Oracle Cloak |
| Ring 1 | Ashyen's Gift |
| Ring 2 | Sparking Arcanite Ring |
| Trinket 1 | Icon of the Silver Crescent |
| Trinket 2 | Scryer's Bloodgem |
| Main Hand | Eternium Runed Blade |
| Off Hand | Orb of the Soul-Eater |
| Wand | The Black Stalk |
Notice the heavy reliance on Tailoring pieces (Spellstrike and Frozen Shadoweave sets). Acquiring these items early should be a priority for any serious Destruction Warlock.
Phase 1 Best-in-Slot Gear
Phase 1 raid content includes Karazhan, Gruul's Lair, and Magtheridon's Lair. This list represents the best gear from these raids combined with the strongest pre-raid options.
| Slot | Item |
|---|---|
| Head | Voidheart Crown |
| Shoulders | Voidheart Mantle |
| Chest | Voidheart Robe |
| Wrists | Bracers of Havok |
| Hands | Voidheart Gloves |
| Waist | Girdle of Ruination |
| Legs | Leggings of the Seventh Circle |
| Feet | Frozen Shadoweave Boots |
| Neck | Brooch of Unquenchable Fury |
| Back | Ruby Drape of the Mysticant |
| Ring 1 | Band of Crimson Fury |
| Ring 2 | Ashyen's Gift |
| Trinket 1 | Icon of the Silver Crescent |
| Trinket 2 | Quagmirran's Eye |
| Main Hand | Talon of the Tempest |
| Off Hand | Orb of the Soul-Eater |
| Wand | Eredar Wand of Obliteration |
The Voidheart set pieces (Tier 4) replace several pre-raid items, while some crafted pieces like Frozen Shadoweave Boots and Girdle of Ruination remain competitive.
Enchantments
Apply these enchantments to get the most out of your gear:
| Slot | Enchant |
|---|---|
| Head | Glyph of Power |
| Shoulders | Greater Inscription of Discipline |
| Back | Enchant Cloak - Subtlety |
| Chest | Enchant Chest - Exceptional Stats |
| Wrists | Enchant Bracer - Spellpower |
| Hands | Enchant Gloves - Spell Strike |
| Legs | Runic Spellthread |
| Feet | Enchant Boots - Boar's Speed |
| Rings | Enchant Ring - Spellpower (requires Enchanting) |
| Main Hand | Enchant Weapon - Soulfrost |
Gem Selection
Gems provide significant stat customization. Match socket bonuses only when the bonus is worthwhile (typically +4 Spell Damage or better).
| Socket Color | Recommended Gem |
|---|---|
| Meta | Chaotic Skyfire Diamond |
| Red | Runed Living Ruby |
| Yellow | Veiled Noble Topaz |
| Blue | Glowing Nightseye |
Gem Strategy:
- Prioritize meeting your Meta gem requirements first
- Runed Living Ruby (pure Spell Damage) is your primary gem for red sockets
- Veiled Noble Topaz provides Spell Damage and Spell Hit, useful while reaching hit cap
- Glowing Nightseye satisfies blue socket requirements while providing some Spell Damage
- Once hit capped, consider ignoring socket bonuses and using Runed Living Ruby in all slots unless the bonus is substantial
Consumables
Proper consumable usage provides a significant damage boost. Always come to raids fully stocked.
Flasks and Elixirs
Flask of Pure Death is the standard choice, providing substantial Shadow, Fire, and Frost spell damage. Flasks persist through death, making them ideal for progression content.
Food Buffs
Choose one of the following Spell Damage foods:
- Blackened Basilisk
- Crunchy Serpent
- Poached Bluefish
All three provide equivalent Spell Damage bonuses. Use whichever is most affordable or accessible.
Potions
Destruction Potion is your damage potion, providing a burst of Spell Damage and Critical Strike during its duration. Use during Bloodlust/Heroism or other high-damage windows.
Weapon Enhancement
Brilliant Wizard Oil applies to your main hand weapon, providing additional Spell Damage and Spell Critical Strike rating.
Additional Consumables
- Soul Shards: Stock plenty before raids. You need them for Soulshatter, Healthstones, Soulstones, demon summoning, and Ritual of Summoning.
- Dark Rune / Demonic Rune: Emergency mana restoration that damages your health. Useful when Life Tap alone can't sustain you.
- Flame Cap: Provides a burst of Fire damage on use, excellent for Fire Destruction or during high-damage phases.
Threat Management
Threat is one of Destruction's greatest challenges. Without proper management, you'll pull aggro and likely die, resetting your damage and potentially causing raid wipes.
Threat Reduction Tools
Destructive Reach (talent) provides a passive 10% threat reduction. This helps but doesn't solve threat problems entirely.
Soulshatter halves your current threat when activated. Use it strategically:
- Don't use at the start of fights when you have minimal threat accumulated
- Save it for mid-fight when your threat is genuinely problematic
- The 5-minute cooldown means you can't rely on it for every encounter
- Requires a Soul Shard to use
Enchant Cloak - Subtlety provides additional threat reduction on your cloak enchant.
Threat Management Strategies
- Watch Threat Meters: Use a threat tracking addon and monitor your position relative to the tank constantly.
- Start Slow: Resist the urge to burst immediately. Let tanks establish solid threat before committing to full damage.
- Communicate: If you consistently have threat issues on certain encounters, discuss with your tanks and raid leader.
- Time Soulshatter: Use Soulshatter roughly mid-fight when threat is problematic but you've accumulated enough to make the reduction meaningful.
- Stop Casting When Necessary: Sometimes the correct play is to stop dealing damage briefly rather than pull aggro and die.
Movement and Positioning
Destruction Warlocks suffer during movement phases due to reliance on hard-cast spells. Proper planning minimizes damage loss.
During Required Movement
- Life Tap: Use instant-cast Life Tap to restore mana without stopping.
- Refresh Instant Abilities: Apply or refresh Curse of Doom, Curse of Agony, or other instant-cast abilities.
- Pre-Position: When you know movement is coming, position yourself to minimize travel distance.
- Time Movement: Begin casting as soon as you reach your destination. Every moment standing still without casting is lost damage.
Hellfire Considerations
Hellfire requires you to stand still and damages yourself. Only use when:
- You're safely positioned in melee range
- Healers can sustain the self-damage
- The fight situation allows you to channel without interruption
- Multiple enemies are grouped to justify the risk
Class Trainer Information
You must visit Class Trainers to learn new spells and higher ranks of existing spells as you level. Warlock trainers exist in most major cities.
Alliance: Trainers are located in the basement of the Slaughtered Lamb in Stormwind City's Mage Quarter. Demisette Cloyce is conveniently located at coordinates 25.8, 77.6.
Horde: Trainers are found in Orgrimmar's Cleft of Shadow. Grol'dar is located at coordinates 48.0, 46.8.
Demon Trainers: Unlike player abilities, pet abilities are taught through Grimoire items purchased from Demon Trainers (such as Grimoire of Blood Pact Rank 2). You can purchase these in advance and learn them without returning to a trainer. Demon Trainers are typically found near Warlock Trainers.
Summary
Destruction Warlocks excel through consistent, high damage output and scale wonderfully with gear. To get the most out of the spec:
- Prioritize Tailoring and acquire your crafted gear as early as possible.
- Reach the 16% Spell Hit Cap before stacking other damage stats.
- Master Threat Management through proper Soulshatter timing and awareness.
- Maintain Your DoTs (Immolate and assigned Curses) while filling with Shadow Bolt or Incinerate.
- Stock Consumables and Soul Shards before every raid.
- Use Movement Phases for Life Tap and instant-cast abilities.
- Coordinate with Your Raid regarding curse assignments and (for Fire Destruction) ensuring Improved Scorch uptime.
The straightforward rotation lets you focus on encounter mechanics and raid awareness, while your damage remains competitive with far more complex specs. Destruction Warlock rewards preparation, positioning, and patience with consistently excellent performance throughout The Burning Crusade.