
This Boosting Ground guide breaks down everything about playing a Destruction Warlock in TBC Classic PvE. You'll find detailed breakdowns of both the Fire and Shadow builds, full rotation priorities, mana management strategies, threat control tips, and a rundown of every ability in your toolkit.
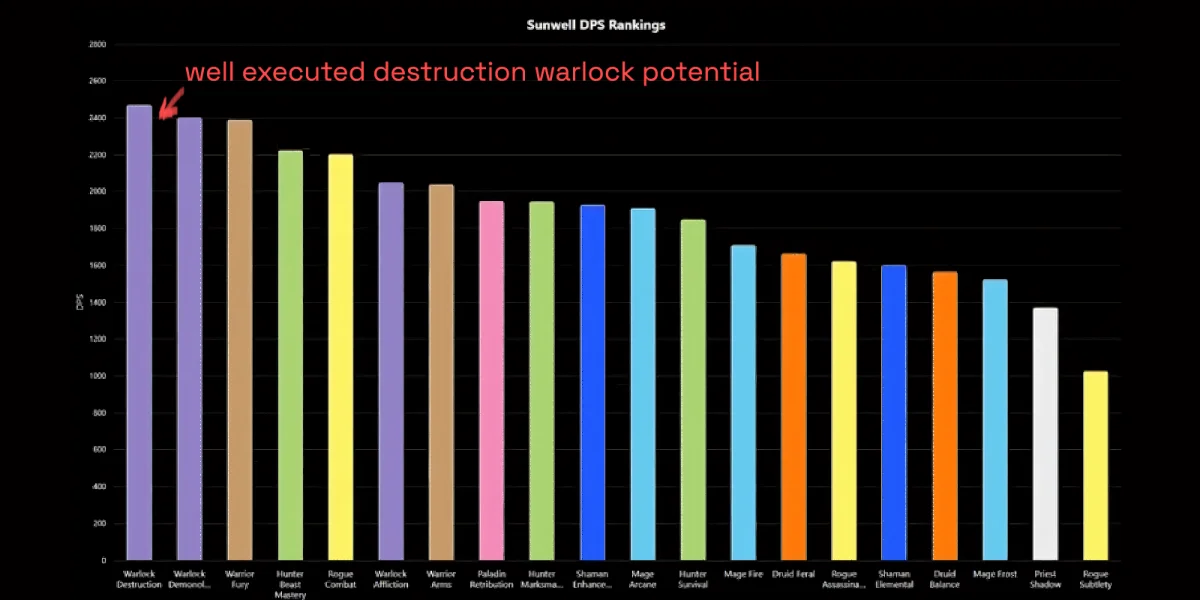
Destro Warlocks have one of the most straightforward rotations in TBC Classic. The spec is easy to pick up, but there's a real gap between a decent Destro lock and one who's consistently near the top of the meters. Knowing when to use which curse, how to handle movement without tanking your DPS, and how to juggle mana and threat throughout a fight is what separates the two. This guide covers all of it.
This guide works for players at any experience level, from first-time Warlocks learning the spec to raiders looking to tighten up their play.
Pre-Fight Setup
Before any boss encounter or dungeon pull, you've got several things to handle as a Destruction Warlock. Skipping these costs you real DPS or hurts your raid.
Buffs to Maintain
Fel Armor should be active at all times. It gives you free spell damage and increases the healing you receive, which pairs directly with Life Tap (more on that later). Demon Armor exists as an alternative with armor, Shadow Resistance, and passive health regen, but Fel Armor is strictly better for DPS in virtually all situations. The healing boost from Fel Armor, especially with the Demonic Aegis talent, outweighs the defensive perks of Demon Armor.
Demonic Sacrifice is the backbone of your DPS as Destruction. Which demon you sacrifice depends on your build:
Sacrifice your Imp for single-target encounters. For AoE-heavy fights, sacrifice your Succubus instead.
Sacrifice your Succubus at all times, regardless of the encounter.
Make sure your Demonic Sacrifice buff is active before the pull. If you lose it mid-fight for any reason, use Fel Domination combined with the Master Summoner talent to instantly resummon a pet and sacrifice it again.
Firestone (Fire Build Only)
Fire Destruction Warlocks should have a Master Firestone conjured and equipped in place of a wand. This adds extra Fire damage that benefits your rotation directly.
Raid Responsibilities
Before the raid starts and throughout the run, handle these duties:
- Ritual of Souls: Provides Master Healthstones for the entire raid. Each cast costs one Soul Shard and produces up to 10 Healthstones, so coordinate with other Warlocks to make sure everyone's covered.
- Soulstone: Keep a Master Soulstone active on your assigned target (typically a healer or someone who can resurrect). Watch the duration and reapply it if it expires or the player dies and consumes it.
- Curse Assignment: Know which curse you're responsible for before the fight starts. All Warlocks in the raid should coordinate curses to prevent overlap and make sure every important debuff is covered.
Single-Target Rotation
The Destro Warlock single-target rotation is simple at its core, but execution still matters. It differs slightly depending on your build.
Fire Destruction Rotation
- Apply your assigned Curse (see the Curse Priority section below).
- Cast Immolate and maintain it with 100% uptime.
- Cast Corruption on the pull to help with initial threat generation, not for sustained DPS.
- Spam Incinerate as your filler between DoT refreshes and curse reapplications.
- Refresh DoTs as they expire. Let them fall off naturally before recasting. Don't overwrite a DoT that still has time remaining, since you'll clip the final tick and lose damage.
Flame Cap is mandatory for Fire Destro. Use it alongside your cooldowns for a significant damage boost during burst windows. Not using it means leaving real DPS on the table.
Shadow Destruction Rotation
- Apply your assigned Curse.
- Cast Immolate if you're talented into Immolate-boosting talents (like Emberstorm), or if a Fire Mage in your raid is providing the Improved Scorch debuff. If you're stacking heavy Shadow damage gear and have no Fire-boosting talents, you can skip Immolate entirely since the DPS gain will be marginal at best.
- Cast Corruption on the pull to assist with threat.
- Spam Shadow Bolt as your primary filler.
- Refresh DoTs as they expire. Same rule as Fire: never overwrite a DoT that still has ticks remaining.
DoT Refresh Timing
Managing your DoT uptime is one of the things that separates average Destro Warlocks from strong ones. The goal is to maintain as close to 100% uptime as possible without clipping that final tick.
You can start casting the replacement spell before the current DoT actually falls off, timing it so the new application lands right after the last tick. Say your Immolate has about 1 second remaining when you start your next Immolate cast (roughly 1.5 seconds with talents). You'll lose about 0.5 seconds of uptime, which is a minor and acceptable loss. If you start casting with 2 seconds still on the DoT, though, the new cast will land before the final tick fires, overwriting it and costing you damage.
Always let your DoTs expire before refreshing. Pre-casting is fine and even encouraged, but only when the timing works out so you don't overwrite the previous application.
AoE Rotation
When you're facing multiple enemies, the rotation shifts away from single-target fillers:
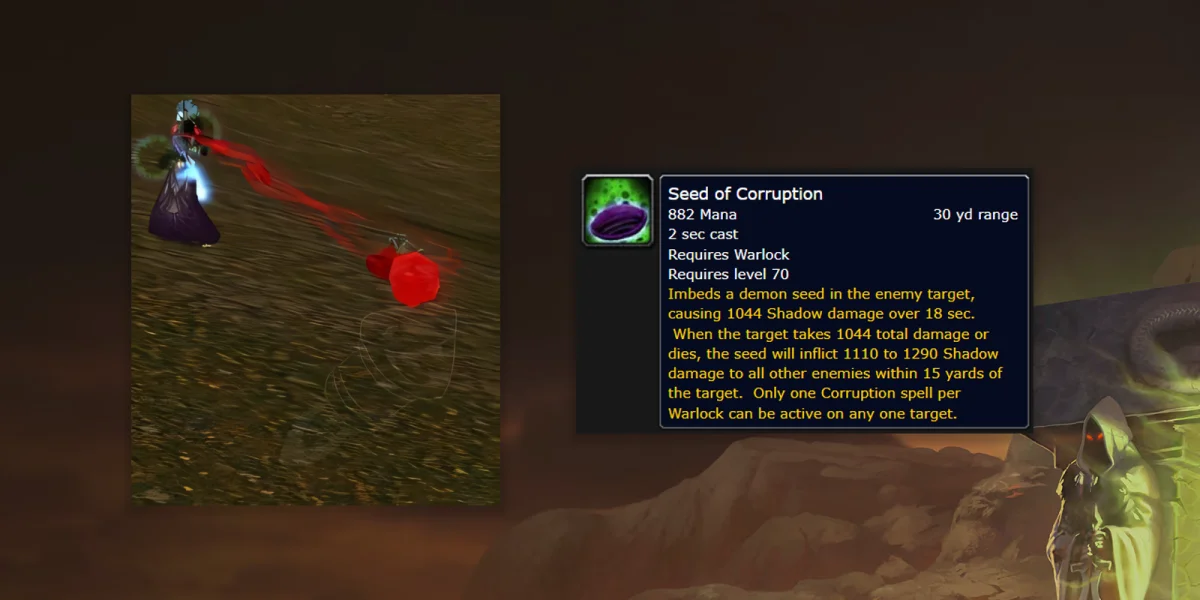
- Seed of Corruption is your go-to AoE ability. Apply it to every possible target. It deals strong damage on detonation and you can cast it from a safe distance, making it the best multi-target option in almost every situation.
- Hellfire works if you're in melee range and it's safe to channel. Since Hellfire damages you too, only use it when survivability isn't a concern and your healers can keep you up through it.
- Rain of Fire is generally not worth casting in PvE. It deals far less damage than Seed of Corruption. If you already have Seeds on all targets and can't safely Hellfire, you're better off falling back to your single-target spells rather than using Rain of Fire.
As mentioned in the pre-fight setup, Fire Destro Warlocks should sacrifice the Succubus instead of the Imp for encounters that are primarily AoE-focused.
Curse Priority and Assignment
Curses are a core part of the Warlock toolkit, and coordination among all the Warlocks in your raid is critical to avoid overlap. You can only have one curse active on a target per Warlock, so each lock should be assigned a specific one. Here's the general priority order and when each curse fits best:
| Curse | Effect | When to Use |
|---|---|---|
| Curse of the Elements | Reduces magic resistance, increases magic damage taken | Top priority for caster DPS. Ideally cast by an Affliction Warlock with Malediction. Should always be active on the target. |
| Curse of Recklessness | Reduces target armor, breaks Fear effects | Melee equivalent of Elements. Also useful for controlling Fear - apply to break fear, remove to re-fear. |
| Curse of Doom | Detonates after 60 seconds for large Shadow damage | Highest personal DPS curse. Only use when the target will survive the full 60-second duration. |
| Curse of Agony | Deals escalating damage over time | Alternative when Doom is on cooldown or the target will die in under 60 seconds. |
| Curse of Tongues | Increases enemy casting time | Situational. Only on encounters where slowing boss/add casts makes a real difference. |
| Curse of Weakness | Reduces physical damage output | Shares debuff slot with Demoralizing Shout. Only apply if no Warrior is handling it. |
| Curse of Exhaustion | Slows enemy movement speed | Rarely used in PvE. Primarily a PvP kiting tool. |
Mana Management
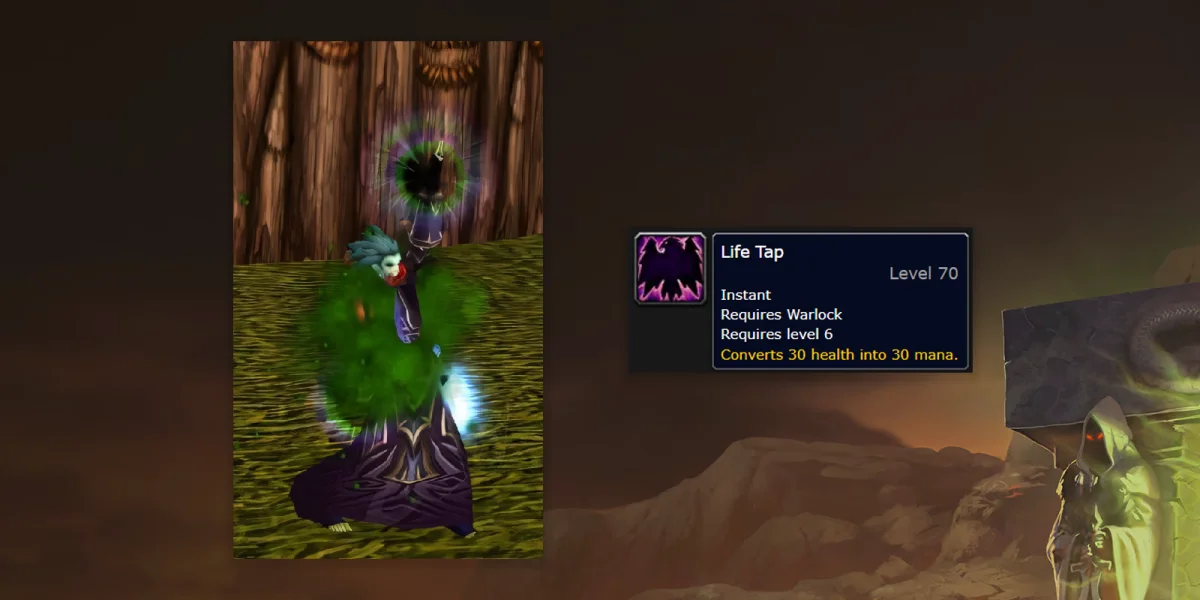
Warlocks have a unique relationship with mana thanks to Life Tap, which converts health into mana. Managing this well is one of the most important skills for keeping your DPS consistent throughout a fight.
Life Tap Usage
Life Tap is your primary way to get mana back. Use it as needed, but smart timing makes a noticeable difference:
- Don't tap right before unavoidable raid damage. If a boss mechanic is about to hit everyone, tapping puts you at risk of dying to the hit.
- Don't tap when healers are already struggling. They need to top you back up after every Life Tap, so be aware of how much pressure they're under.
- You don't need to tap to full mana. Ideally, you'd end every fight with zero mana remaining and no time spent idle, meaning you used exactly as much mana as the fight required. Topping off wastes global cooldowns on mana you won't spend.
- Save your taps for movement phases. If you know you'll need to dodge a mechanic or reposition soon, hold your Life Tap for that window. This way you're not burning a GCD on mana during free-casting time.
- Don't tap during burst windows. When your damage cooldowns or trinkets are active, every GCD should go to damage spells. Plan ahead and go into your cooldown windows with as much mana as possible.
Mana Alternatives
Before falling back on Life Tap, consider these options that cost you less overall DPS:
- Demonic Rune / Dark Rune: These consumables restore mana directly without costing health or a damage GCD (they do share a cooldown with mana potions, though). Use them on cooldown.
- Mana Potions: Same idea. They restore mana without the health cost and share a cooldown with health potions and Runes, so plan your usage.
Both of these should always take priority over Life Tap since Life Tap costs both a GCD and health that your healers need to restore.
Dark Pact
Dark Pact converts your pet's mana into yours. Since Destruction Warlocks sacrifice their demon through Demonic Sacrifice, Dark Pact won't be available during normal gameplay. It's worth knowing about as an option for builds or situations where you keep an active pet, but it won't come up in standard Destro play.
Handling Movement
One of the challenges for Destro Warlocks is that your core rotation revolves around cast-time spells (Shadow Bolt, Incinerate, Immolate). Forced movement means lost DPS. Knowing what to do during those windows keeps the damage loss to a minimum:
- Life Tap: If you need mana, movement is the perfect time to tap.
- Conflagrate: If you're specced into it, Conflagrate gives you an instant-cast damage option on the move. It consumes your Immolate DoT on the target, though, so you'll need to reapply Immolate afterward. Don't use Conflagrate as part of your regular rotation. Using it on cooldown is a net DPS loss because it strips your Immolate uptime. Save it for forced movement when you can't cast anything else. Also avoid using it right before your Immolate is about to expire naturally, since you'd waste the remaining DoT ticks.
- Shadowburn: Another instant-cast option during movement. It costs a Soul Shard and, more importantly, consumes Improved Shadow Bolt charges, which hurts your subsequent Shadow Bolt damage. Like Conflagrate, don't use Shadowburn on cooldown. Reserve it for movement phases when nothing else is available.
Threat Management
Destruction Warlocks can put out extremely high burst damage, which means threat management is a constant concern. Pulling aggro off the tank can get you killed, or worse, cause a wipe.
Soulshatter
Soulshatter is your main threat dump. It reduces your total threat by a percentage, giving you breathing room. A couple of important notes on how to use it well:
- Use it mid-fight when your threat is creeping up on the tank's. Monitor your threat meter addon constantly.
- Don't use Soulshatter at the very start of a fight. Early on, your total threat is still low, so a percentage-based reduction won't cut much. Save it for when you've actually built up meaningful threat.
Beyond Soulshatter, just watching your threat at all times is critical for Destro Warlocks. This is especially true on the Fire build, where burst windows with Flame Caps and trinkets can spike your damage (and your threat) dramatically. Keep a threat meter addon running and be ready to stop casting briefly if you're about to overtake the tank.
Corruption on the pull (as noted in both rotations) helps with early threat by spreading your initial damage across a DoT rather than frontloading it all through direct damage spells.
Cooldowns
Destro Warlocks have a relatively limited cooldown toolkit compared to some other classes, but using what you have properly still makes a difference:
Soulshatter
Covered in detail in the Threat Management section above. Use mid-fight to drop threat when you're approaching the tank's level.
Fel Domination
Reduces the cast time of your next demon summon. Combined with the Master Summoner talent, this lets you instantly summon a new pet. Its main use is quickly re-summoning a pet to sacrifice if you lose your Demonic Sacrifice buff during a fight. You can also use it to swap between demons if an encounter requires a different pet for a specific phase.
Demonic Sacrifice
More of a permanent buff than a traditional cooldown, but maintaining it is non-negotiable. If it drops off for any reason, resummon and sacrifice a new pet immediately using Fel Domination.
Shadow Ward
A defensive cooldown that absorbs Shadow damage. Valuable on any encounter with Shadow-based mechanics, since it prevents both the damage itself and the spell pushback that comes with taking hits while casting.
Complete Ability Reference
Here's a full breakdown of every ability relevant to Destruction Warlock PvE gameplay, organized by category.
Shadow Bolt is your main filler as a Shadow Destruction Warlock. Cast it whenever you're not applying or refreshing DoTs, curses, or managing mana and movement. It benefits from the Improved Shadow Bolt talent, which places a debuff on the target that increases Shadow damage taken after a crit.
Incinerate is the Fire Destruction equivalent of Shadow Bolt. It fills the same role as your primary cast between DoT and curse maintenance, just dealing Fire damage instead.
Seed of Corruption is your primary AoE damage spell. It applies a debuff to the target that detonates when enough damage is dealt, dealing AoE Shadow damage to all nearby enemies. Extremely powerful and castable from range, making it the best AoE option in nearly all situations.
Hellfire is a channeled AoE that damages all nearby enemies but also hurts you. Only use it when you're in melee range and it's safe to take the self-damage. Outside of AoE situations, Hellfire has one niche use: you can channel it before encounters to proc talents or items that trigger from taking or dealing damage, like Nether Protection.
Rain of Fire is a channeled ground-targeted AoE. It's significantly weaker than Seed of Corruption for PvE damage. In PvP, it's useful for breaking Rogues and Druids out of stealth, but in PvE, avoid it unless you have no other options.
Conflagrate is an instant-cast spell that consumes your Immolate DoT on the target for burst damage. Don't use it in your regular rotation since consuming Immolate is a DPS loss. Save it for forced movement. Requires talent investment.
Shadowburn is an instant-cast spell dealing Shadow damage that costs a Soul Shard and consumes Improved Shadow Bolt charges. Like Conflagrate, using it on cooldown is a net DPS loss. Only pull it out during forced movement when other options aren't available.
Immolate is a Fire damage DoT with an initial direct damage component followed by periodic ticks. Both Fire and Shadow Destro Warlocks should maintain it in most situations (see the rotation section for exceptions on Shadow builds without Fire-boosting talents). Maintain 100% uptime without clipping the final tick.
Corruption is a Shadow damage DoT with no initial direct hit. Destruction Warlocks primarily use it on the pull to help with threat generation. Unlike Affliction or Demonology Warlocks who keep Corruption active at all times, Destro Warlocks typically lack the talents to reduce its cast time, making it less efficient as a sustained DPS source.
Life Tap converts health into mana. Your primary mana regen tool. See the Mana Management section for detailed usage advice.
Drain Life channels Shadow damage on the target while healing you. Occasionally useful as an emergency self-heal if you're in danger of dying, but it deals much less damage than Shadow Bolt or Incinerate. Stick to your fillers and let healers handle your health in most situations.
Drain Soul channels Shadow damage and produces a Soul Shard if the target dies during the channel. Only cast this when a mob or boss is about to die and you need shards.
Drain Mana drains mana from the target. Almost never used in PvE raid content. This is primarily a PvP ability.
Master Healthstone provides a solid self-heal on use. Always have one available before every fight.
Ritual of Souls creates a Soulwell that raid members can click to grab Master Healthstones. Costs one Soul Shard and produces up to 10 Healthstones. Coordinate with other Warlocks to supply the full raid.
Ritual of Summoning teleports a raid member to your location. Indispensable for getting the raid assembled, especially for players who are late or need to return after a death.
Health Funnel channels a heal on your pet. Useful when your pet needs healing and the raid healers can't spare the attention. Less relevant for Destro locks who sacrifice their pet, but necessary if you need to keep one alive temporarily.
Fel Armor is your primary self-buff. Provides bonus spell damage and increases healing received. Should be active at all times. Gets stronger with the Demonic Aegis talent.
Demon Armor is an alternative self-buff with armor, Shadow Resistance, and passive health regen. Worse than Fel Armor for DPS. Only consider it if you absolutely need Shadow Resistance for a specific encounter, and even then, the healing from Fel Armor usually wins out.
Shadow Ward absorbs Shadow damage for a set duration. Strong on encounters with Shadow-based mechanics and helps prevent spell pushback from Shadow damage hits.
Eye of Kilrogg summons a controllable eye for scouting. You can also use it to safely pull packs of mobs from long distances, especially if you buff it with a HoT beforehand. Situational but handy in certain dungeon and raid contexts.
Fear causes an enemy to flee. Works as crowd control on trash or adds, but be careful since feared mobs run in random directions and can pull additional packs. You can break Fear early by applying Curse of Recklessness to the target.
Banish incapacitates a Demon or Elemental target, making them immune to all damage and unable to act. Duration depends on the rank you use, so cast a lower rank if you need a shorter CC window. Very useful for controlling specific add types in raids and dungeons.
Howl of Terror is an AoE fear centered on you. Only comes up occasionally in PvE (mostly emergencies), but it's strong in PvP and while leveling.
Death Coil is an instant-cast ability that deals Shadow damage, briefly fears the target, and heals you. Useful during movement for a bit of damage and self-healing. Also serves as an emergency CC tool.
Shadowfury is an AoE stun lasting 2 seconds on a 20-second cooldown. Requires talent investment. Primarily a PvP tool, but it can help in dungeon situations where a quick AoE stun buys your group some breathing room.
Subjugate Demon lets you enslave certain demons, controlling them as a pet. This replaces your current demon. Some raid encounters feature powerful demons that can be enslaved, but doing so means giving up your normal pet (and your Demonic Sacrifice buff along with it).
Create Spellstone creates a Spellstone you can use to dispel debuffs from yourself. Mostly a PvP tool.
Create Firestone creates a Firestone that boosts Fire damage when equipped. Part of the pre-raid setup for Fire Destro Warlocks.
Detect Invisibility lets you see invisible mobs. Situational, but necessary for specific encounters or areas with invisible enemies.
Unending Breath extends your underwater breathing from 1 minute to 10. No real use in raids or dungeons, but it's convenient for water-based quests and world content.
Demon Choices
Since Destro Warlocks sacrifice their demons through Demonic Sacrifice, the pet you summon is chosen based on which sacrifice buff best fits your build and the encounter.
Fire Destruction
- Single-Target: Sacrifice the Imp. The Imp sacrifice buff is your best option for single-target Fire damage.
- AoE Encounters: Sacrifice the Succubus. The Succubus sacrifice buff provides a stronger benefit for multi-target situations.
Shadow Destruction
- All Situations: Sacrifice the Succubus. This is the best choice for Shadow damage output across the board, whether single-target or AoE.
Other Demons (For Reference)
These pets aren't part of the standard Destro rotation, but they're still in your toolkit:
- Voidwalker: Can be sacrificed outside of raids for extra sustain through its Sacrifice shield, which also gives pushback avoidance. Not used in standard Destro raid play.
- Felhunter: Brings Spell Lock (interrupt) and Devour Magic (dispel). The resistance buff from Master Demonologist also helps for specific PvE boss tanking situations. Primarily a PvP pet.
- Felguard: The most powerful non-enslaved Warlock minion. This is the signature Demonology pet and isn't used by Destruction specs.
Amplify Curse and Soul Link
Two cooldowns from other talent trees are worth a quick mention for completeness:
- Amplify Curse (Affliction): Boosts the base damage of your next curse. Only available if you've invested deep enough into the Affliction tree to reach it.
- Soul Link (Demonology): Splits damage between you and your pet while also providing a damage increase. The damage-sharing component matters mostly for PvP, while the extra damage benefits Demo builds in PvE. Not usable in standard Destro builds since your pet is sacrificed.
Quick-Reference Rotation Summary
Fire Destruction (Single Target)
- Assigned Curse
- Immolate (maintain 100% uptime)
- Corruption (on pull only, for threat)
- Incinerate (filler spam)
- Use Flame Cap with cooldowns
Shadow Destruction (Single Target)
- Assigned Curse
- Immolate (conditional: use if talented for Fire or if Improved Scorch is active; skip if stacking pure Shadow gear)
- Corruption (on pull only, for threat)
- Shadow Bolt (filler spam)
AoE (Both Builds)
- Seed of Corruption on all targets
- Hellfire if in range and safe
- Avoid Rain of Fire. Use single-target spells instead if Seeds are applied and Hellfire isn't safe
Common Mistakes to Avoid
Clipping DoTs. Refreshing Immolate or Corruption before the final tick is a straight DPS loss. Always let them expire naturally before reapplying.
Using Conflagrate or Shadowburn on cooldown. Both are net DPS losses when worked into your regular rotation. Save them for movement.
Life Tapping during burst windows. Every GCD while your cooldowns are active should go toward damage. Tap before your burst begins.
Popping Soulshatter at the start of a fight. The percentage-based threat reduction doesn't remove much when your total threat is still low. Hold it for mid-fight when the reduction actually matters.
Skipping curse coordination. Overlapping curses between multiple Warlocks wastes debuff slots and raid DPS. Always confirm your assignment before the pull.
Casting Rain of Fire over Seed of Corruption. Seed is significantly stronger for AoE. Rain of Fire should almost never see use in PvE.
Forgetting Flame Cap on Fire builds. This consumable is a major part of Fire Destro's burst damage. Skipping it means leaving a lot of DPS behind.