
This guide covers the best locations for finding blueprints across every map in ARC Raiders. You'll learn the most efficient farming routes, which containers to prioritize, how map conditions affect drop rates, and some lesser-known tricks that'll speed up your collection.
Why Blueprints Matter
Blueprints are the backbone of crafting progression in ARC Raiders. They determine which weapons, gear pieces, explosives, and utility items you can make once your stations are upgraded. Even maxing out your crafting stations won't help if you don't have the right blueprints. You can't craft the Anvil revolver or Torrente machine gun without their blueprints, and the same goes for all Tier-3 augments.
Every blueprint you secure permanently expands what you can build for future raids. Since blueprints drop from specific container types in high-value locations, running targeted farming routes beats hoping for random drops during normal gameplay.
How Blueprint Drops Work
Before diving into specific locations, understanding the drop system helps you make smarter choices during raids.
Container Hierarchy and Loot Tiers
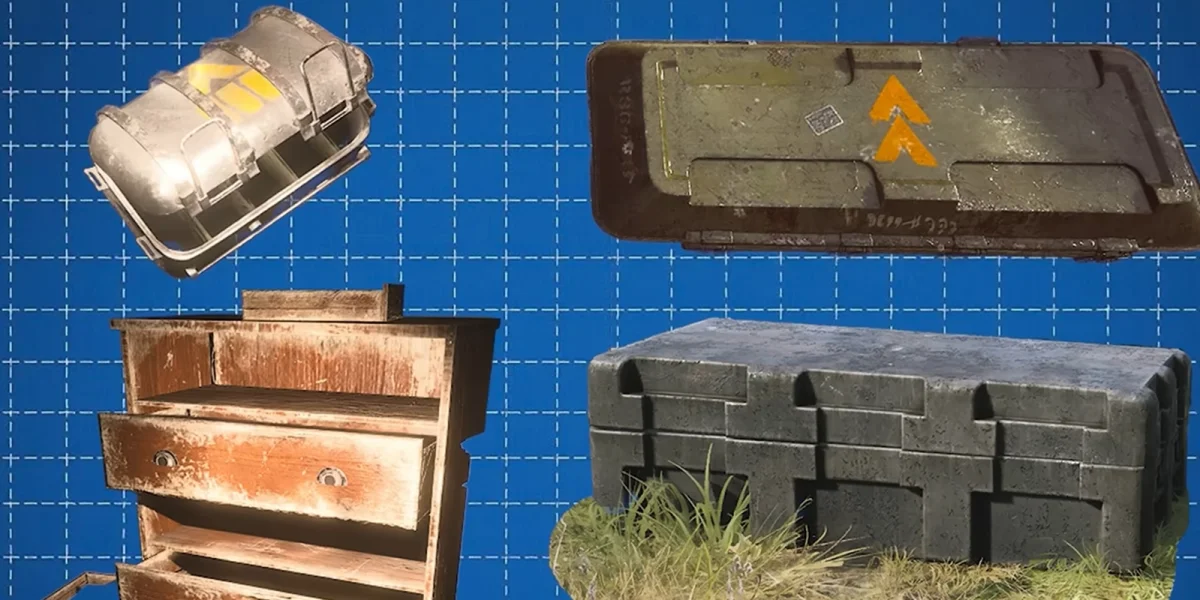
Blueprints can technically drop from almost any container, but the base chance is extremely low. The only reliable way to boost your odds is opening containers that pull from higher-tier loot tables. The game tags certain containers and locations as "high value," which improves the quality of everything inside.
Room Classification and Loot Quality
The game treats certain room types as high-value zones, which boosts the loot quality of every container inside:
- Breach Rooms: Any room you access through a breachable door counts as high-value. Even ordinary-looking containers inside get boosted drop rates.
- Key Rooms: Locked rooms requiring specific keys have premium loot tables. Some can be accessed through exploits (more on that later), though these methods might get patched.
- Puzzle Rooms: Areas you unlock by solving puzzles get the same high-value treatment.
- Parkour-Only Entries: Rooms that require tricky movement to reach often have better loot as a reward for the effort.
Map Conditions and Timing
Testing across different map conditions shows real differences in blueprint drop rates. Knowing when to farm helps you get the most out of each session.
Daytime Raids
Standard daytime raids give you baseline drop rates. You can still find blueprints during the day, but testing shows they drop less often compared to other conditions. Recent patches seem to have shifted more blueprint opportunities toward conditional events and night raids.
During daytime, focus on brown drawers and lockers since these container types keep their elevated drop chances regardless of time.
Night Mode Raids
Night mode explicitly tells you that loot is increased, and this applies to blueprint drop rates too. The trade-offs are fewer extraction points, darker environments that make navigation harder, and more aggressive PvP.
Testing confirms a noticeable jump in blueprint drops during night raids compared to daytime. Higher-tier loot like epic and legendary items also shows up more often. If you're comfortable with the increased difficulty and fewer extracts, night mode gives you consistently better farming.
Electromagnetic Storm Events
These events can happen on various maps and have a few distinct features: nighttime-level darkness, fewer ARC spawns, and dramatic lightning strikes across the map.
Testing across multiple runs with full groups showed dramatically higher blueprint yields during storms compared to any other condition. The blueprints found during electromagnetic storms weren't limited to common items either. Testing produced Wolfpack blueprints, Snap Hook blueprints, and various attachment blueprints.
Recent Patch Changes
The North Line update (Update 1.2.0) made several adjustments that directly impact farming strategies.
| Change Type | Description |
|---|---|
| Raider Containers | Blueprint drop rates were adjusted |
| Rare Blueprints | Bobcat, Tempest, and Volcano now drop more reliably |
| Over-tuned Drops | Bettina blueprint was reduced to normal levels |
| Map Fixes | Unintended exploits removed, loot access corrected |
| Interaction Updates | Probes, Husks, and Raider Caches now count toward objectives |
Core Farming Strategies
These principles will boost your blueprint acquisition rate regardless of which map or location you choose.
Maximize Container Volume
Blueprint farming comes down to opening as many high-value containers as possible per raid. Every additional weapon case, breach room, or Raider Cache you check improves your chances.
- Plan Efficient Routes: Map out paths connecting multiple high-value locations with minimal travel time between them.
- Hit Breach Rooms First: These consistently give the best loot quality. Make them your primary targets on every map.
- Never Skip Weapon Cases: Even weapon case spawns with low appearance rates deserve checking. Weapon cases have the highest blueprint drop rates among all container types.
- Listen for Raider Caches: These fixed-spawn containers make a distinctive ticking sound. Enable Night Mode audio settings to make the ticking carry farther and become easier to hear.
Smash-and-Grab Farming
For focused blueprint farming, consider running minimal loadouts that reduce your risk per raid:
- Load into raids with cheap or easily replaceable gear
- Sprint directly to one or two high-value locations
- Check the priority containers quickly
- Extract immediately if you find a blueprint
This approach keeps your losses minimal on unsuccessful runs while letting you complete more raids per session. Even failed runs cost almost nothing when your kit investment is low.
Equipment Recommendations
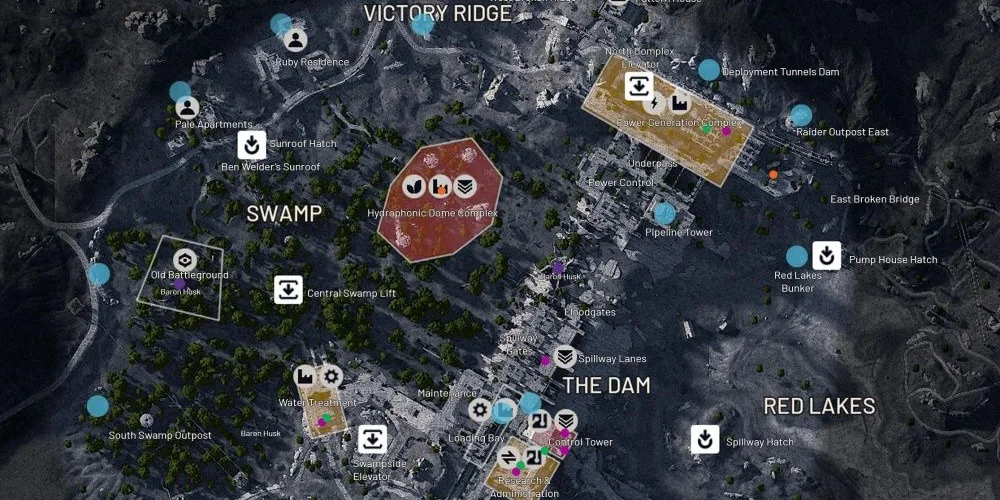
Dam Battlegrounds Locations
Dam Battlegrounds has several efficient blueprint farming spots, including two that remain lesser-known among players.
West Broken Bridge Hidden Vault
This spot ranks among the simplest and most efficient blueprint opportunities in the entire game. It sits at the end of a collapsed bridge, away from common traffic routes, and allows for extremely fast smash-and-grab runs.
The hidden chamber has a weapon case spawn with a notably high appearance rate. Medical bags, grenade cases, and black Raider containers can also spawn here, all with strong blueprint potential. This spot is perfect for smash-and-grab farming.
Lower Bridge Support Mechanism Rooms
Beneath the main concrete bridge, a series of support rooms can be accessed by activating nearby switches that lower metal bridge support platforms.
- Find the small control panels built into the sides of the bridge on the upper walkway
- Interact with the switches to drop the support platforms
- Step onto the lowered segment and follow it downward into the under-bridge structure
- Move through the walkway to access the interior rooms
- Check both sides since spawns can alternate between runs
These support rooms have weapon cases, medical bags, ammo crates, and black Raider containers. The entire area counts as a controlled-access structure, which raises loot quality above surface-level containers. Minimal ARC interference makes this spot ideal for grabbing blueprints before pushing deeper into the map.
Testing Annex
During electromagnetic storm conditions, the Testing Annex becomes an exceptionally productive blueprint location. This building has numerous medical loot containers that drop quality items.
Located in a yellow loot zone, meaning lower PvP contest rates compared to red zones. Testing during electromagnetic storms produced numerous blueprints from this single building. The combination of lower player traffic and elevated storm drop rates makes the Testing Annex a top priority during electromagnetic conditions.
Control Tower
The Control Tower gives excellent blueprint opportunities during both night mode and electromagnetic storm conditions. This location attracts more PvP activity than yellow zones, so speed is key to avoiding fights. Consider bringing traps, mines, and smoke grenades for defense.
The building has numerous lockers that can drop blueprints plus multiple other container types scattered throughout. You can climb to the very top, slide down the ladder, jump off, and loot the spawns outside the key room.
Buried City Locations
Buried City offers one of the highest concentrations of efficient blueprint farming locations across its various districts.
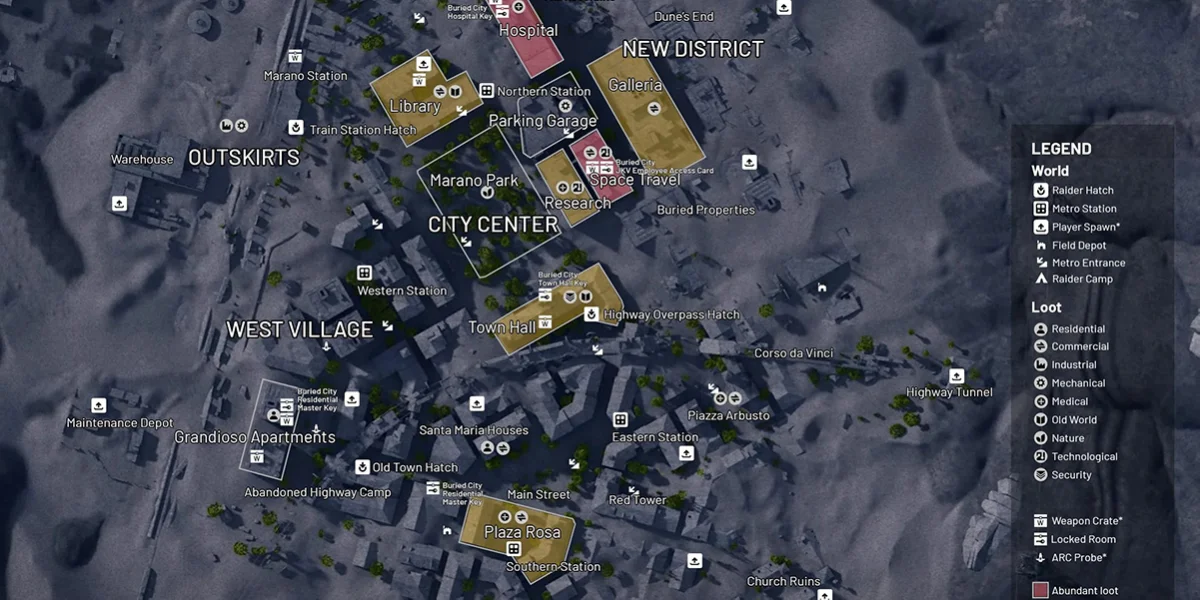
Marano Station Breach Room
On the northern side of Marano Station, this breachable room is one of the most dependable blueprint spots on the map. It's far from central hotspots with low player traffic that usually means uncontested access. The breach door requirement classifies the entire interior as high-value.
- Head to the northern wall of the Marano Station structure
- Breach the door to access the locked interior
- Check the two breach boxes near the back
- Look for a weapon case spawn on the left side
- Scan the corners for grenade tubes or ammo crates
Even when the weapon case doesn't spawn, the breach boxes alone make this room consistently productive. Its isolation and low contest rate make it an ideal early check when spawning near the western side of Buried City.
East Housing Windows
These two connected rooms on the eastern side of Buried City, just south of the Piazza Roma metro exit, form one of the fastest double-checks you can make during a blueprint run.
The attic room gives you a safe elevated space with a strong weapon case spawn. The street-level room across the road offers a second quick blueprint shot. Both locations sit slightly off the busiest routes, reducing contest rates.
Kitchen Rope Stairwell Spawn
This interior room sits just south of the East Housing Windows and works as a natural third stop when moving down the eastern side of Buried City. Easy entry through a street-facing window, kitchen area with a reliable weapon case spawn on the counter, and an internal rope that zips you directly to the upper floor, skipping the staircase.
High-Value Rooftop Zipline Room
This blueprint spot sits above the Grandioso Apartments, accessed via the zipline from West Village Piazza Roma.
The high-tier classification of this room, combined with its density of blueprint-eligible containers, makes it one of the best blueprint opportunities in Buried City.
Plaza Rosa Pharmacy
On the east side of the Plaza Rosa district, this pharmacy is one of the most container-dense blueprint spots on the entire map. Pharmacies count as full high-value zones from top to bottom. Every drawer, shelf, cabinet, medical bag, and potential weapon case carries boosted blueprint odds. The multi-floor layout lets you loot quickly and reposition if needed.
Red Tower
The Red Tower sits northeast of Plaza Rosa, standing out with its red exterior and narrow vertical layout. Multiple high-value interiors stacked across upper floors, each room can spawn medical bags, red lockers, and one or more weapon cases.
Secret Breach Room (Residential House)
In one of the general houses on the street, you can climb the stairs to find a breach room that becomes exceptionally productive during night mode. Contains numerous brown drawers and other valuable containers. Backpacks and additional containers frequently spawn. Excellent for getting quality blueprints during night raids.
Spaceport Locations
Spaceport features distinctive industrial architecture with multiple elevated farming opportunities and hidden container spots.
Vehicle Maintenance Upper Level
Vehicle Maintenance sits in the south-central part of Spaceport, below Control Tower A6 and west of Container Storage. Surrounded by open ground without major player rotation lanes, it's usually quiet early in raids. The upper level has a compact lounge area with a reliable weapon case spawn.
Fuel Lines Vertical Pipe
The Fuel Lines zone runs along the long industrial trench west of Launch Towers and has one of the most overlooked blueprint spots on the entire Spaceport map.
This is one of the most consistent blueprint rolls in Fuel Lines because the spawn location is so well hidden in plain sight. Players regularly pass nearby but almost never check inside the pipe.
Departure Building Staff Bathroom
The Staff Bathroom inside the Departure Building has strong blueprint potential but comes with significant risk because of its central location. Before Update 1.2.0, the bathroom door opened normally. After the update, it became a breachable door, officially marking it as a high-tier loot room with upgraded loot quality.
Spaceport Perimeter Loot Towers
The Loot Towers are built directly into the perimeter wall around the central facility, forming square, elevated guard posts at regular intervals. Not marked on the map but easily visible from a distance because of their height and boxy silhouette.
At the top you'll find weapon case spawns (primary blueprint farming draw), crates and small containers along the walls, occasional security lockers, and rarely an automated turret. The perimeter Loot Towers give you some of the most consistent blueprint rolls on Spaceport with minimal PvP risk.
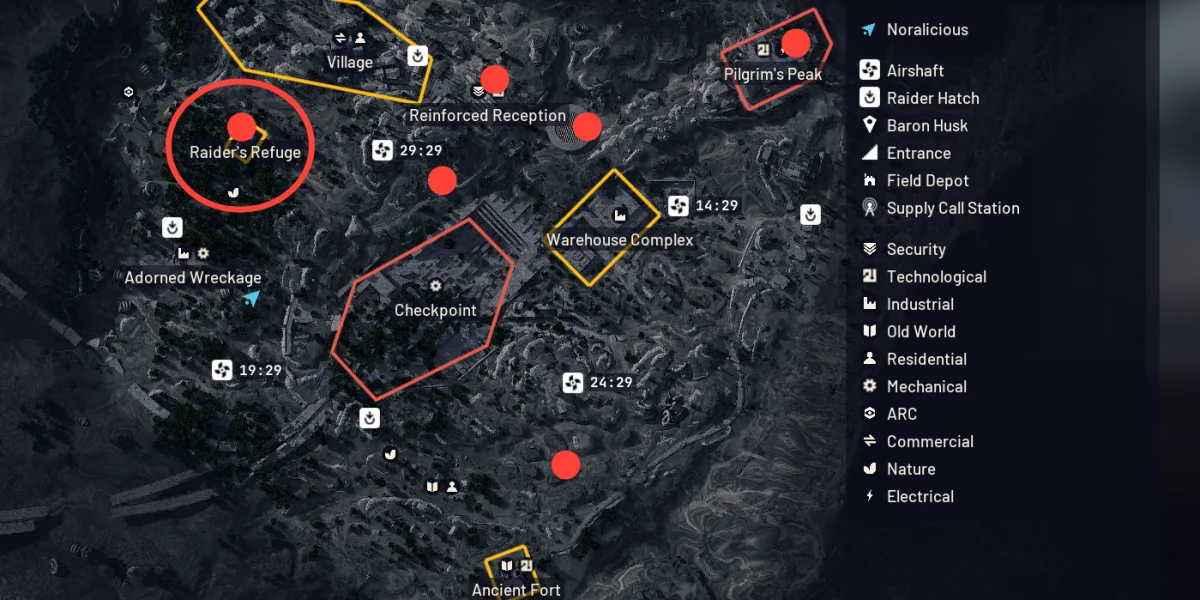
Blue Gate Locations
Blue Gate features an extensive underground facility with multiple high-value areas and some of the best augment blueprint opportunities.
Underground Facility Entry
The underground area on Blue Gate isn't marked as a yellow or red location on the map, making it somewhat off the beaten path. Look for a location where a staircase icon appears when you get close enough, head into the building, and take the zipline down to the bottom floor.
The entire underground facility works as the looting area, but three key areas consistently produce the best results.
Yellow Door Breach Room (Locker Room)
This small breach room is quick to access and usually has quality items. Follow the blue line on the floor into the facility, continue until you see the line become both red and blue together. Just before hitting that combined blue and red line, turn left and find the door with yellow markings on it.
Testing shows this area produces augment blueprints reliably, including the valuable Survivor Looting blueprint.
Color Terminal Puzzle Stashes
This location involves a mini-game that determines where loot spawns. Activate the terminal and wait a few seconds. Watch the monitor as it flashes white, then eventually shows a color (red, blue, or yellow). Whatever color appears, follow the matching color symbols painted on the walls to find a painted X on the floor with a lootable container next to it.
Battery Puzzle Room (Red Room)
This area takes more effort to unlock but typically gives the best rewards. Find a panel somewhere in the underground area containing three batteries you can pull out. The battery panel location is randomized between up to four possible positions. Take all three batteries and deliver them one at a time to the door, then plug each battery into the wall.
Village Area
During electromagnetic storms or night mode, the entire village area on Blue Gate becomes productive for blueprint farming. Excellent for valuables, Lance Mixtapes, and snow globes. Notable for weapon attachment blueprints and productive even during normal conditions.
Stella Montis Locations
Stella Montis is an entirely underground facility with an enclosed, maze-like layout. You can't avoid other players by rotating around the area since you'll eventually run into others in the corridors. The multi-floor layout does give you chances to break line of sight or disengage during fights.
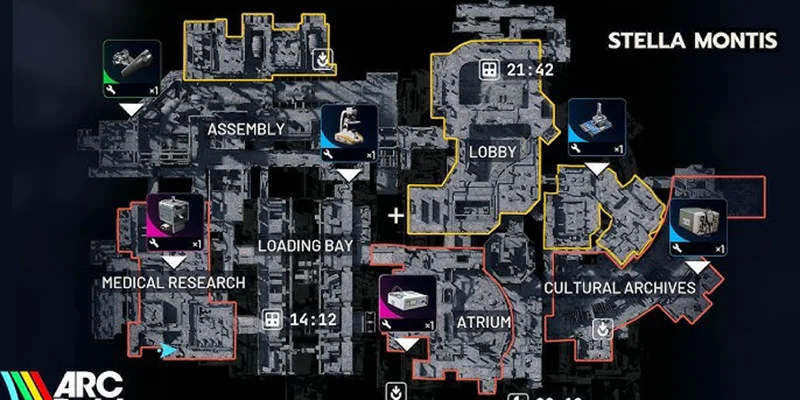
Security Checkpoint (Four Floors)
The Security Checkpoint sits on the east side of the Lobby inside a yellow-tier loot zone. This structure is built vertically around a central staircase with four full floors of rooms, side chambers, and branching hallways.
Every entrance requires breaching, which flags the entire space as high-value from top to bottom. This means higher-tier loot rolls on every container and significantly better blueprint odds than ordinary rooms.
Security Checkpoint Lower Floor Key Room
The most valuable part of the Security Checkpoint is on the lower floor, where a locked room normally needs a key. Inside you'll find a high-probability weapon case spawn, multiple black Raider containers, and additional high-value items.
East Lobby Breach Room
On the east side of the Lobby, a compact breach-only room consistently delivers high-quality loot. Both entrances require breaching, and every container inside gets elevated loot rolls. The small interior is densely packed with lockers and cabinets with boosted loot, possible black Raider containers, and occasional medical duffel or grenade canister spawns.
Blueprint System Myths
The rarity of blueprints has created numerous myths in the community. Knowing what's actually confirmed versus speculation helps you avoid wasted effort.
What We Know Works
- Container Quality Matters: Higher-tier containers and high-value rooms give better blueprint odds. This includes breach rooms, key rooms, puzzle rooms, weapon cases, and Raider-marked containers.
- No Map Exclusivity: Despite claims that specific blueprints only drop on specific maps, the same blueprints have been found in different containers on different maps.
- Volume Increases Returns: Opening more breach rooms and more weapon cases in a single run means your blueprint income goes up.
Confirmed Exception Cases
Some blueprints are tied to specific acquisition methods:
| Blueprint Type | Source |
|---|---|
| Lure Grenades, Trigger Grenades | Quest rewards |
| Hullcracker and ammo | Quest rewards |
| Jupiter, Equalizer | Harvester event puzzle completion |
| Trials Blueprints | Weekly Trials reward tiers |
Common Misconceptions
- "New Maps Have Better Drop Rates": No region is secretly buffed for blueprint drops. Some maps just give you more access to high-value containers per minute.
- "This Container Type Only Drops This Blueprint": Evidence doesn't support claims that specific blueprints are locked to specific container types.
- "Stella Montis Was Buffed for Blueprints": The North Line update made adjustments to drop rates, but Stella Montis doesn't have confirmed exclusive blueprint buffs.
Duplicate Blueprints and Count
What to Do with Duplicates
You can sell duplicate blueprints for 5,000 Coins each. There's no way to reuse, trade, or convert them into anything else.
Total Blueprint Count
The game has 75 blueprints technically, though the in-game counter shows 74. This happens because the Hullcracker and Launcher Ammo blueprints are combined into one entry.
Vendor Availability
Vendors don't sell blueprints. All blueprints come from loot containers, ARC Surveyors, quests, Trials rewards, or special events.
Complete Farming Checklist
Use this summary to get the most out of your farming sessions:
- Check for electromagnetic storm conditions (highest priority)
- Night mode as secondary priority if no storm available
- Equip Looting Mark II augment if available
- Bring Door Blockers for securing breach rooms
- Pack mobility items for reaching contested locations first
- Load minimal kit for smash-and-grab runs
- Hit breach rooms, key rooms, and puzzle rooms first
- Check every weapon case spawn point you pass
- Listen for Raider Cache ticking sounds
- Hit brown drawers and lockers as secondary priorities
- Avoid unnecessary fights that cut into looting time
- Extract immediately after securing valuable blueprints
Frequently Asked Questions
There are 75 blueprints total, though the in-game counter shows 74. The Hullcracker and Launcher Ammo blueprints are combined into one entry.
Weapon cases have the highest blueprint drop rates. Raider-marked containers (Raider Caches, black containers, grenade canisters, medical duffels) and brown drawers also have elevated chances.
No confirmed map-specific buffs exist. Maps that offer more high-value container access per run produce more blueprints, but this comes from volume rather than hidden drop rate modifiers.
No. All blueprints come from loot containers, ARC Surveyors, quests, Trials rewards, or special events.
Sell them for 5,000 Coins each. There's no other use for duplicates.
Electromagnetic storm events produce the highest observed drop rates based on testing. Night mode comes second. Daytime raids have the lowest blueprint frequency.
Conclusion
Blueprint farming in ARC Raiders rewards preparation, route knowledge, and container prioritization over pure luck. Targeting high-value rooms, hitting weapon case spawns consistently, and farming during electromagnetic storms will dramatically speed up your collection growth.
Memorize key locations across each map, build efficient routes connecting multiple blueprint opportunities, and make checking these spots a habit during every raid. The investment in learning these locations pays off throughout your entire progression.