
Understanding Map Modifiers in ARC Raiders
Map modifiers (also called map conditions) change the standard extraction experience by introducing special challenges, environmental hazards, and better loot opportunities. These conditions rotate on timed schedules throughout each day, letting you choose between standard maps or modified versions with higher risk and better rewards.
When you're selecting your raid destination, you'll see alternative map options next to the standard icon. These alternatives have specific modifiers that change gameplay in meaningful ways. Each modifier shows a countdown timer indicating when new conditions become available, so you can plan your raids around preferred events or wait for different opportunities.
Some modifiers apply directly to the standard map and appear as small symbols next to map names. You can't avoid these except by waiting for the rotation to change. Other modifiers appear as separate map choices, giving you the option to select or skip them.
Conditions range from straightforward loot increases to complex boss encounters requiring team coordination. Your success depends on understanding what each modifier changes and how those changes affect your extraction strategy.

Major vs Standard Modifiers
Map modifiers fall into two categories that determine their impact on Trials points (a progression system tied to weekly challenges).
Major Conditions
Major Conditions award double the standard Trials points you earn during raids. These modifiers introduce severe environmental hazards or significant gameplay restrictions, creating high-risk scenarios that reward successful extraction with faster challenge completion. The increased difficulty makes them valuable for farming weekly Trials, but you'll face serious dangers.
Current Major conditions include Night Raid and Electromagnetic Storm. Both create darkness or limited visibility, reduce available extraction points, close Raider Hatches completely, and spawn more aggressive ARC units across the map.
Standard Conditions
Standard Conditions keep normal Trials point rates while changing specific gameplay elements. These range from simple resource boosts to complex puzzles and boss encounters. Standard modifiers offer targeted opportunities for specific loot types or present unique challenges without the widespread difficulty spikes of Major conditions.
Environmental Modifiers
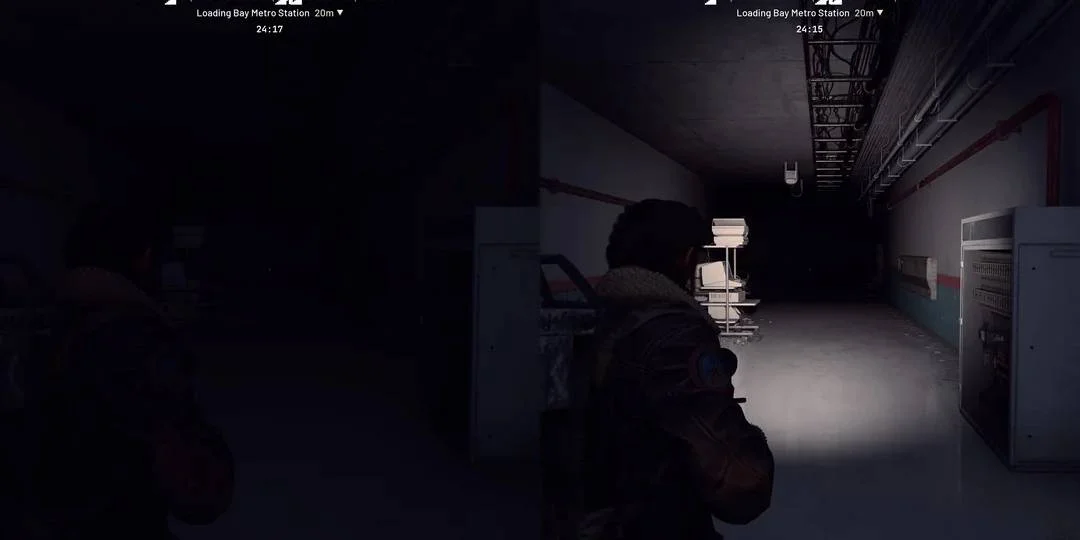
Night Raid (Major Condition)
Night Raid turns existing maps into darkness-covered extraction zones where visibility becomes your primary challenge. This modifier can appear on every map in ARC Raiders: Dam Battlegrounds, Buried City, Spaceport, Blue Gate, and Stella Montis.
Environmental Changes
The entire map operates under night-time conditions, forcing you to rely on flashlights for basic visibility. This darkness affects both navigation and combat, making it much harder to spot enemies, loot containers, and environmental hazards. The reduced visibility works both ways though. Skilled players can use darkness as concealment while creating opportunities for unexpected encounters.
ARC Behavior Changes
ARC units become way more aggressive during Night Raids. Spawn density increases across the entire map, placing more hostile units in your path. These enemies patrol more actively and respond faster to player presence, making previously safe routes considerably more dangerous.
Extraction Restrictions
Active Return Points drop to only two instead of the standard four. This forces all Raiders on the server to funnel toward limited extraction zones, creating concentrated player competition at these points. The restriction becomes especially problematic late in the raid timer when multiple groups try extracting simultaneously.
Raider Hatches stay completely closed during Night Raids, removing your quick emergency extraction option. You can't escape through these alternate routes regardless of circumstances, making extraction planning crucial before you engage in combat or loot high-value areas far from Return Points.
Loot Improvements
Despite the increased danger, Night Raid provides some of the best farming opportunities available. Loot value and rarity increase across the entire map, with particularly big improvements to items found behind locked doors. Keys spawn at higher rates during this condition, making it the best time to bring keys for accessing secured rooms.
Blueprints drop at increased rates throughout Night Raid maps. The combination of better loot behind locked doors and increased blueprint chances makes this condition valuable when you're seeking specific crafting recipes or rare items.
Strategy Considerations
The reduced visibility cuts both ways. While you struggle to see enemies and other players, they face the same limitation when trying to spot you. Stay mobile and avoid predictable patterns to counter the aggressive ARC spawns. The limited extraction points mean you should position yourself with Return Point access in mind throughout the raid rather than ranging too far from these crucial zones.
The increased key spawn rate makes Night Raid perfect for targeting locked room loot, but other players benefit from this increase too and will likely compete for the same secured areas. Your flashlight gives away your position to observant enemies, so think about when to use light versus accepting reduced visibility for stealth.
- Double Trials points for fast progression
- Significantly increased loot quality and rarity
- Higher blueprint drop rates
- More keys spawn for locked areas
- Darkness provides stealth opportunities
- Severely limited visibility requires flashlight
- Much more aggressive ARC spawns
- Only two active Return Points
- Raider Hatches completely closed
- High player competition at extraction
Electromagnetic Storm (Major Condition)
Electromagnetic Storm works similarly to Night Raid but adds periodic lightning strikes as a constant environmental hazard. This condition appears on Dam Battlegrounds, Blue Gate, Spaceport, Buried City, and Stella Montis.
Environmental Hazards
The map gets hammered by continuous heavy thunderstorms with rainfall and lightning strikes hitting random locations throughout the raid. Before each strike, the ground shows sparking sections that serve as brief warnings. These sparks appear moments before lightning impacts that specific spot, giving you a small window to move clear.
Lightning strikes deal massive damage that can instantly down unprepared players. But the strikes affect ARCs with equal lethality, capable of destroying smaller ARC units outright or stunning larger enemies. This creates tactical opportunities where positioning near spark zones can eliminate pursuing ARCs without direct combat.
The constant thunder and heavy rain provide excellent audio cover that masks footsteps and gunfire. Sounds that normally reveal player positions become much harder to detect, allowing for stealthier movement despite reduced visibility from storm conditions.
Visibility and Navigation
Like Night Raid, Electromagnetic Storm reduces visibility across the map, though not to complete darkness levels. The storm conditions, heavy rain, and general atmospheric effects make spotting enemies and identifying loot more difficult. The combination of visual and audio disturbances creates a disorienting environment that favors players who know map layouts well.
ARC Behavior and Spawn Changes
ARC difficulty and spawn density both increase during Electromagnetic Storms. More units patrol the map, and they show more aggressive engagement patterns. But the lightning hazard affects them just as much as it affects you, occasionally eliminating threats without your intervention.
Extraction Restrictions
Return Points reduce to fewer active sites, similar to Night Raid. Expect significantly fewer extraction options than standard conditions. This concentrates player traffic at remaining extraction zones.
Raider Hatches close completely during Electromagnetic Storm, removing these emergency extraction routes. Combined with reduced Return Points, extraction planning becomes critical before you venture into high-risk areas.
Loot Improvements
Container loot quality increases throughout the map. You'll find higher-tier items in standard loot locations more frequently than during normal conditions. Blueprint drop chances improve, making Electromagnetic Storm valuable for farming crafting recipes.
The increased loot quality applies broadly rather than concentrating in specific areas, so exploring multiple locations during a single raid yields better results than focusing on one high-value zone.
Strategy Considerations
The lightning hazard forces constant repositioning. Standing still becomes dangerous as spark zones can appear beneath your feet. You can use this same mechanic defensively though, by leading ARCs into spark zones or baiting enemy players into striking distance.
The audio masking from thunder and rain creates both opportunities and risks. You move more stealthily, but so do other players and ARCs. You can't rely solely on sound to detect threats, requiring greater visual vigilance despite reduced visibility.
Surviving Electromagnetic Storm requires mobile gameplay that takes advantage of environmental kills while avoiding the same hazards. The substantial loot rewards and double Trials points make the chaos worthwhile for players who maintain awareness and use the lightning strikes strategically.
Lush Blooms (Standard Condition)
Lush Blooms is the most beginner-friendly modifier, focusing purely on resource abundance without adding combat challenges or environmental hazards. This condition significantly increases natural resource spawns across all maps.
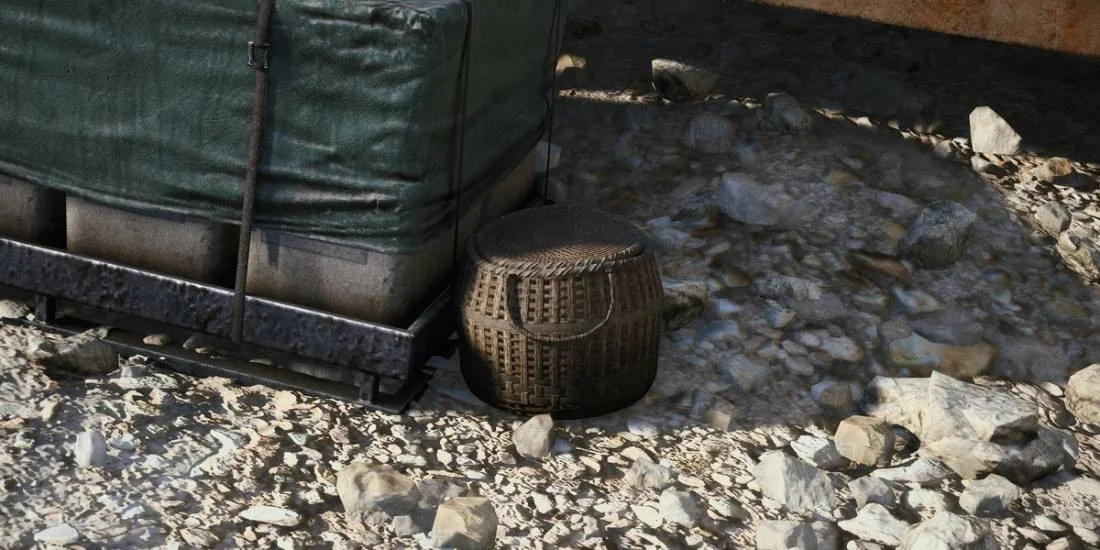
Resource Spawn Changes
When Lush Blooms activates, the map fills with Wicker Baskets containing nature items. These small brown containers spawn near nature areas, fruit trees, and old-world settlement locations. Recognizing these spawn zones helps you efficiently collect resources during this event.
Fruit trees provide double or triple their normal yields when you interact with them during Lush Blooms. A tree that normally drops one or two items instead provides way more resources from a single harvest. Plant nodes similarly yield more materials per harvest action.
The modifier exponentially increases spawns for specific nature items:
- Lemons
- Apricots
- Mushrooms
- Olives
- Prickly Pears
- Agave
- Other Nature-category loot
Some nature items stay restricted to specific maps even during Lush Blooms. You won't find every nature resource type on every map, so targeting specific items requires knowing which maps naturally spawn those resources.
Key Farming Locations
Specific areas become highly efficient collection zones during Lush Blooms. Notable locations include the Hydroponic Dome Complex on Dam Battlegrounds, the Olive Grove on Blue Gate, and the Town Hall Gardens on Buried City. These areas combine natural resource spawns with structural features that concentrate Wicker Baskets and fruit trees.
Gameplay Impact
Unlike other modifiers, Lush Blooms doesn't increase ARC spawns, reduce extraction points, or close Raider Hatches. The map plays identically to standard conditions except for the increased nature resources. From a difficulty perspective, it's comparable to running a map without modifiers.
Loot-Focused Modifiers
Uncovered Caches (Standard Condition)
Uncovered Caches introduces time-sensitive loot containers scattered throughout the map that you must locate through audio cues and excavate before they self-destruct. This condition can appear on Dam Battlegrounds, Buried City, Spaceport, Blue Gate, and Stella Montis.
Cache Location Mechanics
Raider Caches don't appear on your map or get any visual markers visible from distance. Instead, you need to locate them by listening for distinctive audio cues. The caches emit a ticking sound (similar to an old clock) or beeping sound that gets progressively louder as you approach their location.
During this event, small red flags may also appear above buried containers, making them easier to spot once you're in the general vicinity. But the primary method for finding caches stays the audio cue, requiring you to turn up your game volume and listen carefully while exploring.
Time Pressure Element
Raider Caches are rigged to explode if you don't excavate them quickly enough. The ticking or beeping sound that helps you locate them also serves as a timer. The exact duration before detonation varies, but the speed of the audio cue indicates urgency. Faster beeping or ticking means higher chance of imminent explosion.
This time pressure means you can't just mark cache locations and return later. Once you locate a cache, you need to decide immediately whether to excavate it or keep moving. The explosion destroys the loot entirely, making timing critical.
Loot Contents
Successfully excavated Raider Caches contain multiple items rather than single pieces of loot. Contents include:
- Ammunition
- Gadgets
- Grenades
- Medical supplies
- Potential weapon blueprints
The potential blueprint drops make Uncovered Caches valuable when you're seeking crafting recipes. The multiple items per cache mean successful excavations provide significant inventory additions.
Prospecting Probes (Standard Condition)
Prospecting Probes significantly increases the spawn rate of ARC Probes falling from the sky across the map. This modifier provides better access to mechanical components and ARC-related materials but comes with a notable position-revealing risk.
Probe Spawn Changes
The increase in probe spawns is alarming in frequency. You should expect to see probes frequently falling from the sky throughout your raid, far more than during standard conditions. This creates numerous opportunities to gather mechanical components without necessarily hunting ARCs directly.
Breach Alarm Mechanic
Opening any ARC Probe triggers a loud alarm that broadcasts your position. This alarm serves as an audio beacon alerting both ARC units and other players to your exact location. The alarm completely gives away your position to everyone nearby.
This creates a risk-reward calculation for each probe you encounter. The mechanical components inside are valuable, but breaching announces your presence to everyone nearby.
Loot Benefits
Getting Mechanical Components becomes way easier during Prospecting Probes. These components get used for various crafting recipes and upgrades, making this modifier valuable when you're working on specific gear progression paths.
The increased spawn frequency means you can gather substantial materials during a single raid if you're willing to accept the positioning risk.
Launch Tower Loot (Standard Condition)
Launch Tower Loot is a map-specific modifier that only appears on the Spaceport map. This condition concentrates high-value loot at the top of the Launch Tower located at the map's center, creating a high-risk extraction challenge.
Access Requirements
Getting to the Launch Tower requires finding an Industrial Battery somewhere on the map to activate the doors. The battery spawns close to the base of the tower, somewhere in the tunnels, or near the fuel pods. This searching requirement means you can't rush directly to the tower but must first locate the access item.
You might also need to insert Fuel Cells into Generator Consoles to access the tower via ziplines. The exact mechanics may vary between instances.
Loot Concentration
A sizeable amount of loot concentrates at the Launch Tower's top. Everyone making it to this spot can expect to walk around with substantial loot, indicating big rewards for successful access and extraction.
Defensive Challenges
The Launch Tower gets heavily protected by multiple ARC drones, making the approach and looting process dangerous from an AI perspective. The concentrated loot also attracts other players, creating significant PvP risk. You'll face both ARC resistance and likely player confrontation.
The central map position makes the tower visible from long distances, alerting other players when you attempt access. This removes the element of surprise and guarantees other groups know someone's going for the valuable loot.

Locked Gate (Standard Condition)
Locked Gate is a map-specific modifier exclusive to the Blue Gate map. This condition creates a multi-stage puzzle requiring collection of security codes from specific locations to unlock a secured area.
Security Code Locations
You need to collect four Security Codes from specific named locations:
- Raider's Refugee
- Pilgrim's Peak
- Reinforced Reception
- Ancient Fort
These locations spread across the Blue Gate map, requiring extensive travel and map knowledge to locate all four codes efficiently.
Unlock Objective
The collected Security Codes unlock the Gate Room Control at the Warehouse Complex. This provides access to a secured area or valuable loot cache.
Gameplay Impact
Active Return Points reduce during Locked Gate, limiting your extraction options similarly to Major conditions. Raider Hatches stay unavailable, removing emergency extraction routes. These restrictions create the same extraction pressure as Night Raid or Electromagnetic Storm despite the Standard classification.
Combat-Intensive Modifiers
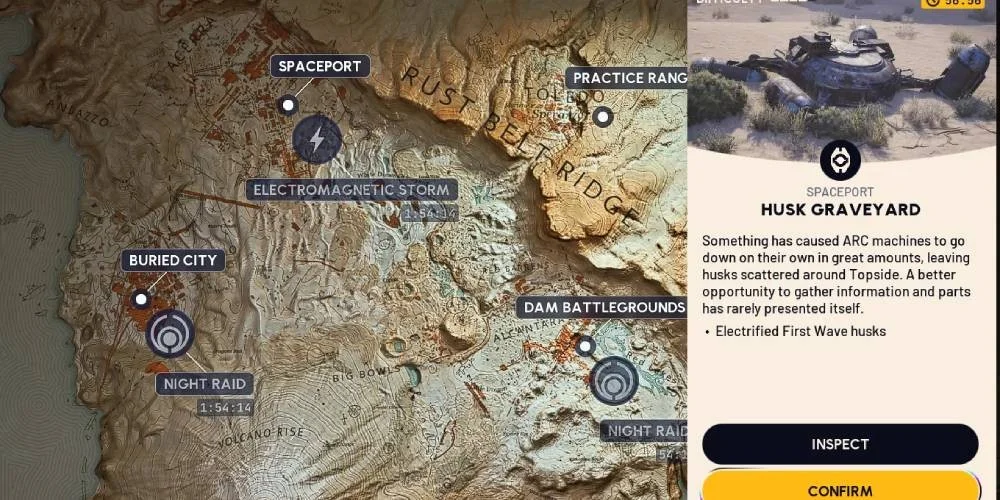
Husk Graveyard (Standard Condition)
Husk Graveyard significantly increases the number of destroyed ARC husks scattered across the map, providing better access to rare ARC components without direct combat. This modifier can appear on Dam Battlegrounds, Buried City, Spaceport, Blue Gate, and Stella Montis.
Husk Spawn Changes
Additional quantities of specific husk types appear in random locations across the map:
- Wasp Husks (or Wasp Drone Husks)
- ARC Couriers
- Rocketeer Husks
Baron Husks stay at their fixed locations and don't increase in quantity during this event. You should still know where to find Baron Husks from normal map knowledge, but other husk types appear in greater numbers at varied locations.
Breach Hazard Mechanic
Breaching husks during Husk Graveyard carries additional risk beyond normal conditions. Many husks emit electrical discharges when opened that briefly stun you if caught in the effect. This stun temporarily freezes you, creating vulnerability to ARC or player attacks.
Before the discharge triggers, you'll see the hull beginning to spark. This visual warning gives you time to react, but the window is brief.
Safe Breach Technique
To safely loot husks during this modifier:
- Start the breach process
- Once the husk opens, immediately roll away
- Wait for the electrical sparks to settle
- Return to loot the contents
This technique lets you avoid the electrical discharge that would otherwise stun you. Skip this safety procedure and you'll get hit by a nasty electric current that momentarily freezes you in place.
Available Components
Husk Graveyard provides access to rare ARC components that normally only drop from defeating active ARC units:
| Component Type | Rarity | Primary Use |
|---|---|---|
| Bastion Cells | Epic | Weapon Crafting |
| Bombardier Cells | Epic | Weapon Crafting |
| Leaper Pulse Units | Epic | Gear Upgrades |
| Rocketeer Drivers | Epic | Workshop Upgrades |
| Damaged ARC Parts | Rare/Uncommon | Workshop Upgrades |
Hidden Bunker (Standard Condition)
Hidden Bunker is a map-specific modifier exclusive to the Spaceport map featuring a complex multi-player puzzle and increased ARC presence. This condition awards double Trials points despite the Standard classification.
Antenna Activation Objective
Access to the bunker requires activating four Rooftop Antennas that spawn randomly around the Spaceport map. The random spawn locations mean you can't just memorize fixed antenna positions but must search the map to locate all four during each raid.
Players across the server typically cooperate to activate all four antennas. Other ARC Raider players are usually willing to work together to open the entrance. The requirement for multiple antenna activations effectively forces multi-player participation (coordinated in advance or not).
Bunker Contents
Once all four antennas activate, the entrance opens revealing a good amount of loot for initial collection. But the bunker also contains eight terminals where you can download information.
Unresolved Puzzle
What you do with the terminal information is the tricky part. The ARC Raiders community is actively trying to figure out what key details they're missing to complete the final hurdle of this puzzle. Players are still working out the complete solution.
Trials Objective
You can retrieve data from the various terminals inside the bunker to complete Trials objectives. This makes Hidden Bunker valuable for weekly challenge progression.
Boss Encounter Modifiers
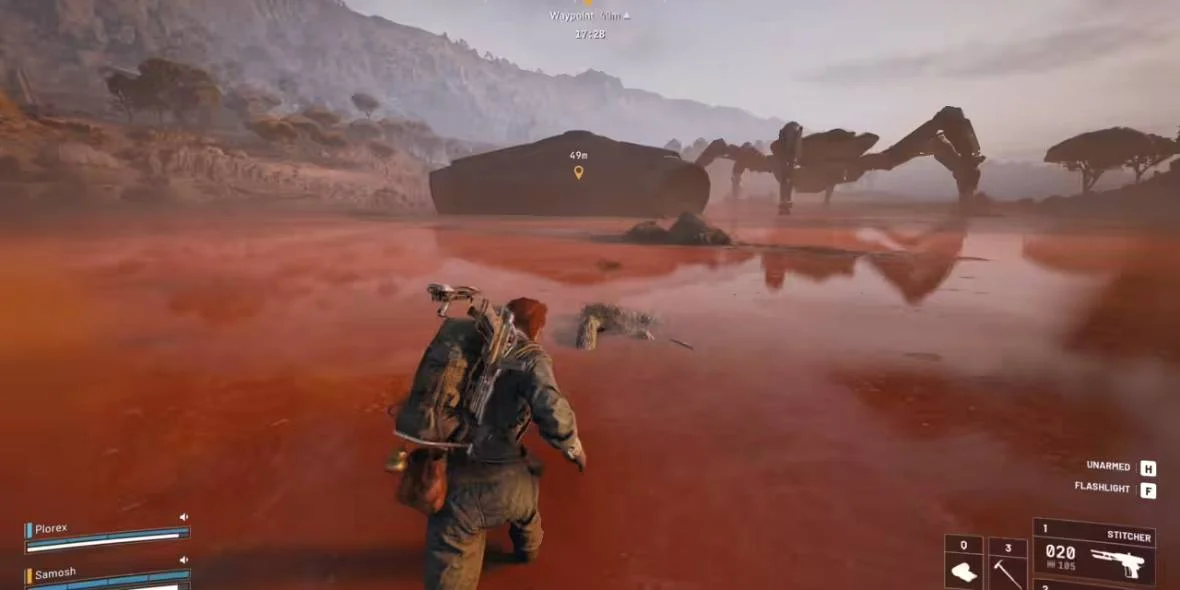
Harvester (Standard Condition)
Harvester spawns a massive downed structure on the map that combines a challenging boss encounter with a puzzle-solving element. This modifier features the Queen ARC as a primary defensive threat and offers high-tier blueprint rewards.
Harvester Structure
A giant Harvester structure appears somewhere on the map. It's hard to miss, looking like a ship wreck full of plenty of loot. The structure itself serves as both the loot source and a puzzle challenge requiring specific items and mechanics to access fully.
Queen ARC Guardian
The Queen ARC is the largest enemy you can find in the game and represents the primary obstacle to accessing Harvester loot. She constantly patrols and protects the Harvester, attacking any players who approach.
The Queen poses a significant combat challenge even for well-equipped groups. Even your best weapons and gear might not be enough. Taking down a Queen requires heavy coordination from multiple players.
Cross-Group Cooperation
The difficulty of defeating the Queen often requires cooperation with players outside your immediate group. You may need to break away from your comfort zone to deal with the Queen, working with players outside your group. This creates temporary alliances similar to Hidden Bunker's antenna activation.
Success requires server-wide cooperation where multiple groups on your instance work together to bring down the Queen. There's a lot of risk with engaging a Queen Arc, but plenty of reward if other players on your server can cooperate and work together.
Puzzle Mechanics
Accessing the Harvester involves a puzzle with Fusion Cores (also referred to as Power Canisters). The structure is a trapped puzzle structure located in open areas with multiple hazard phases.
Environmental Hazards
The Harvester cycles between different dangerous phases:
- Fire purges that force you out of the structure
- EMP pulses that briefly stun you
Yellow nodes appear on the walls that you must destroy before the fire cycle activates. This creates time pressure where you need to eliminate these nodes before the fire purge triggers.
Power System
Fusion Cores (or Power Canisters) are scattered near the Harvester. You need to collect these and insert them into slots around a central pillar to progress through the puzzle.
Blueprint Rewards
Successfully completing the Harvester challenge offers valuable blueprint drops including:
These represent some of the most valuable crafting recipes in the game, making the Harvester encounter worth pursuing despite the significant challenge.
Matriarch (Standard Condition)
Matriarch spawns an apex ARC boss that's the largest and most heavily armored enemy in the game. This encounter creates chaotic multi-group PvE scenarios with valuable blueprint rewards.
Boss Characteristics
The Matriarch is larger than The Queen and appears as a massive armored walker, positioning her as the largest boss-type enemy available. She's visible from long distances due to her size, serving as a beacon that draws multiple Raider groups to the same location.
Spawn Mechanics
The Matriarch spawns in open areas with enough space for her to maneuver. Typically, she appears near map centers where the terrain accommodates her size and movement patterns. The open-area spawns make approach from multiple angles possible but also leave limited cover options during the fight.
Armor and Weak Points
The Matriarch has heavy armor that resists standard damage. She has a glowing core weak point that serves as the primary damage target. But this core requires precise shots from multiple angles to hit effectively, demanding coordination and positioning during the fight.
Combat Abilities
The Matriarch employs multiple attack patterns:
- Rocket fire directed at players
- Gas attacks that create area denial hazards
- Defensive shield phases that block all damage
The defensive shield is a major challenge, as it completely blocks damage during certain phases. This forces you to recognize shield activation and cease fire to conserve ammunition until the vulnerable phase returns.
Reinforcement Summoning
Throughout the fight, the Matriarch summons waves of additional ARC units including:
| Unit Type | Threat Level | Counter Strategy |
|---|---|---|
| Fireballs | Medium | Maintain distance, use cover |
| Wasps | High | Priority target, ranged focus |
| Leapers | Medium | Area denial, explosives |
| Bastions | High | Focused fire, armor penetration |
| Bombardiers | Very High | Immediate elimination, long range |
| Rocketeers | Very High | Cover usage, quick movement |
These reinforcements create secondary targets you need to manage while maintaining pressure on the Matriarch herself. Ignoring reinforcements results in overwhelming numbers, but focusing too heavily on them extends the main fight dangerously.
Multi-Group Dynamics
The Matriarch's difficulty and visibility create situations where multiple Raiders converge on the same location, resulting in chaotic PvE encounters where squads temporarily cooperate to take her down. This creates similar dynamics to the Harvester's Queen encounter, where cross-group cooperation becomes necessary despite potential PvP after the boss dies.
Coordination Requirements
The encounter requires coordination with some players drawing aggro while others target the weak core. This suggests tank-and-damage role distribution where certain players intentionally attract the Matriarch's attention while others focus on precision shots to the glowing core.
You'll need a whole team at minimum and potentially need to work with other players beyond your immediate group. Solo attempts are inadvisable, and even organized groups may struggle without server cooperation.
Reward Drops
The Matriarch has a chance to drop rare loot including:
Multiple Matriarch defeats may be required to obtain both blueprint and reactor components.
Multiple Defeat Requirement
Completing the Aphelion weapon requires both the blueprint and the Matriarch Reactor. Since both come from Matriarch defeats and drops aren't guaranteed, expect to defeat the Matriarch multiple times trying to get these resources and increase your chances of getting this Legendary weapon.
This creates a long-term farming objective where you'll repeatedly attempt the encounter to collect all necessary components.
Upcoming Map Modifiers
Snowfall (Upcoming, Major Condition)
Snowfall is confirmed as an upcoming map modifier scheduled for release in the Cold Snap update. This will introduce winter weather conditions to all maps in the Rust Belt Ridge region.
Release Timing
The Cold Snap update is expected between December 17-22, 2025. This timeframe is based on the Expedition Project's Departure Window delay, with the window now scheduled for December 17th and the Caravan leaving on December 22nd.
Environmental Changes
Snowfall will cover maps with snow, fundamentally changing their visual appearance. All maps in the Rust Belt Ridge will get a snow-clad look, creating a winter atmosphere across existing locations.
Gameplay Impact
The modifier will shake up the gameplay and how each Raider approaches the map locations. Specific mechanical changes haven't been detailed yet.
Map Updates
The Cold Snap update won't include new maps. Instead, existing maps get the winter visual treatment when Snowfall is active. You'll experience familiar locations with modified aesthetics rather than exploring entirely new terrain.
Map Modifier Strategy Summary
When choosing which modifiers to engage:
For Trials Point Farming
Major conditions (Night Raid, Electromagnetic Storm) provide double points. Hidden Bunker also awards double points despite Standard classification. These are your most efficient options for weekly challenge completion.
For Specific Resources
| Resource Type | Best Modifier | Alternative |
|---|---|---|
| Nature Items | Lush Blooms | Husk Graveyard (secondary) |
| ARC Components | Husk Graveyard | Prospecting Probes |
| Mechanical Components | Prospecting Probes | Standard raids |
| High-Tier Loot | Night Raid | Electromagnetic Storm |
For Blueprint Farming
- Night Raid and Electromagnetic Storm increase blueprint drops generally
- Harvester for Equalizer and Jupiter blueprints specifically
- Matriarch for Aphelion blueprint and reactor
- Uncovered Caches for potential blueprint drops
For Lower Risk
Lush Blooms, Uncovered Caches, Husk Graveyard, and Prospecting Probes maintain standard extraction options and don't significantly increase combat difficulty. These offer focused benefits without Major condition restrictions.
For Group Play
Harvester and Matriarch require group coordination at minimum and benefit from cross-server cooperation. Launch Tower Loot heavily favors organized groups over solo players. Hidden Bunker's puzzle mechanics encourage cooperation despite later competition.
- Targeted resource farming opportunities
- Increased blueprint drop rates
- Double Trials points from Major conditions
- Unique gameplay experiences
- Server-wide cooperation events
- Reduced extraction points
- Closed Raider Hatches
- Increased ARC aggression
- Environmental hazards
- Higher player competition
Understanding these modifiers lets you plan raids around specific objectives (farming progression resources, completing weekly challenges, or pursuing particular blueprint drops). The rotation system means valuable modifiers return regularly, so you can wait for optimal conditions rather than forcing suboptimal raids.