
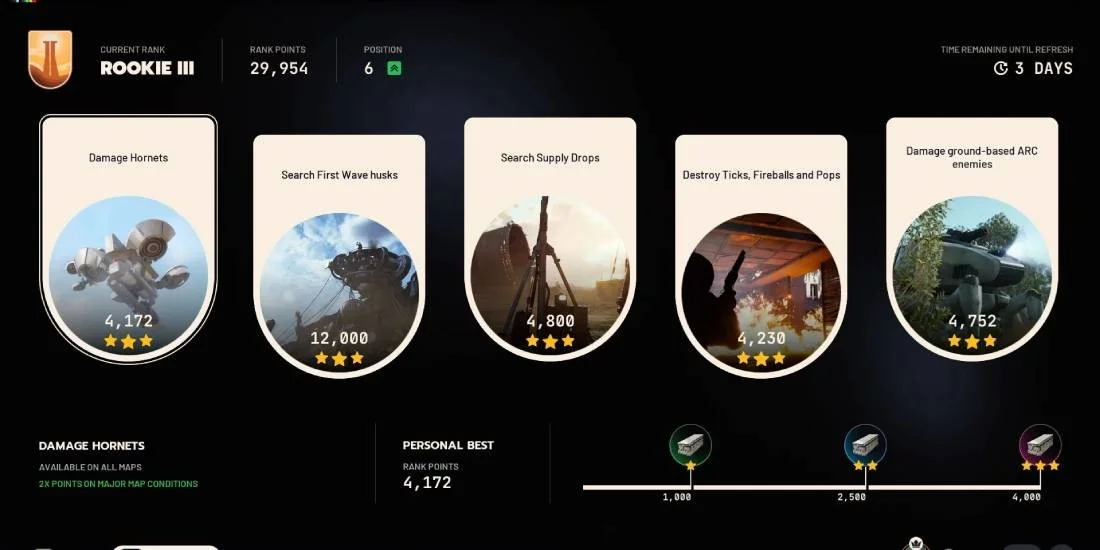
Weekly Trials in ARC Raiders give you solid rewards for completing specific objectives during extraction runs. Five new challenges drop each week with their own point thresholds and reward tiers. This guide covers everything you need to knock out Week 5's Trials, from grabbing a quick three-star ranking to pushing for top leaderboard spots.
Weekly Trials System
Getting familiar with the Trials system will save you time and frustration. Here's what you need to know before jumping in.
Points and Rewards
Each week brings five distinct trials with separate point tracking. You earn points by completing related activities during your raids. A few things matter here:
- You need to hit a specific point threshold during a single match to unlock each trial's reward.
- Points only count if you successfully extract.
- Die before extraction and you lose all the points you built up that run.
- You can check your current trials and progress in the Raider tab by selecting the Trials icon beneath your character.

The 2x Bonus Multiplier
Maps with primary conditions grant double points toward your trials. These 2x bonus conditions include Night Raids, Electromagnetic Storms, and the Hidden Bunker event on Spaceport.
Maximizing Raid Time
Pay attention to the timer at the top of your screen when loading into a map. Loading in at the 30-40 minute mark (depending on the map) means you're entering a fresh raid with full time available. Joining a raid halfway through wastes potential points since you miss enemy respawn cycles, specific objectives may already be done, and you simply have less time to rack up a score.
Push yourself to stay until the final minutes. Extract only after most other players have left, which tends to be safer when you're solo. Conditions can change quickly though, so stay alert.
Damage Rocketeers
This trial rewards you for dealing damage to Rocketeers throughout a single raid. Rocketeers are heavily armored flying ARC enemies, bigger and more dangerous than Hornets.

Point Values and Requirements
Recommended Loadout
Weapons: Heavy ammo weapons like the Anvil or Osprey are critical for breaking armor plating. The Osprey lets you stack medium ammo more efficiently, though heavy ammo strips armor plates faster. Bring a sniper rifle for pulling Rocketeers from long range.
Equipment: Pack at least three Wolf Packs in your safe pockets. These can one-shot Rocketeers under the right conditions. Hullcrackers and Jupiters add more damage options. You'll also want a blue shield plus a backup (Rocketeer missile barrages fire 3-5 missiles that can drop players fast). Blaze traps and Jolt mine traps help defend your position, and deployable cover gives you something to hide behind.
Augments: The Tactical Mark III looting augment provides three safe pocket slots, letting you carry Wolf Packs without risking them on death.
Best Farming Locations
Spaceport Launch Tower (Hidden Bunker Event): Position yourself midway up on the launch tower during the Hidden Bunker event. From this elevation you can set up mines on major entry points and maintain excellent sight lines to pull every Rocketeer on the map. The 40-minute raid duration gives you plenty of farming time.
Blue Gate, Pilgrim's Peak Tower: This location has a double Rocketeer spawn, meaning two quick kills with minimal resistance. Bring a sniper and Wolf Packs to pull every Rocketeer on the map efficiently.
Combat Strategy
The best way to damage Rocketeers without Wolf Packs:
- Aim for the armor paneling covering the Rocketeer's central eye using heavy or energy ammo weapons
- Break this panel to expose the crit spot
- Once exposed, regular gunfire brings it down quickly
Wolf Pack Tips: Throw Wolf Packs from behind the Rocketeer when possible. This guarantees a one-shot kill. If you're attacking from the front, first remove the armor plating from one rotor, then throw the Wolf Pack for a one-shot. When engaging Rocketeers from over 200 meters away, they often fly toward you incredibly slowly. You might not even need Wolf Packs at that range.
Solo vs. Squad: You can complete this solo, but bringing a squad makes killing Rocketeers significantly easier. With teammates, ping a Rocketeer and have everyone focus the same target for quick eliminations.
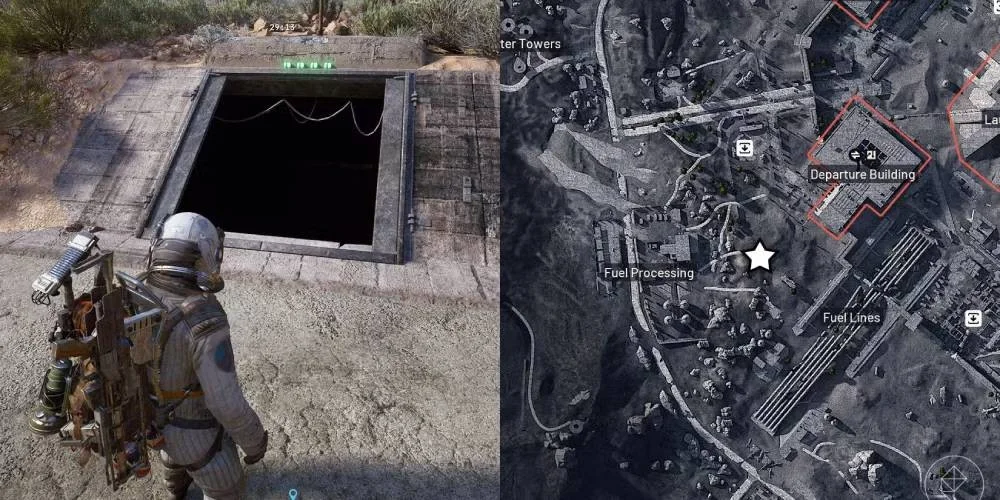
Download Data During Hidden Bunker
This trial only works during the Hidden Bunker event on Spaceport. The event lasts 40 minutes, takes place during daytime, functions like a Night/Storm raid with disabled hatches, and provides the 2x point modifier.
How the Hidden Bunker Event Works
Phase 1: Activating Antennas
Before the bunker opens, four antennas across the map need activation:
- Climb to building tops where antennas are located
- Activate each antenna
- Fight off a small wave of incoming enemies
- Activate the antenna again to complete the relay
Antenna locations are randomly placed at the start of each map. Anyone can activate them. Many antennas are locked behind key rooms, so bring a snap hook and zip lines to access antenna towers on your own.
Phase 2: Entering the Bunker
Once all antennas are active, head to the bunker just south of the Departure/Arrival building. A Bastion typically guards the entrance, but you can use smoke grenades to slip past it, stun it with a Showstopper, or wait for other players to take it out.
Phase 3: Downloading Data
Inside the bunker, eight computer terminals wait for you:
- Terminals start with no light indicator active
- Whoever activates a terminal must stand by it while a yellow light flashes and a green progress bar appears
- Once the bar fills, the light turns green and data can be collected
- Data stays gatherable for roughly 10-15 seconds for all nearby players
- After this window closes, the terminal locks (red light) and needs 2-3 minutes to reset
Why Solo Works Best: Solo play works well for this trial. Players tend to be much friendlier during Hidden Bunker events, especially in solo lobbies. You also don't get bonus points from teammates downloading data, so there's no real advantage to grouping up.
Minimal Loadout Option: Combat requirements are light here, so you can run lean with a snap hook and zip lines in your safe pouch for antenna access, basic survival gear, and smokes and Showstoppers for bypassing the Bastion.
Search First Wave Husks
This trial requires searching the dead ARC bodies (husks) scattered as preset spawns throughout maps. "First Wave" is lore terminology referring to ARC that arrived during the initial attack. These are static environmental objects, not enemies you kill.

What Counts as a First Wave Husk
First Wave husks include all preset dead ARC bodies on the map: Rocketeer husks, Baron husks (the massive ones), Hornet husks, and Harvester husks. These are the breachable, lootable dead bodies found throughout the environment.
How to Complete the Challenge
- Locate First Wave husks around the map
- Breach them if they haven't been opened
- Interact with their loot containers to get points
Best Map Choices
Spaceport (Recommended): This map has 26 lootable husks total. Many spawn on the outskirts away from danger, and these outer areas rarely see PvP compared to the interior. You can finish in 30 minutes, so you don't need to wait for the Hidden Bunker event.
Dam Battlegrounds (Alternative): Contains 22 husks total. Good backup if Spaceport lobbies are rough. Run during Night or Storm conditions for maximum points.
Loadout Recommendations: This challenge is free loadout friendly, meaning you can enter with minimal gear. Still, consider bringing loads of adrenaline shots to make all that running across the map easier, plus a basic survival kit and movement equipment.
Solo, Duo, or Trio? This challenge works equally well regardless of squad size. Just make sure your group hits all available husks on the map.
Damage Snitches
Snitches are flying scanner enemies that don't attack directly. If they spot you, they call in reinforcements. This trial rewards you for taking them out.

Strategy Overview
The approach for farming Snitches:
- Get yourself or your team to an elevated position
- Pick a centralized location on the map
- Use a sniper or Jupiter to pull every Snitch toward you
- Defend your elevation from other teams
- Bring gear to quickly take down these ARC enemies
Best Map and Condition Choices
Hidden Bunker on Spaceport: Gives you an extra 10 minutes of farming time (40 minutes total) plus the 2x modifier. Plenty of centralized elevated positions available.
Dam Battlegrounds (Night or Storm): Great alternative, especially during Electromagnetic Storm. The chaos from storm conditions makes you less likely to get attacked by other players. Position yourself at the top of the control tower with an Osprey, Anvil, or Renegade.
Recommended Loadout
- Osprey (recommended) or Anvil/Renegade for ranged combat
- Sniper rifle for long-range pulling
- Deployable cover
- Zip lines for flanking options
- Traps to prevent ambushes
Damage Ground-Based ARC Enemies
This trial rewards you for dealing damage to ground-based ARC enemies. It has high farming potential, but it's probably the hardest trial this week because these enemies are heavily contested.

Which Enemies Count
Ground-based ARC enemies include Pops, Fireballs, Ticks, Turrets (some players report uncertainty about whether these count, so test if you can), Leapers, Bastions, Bombardiers, Sentinels, Queens, and Matriarchs.
Point Calculation Warning
This challenge is deceptive when it comes to which enemies to focus on. You only get 80% of the XP from kills as points. This means:
- Ticks
- Pops
- Fireballs
- Bastions
- Bombardiers
- Leapers
Best Locations
Hidden Bunker on Spaceport (Primary Pick): Leapers, Bastions, and Bombardiers spawn above the Hidden Bunker in a centralized location. You get 10 extra minutes of farming time, and most players cooperate during this event. Just be warned: this becomes a PvP hotspot because of the high enemy density.
Dam Battlegrounds During Electromagnetic Storm (Alternative): You only get 30 minutes here, but the map features two Bastion spawns, one Bombardier spawn, and three to five Leaper spawns. Solo players have more room to avoid PvP, and groups can split up to farm more efficiently.
Recommended Loadout
Weapons:
- Several Anvils (ammo-efficient and deals heavy damage to AI)
- Anvil Splitters if available (even more damage)
- Hullcracker (for removing armor pieces, then switch to Anvil)
Equipment:
- Smokes
- Showstoppers
- Blaze grenades
- Deadline mines (can one-shot Bastions and Bombardiers)
Combat Strategy
If you're farming on Spaceport during Hidden Bunker:
- Play the inner catacomb section running around the launch towers
- Pop out to aggro Leapers
- Pull Bastions and Bombardiers toward you
- Use Deadline mines for quick eliminations on large enemies
- Target joints for crit damage
- Use Anvil after breaking armor with Hullcracker to conserve ammo
General Tips for All Trials
Efficiency Principles
Focus on one objective at a time. Trying to juggle multiple trials increases your risk of dying or failing to extract with your points.
Pick non-combat objectives for tough maps. Running Night Raids or Electromagnetic Storms? Consider prioritizing trials like First Wave Husks that don't require fighting over contested enemies.
Always extract successfully. No matter how many points you've stacked up, they're worthless if you die before extraction.
Weapon Recommendations Across Trials
The Hullcracker and Wolf Pack grenades show up consistently across multiple trials. Hullcracker deals heavy damage to all ARC types. Wolf Packs provide burst damage for quickly eliminating priority targets. Both are worthwhile picks for runs targeting larger enemies.
Map Condition Priority
When possible, always run 2x bonus conditions:
- Hidden Bunker event (Spaceport): 40 minutes, 2x multiplier, often friendlier lobbies
- Night Raids: 2x multiplier
- Electromagnetic Storms: 2x multiplier
Lobby Behavior Notes
Player behavior varies a lot based on game mode and map condition. Hidden Bunker events tend to have the friendliest lobbies, even in Duos and Trios. Solo lobbies are generally more cooperative. As the game matures, expect more PvP even in traditionally friendly events. Stay alert regardless of how calm a lobby seems.
Week 5 Trial Summary
| Trial | Points Per Action | Three-Star Requirement | Best Location |
|---|---|---|---|
| Damage Rocketeers | ~2,600 per kill | 2 kills | Spaceport Tower / Blue Gate Pilgrim's Peak |
| Download Data (Hidden Bunker) | 800 per terminal | 5 terminals | Spaceport Hidden Bunker Event |
| Search First Wave Husks | ~800 per husk | 5 husks | Spaceport (26 husks) / Dam (22 husks) |
| Damage Snitches | 600 per kill | 7 kills | Hidden Bunker / Dam Tower |
| Damage Ground-Based ARC | Variable (80% XP) | Focus large enemies | Hidden Bunker / Dam Storm |
Wrapping Up
Week 5's Trials are more manageable than previous weeks that demanded endless Snitch farming for competitive rankings. Following the strategies in this guide (prioritizing 2x bonus conditions, choosing the right map locations, and focusing on high-value targets) should help you knock out all five trials and secure your three-star rankings. For leaderboard competitors, the Rocketeer and First Wave Husk trials offer particularly strong farming potential.
One thing stays constant: successful extraction is mandatory. Play smart, watch for other players, and don't get greedy with your time in dangerous areas.