Build Overview
Welcome to Boosting Ground's definitive guide for the Cataclysm Druid, one of the most powerful endgame builds in Diablo 4's Season 8. This build harnesses the devastating power of the Druid's ultimate ability, Cataclysm, transforming you into a walking storm that obliterates everything in its path with torrential lightning strikes and destructive twisters.
The Cataclysm build operates on a foundation of carefully layered multipliers and synergies. Through strategic gear choices and skill interactions, you'll maintain near-permanent uptime on your ultimate ability while dealing catastrophic damage across massive areas. This guide provides everything needed to master this S-tier build from early implementation through endgame optimization.
Core Build Mechanics
- Provocation mechanics ensure every Cataclysm cast benefits from guaranteed Overpower damage
- Mjölnic Ryng enables Cataclysm to inherit all Lightning Bolt modifiers and bonuses
- Tempest Roar transforms storm abilities into Werewolf skills, unlocking shapeshifting multipliers
- Strategic buff layering through Resonance and other effects maximizes damage output
Build Strengths
- Unparalleled area clearing capabilities
- Supreme damage potential for both farming and pushing content
- Excellent scaling into late endgame
Build Limitations
- Significant gear requirements for optimal performance
- Requires attentive buff management and proper skill sequencing
Essential Requirements
Before diving into this build, you'll need several critical components:
Mandatory Unique Items

• Transforms Storm skills into Werewolf skills
• Enables shapeshifting multipliers to affect Cataclysm
• Provides Spirit generation through Lucky Hit mechanics
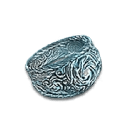
• Grants unlimited Spirit during Cataclysm
• Provides 40-100% increased damage while Cataclysm is active
• Makes Cataclysm benefit from Lightning Bolt modifiers
• Adds ranks to Endless Tempest

• Groups enemies together for optimal Lightning Bolt splash damage
• Provides crucial Ultimate Skill cooldown reduction
• Scales damage based on Willpower
Required Legendary Aspect
• Grants additional ranks to Shapeshifting skills while Hurricane is active
• Essential for Cataclysm rank scaling and cooldown reduction
Critical Temper Manuals
You'll need to acquire these tempering recipes:
- Ultimate Efficiency - Druid: For Cataclysm cooldown reduction
- Nature Magic Innovation: For Hurricane duration extension
Performance Benchmarks
• Adequate Ultimate Skill cooldown reduction from multiple sources
• Hurricane duration that exceeds your full Cataclysm cycle
Skill Configuration
Active Skill Layout
- Maul - Werebear form maintenance and Fortify generation
- Pulverize - Damage reduction application and Spirit spending
- Debilitating Roar - Enemy debuff and damage amplification
- Earthen Bulwark - Barrier, Unstoppable, and Resonance activation
- Hurricane - Stormshifter's Aspect enabler
- Cataclysm - Primary damage source
Skill Point Distribution
| Skill Category | Skills | Investment |
|---|---|---|
| Basic Skills | Maul | 1 point (Enhanced Maul recommended) |
| Core Skills | Pulverize | 1 point base (Primal Pulverize for damage reduction) |
| Defensive Skills | Earthen Bulwark Debilitating Roar |
Full investment with Enhanced variant 1 point with Innate upgrade |
| Companion Skills | None | No investment in base build (variants may differ) |
| Wrath Skills | Hurricane | 1 point with Enhanced Hurricane Full investment in supporting passives |
| Ultimate Skills | Cataclysm | Maximum points Prime Cataclysm: Required Supreme Cataclysm: Essential |
| Key Passive | Ursine Strength | Provides Maximum Life and Overpower synergies |
Passive Skill Priorities
Essential passives include:
- Elemental Exposure
- Charged Atmosphere
- Electric Shock
- Bad Omen
- Endless Tempest
- Resonance
- Quickshift
- Natural Disaster
- Heightened Senses
- Provocation (carefully managed based on cooldown needs)
Spirit Boon Configuration
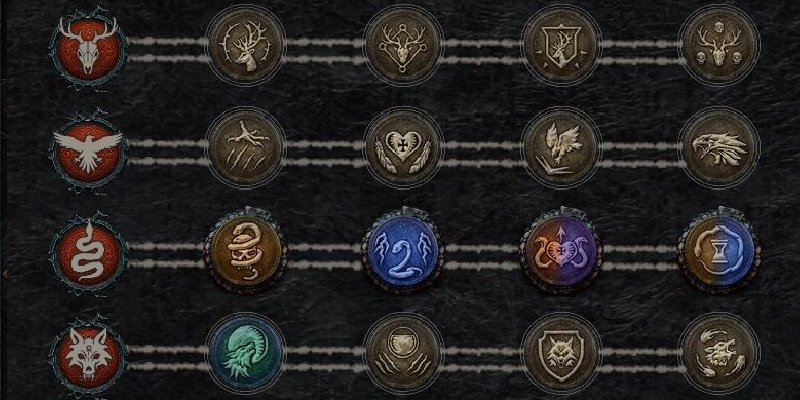
Activate these Spirit Boons for optimal performance:
Equipment and Itemization
Gear Slot Breakdown
Runes: Igni + Xal
Aspect: Changeling's Debt
Priority Stats: Maximum Life, Willpower, Overpower Damage, Critical Strike Damage
Tempers: Lightning Augments (double damage chance), Storm Finesse (Critical Strike)
Item: Tempest Roar (Unique)
Runes: Bac + Yom
Priority Stats: Willpower%, Lightning Resistance, Maximum Spirit, Wild Impulses ranks
Preferred: Shroud of False Death (Mythic) or Mad Wolf's Glee (Unique)
Socket: Grand Sapphire
Key Stats: Maximum Life, appropriate unique bonuses
Aspect: Runeworker's Conduit
Priority Stats: Maximum Life, Willpower, Armor/Resistances, Overpower Damage
Tempers: Storm Finesse, Nature Magic Innovation
Socket: Grand Sapphire
Aspects: Stormshifter's (damage/cooldown), Fevered Mauling (defensive), or Juggernaut's (armor)
Stats: Willpower, Maximum Life, Armor/Resistances, Dodge Chance
Tempers: Worldly Endurance, Nature Magic Innovation
Options: Rakanoth's Wake (early gearing) or high-stat Legendary boots
Stats: Movement Speed, Maximum Life, Willpower, Resistances
Tempers: Natural Motion, Worldly Fortune or Nature Magic Innovation
Socket: Grand Amethyst
Aspects: Apogeic Furor or Electrified Claws
Stats: Willpower%, Envenom ranks, Quickshift ranks, Resonance ranks
Tempers: Storm Finesse, Ultimate Efficiency
Item: Airidah's Inexorable Will
Socket: Grand Ruby
Focus Stats: Willpower%, Close Damage, Lucky Hit, Ultimate CDR
Item: Mjölnic Ryng
Socket: Grand Sapphire
Focus Stats: Willpower, Critical Strike, Movement Speed during Cataclysm, Endless Tempest ranks
Offensive Aspect Strategy
The build offers flexibility in offensive aspect placement:
- Changeling's Debt: Reliable multiplier against poisoned enemies (Overload ensures coverage)
- Apogeic Furor: Stacking ultimate damage with higher ceiling but requires ramp-up
- Electrified Claws: Lower damage but provides stun utility and quality of life
Gem Configuration
Gem Sockets
Runeword Combinations
Primary Setup:
- Igni + Xal: Generates offering through non-Basic skills, provides 20% Maximum Life boost
- Bac + Yom: Movement generates offering, triggers Petrify for crowd control
Alternative Options:
- Zec: Additional Ultimate cooldown reduction
- Jah: Speed farming enhancement
- Que: Defensive layer for pushing
- Nagu + Xal: Maximum overflow Life bonus (requires companion skill investment)
Paragon Board Mastery Guide
Board Progression Overview
The Cataclysm Druid utilizes five total boards (including starter) with specific legendary nodes and glyph placements. Here's your complete progression path:
| Board Order | Board Name | Primary Target |
|---|---|---|
| 1 | Starting Board (Druid) | Path to first attachment point |
| 2 | Heightened Malice | Nature Magic skill damage node |
| 3 | Lust for Carnage | Critical Strike damage as Werewolf |
| 4 | Ancestral Guidance | Ultimate damage based on Spirit |
| 5 | Thunderstruck | Storm skill critical damage |
Detailed Board-by-Board Strategy
- Path directly toward the first board attachment point
- Prioritize Willpower nodes along the way
- Grab all rare nodes within reasonable distance
- Place your first glyph in the socket closest to your exit path
- Primary Target: Heightened Malice legendary node (Nature Magic skill damage)
- Glyph Placement: Keeper (defensive option) or offensive alternative
- Key Rare Nodes: Focus on Willpower and damage reduction nodes
- Rotation: Position to efficiently connect to next board
- Primary Target: Lust for Carnage legendary node (Critical Strike damage as Werewolf)
- Glyph Placement: Werewolf or alternative offensive glyph
- Essential Pathing: Ensure you activate the legendary node with surrounding magic nodes
- Secondary Targets: All reachable rare nodes providing Willpower
- Primary Target: Ancestral Guidance legendary node (Ultimate damage based on Spirit)
- Critical Importance: This node provides massive damage scaling
- Glyph Placement: Spirit (for radius requirements)
- Optimization: Path to maximize rare node acquisition
- Primary Target: Thunderstruck legendary node (Storm skill critical damage)
- Glyph Placement: Electrocution or Dominate
- Final Optimization: Use remaining points for Willpower nodes
Glyph Strategy and Placement
- Werewolf - Damage while in Werewolf form
- Electrocution - Lightning damage and critical strike chance
- Spirit - Damage based on current Spirit (synergizes with Mjölnic Ryng)
- Dominate - Damage to crowd controlled enemies
- Keeper or Undaunted - Defensive options
Glyph Leveling Priority:
- Level 15: Unlock radius bonus and special effects
- Level 46: Maximum radius and conditional damage multipliers
- Focus on offensive glyphs first, then defensive options
Level-Based Progression Guide
Paragon Progression by Level
Levels 50-100:
- Complete Starting Board pathing
- Attach and progress through Heightened Malice
- Begin Lust for Carnage board
- Focus on activating legendary nodes over minor stat nodes
Levels 100-150:
- Complete Lust for Carnage optimization
- Full clear of Ancestral Guidance board
- Ensure all legendary nodes are active
- Begin collecting important rare nodes
Levels 150-200:
- Attach and develop Thunderstruck board
- Optimize pathing for maximum rare node efficiency
- Begin focusing on Willpower node collection
- Ensure all glyphs reach level 15 minimum
Levels 200+:
- Complete all board optimizations
- Maximize Willpower node acquisition
- Push glyphs toward level 46
- Fine-tune based on stat needs
Key Stat Benchmarks via Paragon
Through paragon investment, aim to achieve:
- Minimum 25% damage reduction from various sources
- 300+ additional Willpower (for Runeworker's scaling)
- All relevant legendary node activations
- Maximum glyph radius for full board coverage
Board Rotation and Positioning
Proper board rotation ensures efficient point usage:
- Rotate boards to minimize travel distance between sockets
- Position legendary nodes within glyph radius when possible
- Create paths that capture multiple rare nodes
- Avoid dead-end paths that don't lead to valuable nodes
Node Priority System
When spending paragon points, follow this priority:
- Legendary nodes (always first priority)
- Glyph socket paths
- Rare nodes within glyph radius
- Magic nodes required for legendary/rare activation
- Willpower nodes (after core setup)
- Other stat nodes as needed
Gameplay Execution
Core Rotation
Cataclysm Rotation Sequence
 Maintain Hurricane
 Cast Earthen Bulwark
 Cast Cataclysm
 Use Debilitating Roar
Between Cataclysms: Use Primal Pulverize for the damage reduction against important enemies and Ancestral GuidanceAncestral Guidance damage multiplier. Otherwise, use Maul as filler and for Fortify.
Provocation Management
Successful Provocation management is crucial:
- Monitor stack count carefully (visible on buff bar)
- Calculate points based on Cataclysm cooldown:
- ~22 second cooldown: 1 point in Provocation
- ~18 second cooldown: 2 points in Provocation
- ~26 second cooldown: 3 points in Provocation
- Account for Shroud of False Death adding one rank
- Leave buffer time before maximum stacks to avoid accidental consumption
Snapshotting Mechanics
Every Cataclysm cast requires proper buff setup:
Snapshot Requirements:
- Provocation: Maximum stacks for guaranteed Overpower
- Resonance: Activated via Earthen Bulwark
- Stormshifter's: Active Hurricane for rank bonus
Dynamic Buffs (not snapshotted):
- Form-based multipliers (check each cast)
- Poison status for Envenom
- Seasonal power effects
- Runeword buffs like Xal
Cooldown Management Strategy
Maintaining Cataclysm uptime requires balancing:
Duration Sources:
- Calamity Spirit Boon (35% increase)
- Endless Tempest ranks
- Mjölnic Ryng rank bonus
- Shroud of False Death passive bonus
Cooldown Reduction Sources:
- Skill ranks in Cataclysm
- Ultimate CDR from tempering
- Airidah's Inexorable Will affix
- Stormshifter's rank bonus
- Optional: Rakanoth's Wake, Zec rune
Boss Powers Configuration
Recommended Setup
Alternative Configurations
- Early Gearing: Urivar's Lobbed Bombs (Ultimate CDR)
- Late Game: Replace Haste with Outlaw Sharpshooter's Eye or Harbinger's Volley
- Defensive Option: Blackmailer's Sabotage
Mercenary Strategy
| Role | Mercenary | Skills/Abilities | Purpose |
|---|---|---|---|
| Primary | Varyana, the Berserker | Cleave, Recklessness, Whirlwind, No Escape | Enemy grouping via No Escape |
| Reinforcement | Raheir, the Shieldbearer | Crater (on Maul usage) | Additional grouping support |
Consumable Optimization
Elixir: Fortitude (Maximum Life % for Overpower scaling)
Incense Priority:
- Reddamine Buzz (Maximum Life) or Song of the Mountain (Armor)
- Blessed Guide (Willpower)
- Soothing Spices (Resistances)
Advanced Variants
Speed Farming Adjustments
- Replace Pulverize with Shred for mobility
- Swap Yom for Jah rune (enhanced Evade)
- Consider dropping defensive skills in trivial content
Maximum Push Configuration
- Replace Maul/Hurricane with Wolves/Ravens
- Requires additional CDR sources
- Maximizes Overpower through Life stacking
- Removes Werewolf tag from Cataclysm
- Enables Stone Burst channeling (never consumes Provocation)
- Pairs with Wandering Death's Chest Beam
- Requires Heightened Malice board instead of Lust for Carnage
- Exceptional stat stick with proper rolls
- Combine with Igni + Que for Unstoppable uptime
- Requires Enhanced Earthen Bulwark investment
Seasonal Considerations
- Recasts no longer maintain buffs (reload every cast)
- Xan rune provides brief Critical Strike/Overpower window
- Qax enables resource-based damage amplification
- Charged Atmosphere significantly buffed
- Cataclysm rank 5 adds 70% slow effect
Troubleshooting Guide
Low Damage Issues:
- Verify Provocation is triggering Overpower
- Confirm Hurricane active before Cataclysm
- Check Resonance activation
- Ensure proper Willpower investment
Cooldown Problems:
- Review total CDR from all sources
- Consider additional ranks via gear
- Evaluate Provocation timing alignment
- Add Zec rune if necessary
Survivability Concerns:
- Maintain Werebear form bonuses
- Use Debilitating Roar consistently
- Consider defensive aspect swaps
- Upgrade to Undaunted glyph

This comprehensive guide provides everything needed to master the Cataclysm Druid from initial setup through endgame optimization. Focus on meeting gear requirements first, then refine your rotation and timing. With proper execution, you'll command nature's fury to devastate all of Sanctuary.


