
Introduction and Build Philosophy
Welcome to the definitive guide for the Mighty Throw Barbarian in Diablo 4's Season 8. This comprehensive resource will transform you into a weapon-hurling force of destruction, channeling the nostalgic "Throwbarian" playstyle from previous Diablo iterations into the modern era.
The Rise of the Throwbarian
With the introduction of Vessel of Hatred and Season 8's balance changes, the Mighty Throw skill has evolved from a supplementary ability into a build-defining powerhouse. This transformation is primarily driven by new unique items and synergistic legendary aspects that enable a semi-ranged playstyle previously unavailable to Barbarians.
Build Identity
The Mighty Throw Barbarian operates as a mid-range burst damage specialist, combining the safety of ranged combat with the raw power traditionally associated with melee builds. Unlike conventional Barbarian archetypes that require constant face-to-face engagement, this build allows strategic positioning while delivering devastating weapon volleys that can obliterate entire screens of enemies or delete bosses in a single well-executed rotation.
Why Choose Mighty Throw?
This build excels in scenarios where traditional melee builds struggle:
- Tormented Boss encounters where positioning matters
- High-density rifts where area damage is crucial
- Speed farming situations requiring quick elimination
- Group play where staying mobile enhances survival
Build Strengths and Weaknesses Analysis
- Semi-Ranged Combat: Deal damage from 10-15 yards while benefiting from melee damage multipliers
- Unparalleled Burst: Single rotations can exceed 10 billion damage
- Defensive Layering: Triple shout configuration provides constant protection
- Versatile Playstyle: Excels in both solo and group content
- Setup Dependency: Requires precise buff alignment for optimal damage
- Unique Requirements: The Third Blade is absolutely mandatory
- Rotation Monotony: Constant shout management can feel repetitive
- Cooldown Management: Missing timing windows significantly reduces output
Comprehensive Strengths
1. Semi-Ranged Combat Advantage
The ability to deal damage from a distance fundamentally changes the Barbarian experience. You maintain approximately 10-15 yards between yourself and targets while still benefiting from melee-scaled damage multipliers. This positioning advantage becomes increasingly valuable in higher Torment difficulties where enemy damage can overwhelm traditional melee builds.
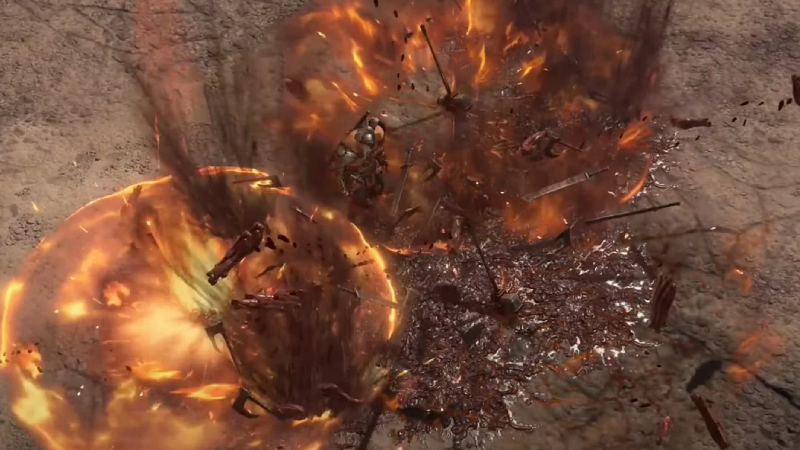
2. Unparalleled Burst Potential
When properly configured with Bane of Ahjad-Den gloves, a single Mighty Throw rotation can deal damage exceeding 10 billion, sufficient to eliminate most Tormented bosses in one cycle. This burst window occurs every 12 seconds, creating a rhythm of setup and devastation that feels both tactical and satisfying.
3. Defensive Layering Through Shouts
The triple shout configuration provides:
- Constant damage reduction through Challenging Shout
- Resource generation via Rallying Cry
- Damage amplification from War Cry
- Unstoppable frames for Tibault's Will activation
This defensive foundation allows aggressive positioning despite the build's burst-oriented nature.
Notable Weaknesses
1. Setup Dependency
Unlike spam-friendly builds, Mighty Throw requires precise buff alignment:
- Berserking must be active
- Encroaching Wrath needs 100 fury spent
- Tibault's Will requires Unstoppable trigger
- Boss powers need proper activation
- Bane of Ahjad-Den operates on a 12-second cycle
Missing any element significantly reduces damage output.
2. Absolute Unique Requirements
The Third Blade isn't just recommended—it's mandatory. Without this unique sword, the build literally cannot function as intended. This creates a significant barrier to entry for players who haven't acquired this specific item.
3. Shout Rotation Monotony
Maintaining three shouts on cooldown becomes mechanically repetitive. While effective, the constant shout management can feel less engaging than more dynamic rotations found in other builds.
Core Requirements and Gear Prerequisites
Mandatory Unique Items

This unique completely removes Mighty Throw's cooldown, transforming it from a 12-second cooldown ability into a fury-based spammable skill. Without this item, the entire build concept collapses.

Provides both a damage multiplier and resource generation, solving two critical build needs simultaneously. The 5-second damage window aligns perfectly with your burst rotation.

This helm fundamentally changes your damage type, enabling fire-based scaling and synergizing with Bane of Ahjad-Den's explosion mechanic.
Essential Legendary Aspects
| Aspect Name | Effect | Priority Location | Impact |
|---|---|---|---|
| Aspect of Herculean Spectacle | Mighty Throw deals 25-45% increased damage and hurls an additional 2 weapons | Two-Handed Slashing Weapon | Triples projectile count for area coverage |
| Bold Chieftain's Aspect | Shout cooldown reduced by 10-30% per nearby enemy, up to 50% | Ring | Enables shout spam in dense combat |
| Relentless Berserker's Aspect | Lucky Hit: Core Skills have 15-35% chance to extend Berserking by 2 seconds | Boots | Near-permanent Berserking uptime |
Complete Skill Tree Breakdown
Mighty Throw Barbarian Skill Distribution (71 Total Points)
Basic Skills (2 Points)
- Lunging Strike: 1/5 - Mobility tool only
- Enhanced Lunging Strike: 1/1 - Fury generation
Core Skills (16 Points)
- Whirlwind: 5/5 - Fury dump for buff activation
- Enhanced Whirlwind: 1/1 - Fury generation
- Violent Whirlwind: 1/1 - Vulnerability application
- Pressure Point: 3/3 - Vulnerable uptime
- Endless Fury: 3/3 - Fury generation multiplier
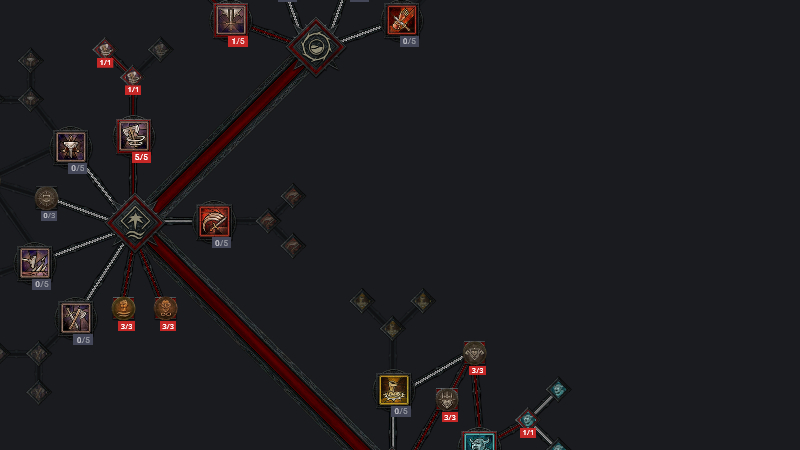
Defensive Skills (12 Points)
- Rallying Cry: 1/5 - One point wonder
- Enhanced Rallying Cry: 1/1 - Resource generation
- Tactical Rallying Cry: 1/1 - Fury gain
- Challenging Shout: 1/5 - Base functionality
- Enhanced Challenging Shout: 1/1 - Healing component
- Strategic Challenging Shout: 1/1 - Thorns bonus
- Imposing Presence: 3/3 - Life pool increase
- Martial Vigor: 3/3 - Damage reduction
Brawling Skills (6 Points)
- War Cry: 1/5 - Damage amplification
- Enhanced War Cry: 1/1 - Berserking trigger
- Power War Cry: 1/1 - Damage bonus
- Booming Voice: 3/3 - Shout duration
- Guttural Yell: 1/3 - Shout cooldown reduction
Weapon Mastery Skills (11 Points)
- Mighty Throw: 5/5 - Primary damage source
- Enhanced Mighty Throw: 1/1 - Attack speed bonus - 25% for 6 seconds
- Fighter's Mighty Throw: 1/1 - Barrier generation - 20% max life
- Thick Skin: 1/3 - Fortify generation
- Counteroffensive: 3/3 - Damage while fortified
Ultimate Skills (11 Points)
- Wrath of the Berserker: 1/5 - Ultimate ability
- Prime Wrath of the Berserker: 1/1 - Full fury on cast
- Supreme Wrath of the Berserker: 1/1 - Fury spent = damage
- Heavy Handed: 3/3 - Critical multiplier
- Wallop: 3/3 - Overpower synergy
- Brute Force: 2/3 - Overpower damage
Key Passives (13 Points)
- Unbridled Rage: 1/1 - 135% damage for double fury cost
- Aggressive Resistance: 3/3 - Berserking damage reduction
- Battle Fervor: 3/3 - Berserking duration
- Prolific Fury: 3/3 - Fury generation
- Pit Fighter: 3/3 - Close damage bonus
Arsenal System Mastery
The Arsenal System allows strategic weapon allocation for different skills, maximizing damage output through proper synergies.
Understanding Weapon Assignments
The Arsenal System allows strategic weapon allocation for different skills, maximizing damage output through proper synergies.
Technique Slot Configuration
- Selected Weapon: Two-Handed Axe
- Bonus Gained: Increased damage against Vulnerable enemies
- Why This Choice: Since every Mighty Throw rotation includes vulnerability application through Whirlwind, this provides consistent damage amplification
Skill-Specific Assignments


Expertise Progression Tips
Focus on leveling Two-Handed Axe expertise first, as the Vulnerable damage bonus provides the most consistent damage increase throughout all content levels.
Comprehensive Gear Guide
Detailed Slot-by-Slot Analysis
Helm Slot - Ugly Bastard Helm
Base Requirements: Item Power 925+
Priority Affixes:
- Cooldown Reduction (12%+)
- Total Armor (1,000+)
- Maximum Life (800+)
- Strength (100+)
Tempering Strategy:
- Manual 1: Brute Innovation - Mighty Throw Pulse Size
- Manual 2: Worldly Endurance - Maximum Life
Masterworking Priority: Focus on Cooldown Reduction for shout uptime
Greater Affix Target: Cooldown Reduction or Maximum Life
Chest Armor
Effect: Whirlwind pulls enemies every 3-6 seconds
Priority Affixes:
- Damage Reduction (8%+)
- Maximum Life (1,000+)
- Total Armor (1,200+)
- Strength (100+)
Tempering Strategy:
- Manual 1: Brute Innovation - Mighty Throw Pulse Size
- Manual 2: Worldly Endurance - Maximum Life percentage
Socket: Grand Ruby for Strength scaling
Gloves - Bane of Ahjad-Den

This unique transforms the build from sustained damage to burst windows. Priority Affixes: Critical Strike Chance (8%+), Attack Speed (10%+), Ranks to Core Skills (+3), Lucky Hit Chance (10%+)

Remaining Gear Slots
| Slot | Aspect/Unique | Priority Stats | Key Notes |
|---|---|---|---|
| Pants | Tibault's Will | Max Life, Damage Reduction, Armor | Defensive cornerstone with offensive window |
| Boots | Relentless Berserker's | Movement Speed (45%+), Evade Charges | Must reach movement speed cap |
| Amulet | Encroaching Wrath | Strength %, CDR, +Heavy Handed | Requires 80% roll for optimal performance |
| Ring 1 | Bold Chieftain's | Crit Chance, Crit Damage, Max Life | Maximum roll essential |
| Ring 2 | Inner Calm | Crit Chance, Crit Damage, Vulnerable Damage | 13% roll minimum |
Weapon Loadout Details
Legendary Aspects Deep Dive
Understanding Aspect Synergies
Tier 1 - Build-Defining Aspects
Location: Two-Handed Slashing Weapon
Roll Range: 25-45% increased damage, +2 weapons
Interaction: Each additional weapon can trigger Bane explosions
Positioning: Must be on slashing weapon for arsenal assignment
Location: Two-Handed Bludgeoning Weapon
Revolutionary Mechanic: Transforms CDR into damage multiplier
Calculation: With 50% CDR, gain 125-250% multiplicative damage
Build Synergy: Makes defensive stat offensive powerhouse
Tier 2 - Core Functionality
Optimal Location: Ring slot for maximum uptime
Mechanics: Each enemy reduces cooldown by percentage
Density Scaling: In 10+ enemy packs, instant shout reset
Quality Requirement: 25%+ roll essential for smooth gameplay
Fury Threshold: 100 fury spent activates
Duration Window: 8 seconds of enhanced damage
Whirlwind Synergy: 3-4 seconds of channeling reaches threshold
Positioning Strategy: Amulet slot for higher roll potential
Tier 3 - Enhancement Aspects
Additional aspects that provide significant benefits but aren't mandatory for basic functionality:
- Aspect of Inner Calm: 3 seconds stationary = triple damage
- Aspect of Elements: Rotating elemental damage bonus
- Aspect of Grasping Whirlwind: Groups enemies for detonation
Stat Priority and Tempering Strategy
Mathematical Stat Breakpoints
Tempering Decision Matrix
| Priority | Tempering Option | Target Slots | Reasoning |
|---|---|---|---|
| 1 | Mighty Throw Pulse Size | All armor pieces | Increases explosion radius and multi-target coverage |
| 2 | Critical Strike Damage | Weapons/Gloves | Multiplicative damage increase |
| 3 | Damage While Berserking | Jewelry | Near-permanent uptime makes this invaluable |
| 4 | Maximum Life | Chest/Pants | Scales barrier and effective health |
| 5 | Movement Speed | Boots (mandatory) | Must reach 45% cap |
Masterworking Strategy Guide
- Priority 1 - Cooldown Reduction (Helm/Amulet) - First 4 ranks here for smooth rotation
- Priority 2 - Critical Strike Chance (Gloves/Rings) - Ranks 5-8 for damage consistency
- Priority 3 - Mighty Throw Pulse Size (All eligible) - Ranks 9-12 for area coverage
Gems and Runeword Optimization
Gem Selection Philosophy
Recommended Gems


Runeword Mastery
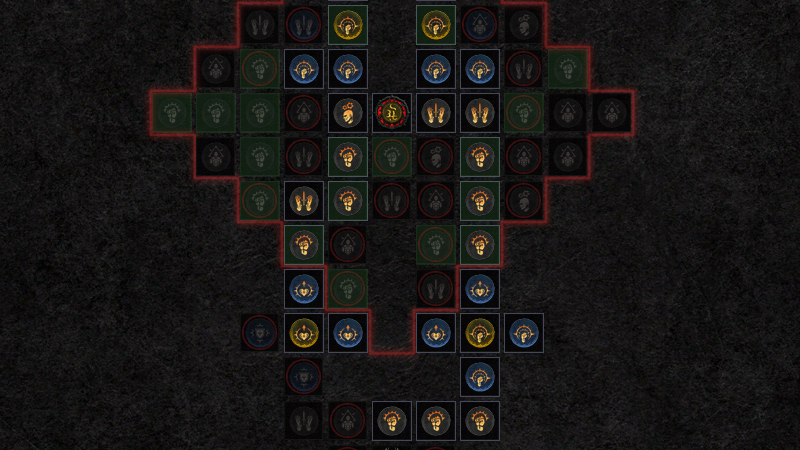
Complete Paragon Board Strategy
Board Progression Roadmap
Board 1: Starting Board
- Path Direction: Move toward Warbringer socket
- Priority Nodes: All Strength nodes within glyph radius
- Glyph Choice: Territorial (damage reduction near enemies)
- Stat Goals: +200 Strength, +10% damage reduction
Board 2: Warbringer
- Legendary Node: Warbringer (25% damage while berserking)
- Path Strategy: Direct route to legendary node
- Secondary Focus: Fury threshold nodes
- Glyph Placement: Wrath (berserking damage)
Board 3: Blood Rage
- Core Benefit: Berserking duration extension
- Node Priority: All berserking-related rares
- Glyph Selection: Ire (berserking bonuses)
- Threshold Achievement: 30% berserking uptime increase
Board 4: Carnage
- Focus: Critical strike multiplication
- Legendary Node: Must acquire for crit scaling
- Rare Nodes: All crit chance and crit damage
- Glyph: Exploit (vulnerable damage amplification)
Board 5: Bone Breaker
- Specialization: Overpower enhancement
- Synergy: Wallop and overpower aspects
- Path Efficiency: Minimize travel nodes
- Glyph Choice: Crusher (overpower frequency)
Board 6: Decimator
- Ultimate Enhancement: Wrath of Berserker bonuses
- Duration Nodes: Extend ultimate uptime
- Damage Nodes: Ultimate damage multipliers
- Glyph: Territorial if second socket available
Board 7: Flawless Technique
- Weapon Mastery: Mighty Throw enhancements
- Technique Bonuses: Two-handed weapon nodes
- Efficiency Focus: Maximum node value per point
- Final Glyph: Ambidextrous (attack speed scaling)
Statistical Benchmarks by Level:
- Level 100: 1,000+ Strength, 15%+ DR, 3 max glyphs
- Level 150: All legendary nodes, 6 level 46 glyphs
- Level 200: Perfect rare selection, resistance cap
- Level 200+: Remove inefficient paths, optimize every node
Glyph Leveling Priority
- Territorial (1-46): Survival cornerstone
- Exploit (1-46): Damage multiplication
- Wrath (21-46): Berserking enhancement
- Ire (21-46): Berserking duration
- Crusher (21-46): Overpower synergy
- Ambidextrous (21-46): Speed scaling
Season 8 Boss Powers Integration
Main Power Selection
Wandering Death's Chest Beam
- Activation: While channeling Whirlwind
- Effect: Enemies take increased damage from you
- Synergy: Perfect alignment with setup phase
- Uptime: Near constant during combat
Modifier Power Optimization
Active while Berserking. Provides elemental damage amplification that multiplies with Ugly Bastard's fire conversion for 20-30% total damage increase.
Triggers on main boss power activation. Grants massive vulnerable damage bonus that covers entire burst window and stacks with Exploit glyph.
Grants stealth on trigger with 2-second overpower window post-stealth. Time with Mighty Throw cast to potentially double burst damage.
Boss Power Rotation Integration
- Begin Whirlwind channel (activates Chest Beam)
- Chest Beam triggers Volley (vulnerable bonus)
- Chest Beam triggers Eye Beams (stealth)
- Exit stealth during Mighty Throw (overpower window)
- All multipliers active during detonation
Mercenary Configuration Guide
Primary Mercenary Analysis
Raheir - The Shieldbearer
Skill Configuration:
- Ground Slam: Crowd control and vulnerability
- Raheir's Aegis: Damage reduction aura
- Bastion: Taunt and damage mitigation
- Inspiration: Party-wide damage bonus
Positioning Strategy: Raheir draws aggro during setup, creates safe Mighty Throw windows, and tanks boss attacks during burst.
Reinforcement Selection
Combat Mechanics and Rotation
Pre-Combat Preparation
- Verify all shouts off cooldown
- Confirm Wrath of Berserker available
- Check Bane of Ahjad-Den timer
- Ensure full Fury bar
- Position for optimal angle
Standard Combat Rotation
Optimal Skill Rotation
 Challenging Shout
 Rallying Cry
 War Cry
 Wrath of Berserker
Whirlwind (3-4s)
MIGHTY THROW!
Wrath of Berserker
Whirlwind (3-4s)
MIGHTY THROW!
Phase Breakdown:
- 0-2s: Defensive setup with shouts
- 2-4s: Buff accumulation via Whirlwind
- 4-5s: Stop for Inner Calm, release devastation
- 5-8s: Cleanup and reset
Advanced Rotation Optimizations
| Situation | Adaptation | Key Points |
|---|---|---|
| Single Target (Bosses) | Focus positioning for all projectiles | Maximum melee range, time for vulnerable phases |
| High Density (Rifts) | Prioritize area coverage | Use terrain, chain pulls with Grasping Whirlwind |
| Speed Farming | Skip full rotation | Basic buffs + Mighty Throw spam |
Unique and Mythic Item Analysis
Core Unique Breakdown
Unique Priority Tiers
Mythic Unique Optimization
Mythic Priority Order
| Mythic Item | Priority | Impact | Integration Notes |
|---|---|---|---|
| The Grandfather | 1st Priority | Largest damage increase | Replace slashing weapon, move Herculean Spectacle |
| Ring of Starless Skies | 2nd Priority | Quality of life improvement | Replace Aspect of Inner Calm, enables spam |
| Shroud of False Death | 3rd Priority | Defensive luxury | Replace chest, relocate Grasping Whirlwind |

Advanced Optimization Tips
Gameplay Refinements
- Shouts can cancel Whirlwind endlag
- Mighty Throw can cancel shout animations
- Movement cancels unnecessary frames
Positioning Mastery
- 10-15 yard sweet spot for safety
- Use doorways for projectile funneling
- Terrain blocks create ricochet damage
Build Variations
- Drop defensive aspects for movement
- Emphasize cooldown over damage
- Sacrifice perfect rotation for pace
- Include Juggernaut aspect
- Prioritize armor/resistance nodes
- Accept 20-30% damage loss
Economy Management
Season 8 Changes and Adaptations
Skill Modifications Impact
Change: Now provides 25% attack speed for 6 seconds
Impact: Smoother resource generation post-burst
Build Benefit: Easier Fury management between windows
Change: Barrier generation increased from 5% to 20% max life
Survivability Impact: 4x defensive improvement
Practical Effect: 3,000+ barrier per weapon swap
Change: 200% reduced to 50% but now multiplicative
Actual Impact: Net damage increase due to calculation fix
Build Effect: More consistent scaling with gear
The Third Blade Rework Analysis
| Version | Effect | Impact |
|---|---|---|
| Old Version | No cooldown on Weapon Mastery skills | Zero resource cost |
| New Version | 100% cooldown reduction, can exceed 75% cap | Slightly higher Fury costs, same functionality |
Competitive Standing
- Competes with top builds across all classes
- Unique playstyle attracts dedicated players
- Scales excellently with investment
- Torment 4 viable with proper execution
Future Considerations
While currently dominant, the build's reliance on specific uniques makes it vulnerable to targeted nerfs. The semi-ranged playstyle and massive burst potential may attract balance attention in future patches. However, the core fantasy of a weapon-throwing Barbarian ensures continued developer support for the archetype.
Conclusion
The Mighty Throw Barbarian represents a perfect evolution of classic ARPG archetypes into Diablo 4's modern systems. By combining strategic positioning, careful buff management, and explosive burst windows, this build offers a unique experience that stands apart from traditional Barbarian playstyles.
- Patience in acquiring mandatory uniques
- Mastery of the 12-second rotation rhythm
- Understanding of multiplicative damage stacking
- Commitment to optimization across all systems
For players seeking a fresh take on the Barbarian class that combines safety, power, and spectacle, the Mighty Throw build delivers an unparalleled experience. Master the rotation, perfect your gear, and rain destruction upon Sanctuary from afar.
"Every throw counts, but the perfect throw ends everything."
This guide will be updated as Season 8 progresses and new optimizations are discovered. Check back regularly for the latest strategies and refinements.