
Terminal has finally opened its doors in Escape from Tarkov's 1.0 update, but getting there isn't as simple as loading into the map. You'll need to complete an extensive quest chain with multiple branching paths, and your choices along the way affect everything from how much time you'll spend waiting to how many rubles you'll burn through.
This guide breaks down every route to Terminal, all the quest steps involved, and the strategic considerations that'll help you pick the right path for how you play.
How the Terminal Quest Structure Works
Your journey starts with the Ticket quest, which branches based on the decisions you make. Three main routes lead to Terminal:
- The Rubles Route - The fastest option, but it'll cost you 300-500 million rubles
- The Lightkeeper Route - A middle ground with moderate time gates and combat challenges
- The Kerman Route - The most time-gated path, though it may unlock a unique story ending
These routes intersect at various points and likely determine which of the game's four endings you'll see.
The Ticket Quest
Once you reach the Ticket quest, you're faced with your first major choice.
Option A: Hand Over the Case to Prapor
Giving the case to Prapor adds extra quest steps, but comes with some benefits:
- Early Lightkeeper Access: You can reach Lightkeeper without needing Intel Center Level 3
- 200 Million Ruble Discount: If you later go the rubles route, you'll pay 300 million instead of 500 million
- Potential Story Impact: This may affect which ending you unlock
Quest Steps After Handing Over the Case
- Find Compromising Material - Complete this objective to move forward
- Gain Access to Lightkeeper - The trader becomes available to you
- Pay Lightkeeper with Three Terror Group Blue Folders - These folders drop most reliably on Labs, particularly in the Research Unit area. You'll need Labs Access Keycards, which you can pick up through Scav runs.
- Fire a Yellow Flare in Front of Ultra on Interchange - Head to the Ultra store and use a yellow flare at the marked spot
- Kill 15 Targets Without Dying in a Single Raid - You need to get all 15 kills in one raid and extract alive. Interchange works well here because of the steady Scav spawns and PMC traffic.
- Case Returned - After finishing these steps, the case comes back to you
Option B: Keep the Case for Yourself
Keeping the case skips the Prapor questline entirely and takes you straight to "The Case is in Your Hands." This is the simpler starting path, but you lose the 200 million ruble discount if you switch to the rubles route later.
Opening the Case
No matter which path you took initially, you need to open the case before progressing. Every route requires this step.
Step 1: Find the Signal Jammer on Labs
The Signal Jammer spawns in several Labs locations:
- Research Unit - Check the tables and surfaces throughout this area
- Cat Room - The circular room with the maneki-neko (lucky cat) figurine inside
- Lecture Theater - Search the surfaces in this section
Other spawn points likely exist beyond these confirmed spots.
Step 2: Complete the 55-Hour Craft
With the Signal Jammer in hand, start a 55-hour craft at the Workbench. That's roughly 2.3 days of real-world waiting.
Step 3: Case Opens and You Get a Key Card
Once the craft finishes, the case opens and you receive a key card. Don't get too excited, though. This card doesn't get you into Terminal. It just kicks off the next phase of your journey.
Working with Kerman
After opening the case, Mr. Kerman reaches out and offers to work together. Your answer creates the next branch in your questline.
Route 1: The Rubles Route
This is currently the fastest way to reach Terminal because it has almost no time gates. Most players who've already made it to Terminal took this path.
Quest Progression
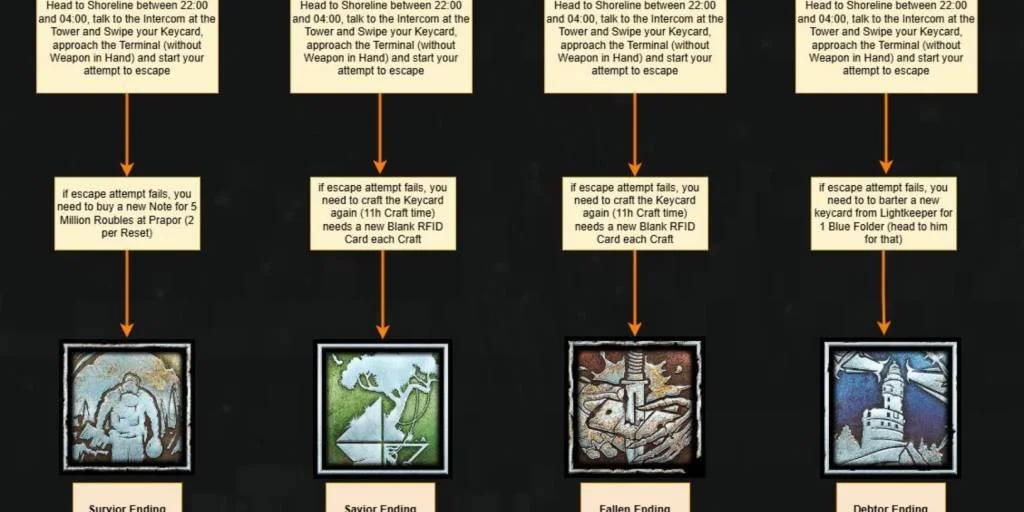
Step 1: Test the Key Card at Shoreline
- Go to the Shoreline Port Entrance
- Swipe the key card at the designated terminal
- The card fails
Step 2: Ask Prapor for Help
Prapor agrees to help, but wants payment:
- 500 Million Rubles if you kept the case at the start
- 300 Million Rubles if you handed the case to Prapor earlier
Step 3: Complete Prapor's Multi-Stage Task
You need to finish four objectives:
- Find Four Terror Group Report Folders on Labs - These spawn in various spots throughout the map
- Kill 50 Targets on Streets of Tarkov - PMCs or Scavs both count
- Kill Four PMCs and Survive in a Single Raid - All four kills plus extraction in one run
- Complete a 5-Hour Craft at the Intel Center - This creates a flash drive from your collected data
Step 4: Get Terminal Access
- Prapor gives you a note for the soldiers at Terminal
- You unlock the "Easy Way" achievement
- Terminal opens up for you
- Fastest Overall: No major time gates after the 55-hour case craft
- Clear Objectives: Straightforward tasks without complex prerequisites
- Best for Players with Deep Pockets: If you've got the rubles, this gets you there quickest
- Extremely expensive (300-500 million rubles)
- May miss story content
- Requires significant ruble farming beforehand
Route 2: Lightkeeper Route
If you agree to work with Kerman initially but later decide to cut ties, you'll end up on this path.
Initial Kerman Quest Steps
Step 1: Search for the Master Key Card and RFID Device on Labs
- The Master Key Card sits in the new Black Room
- Solve the Black Room puzzle and open the safe inside
- You'll find the key card, but the RFID device won't be there
Step 2: Run Labs Approximately Five Times
After roughly five Labs raids (or a time-gated period), you get a message saying the device wasn't found. Mechanic suggests Scav Raiders probably took the RFID device.
Step 3: Mechanic Contacts Elektro
Mechanic negotiates with Elektro for you. A 24-hour time gate starts.
Step 4: Pay Mechanic 40 Bitcoin
Once the 24 hours pass, hand over 40 Bitcoin to Mechanic.
Step 5: Grab the RFID Device
- Use Mechanic's keys to enter Elektro's Apartment on Streets of Tarkov
- The apartment door is right next to the Streets Transit entrance to Labs (the basement entrance)
- Head to the third floor
- Look for the RFID device on or under a coffee table in the apartment
Step 6: Complete the 50-Hour Intel Center Craft
Activate the RFID case from the armored case. This requires a 50-hour craft at the Intel Center (about 2 days).
Step 7: Test the Key Card at Shoreline (It Fails Again)
- Go to Shoreline Port Entrance and swipe the key card
- The card doesn't work
- Kerman admits this was just a loyalty test
The Decision Point: Leave Kerman
Here you can tell Kerman you're done with him. Making this choice:
- Unlocks the "Enough of Your Games" achievement
- Sends you down the Lightkeeper questline
Lightkeeper Quest Progression
- Talk to Lightkeeper - If you don't have Lightkeeper access yet, you'll need Intel Center Level 3 to unlock him
- Collect Five Topographic Reconnaissance Items - Find these on five different maps (one per map). Each reconnaissance item has specific spawn locations
- Complete a 6-Hour Intel Center Craft - Create a special flash drive with the collected material. This is a relatively short wait
- Deliver the Flash Drive to Lightkeeper
- Complete Lightkeeper's Combat Tasks - Kill 30 PMCs on Woods and turn in 100 PMC Dog Tags
- Find Cultist Amulets in Every Marked Room - Collect amulets from each Marked Room location across all maps
- Place Amulets on Lightkeeper Island - Bring all amulets to the Shared Bedroom Marked Key location on Lightkeeper Island. Place them at the designated spot
- Receive Terminal Key Card - Lightkeeper hands you the key card for Terminal access
- Fewer Time Gates Than the Full Kerman Route
- Combat-Heavy: Great for players who enjoy PvP challenges
- Moderate Cost: Requires 40 Bitcoin, not hundreds of millions of rubles
- Still has significant waiting periods
- Requires extensive PvP kills
- Need to visit multiple Marked Rooms
Route 3: Full Kerman Route
This route has the most time gates but may be tied to a unique "true" ending. It requires finishing every story chapter in the game.
Critical Skill Requirements for Story Completion
LMG Skill Level 5
- Use LMGs throughout your raids (the RPK is a solid choice)
- Unchamber and rechamber periodically to gain skill points passively
Stress Resistance Level 10
- This skill can be tedious to level naturally
- Best Method: Run Arena mode, especially Free-for-All matches
- Arena gives boosted XP for skills
- Progress carries over to both PvE and PvP
- Around 3 Arena matches can push your progress significantly
Kerman Route Quest Progression
Step 1: Turn In All Evidence to Kerman
After finishing all story chapters, submit your evidence to Kerman. He directs you to his trusted contact: Fence.
Step 2: Reach 4.0 Fence Reputation
Building Fence Rep Without Scav Raids:
- Use vehicle extracts on every map, and use them often
- Each vehicle extract bumps your Fence reputation
- You can hit 4.0+ Fence rep without ever loading in as a Scav
Unheard Edition owners get a bonus to Fence reputation from the start.
Step 3: Complete Fence's Task
PvP Players:
- Use a cooperative extract with a Scav on both Woods AND Reserve (you need to do both)
PvE Players:
- Kill 5 PMCs in a single raid without killing any Scavs on Shoreline and Interchange
Step 4: Raise BTR Driver Reputation to 0.4
Complete BTR-related quests to build this reputation. Work on these throughout your progression so you don't hit a wall.
Step 5: Build Solar Power in the Hideout
Prerequisites for Solar Power:
- Generator Level 3
- Ventilation (to the required level)
- Various other hideout upgrades
- 72-Hour Construction Time for Solar Power itself
Step 6: Final Key Card Craft
After Solar Power finishes, you unlock the final craft for the Terminal key card. The craft duration is unknown (could be instant, could be another long wait).
Step 7: Wait for the Evacuation to Begin
Once the craft completes, you can enter Terminal when the evacuation event starts. The Terminal map is already in the game.
- Full Story Experience: You'll see all the narrative content
- Potential Unique Ending: May unlock a specific ending unavailable through other routes
- Hideout Completion: Forces and rewards full hideout development
- Longest time gates (200+ hours)
- Requires completing all story content
- Multiple skill requirements
Time Gate Breakdown
Here's a quick look at the time gates for each route:
| Route | Major Time Gates |
|---|---|
| Rubles Route | 55-hour case craft, 5-hour flash drive craft |
| Lightkeeper Route | 55-hour case craft, 24-hour wait, 50-hour RFID craft, 6-hour flash drive craft |
| Full Kerman Route | 55-hour case craft, 24-hour wait, 50-hour RFID craft, 72-hour Solar Power build, unknown final craft |
Rough Total Wait Times:
- Rubles Route: Around 60 hours of crafting and waiting
- Lightkeeper Route: Around 135+ hours of crafting and waiting
- Full Kerman Route: Around 200+ hours of crafting and waiting (possibly more)
Strategic Recommendations
Speed is Your Priority
- Keep the case initially OR hand it to Prapor to save 200 million rubles
- Refuse to work with Kerman
- Farm rubles aggressively
- Pay the 300-500 million and knock out the objectives
Story is Your Priority
- Hand the case to Prapor for early Lightkeeper access
- Work with Kerman
- Complete all story chapters while waiting out time gates
- Push through the full Kerman questline
Budget is Your Priority
- Hand the case to Prapor (saves 200 million if you pivot to the rubles route)
- Work with Kerman initially
- Leave Kerman after the RFID quest
- Finish the Lightkeeper path (costs 40 Bitcoin instead of hundreds of millions of rubles)
Preparation Checklist
Get these things ready before you start the Terminal questline:
Items to Stockpile
- Labs Access Keycards (several)
- Labs Black Keycard (for Bitcoin farming if taking the Kerman route)
- Yellow Flare (if taking the Prapor initial route)
- Ruble reserve (300-500 million if taking the rubles route)
- PMC Dog Tags (100 if taking the Lightkeeper route)
Skills to Level
- LMG Skill to Level 5
- Stress Resistance to Level 10
- Use Arena mode to speed up skill gains
Hideout Upgrades
- Intel Center Level 3 (for Lightkeeper access if needed)
- Workbench (for the 55-hour case craft)
- All prerequisites for Solar Power (if taking the full Kerman route)
Reputation to Build
- Fence Reputation (use vehicle extracts consistently)
- BTR Driver Reputation to 0.4 (complete BTR quests)
Finding Quest Information
The Escape from Tarkov Wiki Discord has the most current info on quest locations and mechanics. The official wiki may not have fully documented all the new 1.0 content yet.
- Use the search function before posting questions
- Check for existing answers to common problems
- Only post if you've found something new
- If you find the answer was already there, delete your duplicate question
Wrapping Up
Terminal access takes serious time and resources no matter which route you choose. The rubles route remains the fastest for players sitting on a fortune, while the story-focused routes offer deeper narrative payoff at the cost of extended waiting periods.
Pick your approach based on how you like to play, what resources you have available, and how much you care about experiencing the full story versus reaching Terminal as soon as possible. Plan ahead, use waiting periods productively to gather resources for the next steps, and you'll get there eventually.