
What is Player Housing in Midnight?
Player Housing finally arrives in World of Warcraft with the Midnight expansion. Blizzard has built this as an evergreen feature with its own roadmap, so you'll see new content and systems added throughout The Worldsoul Saga and beyond. Unlike typical expansion features that you eventually finish, housing works more like an ongoing pillar of the game. There's always something new on the horizon.
This guide covers everything about customizing your home's interior, from basic furniture placement to advanced design tricks, the dye system, and room expansion.
Getting Into Edit Mode
You can't change anything about your home without first entering Edit Mode. Look for the "Edit House" button at the top of your screen while you're inside your house. Click it, and you'll unlock access to four different design tools:
- Decorate Mode lets you place and arrange furniture and decor items.
- Advanced Mode gives you precise control over rotation, scaling, and movement along any axis.
- Customize Mode handles dye application and structural theme changes.
- Cleanup Mode quickly removes items back to storage.
Each mode handles a specific part of the decoration workflow. Understanding when to switch between them will save you a lot of time.
Decorate Mode: Placing Your Furniture
Decorate Mode is where most of your interior design happens. When you activate it, a decor storage window pops up showing everything you own. You'll find both a filter function and a search bar to help track down specific pieces.
To place something, click on it in your storage window, then position it wherever you want. The default setting uses "Snap to Grid," which aligns items to predetermined points for clean, even placement.
Placement Features You Should Know
Surface Alignment means decor items automatically stick to appropriate surfaces. Rugs align to floors, wall decorations attach to walls, and hanging fixtures connect to ceilings. You don't need to manually adjust anything for realistic placement.
Enable Clipping is a toggle that lets items pass through other decor, floors, and walls. This opens up creative options like partially embedding objects into surfaces or layering multiple items together.
Parenting kicks in when you place smaller objects on or inside larger furniture. Put books inside a bookshelf, for example, and those books become "parented" to the shelf. Move the bookshelf later, and the books come with it. No need to relocate every small item individually.
When Decorate Mode Works Best
This mode suits initial furniture placement, quick decoration sessions, and anyone who prefers a set-and-forget approach. If you want items arranged in neat grid patterns without fussing over exact angles, Decorate Mode handles it.
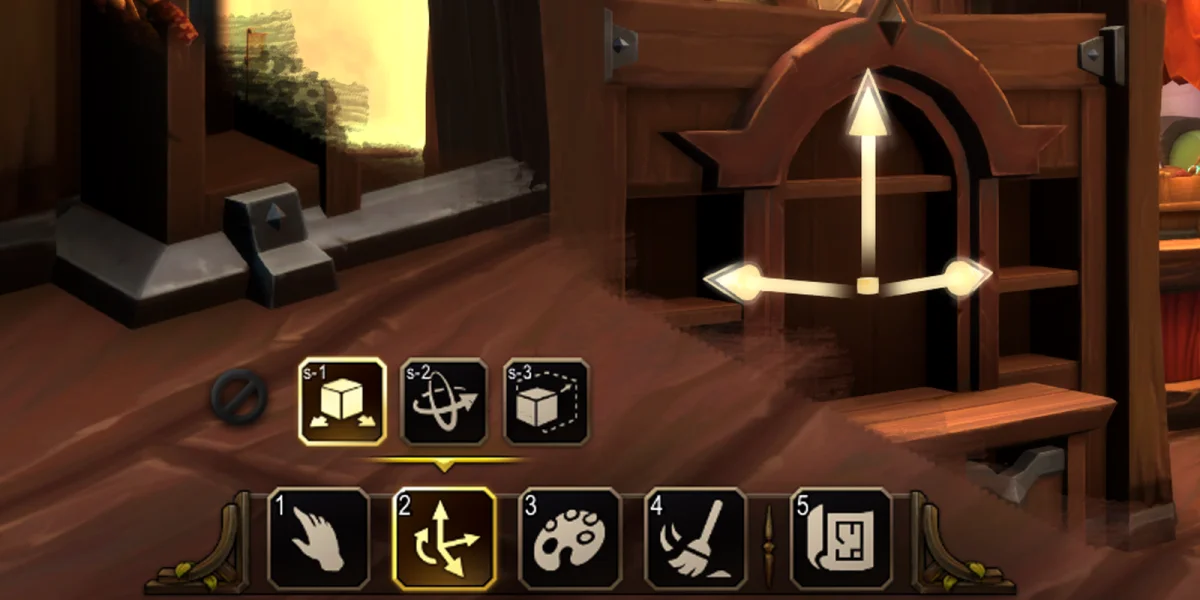
Advanced Mode: Full Creative Control
Advanced Mode removes most restrictions from Decorate Mode and gives you complete freedom over item placement. Complex and unconventional designs become possible here.
What You Can Do in Advanced Mode
Automatic Clipping means collision detection is always off in this mode. Objects pass freely through each other, walls, floors, and ceilings. You can embed items partially into surfaces or layer multiple pieces in the same space.
The Advanced Mode Interface
Three toggle buttons appear above the mode selector when you enter Advanced Mode:
- Move activates repositioning controls.
- Rotate activates angle adjustment controls.
- Scale activates resizing controls.
Snap to Grid isn't available here since it's exclusive to Decorate Mode.
When to Switch to Advanced Mode
Use this mode for floating displays, suspended decorations, specific angles that basic rotation can't achieve, resizing for creative effects, clipping objects together, and fine-tuning after your initial placement in Decorate Mode.

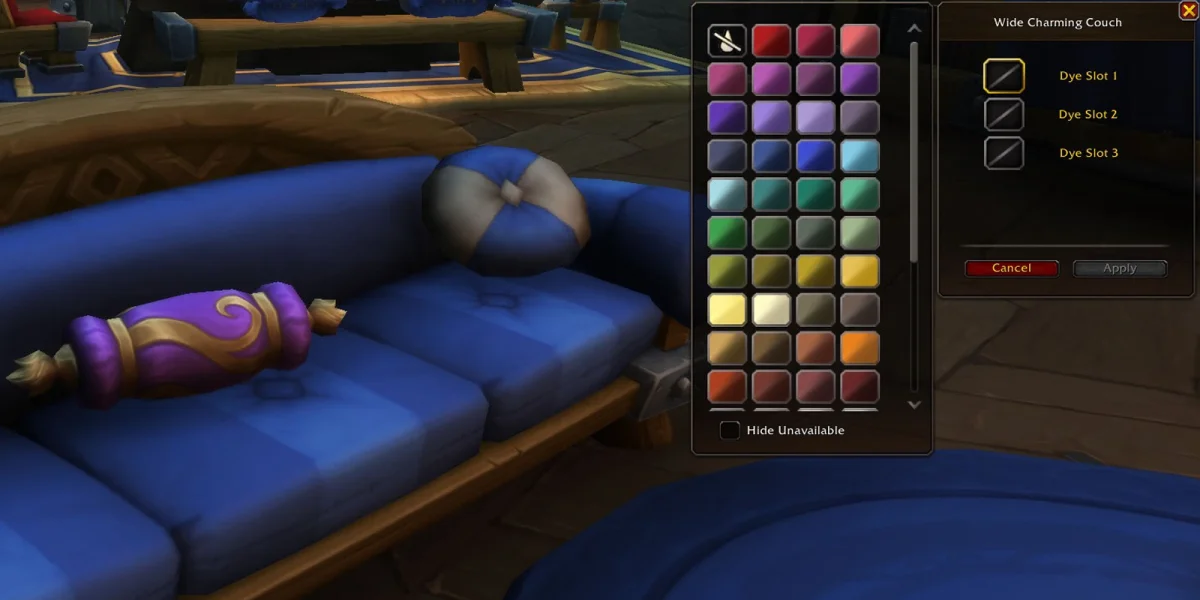
Customize Mode: Dyes and Themes
Customize Mode does different things depending on what you interact with. For eligible decor items, it applies dyes. For structural elements, it changes visual themes.
Dyeing Your Decor
Many decor items support the dye system, letting you adjust their color scheme to match your aesthetic. When you interact with a dyeable item, you can modify:
- Upholstery colors
- Wood coloration
- Metal coloration
- Various other material colors depending on the specific piece
Two players with identical furniture can create completely different looks through dye combinations alone.
Changing Structural Themes
When you interact with doors, walls, or floors in Customize Mode, you can swap their visual theme. The currently known themes are Folk, Rugged, Bel'ameth, and Silvermoon. You might give different sections of your home distinct visual identities, or keep a consistent theme throughout.
Cleanup Mode: Quick Item Removal
Cleanup Mode is the fastest way to remove decor from your home. Just click on any placed item and it instantly returns to your decor storage. Nothing gets deleted permanently.
This mode shines when you're clearing an area to start fresh, reorganizing a section and need to remove multiple items fast, or fixing placement mistakes quicker than repositioning would allow.
The Dye System Explained
The dye system gives you detailed color control over eligible decor items. Knowing how dyes get created and where to find them matters if you want full control over your home's color palette.
How Dyes Get Made
Dye creation involves two professions working together: Inscription and Alchemy.
Creating Pigments: Scribes mill herbs from various WoW expansions into Dye Pigments. The herbs you use determine what pigment type you get. Check the classic section of the Inscription profession interface for recipes.
Creating Dyes: Once you have Dye Pigments, head to a Dye Station at the town center of any neighborhood. Alchemists convert Pigments into finished Dyes at a one-to-one ratio.
Getting Dyes Without Crafting
Where to Learn the Professions
Both Alchemy and Inscription trainers exist in any main capital city. You'll also find them at neighborhood town centers, right next to the Dye Station.
Expanding Your Home with Edit Floorplan
Beyond decorating existing rooms, you can add entirely new ones through the Edit Floorplan feature.
Accessing Floorplan Editing
The Edit Floorplan button sits at the bottom of your screen, next to the editing mode buttons. Clicking it switches your view to an aerial perspective of your current layout. From here, you can see where additions are possible and plan your expansions.
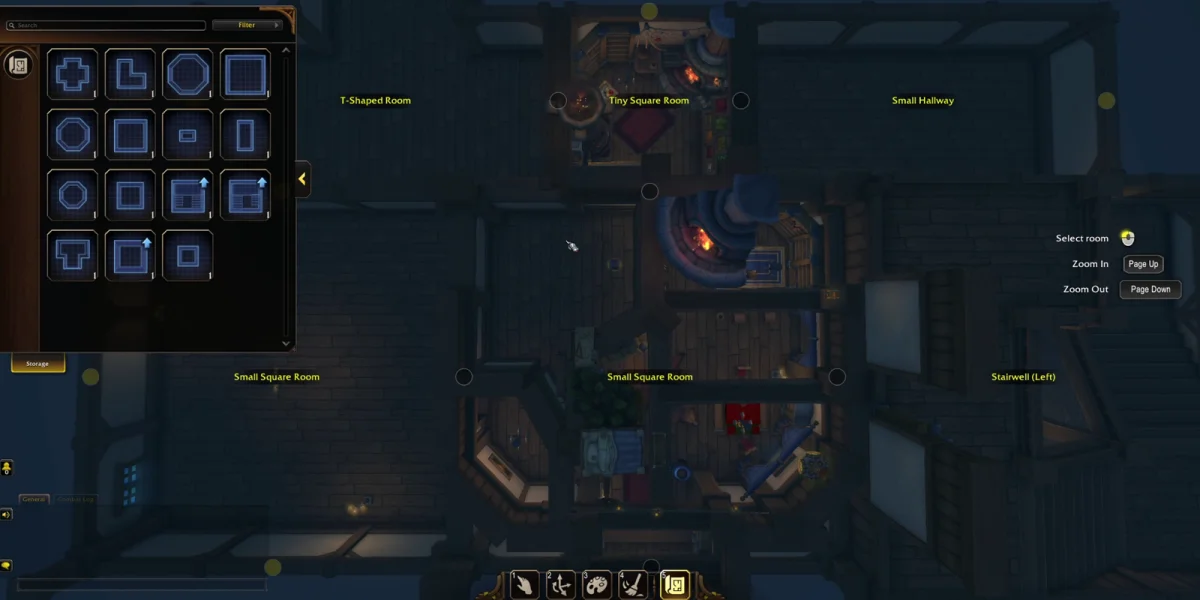
Adding New Rooms
Adding a room takes two clicks:
- Select the room type you want from available options
- Click on a doorway in your existing layout where you want to attach it
The new room connects through the selected doorway. Your expansion options depend on your current layout and which doorways are available.
Available Room Types
You can choose from the following floorplans:
| Room Type | Description |
|---|---|
| Closet | Tiny storage space |
| Cross-Shaped Room | Central hub with multiple connection points |
| Hallway | Connecting corridor between rooms |
| L-Shaped Room | Interesting architectural corner feature |
| Octagon Room (Medium) | Medium-sized unique shape |
| Octagon Room (Small) | Smaller unique shape |
| Square Room (Small) | Standard small room |
| Square Room (Tiny) | Compact space |
| Stairwell (Left/Right) | Vertical connections for multi-floor homes |
| T-Shaped Room | Three-way junction room |
Room sizes range from tiny closets to large spaces suitable for grand halls. L-Shaped and T-Shaped rooms create interesting architectural features, while Cross-Shaped rooms work well as central hubs with multiple connection points.
Understanding Room Budget
Your home has a room placement budget that caps how many rooms you can add. You start with 19 points, and different room types cost different amounts. Larger or more complex rooms eat up more budget than smaller, simpler ones.
Partition Objects
You can also customize room layouts using Partition Objects. These special decor items function as structural elements:
- Columns
- Walls
- Platforms
- Archways
Place Partition Objects using either Decorate Mode or Advanced Mode, just like regular furniture. They let you subdivide larger rooms, create alcoves, or add architectural interest within your existing floor plan.
Every Interior Customization Option
Player housing offers a huge range of customization options. Here's what we know from official demonstrations and reveals.
Multi-Floor Construction
You can add multiple floors using the stairwell room options, building tower-style homes or multi-story mansions through vertical expansion.
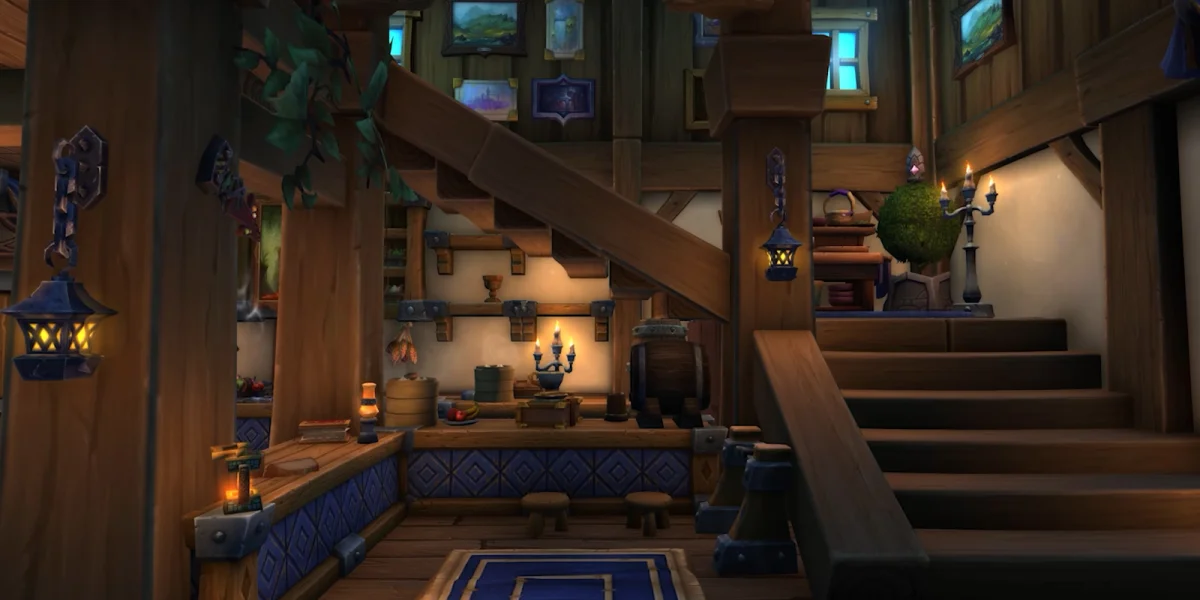
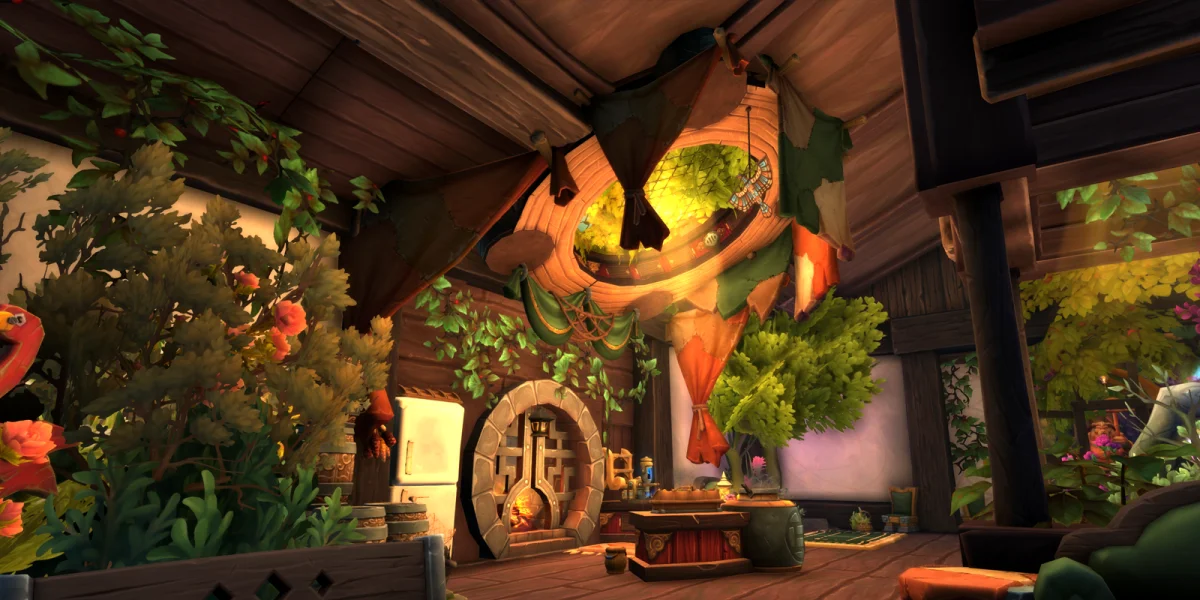
Furniture and Decor Categories
The decor catalog contains hundreds of items across numerous categories:
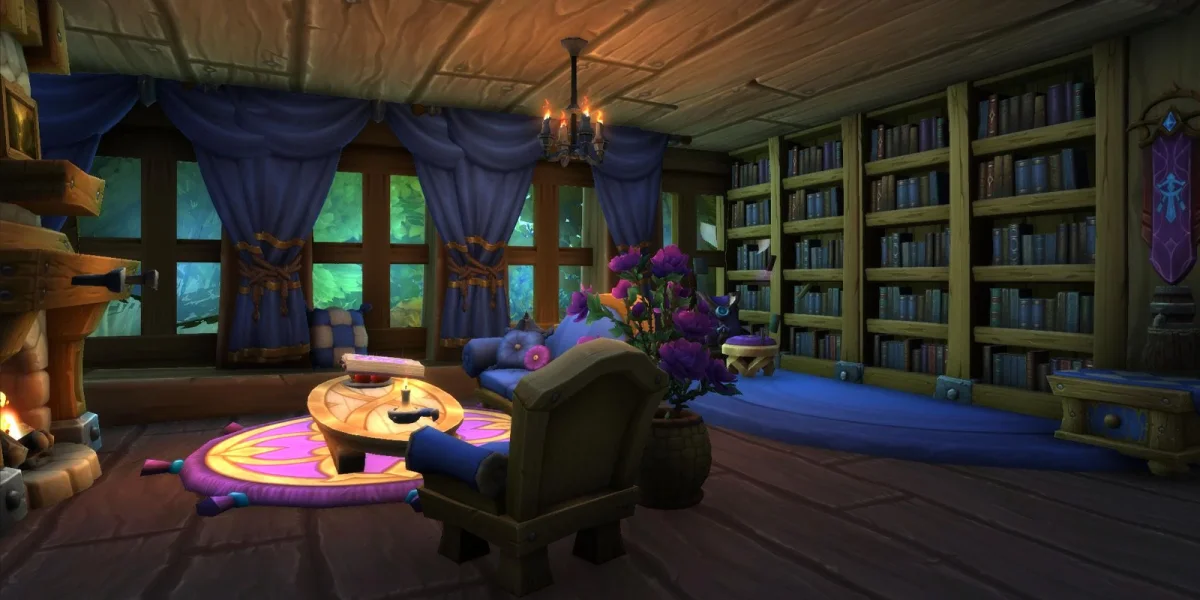
Furniture includes tables, chairs, beds, benches, couches, and bookshelves with customizable books.
Lighting and Fixtures covers chandeliers, fireplaces (with animated roaring flames), and windows.
Decorative Objects range from paintings and folding screens to boxes, barrels, kegs, and miscellaneous food items.
Seasonal Items include Winter Veil trees and other holiday-themed decorations.
Greenery means bushes and trees that you can resize (useful for creating vine or garland effects).
Some items feature unique animations. Floating books and fireplaces with animated flames add dynamic visual interest to your spaces.
Decor Filtering System
With so many items available, the catalog includes filtering to help you find specific pieces:
- Size
- Culture (racial or faction themes)
- Expansion of origin
- Style category
- Thematic category
- Holiday items
Additional checkboxes let you filter for dyeable items only, indoor items only, or outdoor items only.
Surface Customization
Walls, floors, and ceilings can be customized separately from furniture. Known style themes include Folk, Rugged, Bel'ameth, and Silvermoon, letting you set distinct visual tones for different areas.
Import and Export (Coming Post-Launch)
Blizzard plans to add an import and export system for housing layouts after Midnight releases. The feature will work similarly to talent import/export, letting you save and share your designs.
This won't be available immediately when player housing launches, but it's expected in the early days of the Midnight expansion.
Recommended Workflow for New Homeowners
For players just starting out, this progression makes the process smoother:
- Enter Edit Mode by clicking the Edit House button at the top of your screen.
- Plan your room layout using Edit Floorplan before placing furniture. Decorating is easier once your floor plan is set.
- Set structural themes in Customize Mode by choosing wall, floor, and ceiling styles for each room.
- Place major furniture in Decorate Mode using Snap to Grid for quick, aligned placement.
- Refine positioning in Advanced Mode for items needing specific angles, floating placement, or resizing.
- Apply dyes in Customize Mode to color-match items to your overall scheme.
- Use Cleanup Mode to quickly remove anything that doesn't fit your final vision.
Wrapping Up
Player housing interior customization in World of Warcraft gives you serious creative freedom through its layered editing modes, dye system, and room expansion mechanics. The tools accommodate both casual decorators who want quick grid-aligned placement and dedicated designers who need precise scaling and rotation control.
The room budget and Neighborhood Favor progression mean your home grows more elaborate as you play. Combined with hundreds of furniture pieces, multiple surface themes, and the full dye system, you have everything you need to create a truly personalized space in Azeroth.