
How Survival Hunter Combat Works
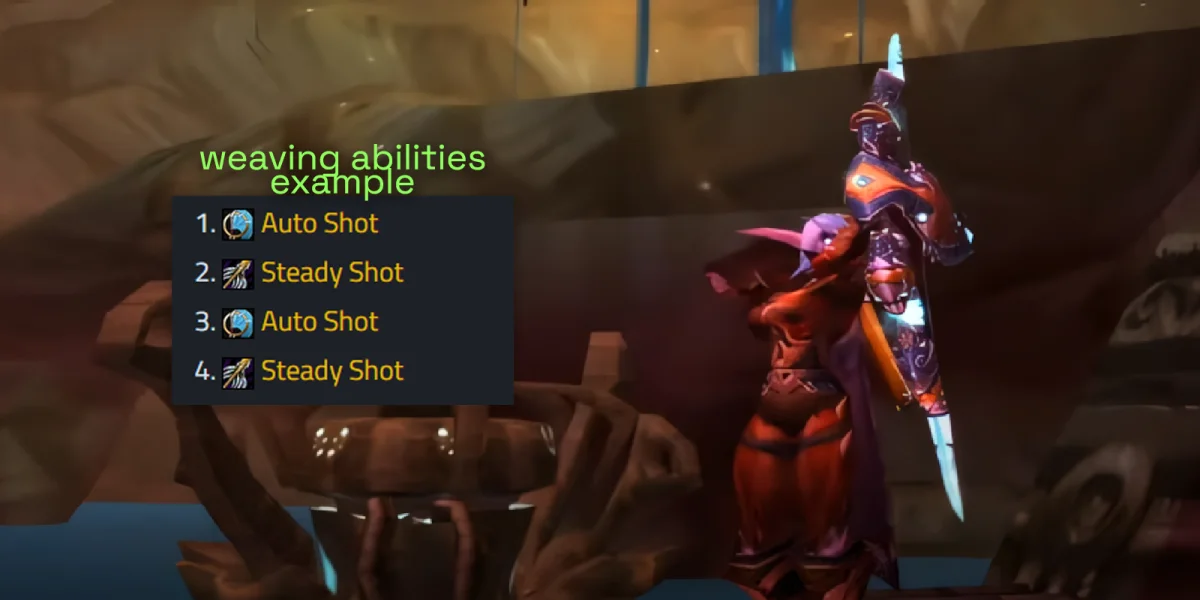
Survival Hunter gameplay in TBC Classic centers on one core mechanic: weaving Steady Shot between your automatic ranged attacks. In Classic WoW, Hunters lacked a reliable filler ability and spent a lot of time doing nothing between shots. TBC fixed that problem by introducing Steady Shot, which scales well with Attack Power and now forms the backbone of your damage.
Your effectiveness comes down to understanding how your weapon speed affects ability timing. You're trying to squeeze Steady Shot casts into the gaps between Auto Shots without delaying either one. This takes some attention to your swing timer, but it creates an engaging, skill-based playstyle that rewards good timing.
Survival Hunters don't have access to the Serpent's Swiftness talent that Beast Mastery builds get, so your baseline attack speed is slower. This actually works in your favor in some ways. The extra time between shots gives you room to fit in instant-cast abilities like Arcane Shot and Multi-Shot more regularly than other Hunter specs.
Core Abilities
Five abilities make up your rotation. Knowing what each one does and when to use it is the foundation of playing Survival well.
Steady Shot
Steady Shot is your main damage ability and the reason Hunters perform so well in TBC. It deals damage based on your weapon's base damage plus 20% of your Ranged Attack Power, plus a flat 150 damage. Dazed targets take an extra 175 damage on top of that. The short cast time combined with strong AP scaling makes Steady Shot your go-to filler between Auto Shots.
Auto Shot
Auto Shot fires automatically at intervals based on your weapon speed. You never want to "clip" your Auto Shot by casting Steady Shot at the wrong moment, since this delays your next automatic attack and costs you damage. Your entire rotation revolves around fitting other abilities around your Auto Shot rhythm.
Multi-Shot
Multi-Shot actually deals more damage per use than Steady Shot, even against a single target. You should fire Multi-Shot on cooldown in place of a Steady Shot whenever you can. Hitting multiple targets is just a bonus. Watch your surroundings though, and skip Multi-Shot when it might break crowd control on nearby mobs.
Kill Command
Kill Command doesn't trigger the Global Cooldown, so you can use it freely without disrupting your rotation. It becomes available after you land a critical strike, and you should fire it immediately whenever it's ready. The ability can proc again while still on cooldown, so it'll be ready to use the instant the cooldown ends. Getting close to 100% uptime on Kill Command matters for your damage.
Arcane Shot
Arcane Shot plays a bigger role for Survival Hunters than for other specs. Since you don't have the attack speed bonuses that Beast Mastery Hunters enjoy, you naturally have gaps in your rotation where Arcane Shot fits comfortably. This instant-cast ability also comes in handy during movement when you can't stand still to cast Steady Shot.
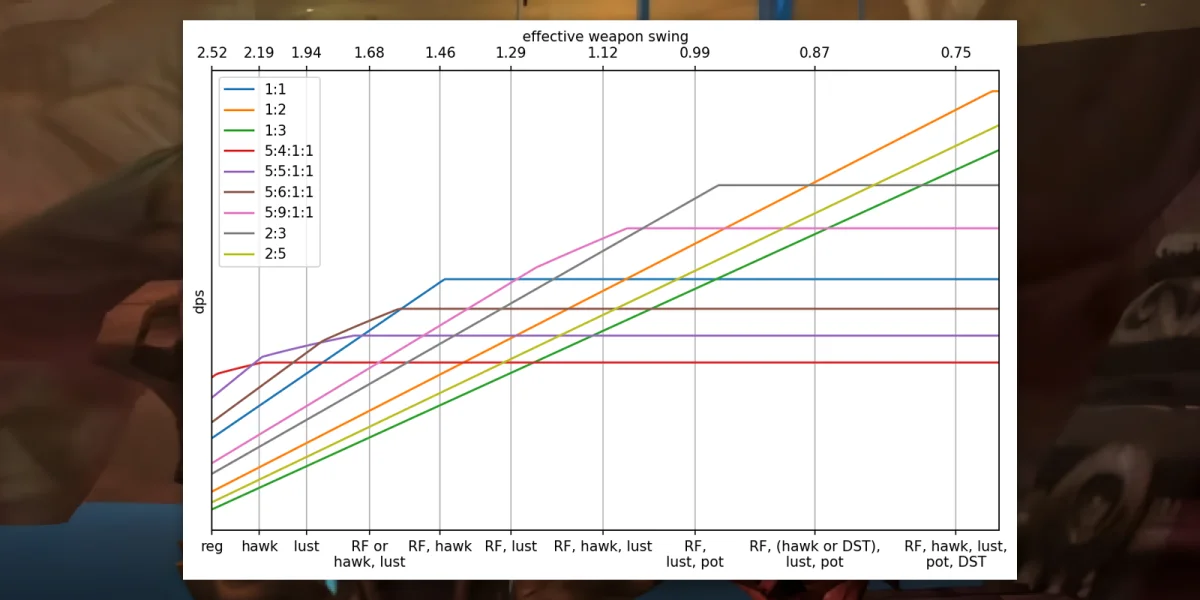
Weapon Speed and Rotation Selection
The rotation you use depends on your current "effective weapon speed," which is your base weapon speed after any haste effects modify it. Different weapon speeds create different timing windows, and using the wrong rotation for your speed means you'll either clip Auto Shots or waste time standing around.
Haste effects that change your weapon speed include:
- Gear with Haste Rating
- Rapid Fire (your main cooldown)
- Haste Potions
- Quick Shots procs from Aspect of the Hawk
- Heroism/Bloodlust from Shamans
When multiple haste effects stack, your effective weapon speed drops significantly. You might need to switch rotations mid-fight to keep your damage up.
The 1:1 Rotation
The 1:1 rotation is the most straightforward option and works as your entry point for learning Survival Hunter gameplay. The name describes the ratio of Steady Shots to Auto Shots: one Steady Shot for every one Auto Shot.
When to Use 1:1
This rotation works best when your effective weapon speed falls between roughly 1.3 and 2.1 seconds. For most Hunters with standard gear and no crazy haste stacking, this is your default rotation.
How to Execute 1:1
The pattern is simple alternation:
- Auto Shot fires
- Cast Steady Shot
- Auto Shot fires
- Cast Steady Shot
- Keep alternating
Throughout this rotation, use Kill Command right away whenever it becomes available since it doesn't interfere with your other casts. Swap in Multi-Shot for Steady Shot whenever Multi-Shot comes off cooldown, since it deals more damage.
Why 1:1 Works
At weapon speeds in the 1.3 to 2.1 second range, you have just enough time to finish a Steady Shot cast between Auto Shots without delaying your next automatic attack. The timing is tight but forgiving enough that small mistakes won't destroy your damage.
The 1:1.5 Rotation
If your weapon has a baseline speed around 2.8 to 3.0 seconds (roughly 2.2 to 2.4 seconds when hasted), the 1:1 rotation leaves awkward gaps. The 1:1.5 rotation fixes this by combining two Steady Shots with one instant-cast ability for every two Auto Shots.
The Execution Pattern
- Auto Shot fires
- Cast Steady Shot
- Use Multi-Shot or Arcane Shot (instant cast)
- Auto Shot fires during the Global Cooldown from your instant cast
- Cast Steady Shot
- Auto Shot fires
- Return to step 1
Your Auto Shot fires while you're still on the Global Cooldown from your instant-cast ability. This is intentional. You're not clipping anything because the Auto Shot happens automatically during a window where you couldn't cast anyway.
Choosing Between Multi-Shot and Arcane Shot
Use Multi-Shot whenever it's available since it deals more damage. When Multi-Shot is on cooldown, use Arcane Shot instead to keep the rotation timing intact.
Advanced Rotation Concepts
Beyond the basic rotations, several more complex patterns exist for specific situations or players pushing for every bit of damage.
The 1:2 Rotation
At higher haste levels, you can let two Auto Shots fire before casting your next Steady Shot. This rotation needs more haste than most Hunters have in early content phases but becomes relevant as gear improves.
The 1:3 Rotation
This rotation allows three Auto Shots between each Steady Shot. You need serious Haste Rating investment to reach these speeds, and it's generally not accessible during early progression.
The 5:5:1:1 French Rotation
This complex rotation intentionally delays Auto Shot slightly to fit both Multi-Shot and Arcane Shot into the cycle. It requires precise timing and thorough understanding of your swing timer. Experienced players looking to squeeze out maximum damage can explore this, but it's not required for competitive performance.
AoE Combat
Survival Hunters have three abilities for fighting groups: Multi-Shot, Explosive Trap, and Volley. Each one serves a different purpose depending on enemy count and cooldown availability.
Multi-Shot
Multi-Shot should already be part of your single-target rotation because it deals more damage than Steady Shot even against one enemy. Extra targets just mean bonus damage at no extra cost. Keep using Multi-Shot on cooldown as normal.
Explosive Trap
TBC lets you use traps during combat, making Explosive Trap a solid burst AoE tool. The trap deals immediate damage when triggered plus extra damage over time. Explosive Trap becomes worth using against seven or more targets. Drop the trap where enemies will walk into it, then continue your ranged rotation.
Traps have a two-second arming delay after you place them. Plan your placement around this.
Volley
Volley is your weakest AoE option. Only use it against ten or more enemies AND when both Explosive Trap and Multi-Shot are on cooldown. In most situations, sticking with your single-target rotation while using Multi-Shot on cooldown produces better results than channeling Volley.
| Ability | Target Count | Priority |
|---|---|---|
| Multi-Shot | 1+ targets | Always use on cooldown |
| Explosive Trap | 7+ targets | High priority AoE burst |
| Volley | 10+ targets | Low priority, last resort |
Pre-Pull and Opener Sequence
Your opener sets the tone for the whole encounter and includes several abilities you won't use again during the fight. Getting this right maximizes your initial burst and helps your tank establish threat.
Complete Opener Sequence
Step 1: Hunter's Mark
If you're the Hunter responsible for maintaining Hunter's Mark, apply it before the pull. With the Improved Hunter's Mark talent, this gives 440 Ranged Attack Power and 110 Melee Attack Power to everyone attacking the target.
Step 2: Misdirection
Cast Misdirection on your main tank. This is critical because your opening burst generates a ton of threat, and Misdirection transfers that threat to the tank instead. This helps them establish control and reduces the chance of anyone pulling aggro during the chaotic first few seconds.
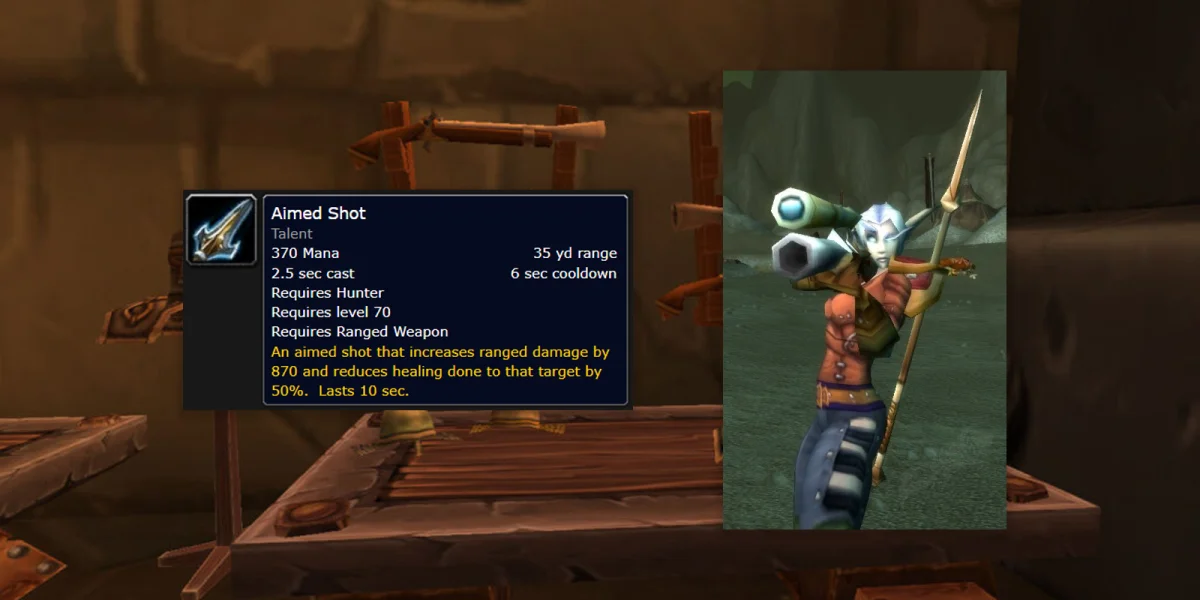
Step 3: Pre-Cast Aimed Shot
Aimed Shot is your single hardest-hitting ability, but the long cast time makes it impractical during normal combat where Steady Shot produces more damage over time. Before a pull though, you can start casting Aimed Shot and time it to land exactly as the encounter begins. If your raid uses a pull timer, aim to finish the cast as the timer hits zero.
Step 4: Distracting Shot (Optional)
Distracting Shot generates more threat than any other Hunter shot. Firing it right after your Aimed Shot transfers massive threat to your tank through Misdirection, giving them a big lead on the threat meter. This is especially valuable if your tank struggles with initial threat generation or if your DPS can pump out high numbers early.
Step 5: Activate Cooldowns
Use racial abilities like Blood Fury, activate any on-use trinkets, and trigger Rapid Fire. Stacking these effects amplifies your damage during the opening window.
Step 6: Begin Standard Rotation
Transition into your normal 1:1 or 1:1.5 rotation based on your current effective weapon speed.
Using Readiness
Readiness resets all your cooldowns instantly. The main use is getting a second Rapid Fire during the encounter. After your initial Rapid Fire ends, use Readiness to reset it and activate Rapid Fire again for another burst window.
Cooldown Management
Survival Hunters have limited direct control over their burst damage, so proper cooldown usage counts for a lot.
Rapid Fire
Rapid Fire is your primary damage cooldown, increasing your ranged attack speed significantly for its duration. For maximum effect, stack Rapid Fire with other haste effects like Quick Shots procs, Heroism/Bloodlust from Shamans, and Haste Potions. This multiplicative stacking creates your biggest damage windows.
Save Rapid Fire for designated burn phases when your raid coordinates cooldown usage. Using Rapid Fire during Heroism dramatically increases its value compared to using it randomly.
Quick Shots
Quick Shots is a proc from Aspect of the Hawk that temporarily increases your ranged attack speed. You can't control when it procs, but staying in Aspect of the Hawk lets you benefit from it. The proc works well with your other haste effects.
Movement and Positioning
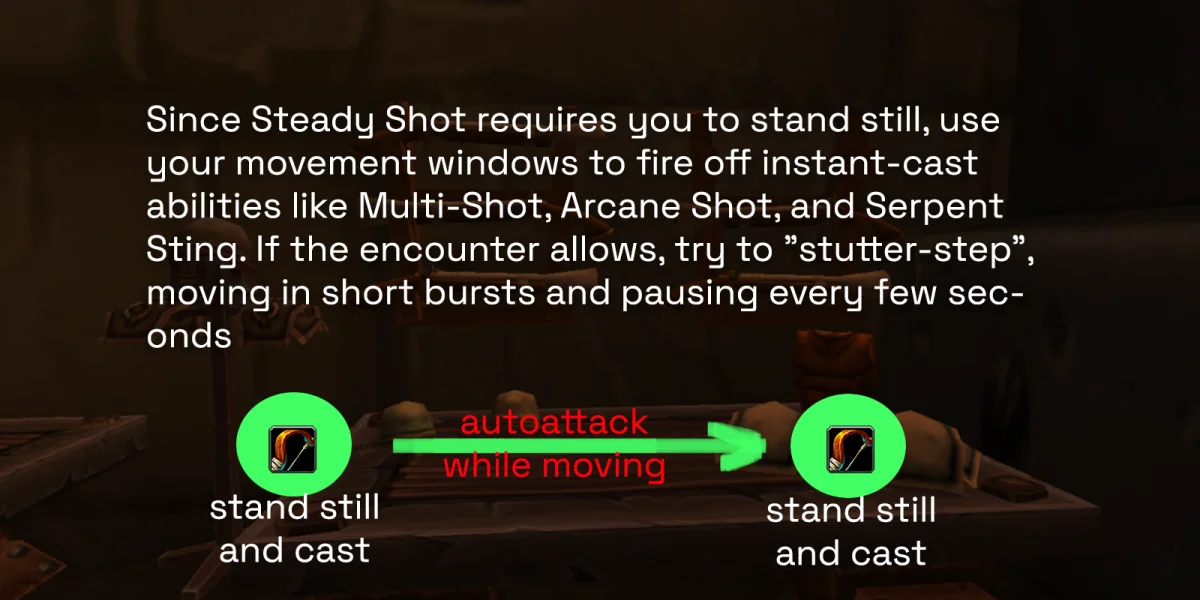
Steady Shot requires you to stand still while casting, which creates challenges during movement-heavy encounters. Knowing how to keep dealing damage while mobile separates good Hunters from great ones.
Using Instant Casts During Movement
When you need to move, use instant-cast abilities to keep dealing damage:
- Multi-Shot
- Arcane Shot
- Serpent Sting
These abilities deal damage without requiring you to stop, so you can reposition while still contributing.
Stutter-Stepping
If movement requirements are moderate rather than constant, you can move briefly, stop to fire an Auto Shot, then keep moving. This takes some awareness of your swing timer but lets you maintain Auto Shot damage during extended repositioning.
Melee Weaving
Melee weaving involves moving into melee range to use Raptor Strike between ranged attacks. This technique was common in Classic WoW but is much less practical in TBC.
Why Melee Weaving Is Less Viable
In Classic, Hunters had lots of downtime in their rotations, creating natural windows for melee attacks. TBC's addition of Steady Shot and increased haste availability removes most of those gaps. Trying to melee weave now risks clipping Steady Shot casts or delaying Auto Shots. You might actually lose damage instead of gaining it.
Weapon Considerations
Melee weaving requires a hard-hitting two-handed weapon to be worthwhile. The problem is that the best Hunter setup uses dual one-handed fist weapons with Adamantite Weightstones applied to each. These weightstones give a damage bonus that also scales your ranged weapon damage, making them extremely valuable. Two-handed weapons also generally give worse stats than two one-handers.
When Melee Weaving Might Work
If you're determined to incorporate melee weaving, you need a rotation with sufficient gaps and encounters where you can consistently stand at exactly five yards from the boss. The ideal approach uses the 1:1.5 rotation and replaces one instant-cast ability every two cycles with Raptor Strike. This only works under specific circumstances and requires precise execution to avoid hurting your ranged output.
For most players, the potential gains from melee weaving don't justify the execution difficulty and equipment compromises involved.
Pet Management
Your pet contributes meaningful damage and needs active management to perform well.
Ensuring Your Pet Attacks Your Target
Pets need explicit instructions to attack. Adding "/petattack" to your rotation macros ensures your pet immediately engages whatever you're attacking without needing separate commands.
Calling Your Pet Back
Create a dedicated keybind or macro to set your pet to passive and recall it. This is important for controlling your pet during encounters with specific mechanics or when enemies shouldn't be attacked yet.
Wind Serpent Specific Tips
If you use a Wind Serpent, you need extra management. Wind Serpents have the Lightning Breath ability, but they won't use it frequently enough on their own. Adding "/cast Lightning Breath" to your rotation macro forces your Wind Serpent to use its main damage ability as often as possible. You only need this for Wind Serpents; other pet families don't require it.
Mana Management
Running out of mana cripples your damage output. Understanding how to maintain your mana pool prevents this problem.
Aspect of the Viper
Aspect of the Viper regenerates mana quickly but reduces your damage output compared to Aspect of the Hawk. Avoid using Viper whenever possible since the damage loss is significant. If you completely run dry though, switching to Viper temporarily lets you recover and get back to dealing damage.
Judgement of Wisdom
If a Paladin in your raid maintains Judgement of Wisdom on your target, your attacks restore mana when they hit. This passive regeneration should sustain your mana pool through most encounters without needing Viper or potions. Coordinate with your raid to make sure this judgment stays active.
Mana Potions
Super Mana Potions and Fel Mana Potions serve as emergency resources to avoid dropping Aspect of the Hawk. Using a potion is better than switching to Viper because you maintain full damage output. Keep potions available for mana-intensive encounters.
Staying in Aspect of the Hawk
Aspect of the Hawk provides increased attack power and enables Quick Shots procs. Both benefits are too valuable to give up except when absolutely necessary. Use every other mana recovery option before resorting to Aspect of the Viper.
Utility Abilities
Beyond your rotation, several abilities provide valuable utility to your raid.
Misdirection
Misdirection transfers threat from your next three attacks to a friendly target, usually your tank. Use this on pull to help establish tank threat and throughout encounters during add spawns or tank swaps. This ability defines much of a Hunter's value beyond raw damage numbers.
Feign Death
Feign Death drops you from combat and clears your threat. Use this to survive botched pulls or raid wipes when recovery is possible. Feign Death no longer lets you swap trinkets during boss encounters like it did in some earlier versions of the game.
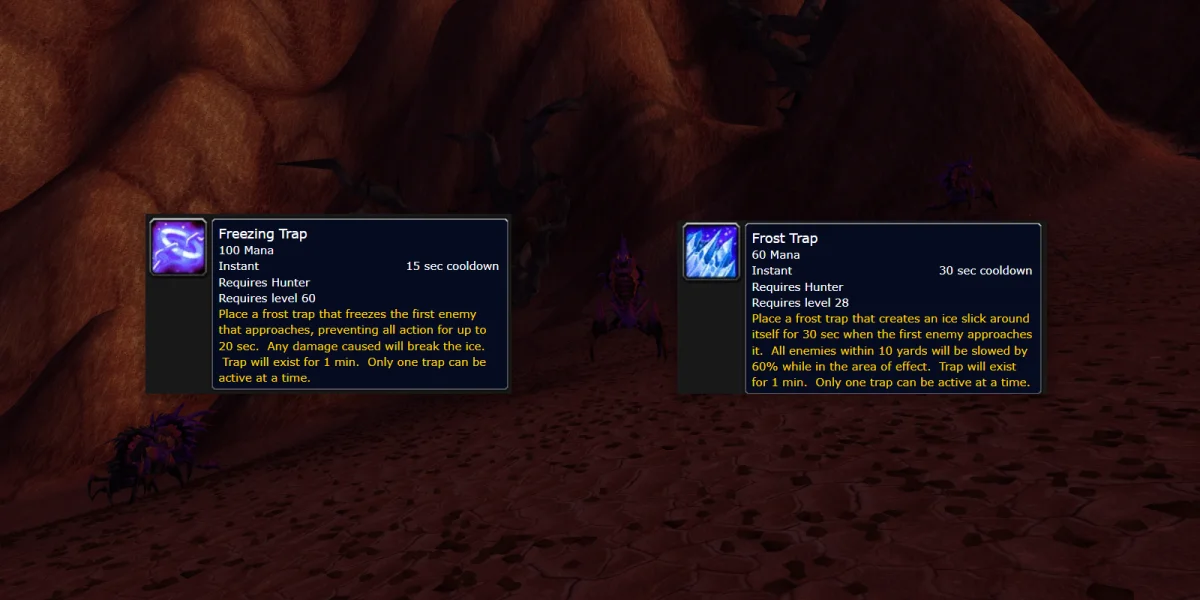
Freezing Trap
Freezing Trap provides crowd control by incapacitating a single enemy. In TBC, you can place traps during combat, though a two-second arming delay exists between placement and activation. Plan your trap placement around this delay.
Frost Trap
Frost Trap creates an area that slows enemies passing through it. Like Freezing Trap, you can place it during combat with the same two-second arming delay. This helps control enemy movement during encounters or dungeon pulls.
Summary
Mastering Survival Hunter in TBC Classic requires understanding the interplay between your abilities and your weapon speed. The core gameplay loop involves:
- Selecting the appropriate rotation (1:1 or 1:1.5) based on your effective weapon speed
- Weaving Steady Shot between Auto Shots without clipping either
- Using Multi-Shot on cooldown in place of Steady Shot
- Activating Kill Command right away whenever available
- Incorporating Arcane Shot during 1:1.5 rotation or movement phases
- Timing cooldowns to align with raid burn phases
- Keeping your pet contributing through proper commands
- Preserving mana to stay in Aspect of the Hawk
Execute your opener properly with pre-cast Aimed Shot and Misdirection, coordinate your Rapid Fire with Heroism and other raid cooldowns, and stay aware of your swing timer throughout encounters. With practice, these elements become second nature, letting you focus on encounter mechanics while maintaining competitive damage.