
HotA Barbarian has been one of Diablo 4's most reliable endgame builds for years, and Season 12: Slaughter doesn't change that. Hammer of the Ancients holds its spot as the strongest Core Skill in the Barbarian toolkit, putting up top-tier numbers across all content types, from Nightmare Dungeons to high-end Pit pushes to the season's new Butcher encounters.
The build's biggest selling point is how many ways you can play it. A ranged generatorless style, close quarters Overpower combos, or a Leap focused speed farm setup all work off the same foundation: stack as much Fury as possible, keep Earthquakes detonating to maintain your damage multiplier from Mantle of Mountain's Fury, and hammer everything in sight.
This guide covers the full picture for Season 12 endgame, starting from your first steps into Torment 1 at level 60 and going all the way to top-end Pit pushing and optimized speed clearing. All four gear stages are covered (Starter, Ancestral, Mythic, and the Push/Speedfarm variants), along with stat priorities, paragon boards, glyph leveling, skill tree choices, rotations, and the Melted Heart of Selig "Low Life" setup that defines the late game.
Season 12 Theme
How Killstreaks Work
Kill enemies fast enough and you'll build a streak that grants increasingly strong bonuses alongside bonus seasonal reputation and experience. There are six tiers:
| Tier | Kill Count |
|---|---|
| Killstreak | 0 to 99 |
| Carnage | 100 to 249 |
| Devastation | 250 to 499 |
| Bloodbath | 500 to 999 |
| Massacre | 1,000 to 9,000 |
| Fresh Meat! | 9,001+ |
In most instanced content (Pits, Nightmare Dungeons, Infernal Hordes), Bloodbath at tier four is a realistic ceiling.
Bloodied Items
Bloodied Items are gear pieces with bonus affixes that roll randomly, split across three categories: Rampage (armor), Feast (weapons), and Hunger (jewelry). Rampage and Feast affixes give small but real combat bonuses. Hunger affixes improve specific loot drops rather than combat performance directly. For HotA Barbarian, target these:
- Rampage: Movement Speed (one roll max), Primary Core Stat, Attack Speed (one roll max)
- Feast: Berserking (preferred), Chain Hook (alternate)
- Hunger: Experience Gained, or personal preference
Bloodied Sigils drop for Nightmare Dungeons, Infernal Hordes, and Lair Bosses, adding extra difficulty in exchange for better rewards. They function as an unofficial fifth Torment tier. Season 12 also adds Slaughterhouses as new locations and lets you transform into the Butcher itself.
Build Overview
HotA Barbarian performs well across all content types, with a particular edge in bossing. The Aspect of Ancestral Force doubles your damage against bosses, so Pit boss phases that drag on for other builds tend to end quickly here. Speed farming sits at moderate without additional work, though the dedicated speed variant covered later closes that gap considerably.
Core Mechanics
Fury Stacking and Furious Hammer of the Ancients
Earthquake Management
The Walking Arsenal System
Walking Arsenal is a Key Passive that gives damage bonuses for using skills across all three weapon types: Two-Handed Mace, Dual Wield, and Two-Handed Slash. In this build:
- Hammer of the Ancients covers your Two-Handed Mace
- Frenzy covers Dual Wield
- Mighty Throw covers Two-Handed Slash (requires manual assignment in the Arsenal menu)
Ground Stomp: Three Jobs at Once
Xan Rune: Guaranteed Overpowers
Polearm Expertise (Technique Slot)
Melted Heart of Selig
Melted Heart of Selig is the defining piece of the late game setup. Equipping it reshapes how both damage and survivability work.
With the amulet equipped, your Fury pool becomes your effective health bar. If it hits zero, you die. That changes how you build the character from the start.
Rule 2: Stack Maximum Fury everywhere you can. Maximum Fury is both your defensive buffer and your primary damage scaling stat through Ramaladni's Magnum Opus. Keep the Elixir of Resourcefulness II running at all times for extra Fury support.
Don't swap to this setup until you can comfortably meet both conditions. Running Selig without enough Fury means dying frequently and dealing less damage than a standard amulet would.
Gear and Stat Priorities
All item descriptions below refer to the Mythic variant loadout - the fully built endgame setup. The Build Variants section covers how to get there from scratch.
Endgame Stat Thresholds
| Stat | Target |
|---|---|
| Ranks to Hammer of the Ancients | 33+ |
| Critical Strike Chance | 100% (via Furious HotA) |
| Attack Speed (stat sheet) | 60 to 85% (~190% with buffs) |
| Chance for HotA to Deal Double Damage | 90%+ |
| Strength | 3,500+ |
| Fury (out of combat) | 300+ (or 800+ with Selig) |
| Life | 10,000+ (or 300 with Selig) |
| Armor | 25,000+ |
| All Resistances | 2,500+ |
| Movement Speed | 200%+ |
Recommended Consumables
| Slot | Item |
|---|---|
| Elixir | Elixir of Resourcefulness II |
| Resistance Incense | Soothing Spices |
| Defensive Incense | Song of the Mountain |
| Core Stat Incense | Ancient Times |
Helm: Crown of Lucion
Chest Armor: Mantle of Mountain's Fury
Gloves: Inner Calm
Pants: Tibault's Will
Boots: 100,000 Steps
Two-Handed Bludgeoning Weapon: Aspect of Ancestral Force
Slicing Weapon: Earthquakes
Mainhand: Sabre of Tsasgal
Offhand: Ramaladni's Magnum Opus
Left Ring: Anger Management
Right Ring: Ring of Starless Skies
Skills and Rotation
The Walking Arsenal cycle is straightforward in practice. Frenzy and Mighty Throw work like extra shouts - just quick presses every 15 seconds between otherwise constant HotA casting.
Skill Breakdown
Skill Tree
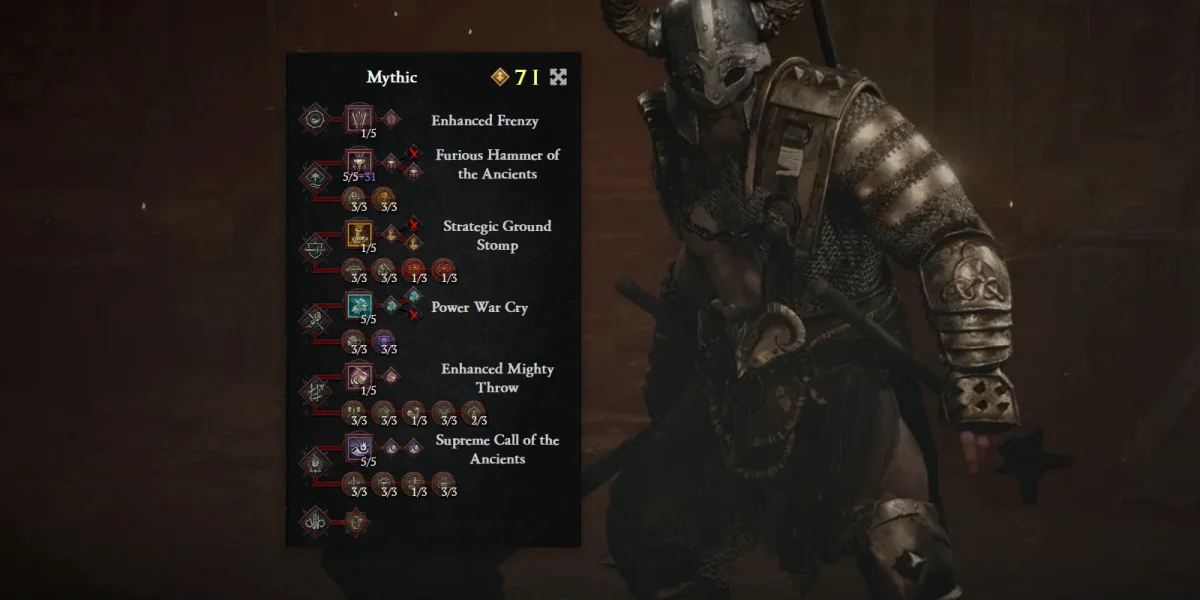
Everything in the skill tree points toward squeezing more out of Hammer of the Ancients:
- Hammer of the Ancients: Maxed with Furious upgrade. Primary investment target.
- Frenzy: Rank 1 with Enhanced Frenzy for Walking Arsenal and Belligerence.
- Ground Stomp: Taken with Strategic Ground Stomp for Ultimate cooldown reduction.
- War Cry: Maxed with Power War Cry. Booming Voice also maxed for longer shout duration.
- Mighty Throw: Taken with Enhanced Mighty Throw.
- Call of the Ancients: Maxed with Supreme Call of the Ancients.
- Support passives: Wallop, Heavy Handed, Weapons Master (for its passive damage multiplier, not weapon swapping), Flawless Technique, and all available Fury scaling and damage multiplier nodes.
Skill Rotation
The rotation runs on two cycles - a 15-second Arsenal refresh and an on-cooldown phase for major abilities - with constant HotA spam as the backbone of everything.
Every ~15 seconds:
- Cast Frenzy once (into the air is fine) to maintain Dual Wield Arsenal buff and Belligerence
- Cast Mighty Throw to refresh the Attack Speed bonus and Two-Handed Slash Arsenal buff
On cooldown:
- Call of the Ancients for Fury generation and all Ultimate bonuses
- Ground Stomp fires automatically from boots - press manually in Push variant for additional grouping
- War Cry for damage and Berserking
- Rupture (Push variant only) for Attack Speed burst and extra Overpower triggers
Main Loop: Spam Hammer of the Ancients toward enemies. Earthquakes detonate automatically every five seconds through the Walking Arsenal x 100,000 Steps x Earthquakes weapon interaction, keeping Mantle of Mountain's Fury's damage multiplier up. The Xan Rune layers in guaranteed Overpowers on top of that.
Arsenal System
Each weapon type in the Arsenal system carries its own Expertise bonuses and passive interactions.
| Skill | Weapon Assigned | Method |
|---|---|---|
| Hammer of the Ancients | Two-Handed Mace | Default |
| Frenzy | Dual Wield | Default |
| Mighty Throw | Two-Handed Slash | Must be manually assigned |
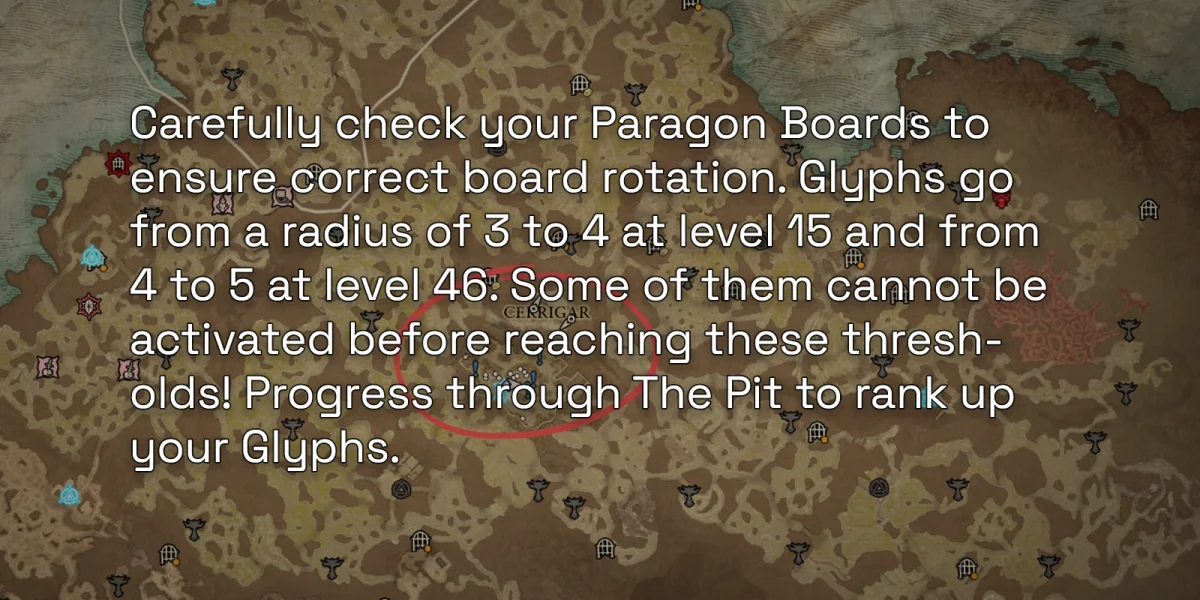
Paragon Boards and Glyphs
Correct board order and smart glyph placement are what push this build from strong to genuinely dominant at high Pit tiers. Position each glyph to activate as many surrounding bonus nodes as possible.
Glyphs expand their activation radius at level 15 (radius 3 to 4) and again at level 46 (radius 4 to 5). Some surrounding nodes can't be activated before hitting those thresholds, so running the Pit regularly to level glyphs matters.
| Board | Glyph |
|---|---|
| Marshal | Marshal Glyph |
| Carnage | Crusher |
| Blood Rage | Challenger |
| Weapons Master | Might |
| Flawless Technique | Wrath |
The Flawless Technique node generates Fury each time you use your Ultimate, keeping your pool topped off during active combat. In the Speedfarm variant, the Marshal Glyph is especially valuable because it powers the Leap cooldown reset loop.
Glyph Leveling Priority
Level the following glyphs in this order, both to Level 15 and then to Level 46:
- Might
- Wrath
- Crusher
- Challenger
- Revenge
Build Variants
The build has four stages of progression, each with clear upgrade targets. The gameplay loop stays consistent throughout - gear quality and variant-specific tweaks are what change.
Designed for fresh level 60 characters heading into Torment 1. Mythic Uniques aren't available at this stage, so the build runs on Legendary Aspects and whatever accessible Uniques you can get. Prioritize Moni and Tec first - these are the two early game items that carry the most weight before Mythics come online. Skip Melted Heart of Selig at this stage. Focus on building Fury through available gear and getting Hammer of the Ancients skill ranks as high as possible.
This stage bridges the gap between Starter and fully Mythic. Start working in Ancestral quality Uniques and push Temper mods and Masterworking levels where you can. The gameplay loop stays the same throughout - gear quality is the only thing improving.
The fully built HotA Barbarian setup, running all Mythic Uniques, well chosen Legendary Aspects, and the Melted Heart of Selig Low Life configuration. All the gear descriptions earlier in this guide describe this stage. Pick up items in this order:
- Xan Rune: Guaranteed Overpowers on demand - significant damage boost.
- Ring of Starless Skies: Core Skill Ranks, Attack Speed, damage multiplier, and the 50% Fury cost reduction that makes Crown of Lucion viable.
- Crown of Lucion: Only equip this after Ring of Starless Skies is on your finger. At 105% damage multiplier it's the strongest single piece in the build, but the skill cost increase will gut your Fury without the ring already in place.
- Melted Heart of Selig: Doubles Maximum Fury, adds the All Stats boost, and enables the Fury based defensive layer. Review both conditions in the Selig section before swapping.
Built to reach the highest possible Pit tier. Changes from the Mythic baseline: Ground Stomp moves to the skill bar for active cooldown reset use alongside the automatic cast from 100,000 Steps; Rupture comes in for a large Attack Speed bonus and extra Overpower triggers; the Xan Rune combination runs in the push setup to maximize Overpower frequency; gameplay centers on grouping enemies tightly so Overpowers hit as many targets at once as possible.
Stack Fury, run shouts and cooldowns, pull enemies together, then blast packed groups with Hammer of the Ancients. Boss fights are a genuine strength here. Ancestral Force's boss damage bonus compounding with all other active multipliers makes even Pit 120 bosses go down in minutes rather than dragging into long, punishing phases.
Gives up some raw damage for much faster map traversal. Changes from the Mythic baseline: Leap replaces one shout skill. The Marshal Glyph resets Leap's cooldown, so you can keep leaping almost constantly. An additional Shout slots in since all shouts also reset the Leap cooldown, creating a loop where Leap is nearly always available.
The loop runs like this: leap to a pack, throw out shouts to reset Leap immediately, leap to the next pack, hammer enemies as you move through. Pit 100 speed clears are very comfortable once this variant is set up properly.
Survivability
At full gear, HotA Barbarian approaches unkillability in Torment content. Several defensive systems overlap to make that possible.
Fury as a Defensive Shield
With Melted Heart of Selig equipped, incoming damage drains Fury instead of Health. In the Low Life setup your Fury pool sits at 800 or above, which is an enormous buffer. Fury regeneration outpaces incoming damage in almost all content at this gear level, so you effectively don't die.
Fortify
A permanent Fortify buff reduces incoming damage passively across the board. You don't need to manage it actively.
Passive Fury Generation
Fury refills fast from three constant sources:
- Flawless Technique generates Fury every time you cast your Ultimate
- Call of the Ancients generates Fury with each attack the Ancients land
- Ground Stomp generates Fury on every automatic cast from the boots
Even after a big hit drains a chunk of your Fury pool, these sources refill it quickly enough that you rarely feel in danger.
The Low Life Counterintuition
Frequently Asked Questions
Open your active skills menu (default keybind: S), hover over the skill, then cycle through weapons with Mouse Button 3. For Mighty Throw specifically, you need the Two-Handed Slash weapon selected, or Walking Arsenal won't trigger off that skill.
Weapons Master gives a passive damage multiplier regardless of whether you actively swap. You're taking it purely for the damage bonus, not the mechanic.
Attack Speed caps vary by weapon type. For this build, target 60 to 85% Attack Speed on the stat sheet, which comes out to roughly 190% with all active buffs running.
The 105% damage multiplier outweighs the cost increase by a wide margin. Just don't equip it before Ring of Starless Skies is in place - the ring's 50% Fury cost reduction is what absorbs the extra overhead.
Very well - noticeably more so than most other Barbarian options this season. Ancestral Force's boss damage bonus stacks through several other active multipliers, which translates to boss kill times measured in minutes even at Pit 120 and above.
Once you can reliably hit 800 or more Maximum Fury and strip Maximum Life increases from your gear and Paragon. Running Selig before meeting both conditions leads to frequent deaths. If the gear isn't there yet, stay on a regular amulet.
No. The 100,000 Steps boots handle it automatically. You can put Ground Stomp on the skill bar in the Push variant for manual cooldown reset control, but in every other variant it runs entirely without your input.
Summary
HotA Barbarian is in excellent shape for Season 12: Slaughter. It handles speed farming, Pit pushing, and bossing well, and the Leap focused Speedfarm variant tightens up clear times considerably for players who want to run content faster.
The power ceiling is real. A fully built Mythic setup with Melted Heart of Selig running properly makes the character nearly unkillable in standard Torment content while putting out the biggest damage numbers the Barbarian class can produce. Getting there doesn't require all the Mythics immediately - Pit 90 speed clears are achievable well before that stage, and the progression path has clear upgrade targets at every step.
A quick rundown of what makes HotA worth playing this season:
- Multiple working playstyles within one build (ranged generatorless, Overpower melee, Leap speed farm)
- Strongest Barbarian Core Skill from first clear all the way to top tier pushing
- Maximum Fury scaling drives both offense and defense at the same time
- Straightforward moment to moment gameplay: one main skill, five supporting abilities
- Top end Pit viability with fast boss kills