
What Blue Fire Is All About
Blue Fire is an optional story chapter that digs into the electromagnetic pulse (EMP) blast that knocked out all communications in Tarkov and kicked off the main storyline. You're basically playing detective, tracking down information about the mysterious "blue fire" incident that changed everything in the city. While it's shorter than some other story chapters, Blue Fire takes you through some seriously dangerous areas like The Lab and multiple locked locations on Streets of Tarkov.
This is an optional story chapter with intermediate to advanced difficulty. Blue Fire fills in crucial backstory about the catastrophic event that triggered everything. You'll learn about TerraGroup's activities and the device responsible for the city-wide blackout.
What You Need Before Starting
Make sure you've got these requirements covered before jumping into Blue Fire.
Quest Progress You'll Need
You need to finish the Tour questline far enough to unlock Mechanic as a trader and get access to The Lab map. Tour gives you the trader access and map unlocks that Blue Fire relies on.
Keys and Items You Can't Skip
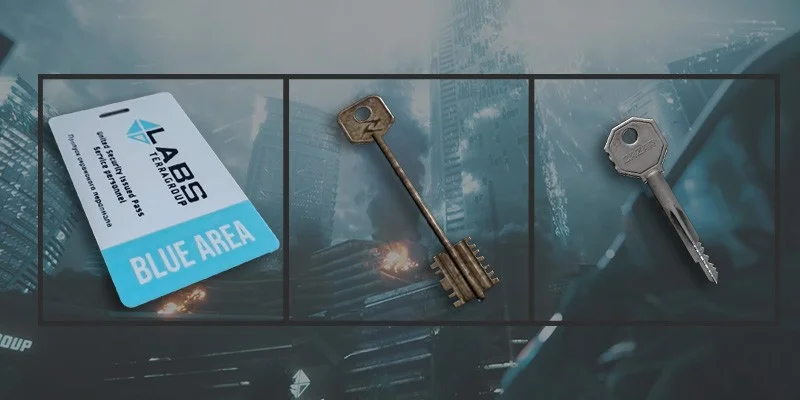
You'll absolutely need a Labs Access Keycard since you'll visit The Lab at least once, maybe twice depending on your choices later. Each card gets consumed when you enter.
You'll also need to pick one of two keys for accessing the device fragment. The Mysterious Room Marked Key opens the marked room at Chekannya Street 13 on Streets of Tarkov. This key has limited uses and costs a fortune on the flea market (you'll need level 35 to buy or sell it). Your other option is the Car Dealership Closed Section Key, which opens the upper locked section of the Lexos car dealership on Streets of Tarkov. It's a single-use key that's usually cheaper than the marked room option.
The Rus Post Car Key is optional but helpful for the final quest step. There's a guaranteed spawn location right next to the vehicle where you use it, so buying it beforehand is your call. For PvP raids, spending the 20,000 roubles upfront prevents headaches if someone else grabs the spawn. For PvE, just grabbing the guaranteed spawn works fine.
Where to Get Your Keys
All required keys drop from scav pockets and backpacks as random loot. You can also find them in jacket searches, drawer searches, and filing cabinets (particularly the Mysterious Room Marked Key). The most reliable method for getting the Car Dealership Closed Section Key is killing boss Kaban at the Lexos dealership. If you want to save time, you can always buy them from the flea market, though prices swing wildly and marked keys or quest-specific keys tend to be expensive.
Insurance mechanics don't function in The Lab, so anything you lose is gone for good. Put the LAN hacking device Mechanic gives you in special inventory slots so you don't lose it if you die. If you somehow lose the LAN hacking device, Mechanic has a barter trade for cigarettes to replace it, so you won't get stuck.
How to Start Blue Fire
You've got two ways to kick off this quest.
Method 1: Reading EMERCOM Leaflets (Easiest Starting Point)
EMERCOM leaflets show up on two maps. Woods is your easiest option. Head to the military camp area (some people call it med camp) near the lake and look for the medical supply area in the upper section. Find a green shipping container in the corner, and inside you'll see a white cabinet with medical supplies. The EMERCOM leaflet is posted on the side of this cabinet. Interact with it to pick it up, open your inventory and actually read the leaflet to trigger the quest, then extract from the raid. You can also find EMERCOM leaflets posted on doors of EMERCOM tents on Interchange.
Method 2: Entering the Marked Room (Auto-Start)
Just walking into the marked room at the back of Chekannya Street 13 on Streets of Tarkov automatically triggers the quest. This method requires owning the Mysterious Room Marked Key before you try it, and you'll need that key again later in the quest. Make sure your key has at least two uses left if you're going this route.
Talk to Mechanic About the EMP Blast
After reading the EMERCOM leaflet and extracting, visit Mechanic in your hideout. The quest deals with advanced technology that's way above standard mercenary pay grade, so Mechanic becomes your tech expert throughout Blue Fire. He knows about the EMP blast that disabled all electronics citywide, but he needs physical evidence to give you concrete answers. Your first task is retrieving a fragment of the device that caused the explosion. Without physical evidence from the blast site, Mechanic can't analyze what caused the city-wide blackout. The device fragment gives him the technical data he needs to figure out what happened.
Locate and Obtain the Device Fragment
The explosion's ground zero was in the city center, which points you to Streets of Tarkov. The quest hints that scavs or cultists may have taken the fragment. You've got two location options for finding it. Pick whichever suits your playstyle and budget better.
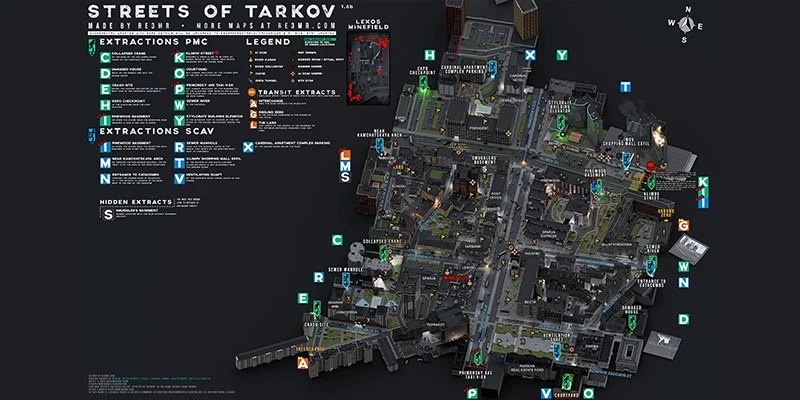
Option A: Lexos Car Dealership Upper Section
The Lexos dealership is on the southern side of Streets of Tarkov. You'll need the Car Dealership Closed Section Key, which is single-use. Watch out for landmines scattered outside the dealership. Boss Kaban and his guards might spawn here, forcing a full clear if they're present. Expect heavy PMC and player scav traffic in PvP raids, though it's much simpler in PvE mode.
- Enter the Lexos car dealership
- Head to the upper floor
- Unlock the closed section using the Car Dealership Closed Section Key
- Walk into the locked room
- The device fragment is sticking out of a green container on the center table
- Grab the fragment (goes into quest item inventory)
- Survive and extract from Streets of Tarkov
Option B: Chekannya 13 Apartments Marked Room
The marked room is on the southwest edge of Streets of Tarkov, near the Collapsed Crane extract. You'll need the Mysterious Room Marked Key, which has multiple uses but requires level 35 for flea market access.
- Find the playground area near Chekannya 13
- Spot the apartment building across the street from the playground
- Enter through the broken window opening
- Continue through the hallway
- Pass through the hole in the wall leading to a stairwell with green lighting
- Find the apartment with bloodstains on the floor
- Follow the bloodstains to a locked room (you'll see cultist stuff everywhere)
- Use the Mysterious Room Marked Key to unlock the door
- The unknown device is in a dead plant in the far left corner
- Grab the fragment (goes into quest item inventory)
- Survive and extract from Streets of Tarkov
Alternate Navigation: From the back of the Chek 15 building, head down the road toward the vet clinic (it's on your left). Pass through the gate just after the vet clinic building and keep left. Continue past the playground and drop through the window opening to enter the building.
The fragment goes straight into your quest item inventory, which is separate from your regular inventory. If you die before extracting, you'll have to return to Streets of Tarkov and grab the fragment again. Both fragments are identical for quest purposes, so the choice is purely about key availability, cost, and which location you prefer. After successfully extracting with the fragment, head back to hand it over to Mechanic.
Plant the Hacking Device in The Lab Server Room
After delivering the unknown device fragment, Mechanic analyzes it and decides he needs more information from TerraGroup's systems. He sends you a LAN hacking device through your messenger that needs to be installed in TerraGroup's main server room.
Prep Work Before The Lab
Accept the LAN hacking device from Mechanic via messenger and put it in your special item slots to prevent loss on death. Equip a Labs Access Keycard (gets consumed on entry) and bring appropriate combat gear. If your Tour questline isn't complete, use transits in Streets of Tarkov or Factory maps to reach The Lab. If it's complete, you'll have direct access. Remember that insurance doesn't work in The Lab, so any gear you lose is permanently gone.
Finding the Server Room
Map Reference: The server room sits on the first floor of The Lab, labeled as room B12. You can also access it from the floor above via room B21.
- Enter The Lab using your Labs Access Keycard
- Go to the first floor
- Find the server room (if you're starting from the black room area, the server room is immediately to the right)
- Pick between two planting spots inside the server room
Where to Plant the Device
You've got two options. The first location is immediately on your left when entering the server room, where servers sit against the wall. This position is more exposed and carries higher risk in PvP situations. The second location is on the opposite side of the server room, where a row of servers sits against the far wall. This spot is more concealed but still requires full area clearance before planting.
The Planting Process
Clear the entire area of enemies and check for other players nearby if you're in PvP. Position teammates as guards if you're in a group (1-2 teammates recommended). The server room gets heavy traffic, so expect potential encounters. In PvE mode, AI enemies are predictable and manageable, so either planting location works fine. If AI shows up during the plant, you can handle them pretty easily.
Approach your chosen server rack and interact to begin planting the LAN hacking device. You're stuck in place for 60 seconds and can't move or do anything else during this time. Any interruption (taking damage, moving, etc.) resets the entire 60-second timer, so stay alert for the full minute. You don't need to survive and extract after completing the plant. If you get killed right after finishing, the quest objective still completes. The "typical head-eyes Labs treatment" won't affect quest progression.
Decision Point - Keep or Sell the Device Fragment
After returning from The Lab and reporting to Mechanic, he makes you an offer regarding the device fragment. You can sell it to him for 1.5 million roubles (the fragment gets removed from your inventory), or you can keep the fragment and unlock the "Better Served" achievement (Refuse to sell TerraGroup technology).
Neither choice impacts story progression or locks future content. Blue Fire continues the same way regardless of your decision. The 1.5 million roubles is a lot of in-game currency, so if you're short on funds, selling makes sense. If you want the achievement or just prefer keeping the item, decline the sale.
Find a Lead on Item 1156
Mechanic's next task requires finding leads about Item 1156. Intelligence suggests relevant information exists in TerraGroup offices at Ground Zero or in TerraGroup facilities like The Lab. Pick between two locations based on what's easier for you to access.
Option A: TerraGroup Science Office on Ground Zero
Location: Second floor of the TerraGroup building, office number four
Key Required: TerraGroup Science Office Key
How to Get the Key: A scientist corpse always has this key on Ground Zero
- Enter the main reception area of the TerraGroup building
- Find the animal statue in the main reception
- Look for the hallway past the animal statue
- The scientist corpse is buried underneath rubble in this hallway
- Search the body to get the TerraGroup Science Office Key
- Go to the second floor of the TerraGroup building
- Find office number four
- Use the TerraGroup Science Office Key to unlock the door
- Enter the office
Enter an adjacent office on the same floor, break one of the windows facing the exterior, climb onto a desk in that office, access the exterior ledge, use the ledge to reach the locked office. Warning: This method is risky and requires careful movement to avoid falling.
Once inside office number four, find the desk in the corner. Look for a book with a letter slightly sticking out. Pick up and read the 1156 Note. Quest objective completes when you read it. No extraction required.
Option B: Dark Office on The Lab
Location: Top floor of The Lab, first dark office closest to the yellow keycard room
Key Required: Labs Access Keycard (gets consumed on entry)
- Get another Labs Access Keycard
- Enter The Lab
- Head to the top floor
- Use the manager's office and dome as reference points
- Position yourself between the two dark offices
- Enter the dark office on the right side
- Go to the center of the room
- Find the desk with a book containing a protruding letter
- The book is positioned to the right side of this desk
- Pick up and read the note from the book
- Quest objective completes when you read it. No extraction required.
- Doesn't consume a Labs Access Keycard
- Key has a guaranteed spawn location
- Alternative entry method available if key is gone
- Good if you already have extra Labs Access Keycards
- You're familiar with Lab layout from the previous quest step
- Corner office location has additional loot opportunities
Both locations provide identical quest progression. Choose based on your available resources and which map you're more comfortable with.
Investigate the Rus Post Office on Streets of Tarkov
Your next objective sends you to the post office on Streets of Tarkov to collect audio recordings. This step requires finding three cassette tapes and listening to their contents.
What to Bring
You'll need a tape recorder (equip in special inventory slot) to listen to the cassette tapes. Equipping it in a special slot means you won't lose it if you die. The Rus Post Car Key is optional but recommended for PvP (around 20,000 roubles on flea market). There's a guaranteed spawn, but buying the key beforehand (especially in PvP) guarantees access if another player grabs the spawn location.
Finding the Post Office
The post office is on Primorsky Avenue (the main street running through the center of Streets of Tarkov), directly across from the Pinewood Hotel and north of the Lexos car dealership. Look for the post office building on the main central street.
Collecting the Three Cassette Tapes
- Enter the post office building
- Find the reception counter area
- Spot the desk behind the counter with a dead scav body nearby
- The first cassette tape is on this desk, to the right of the dead scav
- Pick up and listen to the tape using your tape recorder
- From the reception area, head to the far right corner
- Find the area between two doors
- Locate the coffee machine in this corner
- The second cassette tape is on top of this machine
- Pick up and listen to the tape using your tape recorder
- From the break room area, take a right into the long hallway
- Walk down the hallway toward the glass double doors
- Enter the last door on your left before reaching the double doors
- This storage room has the final tape
- Find the desk in the back right corner of the room
- The third cassette tape is on this desk, in front of the keyboard
- Pick up and listen to this tape. This is the one that completes the objective.
What the Tapes Reveal
The answering machine messages reveal that a courier abandoned cargo because of dangerous conditions in the city. This cargo becomes your next target. After collecting and listening to all three tapes (especially tape 3), your objective updates to locate the Rus Post office vehicle.
Retrieve Object 1156 Blueprints from the Post Van
The final step involves accessing the abandoned courier van outside the post office.
Exiting the Post Office
- Leave the storage office where you found tape 3
- Take a left through the glass double doors
- Take your first right, which leads you out of the building
- You'll emerge on Primorsky Avenue
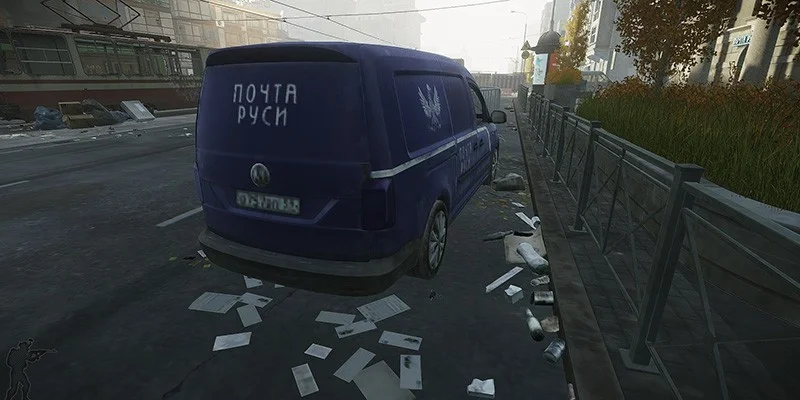
Finding the Rus Post Van
The blue Rus Post van is parked directly outside the post office building on Primorsky Avenue. You should see it immediately when you exit the building.
Getting the Rus Post Car Key
The key spawns on the ground next to the rear passenger wheel (right rear tire) of the van in every Streets of Tarkov raid. If it's missing, another player already grabbed it. Your alternative is using the Rus Post Car Key you bought and brought into the raid beforehand.
Finishing the Quest
- Use the Rus Post Car Key to unlock the van's rear cargo area
- Open the trunk
- Find the blue folder on the floor in the middle of the trunk
- Pick up the Object 1156 blueprints document
- Read the document in your inventory
- Extract from Streets of Tarkov
Quest Complete: After reading the Object 1156 blueprints and extracting, the Blue Fire story chapter finishes completely. You'll unlock an achievement for completing this chapter.
Quest Summary
Blue Fire reveals critical information about the electromagnetic pulse incident that disabled Tarkov's infrastructure. By investigating TerraGroup facilities, planting surveillance equipment, and tracking down abandoned courier cargo, your PMC uncovers details about the mysterious device responsible for the "blue fire" explosion that set the main storyline in motion.
You'll need a minimum of 4 raids to complete this quest (Woods/Interchange for leaflet, Streets for fragment, Lab for hacking device, Streets for post office), or up to 6 raids depending on your choices for finding leads on Item 1156. Completing the chapter unlocks the Blue Fire achievement, and you might also get the "Better Served" achievement if you keep the fragment from Mechanic (though a bug may prevent this from unlocking).
Blue Fire provides optional but valuable context for understanding Tarkov's main storyline. Completing this chapter deepens your knowledge of TerraGroup's activities and the catastrophic event that transformed the city.