
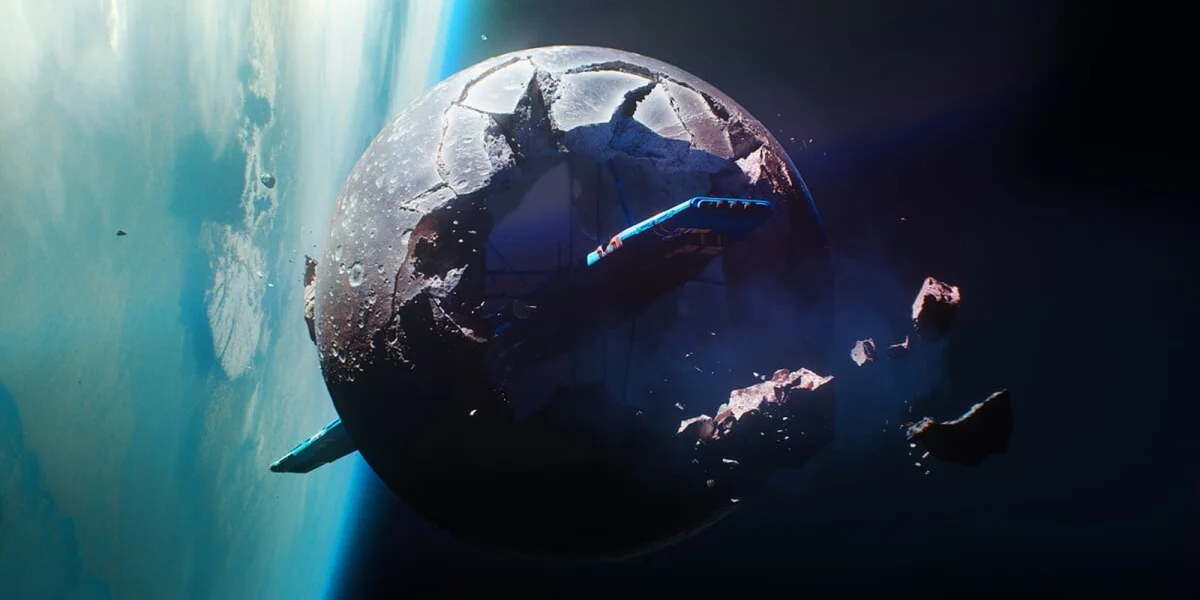
Cryo Archive is Marathon's fourth map and its toughest challenge by a wide margin. Unlike the other three zones, which are all set on Tau Ceti IV, Cryo Archive takes place aboard the UESC Marathon colony ship, specifically the first floor of the ship. It's built like a Destiny 2 raid: a structured endgame experience with tighter mechanics, stronger enemies, and loot you won't find anywhere else in the game.
This guide walks you through what you need to get in, how the map's mechanics work, what enemies you'll be dealing with, and how to actually get off the ship with your loot.
Requirements to Enter Cryo Archive
There are four requirements to access Cryo Archive. You need all four before you can load in.
Runner Level 25
Your season level needs to be at least 25. It's the same gating logic as Outpost at level 12, just set higher. If you've been playing consistently, you'll likely meet the other requirements around the same time you hit 25.
All Six Faction Liaison Contracts Completed
You need an established connection with all six factions, which means completing the introductory contract for each one. The six contracts are:
- Introducing: CyberAcme
- Introducing: NuCaloric
- Introducing: MIDA
- Introducing: Traxus
- Introducing: Arachne
- Introducing: Sekiguchi
The Sekiguchi contract is the most demanding of the six. You'll need to enter Outpost, cross a section packed with UESC forces while your health drains continuously, and reach a specific location to scan yourself. If you're already at level 25 and haven't done it yet, knock it out before your first Cryo run.
Minimum Loadout Value of 5,000 Credits
Your equipped loadout needs to be worth at least 5,000 credits to load in. That means your weapons, implants, cores, equipment, shield, backpack, and whatever you're carrying inside the backpack all count toward the total. Cryo Archive is risky and the rewards are real, so go in knowing you could lose everything you bring.
A Full Squad of Three
You can't run Cryo Archive solo, and you can't bring a Rook either. You need a full team of three, either premade or matchmade. Each Cryo Archive run has four teams active simultaneously.
Availability
Cryo Archive runs on a weekends-only schedule:
| Event | PDT | EDT | GMT | CET |
|---|---|---|---|---|
| Opens (Friday) | 10:00 AM | 1:00 PM | 5:00 PM | 6:00 PM |
| Closes (Monday) | 10:00 AM | 1:00 PM | 5:00 PM | 6:00 PM |
The developers have said they want to expand access eventually, but the window stays limited for now because of how valuable Cryo Archive loot is relative to everything else in the game. Use your weekday sessions to prepare gear, then hit the map on the weekend.
The Free Sponsored Kit
Map Layout and Points of Interest
Cryo Archive is a big map, reportedly around the size of two standard zones combined. It has one central hub and six outer sections, each with its own spawn point marked by a "+" on the map. You're unlikely to run into other teams in the first five to ten minutes since everyone starts in their own corner. PvP becomes a real concern once teams start converging on the central hub.
The map itself is a maze of narrow corridors, rooms that loop back on themselves, and vents connecting different sections. The large central rooms work differently since they leave you wide open to flanks and ambushes if you're not careful about how you enter them.
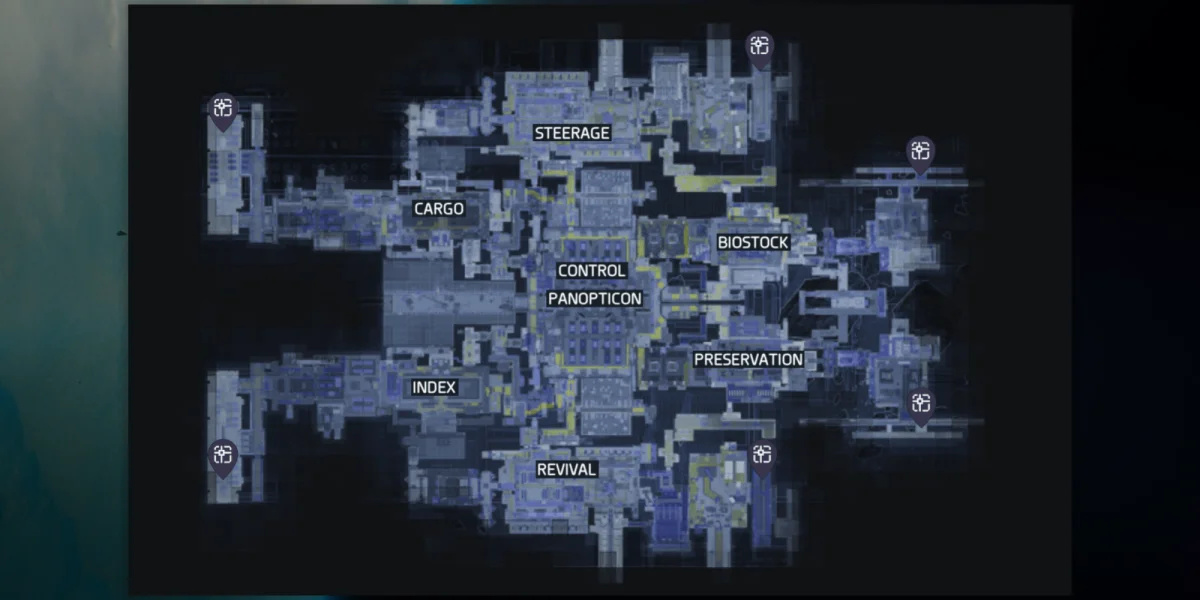
Cryo Archive has eight named points of interest:
| POI | Description |
|---|---|
| Cargo | One of the ship's outer sections at the far end. Ice covers the area and inflicts Frostbite on players, which cuts healing effectiveness and movement speed. |
| Index | The other section at the far end, heavily populated with UESC forces. |
| Steerage | The ship's technical sector. Despite the different theme, loot distribution mirrors Revival pretty closely. |
| Revival | The medical sector, structurally symmetrical to Steerage. Loot is similar across both. |
| Biostock | One of the more aggressive sections on the map. Its proximity to Preservation makes PvP common here early in a run. |
| Preservation | Sits close to Biostock, which means the same PvP risk applies. Both sections together form the hottest early zone on the map. |
| Control | Part of the central hub, loaded with UESC forces. |
| Panopticon | The main hub area and the most likely spot for encounters between teams. Named after a prison design where inmates never know when they're being watched - fitting given the Compiler's presence. |
Security Clearance System
Security Clearance is the core mechanic that shapes how Cryo Archive runs play out. There are four clearance levels, each unlocking a different part of the ship. Getting your clearance up is what pushes you closer to Control, the Panopticon, and the Vaults.
How It Works
Your team's clearance level is tied directly to how many Security Tags you've collectively gathered. Security Tags are small Priority Items found throughout the map. Each new clearance tier requires more tags than the last, starting at three for Level 1. If your team drops tags, your clearance level drops with them, so treat them carefully.
Where to Find Security Tags
- Looting standard UESC forces
- Looting UESC Commanders, Wardens, and Priority Targets
- Picking them up off the floor around the map
- Using a Scanner on walls
- Killing other Runners
What Each Level Unlocks
| Clearance Level | What You Get |
|---|---|
| Level 1 | Wardens appear on your map |
| Level 2 | Security Breach terminals appear on your map (interacting with them raises your clearance further) |
| Level 3 | Batteries and Elevators appear on your map (Batteries are needed to open Vaults) |
| Level 4 | Evac terminals appear on your map |
How Exfiltration Works
Exfil in Cryo Archive works nothing like the zones on the planet, so read this before your first run.
This creates a Secret Exfil point that shows up on your team's map, though any other team that physically stumbles across it can use it too. The Secret Exfil spawns far from the terminal you activated, and you have around 3.5 minutes to reach it before the Matter Transfer process finishes on its own. Miss that window and you'll need to find another terminal and start over. At Clearance Level 4, Evac terminals start appearing on your map, which makes tracking them down much less of a guessing game.
There's also a final exfil that triggers automatically when the run timer hits zero. It doesn't appear on the map and works as a true last resort. No one has located it yet.
Vaults and Keys
Cryo Archive has six standard Vaults and a hidden seventh that requires more work to reach.
The Six Standard Vaults
Each Vault needs two things: a Cryo Archive key and the completion of a puzzle specific to that Vault. Keys can come from looting other maps on Tau Ceti IV, picking them up during Cryo Archive runs, or earning them through CyberAcme contracts. If you've already found one during a regular run and were thinking about selling it, don't. The loot inside is worth far more than the credit value.
Opening a Vault gets you access to high-tier containers with valuables, salvage, and materials. Gold tier weapons can also show up in the weapon lockers inside.
Unlocking Vault 7
Each of the six standard Vaults contains a subroutine you can extract alongside your other loot. Go into a Cryo Archive run carrying all six subroutines, and you'll be able to unlock the seventh Vault. Vault 7 has the rarest loot in the game and is where you'll face the Compiler boss.
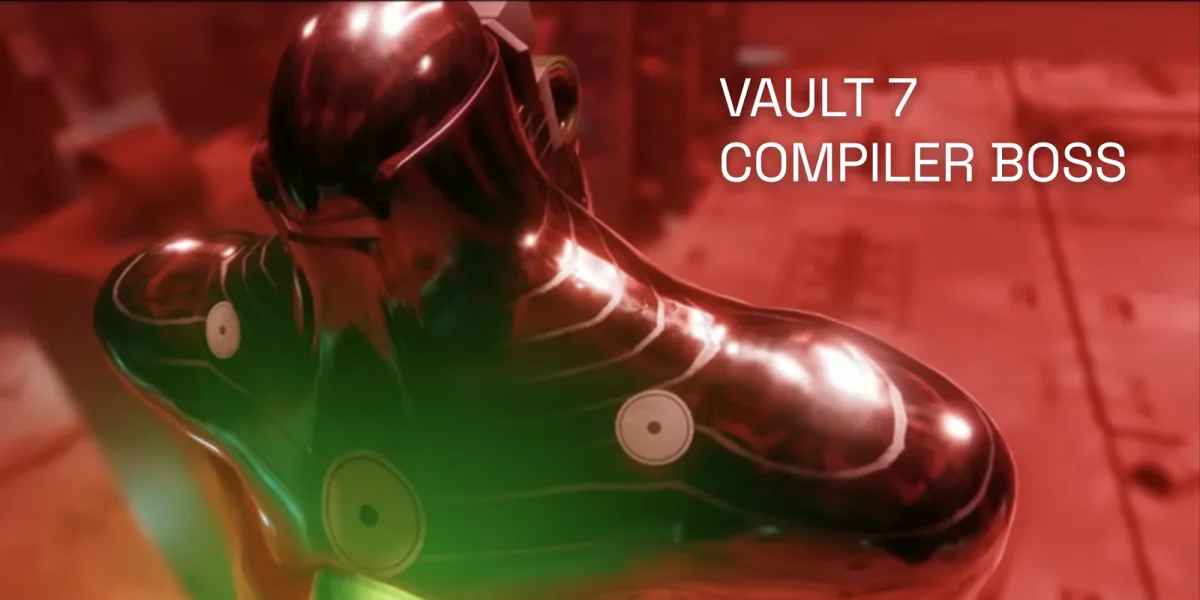
The Compiler Boss Fight
The Compiler is Cryo Archive's raid boss and the only enemy in Marathon that carries over from the original game. In the original Marathon, Compilers were standard enemies, remnants of the S'pht race taken over by the Pfhor. In this game, it's a significantly more dangerous figure: a large cloaked enemy that guards Vault 7 and represents the hardest fight in the game.
When your team engages the Compiler, every other team on the map receives a notification.
Before You Go In
Phase 1 - Terminal Activation
You won't deal damage straight away. First, your team needs to find and activate terminals placed around the boss arena. Each terminal displays symbols, and you must activate the ones showing the correct symbols to open the Compiler up for a damage phase.
Phase 2 - Dealing Damage
Once the damage phase kicks in, the Compiler fires a green laser beam at players and periodically opens its cloak. That's your window to damage the green core at the center of its chest. Closed cloak means no damage, so time your shots accordingly.
The other threat to manage is three green orbs the Compiler sends out throughout the fight. They move slowly but each one can strip between 50% and 90% of a player's health on impact. Shoot them down before they reach your team. Letting even one through can put a teammate in a very bad position.
Compiler Loot
After the Compiler goes down, loot the body for a Compiler Ganglion, a rare piece of Salvage. Head to the back of the room, which opens onto the outer edge of the ship itself. More Compiler Ganglions and chests are waiting there, and those chests can contain the Biotoxic Disinjector, a unique Contraband weapon that doesn't drop anywhere else in the game. Once the fight's done, you can exfil from Cryo Archive.
Enemy Roster
Cryo Archive has the toughest UESC presence in the game, including Commander and Warden variants with unique abilities and significantly more HP than anything you'll find on Tau Ceti IV.
Ghosts can go invisible, which breaks your line of sight and lets them reposition for surprise attacks. In Cryo Archive, they almost never show up alone. Expect Ghost Commanders and WRAITH Wardens nearby. EMP disables the invisibility.
Grenadiers launch two grenades and can absorb more hits than you'd expect. Don't fight them in tight corridors. Bait the grenades out, move to safety, then push back immediately after they detonate.
Armed with a Conquest LMG and purple shields that are difficult to break. The LMG loses accuracy at range, so keeping your distance works in your favor here.
Carries a V22 and burns through shields fast. Unlike standard Ghosts, it actively pushes toward you rather than staying at range. Fight it from a distance, use mines to strip the shield quickly, or lean on EMP.
Armed with an M77 Assault Rifle and Toxic grenades that apply the Toxin status, which cuts healing significantly. The grenades also damage nearby UESC units, which Assassin players can use to their advantage by baiting the Warden into hitting its own escort. Avoid this one if you can. If you can't, bring Mechanic's Kits.
WRAITH creates decoy copies of itself to split your attention while it attacks with a BRRT SMG up close. It can also melee you and apply the Hack status. Bring OS Debug for the Hack, keep your distance, and find high ground if possible. EMP is very effective here.
The tankiest enemy on the map. SCORCH has a full shield covering all sides, a Demolition HMG that can drop a player before they can react, fire attacks from its legs, and a melee that's essentially a death sentence up close. It moves slowly and the HMG fire is easy to dodge at range, but the sheer amount of ammo it takes to kill makes it a bad trade most of the time. Skip it unless you're in a strong position. It does drop Prestige tier rewards when it goes down, so if your team has the ammo to spare, it can pay off.
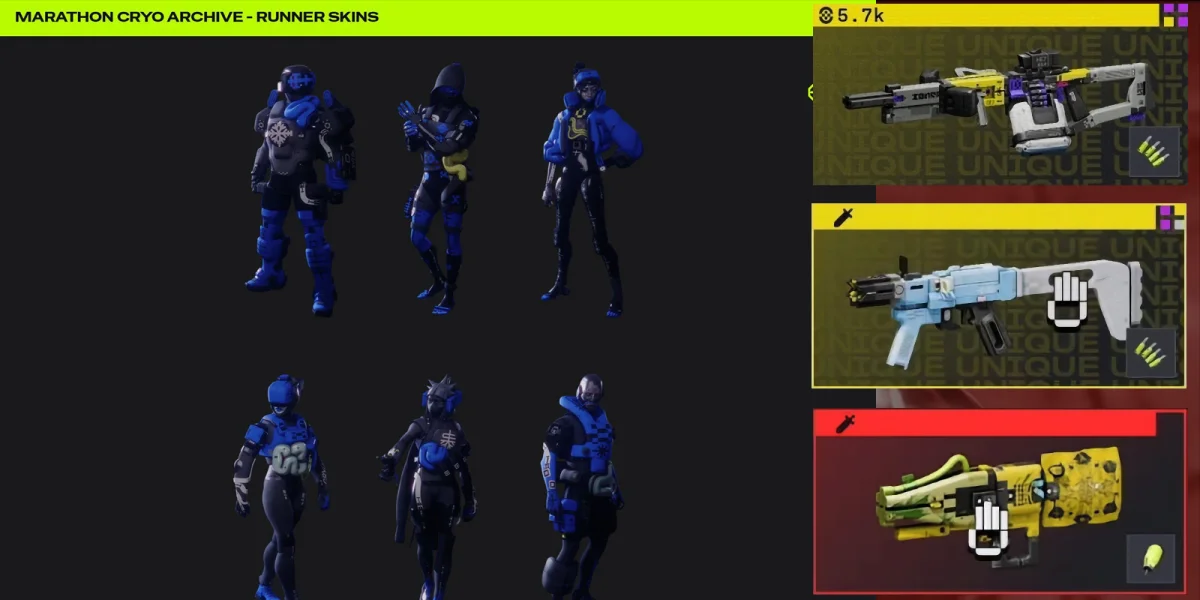
Exclusive Loot
Cryo Archive is the only place in the game to find several items, spread across implants, chip mods, and Vault rewards. All six implants and chip mods can turn up anywhere on the map, not just in Vaults or dedicated loot rooms. Check corners, side passages, and spots off the beaten path throughout your run.
New Implants
You heal faster and use heals faster while inside smoke.
Getting a knife kill restores energy for both your tactical and prime abilities.
Activating a heal at low health also triggers a Cardio Kick effect, which clears your accumulated heat and slows how quickly it builds back up.
New Chip Mods
Significantly increased weapon damage against the Compiler.
Holding ADS for a short time boosts your weapon's effective range and aim assist by a large amount.
While airborne, your weapon gains noticeably better stability and a smaller accuracy penalty.
Vault Rewards
The best loot in Cryo Archive includes:
- Prestige Weapons: Unique frames unavailable elsewhere, including the V00 Zeus RG, V85 Circuit Breaker, and Impact HAR, plus standard weapons with gold tier mods.
- Rare Materials: Alien Alloy and Hazard Capsules, both required for top-tier faction upgrades.
- Golden Backpacks and Shields
- Biotoxic Disinjector: Contraband weapon found only in the Compiler boss room.
- Compiler Ganglion: Rare Salvage from the Compiler's body and the surrounding chests.
CyberAcme Contracts
CyberAcme runs a set of contracts exclusive to Cryo Archive alongside the map's weekly window. Seven contract types are available each weekend:
- You can reroll contracts to sync objectives with your crew.
- Finishing a contract removes it from your list for that week.
- Everything resets the following weekend.
- For players who aren't getting lucky in Vault runs, contracts can be the most consistent path to the map's rarest rewards.
- Contracts also unlock Codex rewards, including shell skins for every available Shell.