
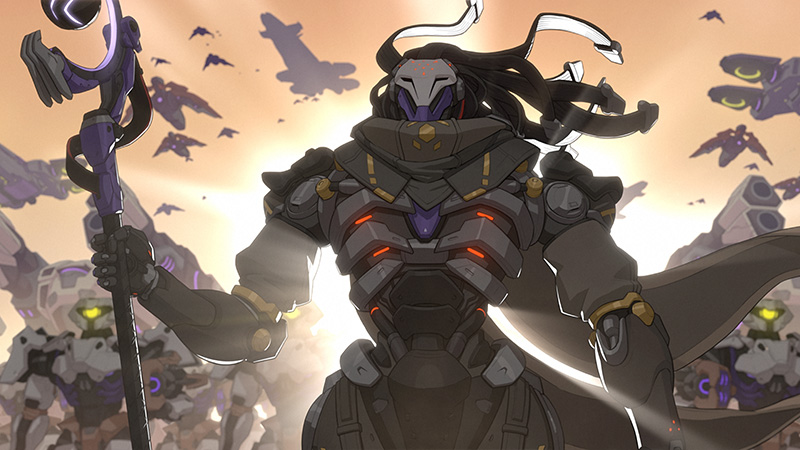
Introduction to Ramattra
Lore and background
Ramattra is the leader of Null Sector, an Omnic revolutionary faction, and a former monk of the Shambali order. He was once a close friend of Zenyatta before radicalizing and leading a remnant of Null Sector in clandestine operations (e.g. London 20 years post-Crisis). The official Overwatch site describes him as "the brutal leader of Null Sector", and Blizzard designers dubbed him Overwatch's first "Tempo Tank" – a tank who shifts roles by swapping forms as the battle's pace changes.
Role in the tank lineup
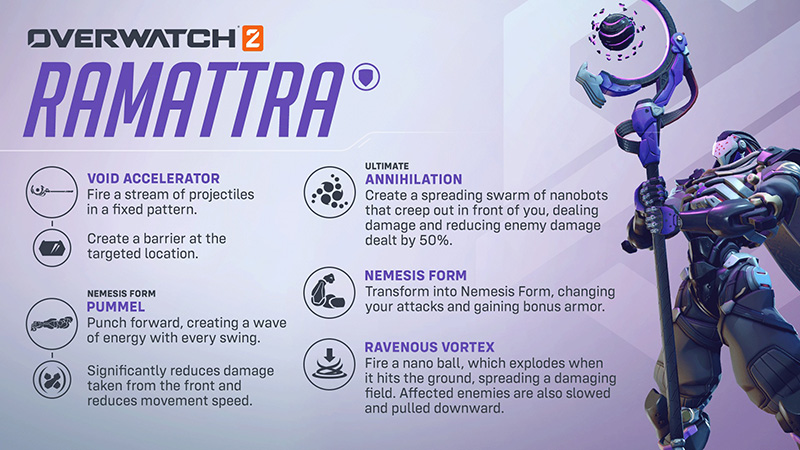
Ramattra is a hybrid tank combining front-line brawling with long-range poke. In Omnic Form he provides ranged damage and a deployable shield, while in Nemesis Form he rushes and brawls. He can play protection or aggression as needed. His kit lets him "fire projectile streams in a predictable pattern… all while creating barriers," and then freely swap to punches and a shield that block front damage. This flexibility makes him versatile: he can function as a poke-and-zoning tank in open chokes, or as a bruiser to dive squishies. In practice, Ramattra often leads engagements by softening targets in Omnic Form, then dashing into Nemesis Form for close fights. His barrier and knockdown pull also let him contest high ground and dislodge divers.
As a Tempo Tank, Ramattra excels at adapting to the flow of battle by switching between forms. In Omnic Form, he behaves like a shield tank with ranged capabilities. In Nemesis Form, he becomes a bruiser tank capable of diving and brawling. This versatility makes him uniquely positioned between traditional main tanks and off-tanks.
Dual-form playstyle (Omnic vs. Nemesis)
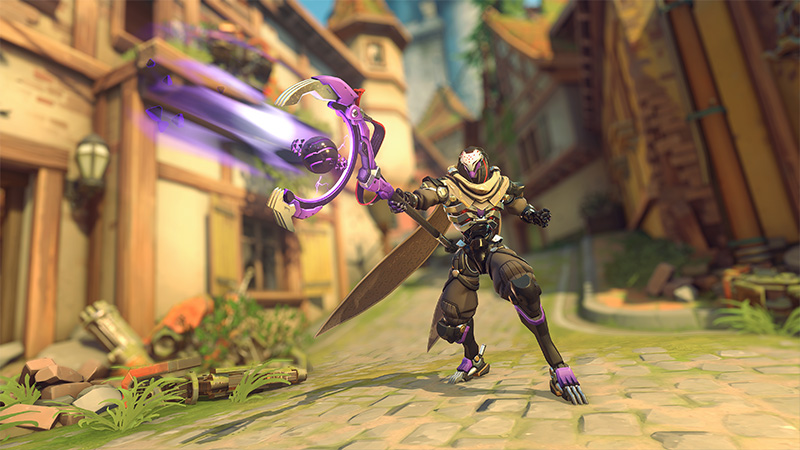
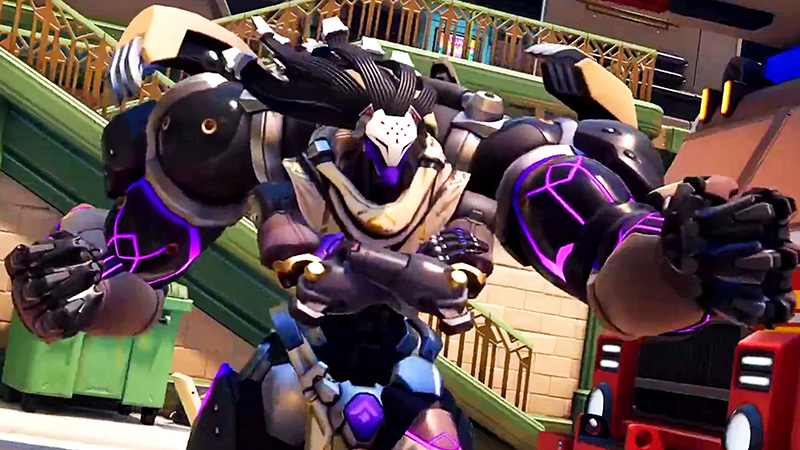
Ramattra's dual forms define his playstyle. In Omnic Form he wields a staff cannon (Void Accelerator) and places Void Barriers to protect allies. This form has the default movement speed and lacks extra armor, so it's best for safe pokes and shielding teammates. In Nemesis Form (8 sec duration) he gains bonus armor (+200) and a 20% speed buff, but swaps to melee attacks (Pummel) and a front-blocking shield (Block). Nemesis Form turns him into a fast bruiser: he can tank damage with added armor and pummel foes to death. The cooldown on Nemesis Form only begins after it ends, so timing is key. Optimal play involves switching into Nemesis Form when you need to dive or secure kills, and reverting to Omnic Form to poke or fall back safely.
| Form | Primary Weapon | Special Ability | Armor | Movement | Best Used For |
|---|---|---|---|---|---|
| Omnic Form | Void Accelerator (Ranged) | Void Barrier | Base only | Default speed | Poking, shielding, safe positions |
| Nemesis Form | Pummel (Melee) | Block | +200 bonus | +20% speed | Diving, brawling, securing kills |
Strengths, weaknesses, and current meta status
Strengths: Ramattra excels at zoning and survivability. His 1000-HP Void Barrier (13 s CD) can block big ultimates or create space, and his Ravenous Vortex disrupts enemy teams by slowing and grounding them. With 375 total health (after the Dec 2024 buff) plus up to +200 armor in Nemesis, he has one of the largest effective HP pools of any tank. Overbuff statistics show Ramattra spends unusually long on the objective (top objective time among tanks), reflecting his ability to soak and contest points. He also benefits teammates by shutting down mobile heroes: for example, Ravenous Vortex will "pull them downward – a potent counter for… Genjis, Pharahs and other DPS that rely on mobility". His ultimate (Annihilation) can also drastically swing fights by halving enemy damage.
Weaknesses: Ramattra lacks mobility, making him vulnerable to kiting and high ground abuse. He has no jump or dash abilities, so heroes like Pharah or Sombra can escape his threat. As one guide notes, his "movement speed and lack of movement abilities make him an easy target for Pharah". Similarly, burst DPS (Reaper, Symmetra, Illari) can quickly melt him if he gets caught without supports nearby. In meta terms, Ramattra thrives in brawl or hybrid comps but can struggle if the enemy brings diving flankers and global ultimates. He "feels imposing," but requires coordination – without allies to peel, even his 200 armor can be overwhelmed. Overall he is currently a strong niche tank: not as omnipresent as Reinhardt, but potent when used smartly in the right comp.
Ability Breakdown (Detailed Analysis)
Omnic Form: Void Accelerator
- Fire pattern: Fires a stream of projectiles from his staff at 25 shots/s.
- Damage: Each projectile deals 4 damage (no headshots), for 100 DPS sustained. With the clip burst bonus active, a full clip output is 125 DPS.
- Magazine: 100 ammo (4 seconds to empty). It reloads in 3 sec, so overall DPS including reload ~100 (125 while firing).
- Range & Travel: 30 m/s projectile speed, no falloff. Effective at mid-range, though projectile drop-off means lead moving targets at long range.
- Tips: This weapon pierces barriers, so it can damage multiple enemies in a line. However, damage is distributed (i.e. 6 pellets of 5 damage each with burst), so headshots are rare. Most damage comes from sustained firing. Void Accelerator is stronger against singular targets up close (high DPS) but also useful poking down targets behind cover.
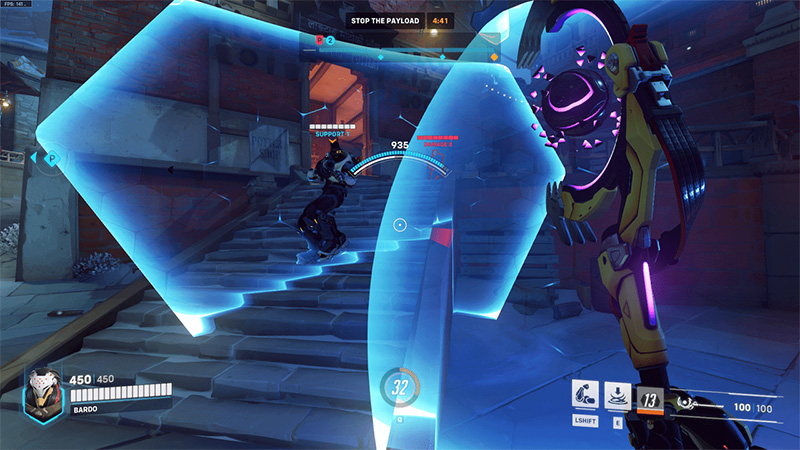
Omnic Form: Void Barrier
- Ability: Create a 1000-HP rectangular barrier at a targeted ground location within ~35 m. The barrier remains stationary for up to 4 seconds, then disappears.
- Cooldown: 13 seconds (begins once placed). Note: December 2024 patch increased it to 16s in 6v6, but in open queue it is 13s.
- Cast: ~0.03 s + 0.5 s targeting/placement; you cannot move during placement.
- Behavior: Only one barrier can exist at a time (placing a new one replaces the old). It is grounded in place, even if placed on moving terrain.
- Usage: Void Barrier excels at blocking enemy fire (sniper lines, chokes) or shielding charges/ults. Because it's stationary, plan its placement carefully (e.g. behind cover or above head level). Since it has only 4s duration, time it for peak enemy damage windows (like blocking a final rocket or sniper shot).
Omnic Form: Ravenous Vortex
- Ability: Fire a projectile (nano ball) that detonates on ground impact, creating a Vortex (4 m radius) for 3s. Enemies inside take 23.3 DPS (70 total).
- Effects: Affected enemies are slowed (-40% move speed) and pulled downward into the vortex (displacing them). It disrupts enemy positioning – for example, it can pull flying heroes to the ground (countering Pharah/Genji).
- Cooldown: 11 seconds.
- Cast: 0.5 s windup + 0.4 s projectile travel (0.9 s total before effect). The Vortex lingers 3s after hitting.
- Usage: Use Ravenous Vortex to slow dives and isolate targets. It's ideal when the enemy is grouped or on high ground (to drop them). Combos: sync Vortex with a Sigma ult or Reinhardt pin to pull lifted enemies down. Note that the projectile can be blocked by Defense Matrix/Matrix; delay if needed.
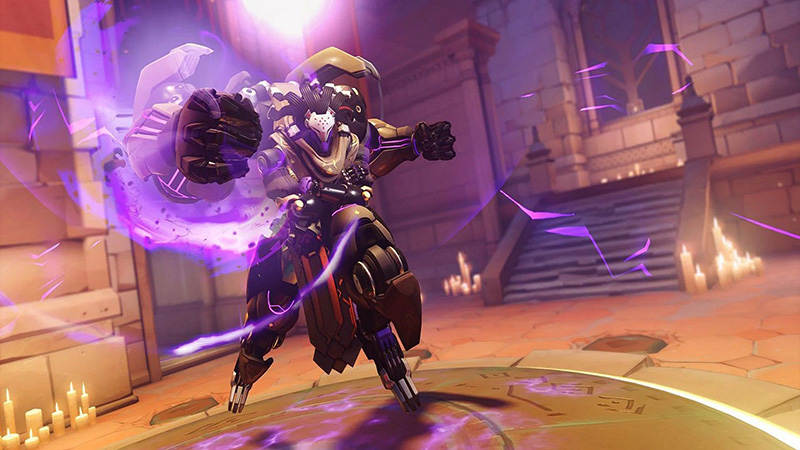
Nemesis Form: Pummel
- Ability: In Nemesis Form, Void Accelerator is replaced by Pummel – a melee strike. Each swing punches forward, sending a wave of energy.
- Damage: 65 per hit (no headshots). Fires at 1.67 swings/s (0.6 s between swings), for 108.3 DPS.
- Ammo: Infinite while Nemesis is active.
- Range: 10.5 m (melee range with a hitbox, plus the energy wave reaches a bit farther).
- Other: Pummel pierces targets and barriers, so it hits multiple enemies in a line (including damaging shields). Quick Melee will cancel the recovery animation of a Pummel strike, enabling faster chained swings.
- Tips: Pummel is ideal for finishing low-health targets. Two to three hits can kill a 200-250HP hero outright. Try to time swings back-to-back (melee cancel) for maximum burst. The pierce property is strong against barrier-wielders (pummel continues through barriers).

Nemesis Form: Block
- Ability: A toggle that slashes into a crossed-arm posture, blocking damage from the front. Activated by holding RMB (right-mouse).
- Damage Reduction: Blocks 75% of incoming damage from the frontal 106° cone. (This is above the normal 50% cap.) Hits from front are heavily mitigated. It also hides Ramattra's head hitbox from frontal shots.
- Movement Penalty: -50% move speed while active.
- Limitations: Block has no fixed duration or cooldown; it lasts as long as you hold it or until Nemesis Form ends. However, it can be interrupted by crowd-control (stun, hack, etc). Importantly, it only covers the front ±53° – flanks and rear will still hurt.
- Usage: Use Block when tanking heavy hits (Winston slam, Sigma ult slam, D.Va ult). Mind your positioning: due to the limited angle, keep enemies in front. Remember that activating Nemesis Form and then immediately blocking gives you maximum protection (it even resets its cast cooldown).
Form transformation mechanics
- Nemesis Form (SHIFT): Instant (0+0.5s) transform into Nemesis Form for 8 seconds. Grants +200 armor (bonus armor decays as damage is taken) and +20% movement speed. Your weapons swap as above.
- Cooldown: Transformation's cooldown starts when the 8s ends. (So effectively you get 8s buff, then an "off-form" period as cooldown.) Note that if you trigger your Ultimate from Nemesis Form, you immediately re-enter Nemesis Form without extra delay.
- Usage: Form-switching is the core mechanic: enter Nemesis form to brawl or soak damage (with block), exit back to poke/barrier when needed. Don't stay in Nemesis form if you're out of threat – you might wait off-cooldown in Omnic form. Plan around the ~19s total cycle (8s form + ~11s cooldown).
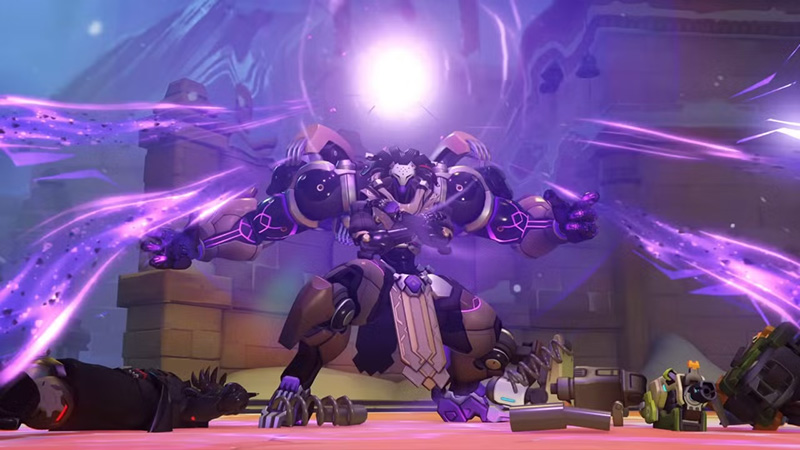
Ultimate: Annihilation
- Effect: Ramattra unleashes a swarm of nanites in front of him (like an energy vortex). Entering ultimate always puts Ramattra in Nemesis Form (with no additional cast time). Affected enemies within ~13m radius take constant damage and are slowed.
- Damage & AOE: Deals 30 DPS (no headshots) in a 13 m frontal cone. At maximum (hitting targets continuously), it lasts 20 sec; base duration is 3 sec (the timer slows to 0.15x when hitting targets).
- Special: While active, it reduces enemy damage by 50% (stated by Blizzard designers). This makes it both offensive damage and a massive ally buff (enemies under Annihilation do half damage).
- Usage: Best used initiation or counter-initiation. Team-boosting: Nano-boost or Amplification Matrix on Ramattra turns Annihilation into a team-shredding move. Or use it in enemy backlines to melt them or to force enemies off point (they can't fight close). Beware counterplay: Zenyatta's Transcendence fully negates Annihilation, so try to bait or waste Transcendence first.
Passive tank abilities
Ramattra's passive grants him innate tank traits: 25% reduced critical (headshot) damage, and reduced knockback from attacks. The crit reduction means headshots (1.5× weapons) only deal ~1.125× damage, making him harder to burst. These passives and his large health help him stand firm in fights.
Form Management Master Guide
- When to swap: Use Omnic Form to poke, block from range, and reposition (e.g. recharge barrier or safety). Switch to Nemesis Form when engaging: for example, when an enemy is at ~100–150 HP and you can land a kill, or when a threat dives your backline. In general, if you're taking significant damage or your team is brawling, Nemesis Form's armor and block are worth it. If your team is holding safely and you are ahead, stay Omnic to recharge barrier and whittle from distance.
- Reading comps: If the enemy has many mobile ultimates (Winston, Pharah, Genji, Brig CC), Omnic Form with vortex can counter-dive. If enemy line-ups are static or if you have strong healers (so you can survive upfront), Nemesis Form lets you punish targets. Always consider enemy peeling: avoid Nemesis if enemy tanks can keep you kited.
- Animation cancels: Quick Melee-cancel is crucial. After a Pummel hit, immediately Quick-Melee to cancel recovery, allowing the next punch faster. This animation-cancel chain greatly boosts your DPS output in Nemesis form. Also, you can cancel Void Barrier cast by reloading or firing.
- Switch economy: Try not to waste Nemesis Form time. If you transform but enemies are no longer in range (they spread out or disengage), drop back to Omnic to reset cooldown sooner. Conversely, if you have leftover Nemesis time and no target, drop form early to save it.
- Map awareness: On maps with long sightlines (Anubis, Ilios Ruins), Omnic form is safer. In close quarters (King's Row streets, etc.), Nemesis form is king. Also, holding Nemesis Form through your ultimate is vital – it automatically maintains Nemesis Form (regaining armor buff) for maximum effect.
Barrier Usage and Positioning
- Choke points & high ground: Deploy Void Barrier to cover long-range choke or key sightlines. For example, on Ilios Lighthouse, you might place it at the choke entrance to block snipers; on King's Row A, put it near the point to shield approaching attackers. You can also place it above ground on payloads or walls (the barrier floats where placed) to protect from above.
- Line-of-sight manipulation: Use barriers to funnel enemies. E.g., in an open area with one entrance, drop it angled so foes must go around or commit early. Remember only one active barrier, so coordinate with allies' shields (Reinhardt, Sigma) to avoid overlap.
- Timing: Because it lasts only 4s, time it for critical moments. Good timings include: just before an enemy ultimate (like Reaper Wraith Form for damage exit, or Mei Blizzard), or to protect a healer under fire. If a friendly DPS is about to get a big shot (e.g. Ana with Nanoed ult), a preemptive barrier can save them.
- Isolation tactics: You can use barriers to isolate targets. For example, place barrier to block only part of the enemy team, forcing others to choose path. This is advanced and risky but can split a push.
- Isolation: Use barriers to focus fire. E.g., barrier behind a single opponent to separate them from teammates.
Ravenous Vortex Techniques
- Displacement combos: Ravenous Vortex's pull-down can combo with other CC: pull up Sigma's Grav-lift or Wrecking Ball's piledriver victims back down and stun them. Combo it with high-damage ultimates (like Grav+Annihilation) to trap enemies.
- Anti-dive use: Throw Vortex at diving flankers to slow and pull them as soon as they jump in. For instance, if a Winston jumps at your backline, pre-fire vortex at where he lands. This slows him, preventing a full slap, and buys time for re-positioning.
- Hazard usage: Environmental kills – aim Vortex at map hazards (high cliffs, cliffsides). If timed so the pull-down happens at edge, flying enemies may fall to their death.
- Area denial: In zoning, use Vortex to discourage rush-ins: the AoE damage + slow means few want to run through it. For example, on Nepal Shrine point 1, dropping a vortex at the center can prevent enemies from crossing.
- Pressure tool: Remember it does 70 damage; don't hesitate to throw it at retreating enemies to finish them. Its slow can help your team catch up.
Nemesis Form Mastery
- Pummel combos: In Nemesis Form, chain Pummels aggressively. Against a stationary target (like a stunned or sleeping hero), you can often land 3–4 swings (~200+ damage) to kill most heroes. Use Quick Melee cancels to keep your swing rate high.
- Block usage: Hold Block whenever an enemy from front fires at you or your team. Drop it if you need to move or when damage stops. Practice the toggle key: by default it's hold-to-block (can be set toggle in options). Remember blocks only from front; turn swiftly if flanked.
- Distance management: Ramattra's melee range is 10.5m. In Nemesis Form, try to close to this distance if pursuing. Conversely, be aware of 10m as max – beyond that your Pummel will whiff, and switching to Omnic might be safer.
- Armor pickup: Each time you enter Nemesis Form, you gain +200 armor (up to your max). If you de-transform early, you'll start a shorter cooldown, but you lose leftover armor potential. Only exit Nemesis if necessary, otherwise use up the full 8s to maximize durability.
Ultimate Usage and Value
- When to pop: Use Annihilation when you need to force the enemy. Excellent windows: enemy is grouped or just after your team's engage. In a 5v5 fight, an early ult (after a Nano or near a grouped enemy) can decide the fight by melting squishy backline. Alternatively, use it defensively: if you get caught out, your ult can turn the tables on chasing foes.
- Positioning: Stay near your team's core when ulting. The nanite swarm is large, but enemies on the flanks can avoid it. Position slightly forward or at an angle so you hit as many as possible.
- Synergy: Coordinate with Buffs: Nano-Boost (doubled damage plus enemy damage debuff) or Amplification Matrix (double damage) make Annihilation devastating. Also, Bastion or Sigma CC ults can set up targets in the swarm.
- Counterplay: Be aware of counters (e.g. Transcendence) and exit opportunities: if your ult is interrupted or expires, you can transform back out. But remember: Annihilation's damage tick rate slows when hitting enemies, meaning it can stretch to 20s if you keep hitting them.
- Value: Annihilation often wins fights by itself due to the 50% damage reduction effect (unlike most DPS ultimates). Use it to nullify enemy ult combos (e.g. go into a nanoed Genji), or to finish fights when they retreat. Its value comes from both damage and massive team survivability boost.
Synergies and Team Compositions
- Healing supports: Ramattra benefits from burst sustain (Ana, Baptiste) and off-heals (Lucio, Moira). A strong Ana grenade shuts down enemy heals (essential vs counter-heal comps), but Lucio speed or Baptiste bubble help him chase and survive.
- High-damage DPS: Combine Ramattra with hitscan or burst DPS who can capitalize on his barriers and disruptions. For example, Sportskeeda suggests a ranged heavy comp: Ramattra + Bastion + Widowmaker + Baptiste + Moira. Ramattra's barrier protects Widow/Bastion while they shred, and his vortex/ult draws enemies into Bastion's line.
- Flank-composition: Alternatively, pair him with flankers and close DPS. E.g. Ramattra + Reaper/Sombra + Baptiste + Moira. Here Ramattra is the anchor: he can dive with Reaper, use vortex to catch fleeing targets, and block incoming damage while Reaper finishes kills.
- Other tanks: He can work with another tank like Sigma or Orisa. Sigma's shield and ult pair well with Ramattra's poke, and Orisa's Halt can cluster enemies for Ramattra's AoE. Many pro players pair Ramattra with Brigitte for extra armor and stun on swings.
- Ultimate combos: Good ult pairing: Ramattra's Annihilation + Nano Boost + Bastion Tank ult can wipe teams. His DPS debuff also amplifies allied ultimates (e.g. Reinhardt Earthshatter).
- Communicate: Let your team know when you have Nemesis/Annihilation up. Call out D.Va ults and Graviton, as Barrier can block them if timed. Coordinate Vortex with engages. Ramattra needs team awareness to dodge his counters and make the most of his forms.
| Composition Type | Tank | DPS 1 | DPS 2 | Support 1 | Support 2 | Strategy |
|---|---|---|---|---|---|---|
| Ranged Heavy | Ramattra | Bastion | Widowmaker | Baptiste | Moira | Protect static DPS with barriers while they deal damage |
| Flank Focused | Ramattra | Reaper | Sombra | Baptiste | Moira | Ramattra anchors while flankers disrupt enemy backline |
| Brawl | Ramattra | Mei | Cassidy | Lucio | Ana | Speed into close range, use CCs to lock down enemies |
Countering and Being Countered
- Counters to Ramattra: Heroes who outmaneuver or out-sustain him are difficult to beat. For example, Dot Esports highlights Roadhog and Orisa as strong counters: Roadhog can hook Ramattra away from healers, and Orisa's Fortify nullifies Ramattra's slows. High burst DPS like Reaper and Symmetra also chew through him. Mobile flanks such as Tracer or Sombra can kite his slow projectiles (Blink/Translocate away). Ana's grenade and sleep dart, as well as Kiriko's Protection Suzu, can shut down his healing and slow. Zenyatta is a special case – his Transcendence can completely counter Annihilation, and Discord orbs shred Ramattra's health.
- Adjusting and counterplay: If an enemy Hog or Orisa appears, try to bait their abilities (hook or Fortify) and punish afterwards. For Pharah/Genji, save Vortex to drop them or chase. If facing Ana/Kiriko, avoid clumping (her grenade pot). Against Zenyatta, either burn him down pre-ult or disengage. In general, focus firing Ramattra's supports when possible, since he is healer-dependent.
- Heroes countered by Ramattra: Ramattra pressures heroes lacking mobility or range. Stationary DPS (Symmetra, Bastion) and big slow tanks (Winston without jumps) can be bullied by his barrier and melee. His Vortex is a strong anti-dive tool – dive heroes are less effective. In skilled hands, Ramattra can beat most tanks in straight fights thanks to Block and armor. Use his crowd-control to pick off squishy heroes that can't escape his grasp.
| Type | Hero | Reason | Counterplay |
|---|---|---|---|
| Strong Against Ramattra | Roadhog | Hook pulls Ramattra from healers; high burst damage | Bait hook then engage; Block to reduce Take a Breather value |
| Symmetra/Reaper | High close-range DPS melts through armor | Keep distance in Omnic Form; use Vortex to slow approach | |
| Zenyatta | Discord amplifies damage; Transcendence counters ult | Target him first or force Transcendence before ulting | |
| Weak Against Ramattra | Pharah/Echo | Vortex pulls them down, removing aerial advantage | Time Vortex for when they're low to ground |
| Bastion | Barrier blocks sightlines; Pummel pierces | Use barrier to close distance, then Nemesis Form to engage | |
| Winston | Vortex counters jumps; Block reduces Tesla damage | Vortex when he jumps in; Block during Primal Rage |
Map-Specific Guides
- Open areas (e.g. Ilios Ruins/Kings Row Streets): In wide maps, use Omnic Form and poke from a distance. Place barriers to block sniper sightlines. On Ilios Ruins point A, for example, a barrier at the well can protect your team from Widow/Moira behind the arches. Save Nemesis Form for when enemies commit into the point or to dislodge a Hog in the pit.
- Narrow chokes (e.g. Hanamura A choke, B Horizon Deck): Barrier-choke is powerful. Send a barrier to one side to narrow their entry path and then throw a Ravenous Vortex at the bottleneck to slow their push. Switch to Nemesis in the choke with Block ready to catch their initial salvo. On payload maps (e.g. Kings Row point A), barrier can guard the cart while allies re-group.
- High-ground maps (e.g. Blizzard World, Lijiang Tower): Use Omnic poke from below and Nemesis to threaten divey defenders on high ground. Vortex is helpful to pull Pharah away from rafters. Also, barrier can temporarily block off common sightlines (e.g. on Lijang Garden center, barrier can sit on the bridge to block above). Look for Enviro kills: on Ilios Lighthouse, pushing a Genji off with Vortex can be fatal to him.
- Objective control: In 2CP or King of the Hill, time your ult for the final seconds of a fight or to secure the point. On single-point maps (e.g. Blizzard World point B), guarding the last stretch with barriers and an ult can thwart the enemy push.
Rank-Specific Strategies
- Low ranks (Bronze–Gold): These players often lack coordination. Focus on basic survival and picks. Use the barrier conservatively to protect a healer or yourself. Don't swap forms too frequently – pick one based on the moment (e.g. Omnic if alone with barrier, Nemesis if you see low-health enemy). Aim your Pummels carefully (no melee cancel panic needed yet). Communicate (ping) your ultimate usage.
- Mid ranks (Platinum–Diamond): Opponents will have more aim and focus. Here, start implementing advanced tactics: quick-melee combos, pinpoint barrier placement (like behind a payload). Vortex into Grav or D.Va combos. Try baiting out enemy barrier usage or stuns before popping Nemesis. Be mindful of flankers: check behind you more often.
- High ranks (Master–GM): Play proactively. Rapidly switch forms in anticipation: if enemy hitscan (Widow, Ashe) is near ult, stay Omnic with barrier; if enemy Ana/Bap are on cooldown, consider diving Nemesis into their backline. Use in-depth knowledge: e.g. pre-pull a hog on high ground or use Pummel-cancel for faster burst. Also, coordinate multi-ult combos (Annihilation + Transcendence contests). Watch killfeeds constantly for flankers hunting you.
Advanced Tech and Mechanics
- Animation cancels: Master the Pummel animation cancel: immediately Quick-Melee after a swing to skip recovery. This can boost your output by ~20%. Similarly, you can cancel Void Barrier casting by sliding or shooting, saving a fraction of time.
- Form-switch exploits: You can jump immediately after switching forms – the movement speed buff kicks in right away. For example, Nemesis-Form into jump (or block) motion can bypass usual cast delays. Practice switching mid-combo: e.g. cast Nemesis Form just as you're Pummeling to extend your combo.
- Block angle management: Remember Block only covers ~106° front. In a melee, pivot slightly to keep as many attackers in front as possible. If caught in a multi-angled fight, alternate Block on/off to reorient your facing.
- Ult canceling: If Ramattra is stunned or knocked up while ulting, the ult continues after recovery, but if extremely threatened you can cancel Annihilation early by re-activating the ult button (bindable option) to get your Nemesis Form back or escape. (Note: this is only possible if you set the alternate cancel key in options).
- Damage math: At high skill, keep track of burst windows. A fully bloomed grenade on Nemesis Ramattra still leaves him tanky, but a Discord orb will significantly expedite kills. Place Vortex on head-height to catch airborne targets, and chain it with melee for an immediate damage spike.
// Ramattra Animation Cancel Technique
// Optimal sequence for maximum DPS

1. Hit with Pummel
2. Immediately Quick Melee (to cancel recovery animation)
3. Next Pummel as soon as Quick Melee completes
4. Repeat steps 1-3 for maximum damage output

// Block Angle Management
// Block only covers 106° front cone (±53° from center)
// Always position to keep most threats in this cone
VOD Review Guidelines
- Key performance metrics: Monitor ult economy (were your Barrier/Annihilation used at optimal times?), survivability (how much damage did you take blocked vs. taken?), and form usage frequency.
- Common mistakes: Check if you overstay in Nemesis (running out of armor early) or flip too often (losing form bonus). Did you use Barrier reactively or proactively? Did you land your Vortex on multiple enemies?
- Decision-making: Review scenarios where you died: were you properly blocking? Did you chase into a trap? Also note missed opportunities: e.g., could you have ulted earlier to win a fight?
- Teamplay: Gauge if you communicated ult or switches. Ramattra shines with team follow-up. On a VOD, check if allies capitalized on your barrier or Vortex (did you call them?).
- KPIs: Track your Void Barrier uptime (seconds of blocking), enemy heroes hit by Ravenous Vortex, and percentage of time spent on objective. Compare kills secured in Nemesis vs. Omnic.
Pro Player Analysis
A few OWL/Contenders players have showcased Ramattra's potential. For example, in OWL, Pelican (SFS) and Fu (Shanghai) have pulled off 3-4k Annihilations in organized pushes. Top 500 streamers emphasize tempo: they often start a fight in Omnic form with a barrier, then instantly flip to Nemesis to catch enemies off-guard. Pro usage notes: they dance around initiation – warding corners with shield, baiting ults, and only diving after key cooldowns. Watching high-level replays reveals a premium on practice combos (quick-melee Pummel) and flawless ability synergy (e.g. always pairing Ravenous with Sigma's Gravitic Flux). Many pros also use alternate binds (like bound Annihilation cancel) to maximize high-skill maneuvers.

Practice Routines and Drills
- Aim drills: Practice leading shots with Void Accelerator, since its slow projectile requires prediction. In custom range, try hitting moving bots at 30m.
- Melee timing: In a practice mode (or custom game), set bots with low health and repeatedly transform to Nemesis and punch them down as fast as possible, using quick-melee cancels to improve speed.
- Barrier positioning: In custom games on various maps, practice dropping barriers in spots that block common sightlines (e.g. top of Ilios Point). Use the free cam to see blind spots.
- Vortex pull: Find flanking routes on each map and practice throwing Vortex toward them to learn its arc and travel time. Also practice firing it over edges to catch enemies.
- Custom vs. Hog/Zarya: Use a teammate on Roadhog or Sigma to hook/shield you. Practice staying alive using Block and transformation in high-pressure scenarios.
- Ultimate timing: In practice, simulate team fights and time your Annihilation for maximum duration on (3s base, learn to extend to 20s by continuously damaging targets). Also practice aiming it to hit as many heroes as possible.
FAQ and Troubleshooting
Q: Should I always transform at the start?
A: Not necessarily. If the enemy is not pressuring or you need barrier for your team, it's fine to stay Omnic. Transform when there's an opening or need to brawl.
Q: When should I use barrier vs. Vortex?
A: If you anticipate damage (spam/ult) hitting your team, barrier it. If enemies are about to dive or escape, vortex them. They often complement each other: e.g. barrier to stop damage, then vortex to punish whoever dives under it.
Q: How to counter Symmetra or Reaper?
A: Against Symmetra, keep moving and block her secondary (turret) by turning. Use Vortex to knock her off from cover. Against Reaper, avoid face-on melees – block his shotguns, try to keep distance in Omnic form, and use Vortex to slow or penalize his Wraith Dive.
Q: What changed in April 2025?
A: Aside from a minor animation fix, Ramattra's kit has been stable. The last major changes were December 2024 (base health up to 375, bonus armor to 200). Always check patch notes for any hidden tweaks.
Q: Which settings are recommended?
A: Many players use "Hold to block" (default) for quick reaction. Some bind Annihilation cancel to a separate key for advanced plays. Lower your form-switch key delay (Off +0.5s) if possible for quick flips.