
Introduction to Soldier: 76
Lore & Evolution
Soldier: 76 (Jack Morrison) is the iconic everyman of Overwatch – a grizzled vigilante and former Overwatch Strike Commander. His lore portrays him as a relentless fighter seeking justice. In Overwatch 1 he debuted as a classic hitscan DPS; in Overwatch his kit remains much the same but has gained buffs.
Role & Kit Overview
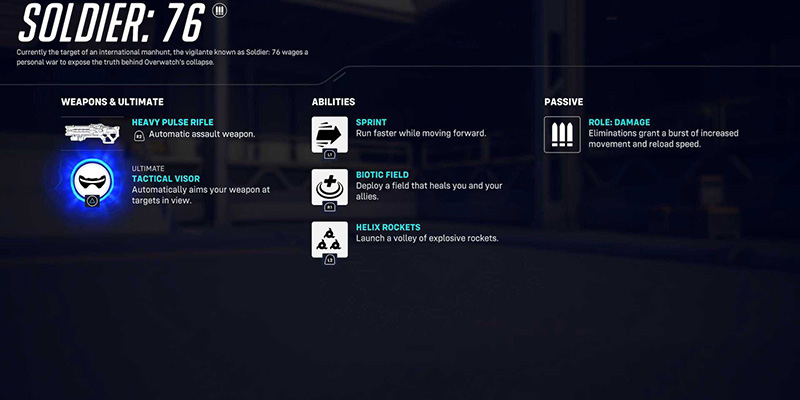
Soldier: 76 is a Damage (DPS) hero built around sustained hitscan fire, mobility (Sprint), self-healing, and an aimbot-like ultimate (Tactical Visor). His kit is simple but effective: a fully-automatic rifle with reliable recoil, Helix Rockets for burst, a Biotic Field heal, and the Tactical Visor ultimate. PCGamesN notes that "he can sprint and self-heal… but really, his strength lies in the damage he can put out with his standard assault rifle" – making him an accessible "stepping stone" hero for both beginners and seasoned players.
Soldier excels at mid-range firefights. He has large ammo reserves (30-round clip) and no bullet spread, so landing body/critical hits is mostly about recoil control. He has excellent vertical coverage (via rockets and no spread) and high consistent DPS (≈170–190 DPS close-range before falloff). New buffs in the April 1, 2025 patch make Sprint twice as fast and improve his passive healing, letting him recover health much faster after skirmishes. This makes him very self-sufficient: he can escape danger with Sprint (now +100% speed) and quickly heal up thanks to the buffed passive.
He lacks any real vertical mobility (no jumps or dashes) and is vulnerable at close range if flanked. Melee heroes or high-mobility flankers (Genji, Tracer, Reaper) can punish him if he mispositions. After the latest patch he cannot see health bars (own or allied), which is a minor inconvenience. His ultimate, Tactical Visor, is powerful but vulnerable to counters (e.g. barriers, sound barrier). Overall, Soldier is very strong at entry-level and mid-tier play because of his straight-forward kit, but at the highest ranks he can be overshadowed by more specialized hitscan or projectile DPS. Nonetheless, he remains a reliable pick in most metas due to his versatility.
Meta Viability
Soldier: 76 often thrives in solo-queue and low-to-mid ranks due to his ease of use and raw damage output. He can carry games by consistently outputting damage while self-healing. In the current meta, he is not "meta-busted," but is a solid pick when enemy comps include vulnerable flying or low-health heroes. He pairs well with many team compositions (see Section 9). In very high-level play, teams often favor heroes like Sojourn or Widowmaker, but Soldier can still be effective on maps or situations that suit his kit.
Ability Breakdown (Stats & Mechanics)
| Ability | Stats | Mechanics |
|---|---|---|
| Heavy Pulse Rifle (Primary Fire) |
|
Hitscan, automatic rifle. No spread, but strong upward recoil from sustained fire. Effective range is medium; beyond ~30m damage falls off. First 3 shots of a burst have perfect accuracy, so tapping in 3-round bursts improves long-range accuracy. |
| Alternate Fire | None | He has no secondary scope or firing mode (except Tactical Visor which locks aim). |
| Helix Rockets (E ability) |
|
Fires a volley of 3 small rockets that travel in a spiral from the rifle's barrel. Cannot headshot. Instant upon firing but have travel time. Great for burst damage, finishing off low-health targets, or shredding barriers/turrets. Can "bank" or "bounce" rockets off walls/ceilings to catch enemies around corners. |
| Sprint (Shift ability) |
|
Soldier dashes forward at high speed. By default, Sprint is toggled on/off. Can reload while sprinting (with certain talent or if you cancel to reload after sprinting ends). Use Sprint to reposition between fights, flank quickly, or escape. |
| Biotic Field (E ability) |
|
Deploys a healing emitter on the ground that heals Soldier and allies. The emitter stays on surfaces and moves with payloads. Use Biotic Field to sustain in fights or pre-drop it when expecting damage. Also grants anti-heal to foes if you have that perk (Stadium only). |
| Tactical Visor (Ultimate, Q) |
|
Lock-on aimbot ultimate. While active, Soldier's rifle auto-aims at any enemy he "looks at," ignoring aim errors. Ignores normal aim recoil and bullet spread, but does not remove damage falloff. Cannot auto-aim Helix Rockets. Can headshot, but only if your crosshair is placed on the target's head at the time of lock. |
Aim Techniques (Controller & Mouse)
Mastering Soldier's aim is crucial. His rifle is hitscan with only vertical recoil, so practice is key. Recoil control: Because Soldier's gun climbs steadily, the simplest aim method is tracking (steadily counter-moving your mouse/controller down to follow enemy movement). At short range, you may opt to fire in short bursts or double-tap (2–3 bullets, pause, repeat) to reset recoil, which yields tighter headshot clusters. Alternatively, for long-range opponents, burst-fire 3-round bursts using Soldier's first-3-shots "pinpoint" accuracy to ensure each burst lands. On console (controller), aim-assist helps but keep "Aim Smoothing" moderate. Many console Soldiers turn aim smoothing low and sensitivity relatively high to allow quick flicks; the lower smoothing gives more consistent tracking feel. On PC (mouse), many top players use mid-to-low DPI (e.g. 400) with medium in-game sensitivity, so that tracking is smooth but turning fast is still possible.
Tracking vs. Flick
Soldier is primarily a tracking hero – you want to keep constant damage on targets. Against very mobile targets (Genji, Tracer) you can use flick shots to score one/two powerful shots (especially Helix or sniper-like headshots), but generally use smooth tracking. Practice on moving bots to follow head-level targets. Burst-firing at range (or tap shooting) can be seen as a compromise: it momentarily lets recoil reset, making tracking easier over time. If an enemy strafes unpredictably, flick once then adjust tracking.
Burst Firing
For maximum accuracy at distance, use 3-bullet bursts: fire ~0.3s (three bullets) then release, then resume. This exploits Soldier's no-spread and flat first-shot recoil, effectively "rebasing" recoil each burst. At close range, you can hold full auto and counter the recoil, or simply do 3-4 bursts rapidly.
Optimal Settings
There's no universal "best sensitivity," but consistency is key. Lower sensitivities typically yield better tracking. Many players suggest DPI 400–800, sens ~7–10 on 800dpi, or around 17–25 cm/360°. For controller, keep aim-assist window small and turn sensitivity high enough to flick but with enough assist for tracking. Some console Soldiers use "PlayStation/Open"~30 sensitivity with smoothing ~0 or 10%. In all cases, practice in the training range to find a setting that lets you comfortably track mid-range targets.
Helix Rocket Usage & Combos
Helix Rockets are Soldier's burst nuke. Use them to finish off low-health enemies, chunk barriers, or disorient opponents. Because each direct rocket does 120 and splash 80, a headshot plus a Helix almost kills many DPS (e.g. 150-HP targets). Here are some tips:
- Combo with rifle: The classic combo is Helix Rocket -> immediately follow with rifle fire. If you can hit a headshot right after a Helix hit, that often kills squishies instantly. For example, poke a headshot, turn to shoot, and the next Helix kills.
- Bait and punish: If an enemy is peeking a corner, fire Helix right as they appear – often you can outpace their reaction. Conversely, you can start firing your rifle at the corner and when they peek, launch a Helix at their feet or wall to deal huge burst.
- Splash usage: Hitting multiple targets with the 2 m radius splash is tricky (only 80 damage), so Helix is best single-target. Avoid using it directly under your feet (40 self-damage). It can, however, force flanking Tracers or shield characters out of cover.
- Animation cancel: Immediately after firing Helix, you can melee (or duck) to shorten the total animation time – this has no gameplay effect other than feeling more fluid. It can help you quickly line up your next shots.
- Defensive use: In emergencies, Helix Rocket can serve as a disengage tool. Fired underfoot right before retreating, it can slightly propel you back (and damages chasing foes). Also it can interrupt strong enemy ultimates (e.g. nano'ed Reaper's shotguns).
Sprint Strategies (Movement & Rotations)
Sprint is Soldier's mobility engine. In April 2025 he became truly fast: Sprint speed was doubled. This means Soldier can reposition or chase virtually any hero on foot. Use sprint:
Rotations
From spawn or during downtime, hold Sprint to reach objectives faster. For example, on escort maps like King's Row, sprint from forward spawn through the left alley to the second capture point high ground quickly.
Evasion
If you're low or enemies close, flip on Sprint and strafe unpredictably – you out-run many threats. Sprint does not allow shooting, so pick safe moments (like after a fight or with team covering). Remember that Overwatch tips emphasize sprinting out of combat: "Get in the habit of using Sprint whenever you're not in combat".
Flank & Reposition
Soldier can briefly peel away from the team to harass a flank. Drop a Biotic Field at a healed location, then sprint to a secondary angle or high ground (e.g. on Ilios or Nepal) and shoot from there, using your Biotic Field to survive. When threatened, sprint back to safety or your team quickly.
Map-specific routes
Use sprint to take shortcuts. On King's Row first point, sprint down the left alley to flank. On Volskaya or Junkertown, use high-speed boosts to contest the payload faster.
Biotic Field Tactics (Healing & Support)
Biotic Field is a powerful heal but requires smart placement:
Self-Preservation
When you drop below ~100 HP in a 1v1, turn and drop it between you and enemies (ideally behind cover). This gives you 200 HP over 5s to retreat. Against a Winston or Reaper dive, you can win the trade by facing them with Biotic up.
Team Support
If your team is grouped in a fight, toss it into the midst or at the payload to heal allies (200 HP quickly translates to ~10% ult charge per person). In stalled fights, catching two teammates yields 400 HP total - huge for holding angles.
Anticipation
Don't wait until 20 HP. If expecting heavy fire (e.g. Reinhardt charges), drop it proactively. Overwatch advice: "Drop Biotic Field at the start of a fight". Also, if you're pushing a choke, bait enemies forward then toss Biotic behind you to out-sustain poke.
Cooldown Management
It's 15s, so avoid wasting it. If your team has a Brig or Ana that can heal you temporarily, you can save Biotic for later. Remember it persists even if you move away, so you can throw it on the high ground or from afar.
Tactical Visor Mastery (Timing & Counters)
Tactical Visor (TV) is Soldier's game-changing ultimate, but using it requires timing and awareness:
Timing
Use Visor when multiple enemies are in sight and vulnerable (e.g. after a D.Va bomb or when barriers are down). Coordinate with a Zarya Graviton Surge or Nano Boost for maximum efficiency (the classic "nano visor" combo is still strong). Pre-damage them with Helix or rifle before popping TV to maximize kills.
Positioning
Pop TV from a distance or high ground so enemies must approach you. Don't stand within enemy Rein shield; instead peek from outside its arc. High ground angles (like Hanamura second point tower or Eichenwalde church) let you hammer foes safely. Overwatch advice suggests using Visor from long range and surprise, not rushing in melee.
Avoid Counters
Barrier Shields negate Visor's effect – don't waste it on a full Rein or Orisa shield. Ana: her Biotic Grenade anti-heals or Sleep Dart can ruin your Visor, so eliminate or bait out Ana first if possible. Lucio: Sound Barrier (Sound Barrier blocks damage from Visor). DotEsports notes: "Ana and Lucio have abilities to counter Tactical Visor". Roadhog's hook can pull you out of position mid-Visor – keep enough distance or angles.
Enemies to Target
Visor locks onto any visible enemy (heroes, B.O.B., etc). Prioritize low-mobility or backline targets. Tanks like Winston/D.Va are less ideal unless low health. Versus Pharah or Tracer, Visor is extremely strong because their movement is filled by your aim lock.
Ammo & Reload
Activating Visor instantly reloads your gun and negates the need to reload afterwards. You can empty your clip before popping Visor without worry. A trick: fire a few shots (or Helix Rockets) to soften targets, then pop Visor to auto-aim the finishers.
After TV
Once Visor ends, reposition immediately – enemies will aggressively counter you, knowing you have no instant-lock. Also be mindful not to take unnecessary damage after the ult ends.

Positioning Fundamentals
Proper positioning is vital for Soldier's survival and damage:
High Ground & Cover
Soldier "does his best work … from a defensible position on high ground," where melee threats can't reach him easily and he gains cover. Whenever possible, fight from rooftops or ledges overlooking points. For example, on Ilios Well or Lijiang Control, stand on the rim; on Assault maps like Hanamura, use the high balconies or the pagoda roof. Staying above enemies also makes landing Helix Rockets and rifle shots easier.
Angles
Always keep a corner or teammate between you and enemies when possible. Peek in-and-out to shoot, never remain fully exposed. Soldier excels at medium range: maintain ~15–30 meters on foes. If chased, always retreat towards cover.
Map Rotation Paths
Plan your path to objectives. Use Sprint to take unexpected flanks. On Escort/Hybrid maps, consider side paths: e.g. King's Row has an alley route to high ground; Route 66 second point has a diner rooftop; Watchpoint Gibraltar has a zipline from the launch pad to the tower.
Objective Play
When holding or contesting, position slightly off-center to avoid puddles of enemy fire. Drop your Biotic Field in a corner of the point or payload, not at its very center, to mitigate flame or explosion combos.
Team Peel
Since Soldier lacks a personal escape besides Sprint, stay near tanks (Reinhardt's shield, Zarya bubbles) or off-healers (Lucio speed boost) so you have cover. If you step out alone, have a retreat plan. Whenever possible, maintain sightlines with your team behind you (so a flanker can't sit on your back).
Team Synergy & Comps
Soldier: 76 synergizes with many heroes but pairs best in certain comps:
Tanks
He works well behind barrier tanks like Rein, Sigma, Orisa or Ramattra – their shields allow him to unload safely. A Dive comp (Winston/D.Va) can also protect him, with Winston dive creating chaos and bubble for cover. He combos excellently with Zarya: Zarya's bubble lets him dump many rockets or Visor fire onto bubbled targets, and a Zarya Graviton into a Nano Visor is devastating.
Supports
Double-support like Moira+Mercy or Lucio+Ana suit Soldier. Mercy can boost his damage (Critical Boosts make headshots one-shot) or Rez him if things go wrong. Ana can Nano him or anti-nade big threats. Lucio's speed boost (Sound Barrier to block incoming damage) helps him reposition and survive Visor. Baptiste can Amplify Visor damage with BAP+Amp Matrix (though Ana is slightly better for Nano Visor).
Soldier: 76 works exceptionally well with Ana for the powerful Nano Visor combo. Mercy's damage boost can turn his rifle into a deadly weapon, increasing his already high DPS. Lucio provides valuable speed boost for repositioning and Sound Barrier can protect Soldier during his Tactical Visor. Baptiste's Immortality Field keeps Soldier alive in crucial moments, while his Amplification Matrix can double Soldier's damage output.
DPS Partners
Hitscan allies (Cassidy, Ashe) overlap in role, so pick situationally (e.g. double hitscan vs mobile is fine; vs heavy dive might prefer projectile like Genji instead). Heroes that group enemies (Reaper, Sombra) or burst combos (Mei, Kiriko) set up easy kills for Soldier.
Effective Compositions
Soldier fits almost any DPS lineup if space is given. In brawl or deathball comps, he sits behind Rein shield. In dive comps, he often plays more mid-range, not diving himself. In poke comps, he can provide sustained pressure.
Ultimate Combos
Coordinate ultimates for maximum impact. For example, pairing Visor with Zarya's Graviton or Ana Nano yields quick multi-kills. He can also back up D.Va's Self-Destruct by cleaning up survivors. Conversely, an ult synergy to note is that his Biotic Field and Healing can sustain a Rein/Zarya dive.
| Ultimate Combo | Effectiveness | Strategy |
|---|---|---|
| Nano Visor (Ana + Soldier) | ★★★★★ | Ana's Nano Boost increases Soldier's damage by 50% while reducing damage taken, making his Tactical Visor extremely lethal |
| Graviton Visor (Zarya + Soldier) | ★★★★★ | Zarya's Graviton Surge groups enemies together, making them perfect targets for Soldier's Tactical Visor |
| EMP Visor (Sombra + Soldier) | ★★★★☆ | Sombra's EMP disables enemy shields and abilities, removing barriers that would block Tactical Visor |
| Amplification Visor (Baptiste + Soldier) | ★★★★☆ | Baptiste's Amplification Matrix doubles Soldier's damage, making Tactical Visor extremely potent |
| Shatter Visor (Reinhardt + Soldier) | ★★★☆☆ | Reinhardt's Earthshatter stuns enemies, allowing Soldier to easily eliminate them with Tactical Visor |
Counter Strategies – Both Ways
Countering Soldier: 76
Know his weaknesses. The Dot Esports hero counter guide highlights that Widowmaker and Ashe can out-range Soldier, so snipers who land shots quickly can defeat him. Genji is another strong counter: he can reflect all of Soldier's damage (bullets and rockets) back at him. Roadhog's hook and insta-kill combo can yank him out of position. D.Va can eat rockets with Defense Matrix or dive-kill him. Use crowd-control (Mei freeze, Sombra hack) to shut Soldier down, since he is very vulnerable when his abilities (Biotic Field/Visor) are disabled.
Key concept: Take away his peace. Force him into close-range chaos by flanking or diving. Heroes like Tracer or Reaper rushing him can win 1v1 if he's unaware. Check corners and flank routes for a Soldier peeking, and save CC/flashbangs to use on him.
Genji: Can reflect all of Soldier's projectiles and easily get in close range
Widowmaker: Can out-range Soldier and kill him before he can react
Roadhog: Hook can pull Soldier out of position for an easy kill
D.Va: Defense Matrix negates Helix Rockets and can dive Soldier effectively
Sombra: Hack disables Sprint and Biotic Field, making Soldier vulnerable
How Soldier Counters Others
Soldier thrives against certain heroes. He shines at shooting Pharah, Mercy, and Junkrat – heroes who lack hitscan to reliably hit him. For example, Pharah is "highly vulnerable to heroes with hitscan weapons like Soldier: 76"; a few shots force her down. Junkrat's grenades are slow: "Fast-firing heroes like… Soldier: 76 can take him out before he can land his grenades". Basically, Soldier is great against backline sniper/launchers (Widowmaker can be shot out of her nest with steady fire) and bulky tanks once barriers are down.
In general, Soldier prioritizes low-health, high-priority targets. During fights he should switch focus: kill supports (Mercy/Ana/Zen) or damage heroes first, use Helix on fleeing enemies, and only focus tanks if there's no other choice or if he's using Visor. Also, watch for enemies that counter Soldier (see above) and try to eliminate or avoid them. When facing hit-scan counters like Cassidy or Ashe, his best bet is to use superior sprint to reposition and shoot from unexpected angles.
Pharah: Highly vulnerable to Soldier's hitscan weapon
Mercy: Can be picked off when flying with Pharah or during Resurrect
Junkrat: Outranges Junkrat and can dodge grenades with Sprint
Zenyatta: Low mobility makes him an easy target for Soldier
Torbjörn: Can destroy turrets from distance and outside their range
Map-Specific Guides (Routes & High Ground)
Every map in Overwatch has unique lanes and high-ground spots. Here are examples:
King's Row (Escort)
On Point A, sprint down the left alley to secure high ground (the ledge overlooking choke). On Point B, use the building entrance on the right to sprint up to the high balcony behind the defenders (great for Biotic Field cover). Always consider flanking through the side streets to surprise enemies.
Hanamura (Assault)
Attackers often push through the right choke; defenders enjoy the high ledge above the choke. Sprint around to reach the top of the temple and rain rockets. After capturing A, on Point B drop to the long bridge or upper catwalk and snipe from there.
Eichenwalde (Hybrid)
At the first point, high ground above the church (on the right side) is a strong Soldier perch for harassing defenders. Sprint up the rubble on right to reach it. During Payload, use sprint to rush the two story left building overlooking the cart.
Ilios Well (Control)
High rim around the well is excellent. Sprint onto the skull ledges to flank the enemy backline, or hold the big bridge. Lower Well point: drop Biotic Field on high ground near spawn to safely heal then rejoin fight.
Watchpoint: Gibraltar (Escort)
First point attackers should split: one flanks left, the other sprints up the rocket launch pad to the tower, then hops to the bridge. Holding upper platform overlooking the bridge is strong.
In all maps, carry Biotic Field and plan where to place it safely. Use Sprint to reach contested high ground quickly, then rain down fire. If enemy pushes, Sprint back to regroup or use different flank. Mastery comes with experience of each map's geometry.
Rank-Specific Playstyles & Carry Tips
Bronze–Silver
Play methodically. Focus on positioning, not flashy plays. Always keep an escape route (Sprint) and use Biotic Field early. Work with your team's barrier and wait for heals. Aim fundamentals: use 3-round bursts at distance and tracking up close. If you struggle with flicks, concentrate on consistent body aim. Don't overextend – Soldier is easy to punish if isolated.
Gold–Platinum
Opponents are tougher but kills are still often clutch. Start using advanced combos (Helix+shoot). Learn to time Tactical Visor; don't waste it. Try basic flanks when team fights drag on. Call out visors and coordinate with supports. Prioritize enemy healers and snipers. Your positioning should improve – peak from better angles and always manage cover.
Diamond–Master
Here aim must be sharp. Work on headshots; 2–3 well-placed shots down an opponent instantly. Use Helix trickshots off walls. Pre-aim corners and track targets' heads. Advanced tactics: drop Biotic Field in unexpected locations (like mid-jump) to bait opponents. Use sprint mid-fight to reposition unpredictably. Push your mechanical limits – try flick headshots and burst fire mid-range consistently.
Grandmaster
At this tier, Soldier can carry when the team comp or map favors him. Your aim should be near-peak. Focus on macro: you must know every map and enemy cooldown. Make use of frame-perfect animation cancels (e.g. Helix + melee to shave milliseconds). Synchronize your visors with multiple teammates' ultimates. Use every advantage: e.g. as soon as a friendly D.Va bomb lands, pop Tactical Visor. At this level, Soldier is less about brute aim and more about tactic – baiting, mind games, and split-second decisions to exploit enemies' weaknesses.
(No matter rank, always self-review after games. Pay attention to deaths: if you died 1v1, ask why – was a Reaper flanking? Did you mis-time visor? Focus on one improvement per game.)
Advanced Techniques (Tech & Animation Cancels)
Here are some high-skill tricks and "tech" for Soldier 76:
// Advanced Soldier: 76 Techniques

- Helix-Melee Cancel
  Fire Helix → Immediately Melee → Resume firing rifle
  (Saves ~0.1s in animation recovery)

- Quick Reload Sprint
  With "Agility Training" talent: Sprint while reloading
  Without talent: Cancel reload by firing or switching modes

- Slide Cancels
  Crouch + Move → Jump/Crouch → Peek corners
  (Maintains momentum while changing position)

- Tactical Visor Sensitivity
  Set in-game Tactical Visor sensitivity higher (150-200%)
  Allows for faster target switching during ultimate
Helix–Melee Cancel
Immediately melee (or crouch) after firing Helix to speed up the cast animation. This lets you resume firing your rifle ~0.1s faster. It's subtle but can help in tight 1v1s.
Rocket Jump (Tip)
Soldier cannot rocket-jump like Pharah, but skilled players sometimes jump + fire Helix at their feet to gain a small height bump or distance. The self-knockback (40 damage) is minor and can launch you over low obstacles. Use carefully, as it costs health.
Quick Reload Sprint
If you have the "Agility Training" talent (Stadium mode), reloads while sprinting are possible. In normal play without that talent, you can still cancel a reload by firing or switching modes. Learn to time your reloads: for example, after a burst of fire, reload only if safe, or utilize Tactical Visor's auto-reload instead.
Slide Cancels
Sliding (crouch + move) doesn't cancel rifle reload anymore (since patch), but you can use a quick jump or crouch to peek corners instantly and then continue shooting.
Aim Technique
Set your in-game Tactical Visor sensitivity higher than normal sensitivity (many players use ~150–200% on vis) so you can scan targets quickly once lock-on occurs. Adjust via practice range until you can flick across the screen smoothly during Visor.
While these techniques are often subtle, they can make a difference at high level. Focus first on consistent fundamentals; sprinkle in tech as you become comfortable.
Resource Management (Ammo, CD, Ult)
Good Soldiers manage resources carefully:
Ammo
Heavy Pulse Rifle clips 30. Conserve ammo by reloading only when safe. Don't waste shots on fully healed tanks; focus heads or wait for ultimates to drop shields. Remember Tactical Visor reloads you for free, so pre-fire or empty your clip before activating it.
Helix Cooldown
Only fire Helix when it can secure a kill or significant damage. Missing a Helix on a fleeing enemy is wasted DPS (with 6s CD). Try to guarantee a hit (on visible heads or when the target is stationary).
Biotic CD
Similar idea – use on cooldown. Keep track of fights: if you used Biotic Field 10s ago, it comes up soon. Don't hold onto it too long hoping for perfect moment; an early drop often turns a fight.
Ultimate Economy
Tactical Visor should net kills to earn it back faster. Every elimination gives ~8% ult charge, so a triple kill vision is 24% charge – meaning you can get it back relatively quickly if you secure multi-kills. Play aggressively when Visor is available, but know when to back off if nothing to shoot. If an enemy uses Sound Barrier or a big shield, it might be smarter to delay Visor slightly rather than waste it.
Health & Healing
Post-fight, sprint back for a heal from supports. Don't rely on your passive (now faster) if there's a Medic to give you immediate health. Use your own Biotic Field to top up before re-engaging – it also charges your ult.
| Resource | Management Tips |
|---|---|
| Ammo (30 rounds) |
|
| Helix Rockets (6s CD) |
|
| Biotic Field (15s CD) |
|
| Ultimate Charge |
|
Reviewing VODs & Self-Assessment
To improve, regularly review your gameplay:
Replay VODs
Use Overwatch's in-game replay system (or recording software) to watch your matches. Focus on deaths and ultimate usage. Ask: Why did I die? Was I overly exposed? Did I waste Visor on few targets? Identifying mistakes is key.
Key Performance Indicators (KPIs)
Track your accuracy and win-rate. Tools like Overbuff or the new Overwatch stats tracker can show your kill participation and shots landed. Set goals (e.g. 40% rifle accuracy, 1.5k damage per 10 min).
Common Mistakes
Look for patterns: maybe you're overextending, or miss Helix on crucial targets, or not using Biotic Field early enough. The reddit Overwatch University often posts "VOD review" requests, which can highlight typical errors.
Use Tools
Custom games with Aim Training bots or headshot-only modes help refine aim. The workshop has "Ana Aim Bot" maps for tracking practice. After playing a match, try a 5-minute drill hitting moving bot heads to reset focus.
Self-Critique
Critically assess whether a loss was your fault or team's, but focus on your decision-making. For example, if your team died because you didn't focus a low-HP Mercy, mark that mentally. Over time you'll notice what adjustments yield wins.
NA Pro Player Examples & Analysis
While Soldier is not a staple of top-tier pro play, some North American hitscan DPS offer lessons:
Constant Fire Discipline
In pro matches and high-level streams, NA DPS (e.g. OWL Contenders players) emphasize always outputting damage safely. They rarely "spray and pray" at odd angles. Studying any high-rank Soldier VOD (like GM ladder videos) shows disciplined bursts at 20–30m, using Helix only to confirm kills or mid-fight.
Ultimate Timing
Top players rarely throw Visor away. They often communicate with teammates to combo it (e.g. "Genji blade + Soldier visor" or "Zarya grav + visor"). Watch for instances where pros use Visor right after enemy barrier drops.
Positioning Awareness
Pro Soldiers use Sprint aggressively to appear in unexpected lanes. For example, on Hanamura B, a pro might sprint straight up the alley to the defenders' top balcony and unleash rockets. They often use maps' geometry cleverly, bouncing Helix off ceilings or dropping behind shielded enemies.
Consistency Under Pressure
Notice that at high level, players use Biotic Field very reactively – often dropping it just as a flank is seen, rather than waiting out. They also track enemy cooldowns (shooting Orisa right after fortify ends, etc). Even NA pros who specialize in other hitscan roles (like Hydration or KSP in OWL) show that Soldier should always fire at head level, aim small adjustments, and never spray full auto at long range when a two-tap headshot would do.
Pro Insight: If you can find any top NA Soldier player streams (Contenders or high-rank), look at how they peek only briefly, wiggle strafe during fights, and immediately retreat via Sprint when pressured. They often put Biotic Field preemptively on choke points and use every Helix on the move to maximize output. While names change, the trend is precise, controlled play – something to emulate in your own games.
Practice Routines & Drills
To master Soldier, build a structured routine:
Aim Training
Spend 10–15 minutes in the Practice Range or Workshop each session. Practice tracking moving bots and flicking to heads. Aim maps (like "Ana vs Bots" or "Fast Aim" custom games) help.
Custom Game Bots
Launch quick custom games vs AI on your most troubled maps. Play Soldier only; focus on consistent behavior. Adjust sensitivities and crosshairs if needed.
// Custom Game Setup for Soldier: 76 Practice

- Create Custom Game
- Map: Any map you want to improve on
- Mode: Skirmish or Deathmatch
- Add AI Bots (Medium or Hard difficulty)
- Hero Selection:
  * You: Soldier: 76 only
  * Enemy: Add variety of heroes to practice against

- Focus Practice Areas:
  * Tracking moving targets
  * Burst firing at long range
  * Helix rocket + primary fire combos
  * Movement between high ground positions
  * Cover usage and peeking
Workshop Drills
Use workshop training modes such as hitscan aim trainers. Many community maps exist that simulate jumping targets (to mimic Tracer/Genji).
Scrims and Deathmatch
If possible, run DM matches to warm up. Soldier's hitscan nature benefits from deathmatch – track enemies, flick on heads, and use Helix kills.
Motion & Cooldown Practice
Even in a custom game, practice juggling shooting, Helix, Biotic, and Sprint. For example, fire 5 shots, then Helix, then immediately reload, then sprint, then Biotic. Build muscle memory for cycling your abilities fluidly.
Mental Reps
Visualize fights. Before a game, remind yourself: "if tracer jumps me, turn around and Helix her, then shoot." Having set plays in mind helps in actual gameplay.
Hero Matchups (Advanced)
Below are tips vs each class of hero (for details against every hero, practice individual counters):
Tanks
- Reinhardt: Keep distance; fire at his head before he plants shield. Use Helix to chunk his barrier or catch him if he's alone. Pop Biotic if he charges. Visor is powerful if shield is down.
- Winston: Electric shocks hurt Soldier; try to shoot Winston's head when he dives. Use Helix to deter him, drop Biotic if he lands near. Sprint back if he barrels in. Tactical Visor will track Winston well, but be ready to flee if his bubble pops you.
- Roadhog: Beware his one-shot combo. If you see hook, immediately Sprint sideways. Pre-fire Helix as he emerges, as he's large target. Keep moving laterally.
- Zarya: If bubble on you, unload Helix and bullets – she absorbs damage. If her barriers are down, shoot her through. However, Don't tunnel vision – Zarya's primary threat is farm charge, not kill.
- D.Va: Her Defense Matrix eats your rockets; be cautious. Best to fight her with rifle only; Helix can kill her once out of mech. Keep distance so Matrix isn't always on you. Use Visor on D.Va only after DM is gone.
Damage Dealers
- Tracer: Headshotting Tracer is easiest using tracking. Helix often one-shots low-HP Tracer. When she blinks close, Sprint away diagonally. Use Biotic if she's on you. Visor excels at wiping clumped-up Tracers.
- Genji: Save Helix for after his deflect fades; never waste it into deflect. Headshots are crucial – aim at his chest or head as he swings. If Nanoboosted, run and use Biotic; if you can land a headshot and Helix on nano-Genji, you can kill him.
- Cassidy: This is often a shootout: bait out his Flashbang then out-DPS him. Don't group with team if he might use Rolling Ball. You might flank around his sight lines or use cover. If he pops Deadeye, move – try to shoot him as he guns up.
- Ashe: She can 2-shot you from range. Avoid peeking without cover. If she uses Dynamite, cancel reload or step out of it. If Bob is up, you can (try to) shoot him or bait Bob out then push during Ashe's reload. Visor can beat Ashe if you catch her before she crouches.
- Widowmaker: Avoid open duels. If you must fight, try to approach via alternate routes (sprint flank). Use SMG to break her concentration or discourage her. If you force a retreat, she becomes easy pick for Visor or Helix.
- Reaper: At close range he beats you. Always keep your distance (>10m). When in range, fight by strafing to avoid Shroud and shotguns. Fire Helix when he heals to interrupt. Visor can melt Reaper if you catch him overextending.
- Sojourn: Similar to Soldier but lower hp. Her Railgun can instagib, so don't stand still. Both have small magazines; avoid trading heads. You out-heal hers if you land shots. Helix and constant pressure will force her to regen.
- Junkrat: His projectiles bounce unpredictably. Suppress him with bullets or headshot him if he's jumping. When he uses Rip-Tire, focus on evasion or shoot the tire. He is slow – use Sprint to outmaneuver his nades.
- Mei: Keep range (she's slow). Helix around corners can punish ice walls. If she gets close, drop Biotic and retreat; fighting her close is unwinnable. Use Visor on her if she's fully encased in ice (actually don't, wait for her to thaw).
- Bastion: Always move; never engage him alone at range in turret mode. Use Helix to force him to move or get kills if he's exposed. Flank routes (sprint through spawn tunnels) are best to hit him in Recon mode. Visor can clear tank Bastion if teammates dive him simultaneously.
Support
- Ana: Sleep Dart is your biggest threat. Bait or avoid her until her nade is down, or bait a hook shot with Visor. Out-heal her anti-heal by consistent fire. Visor can delete nano-boosted targets which is often Ana.
- Mercy: If she's alone, four headshots kill her. Pay attention to Valkyrie – save your Helix or focus her at Valk start. When playing Mercy, prioritize whoever she's boosting. Biotic Field can win 1v1 with pocketed Mercy.
- Lucio: Constant healing and speed is hard to counterheadshot. Track him as he swings around. Helix and headshots still kill him quickly (104 HP). If he Sound Barriers, don't visor until after it ends. Lucio often wall-runs or boops; use predictive aim.
- Moira: Her beam tracks you, but she has limited ammo and teleport CD. Aim at her side to avoid Coalescence (it pierces through barriers). Helix center can catch her mixing mode, but she's squishy; use headshots.
- Zenyatta: Zenyatta's head is a large target. Kill Discorded enemies instantly. His Orbs give him mobility – be wary of Riptire. Visor easily destroys him if he's exposed.
(For each hero, keep track of their dashes or invulns. E.g., if a hero uses blink or invulnerability, pause firing briefly and then counterattack.)
| Hero Type | Approach | Key Counters |
|---|---|---|
| Tanks | Keep distance, focus head/weakpoints, use Helix on barriers | Roadhog (hook), D.Va (matrix), Zarya (bubble) |
| Mobile DPS | Track consistently, use Biotic proactively, punish with Helix | Genji (deflect), Tracer (blinks), Reaper (close-range) |
| Snipers/Ranged | Use cover, flank routes, Sprint to close distance | Widowmaker (range), Ashe (dynamite), Hanzo (scatter) |
| Supports | Prioritize kills, focus healing targets, use Visor to finish | Ana (sleep dart), Lucio (sound barrier), Zenyatta (discord) |
Role of Hitscan DPS & Target Priority
As a hitscan DPS, Soldier's role in a team is consistent pressure and target elimination. He should focus on:
Primary Targets
Enemy backline (snipers, supports) or any target in sight. His hitscan rifle excels at picking off fleeing squishies (Pharah, Mercy, Tracer), and at shredding armored targets once barriers are gone. In team fights, call out low-health targets to focus together. A well-placed Helix or headshot can remove a crucial enemy from the fight.
Secondary Targets
High-value DPS (Reaper, Genji) if they overextend. Also shoot at big targets to force cooldowns (e.g. shooting Reinhardt to make him drop his shield).
Positioning Duties
Unlike flankers, Soldier often holds the midline or high ground in team comps. He's responsible for holding angles or pressure points. He should not wander alone – in 5v5, stick close enough to peelers or support so he's not caught by dive. He must create space: for example, if the enemy dives on him, he lures them into his team's crossfire.
Support
As the hitscan DPS on your team, your hits help create breathing room. If barriers are broken and enemies are retreating, you press forward. If the team is being dove, use Biotic to counter-dive heals.
Ultimate Economy
Soldier's ultimate counters enemy immortality (e.g. it can smash through Genji's deflect or D.Va's defense matrix if timed) and can single-handedly clear fights. Communicate with your team about when you have Visor: good target priority (e.g. popping on three cornered enemies) can win fights.
In short, Soldier's niche is versatility: he can play almost anywhere on the map, handle most heroes at range, and self-sustain through fights. He's a safe DPS pick who should pressure relentlessly while his team follows up.
FAQ & Patch Notes Highlights
April 1, 2025 buffed Soldier: he now runs twice as fast (Sprint +100%) and his passive self-heal starts and works much faster. (This means he recovers health more quickly after shooting/being shot, and is harder to catch.) A strange change is that Soldier can no longer see any health bars (allied or enemy) – you'll have to track health by damage dealt rather than UI. The rifle's projectile size was also slightly increased recently, making hitbox registration easier.
Practice in the training range on moving bots. Try to pull down gently (the gun recoils up). Always compare burst versus full-auto: at long range, three-shot bursts often hit more consistently because the gun resets recoil. Use the first shot tap for distance, then adjust with subsequent shots.
In Options, you can set Sprint to toggle (stay on until pressed again) or hold-to-sprint. Toggle is popular so you don't have to hold the key. Overwatch tips suggest sprinting whenever out of combat.
You may be too close. A direct hit is 120, and splash is 80 (40 self). If an enemy is less than 2 m away, some damage will go into splash (and into you). Stand ~3-5 m away when possible for max effect.
Overextending alone, wasting Helix on trivial targets, or misusing Tactical Visor on hard targets are frequent errors. Also, forgetting to use Biotic Field early or sprint when safe are easy fixes. Watch replays to catch these.
Aim assist helps Soldier significantly. Still track smoothly; flicks are aided less. Keep Aim Smoothing low (around 0–30%) for precision. Many console Soldiers set high sensitivity to turn quickly. Crosshair placement at head-level is crucial. Use Audio cues – Soldier's Sprint makes noise, so be mindful when flanking.
His winrate is above 50% in many ranks, showing he's strong but his pick rate is modest. He's not "broken," but current buffs mean he's a solid pick. If he feels underpowered, review your aim and positioning first – he rewards skillful play. According to community stats (Overbuff), his win rate in Grandmaster is around mid-50's, implying he's slightly strong when played well.
Always reposition after each engagement using Sprint. If a Widowmaker is camping, consider switching or forcing her out with flankers. If Genji/Tracer dive you, back off immediately, use Biotic Field, then fight from distance. In 5v5, call for help or peek in/out.
On PC, mechanical aim skills allow you to flick headshots more reliably. On console, you rely more on the aim-assist to track enemies; therefore, focus on slow controlled movements and let the aim assist set you on target. Vertical recoil on console can be stronger due to assist, so tune sensitivity or burst-fire more often.