
The OG Lightning Spear Invoker works as both a League Starter and a fully capable endgame build in Patch 0.4 (The Last of the Druids). This guide walks you through all three stages: leveling through the campaign, getting into early maps, and scaling up to pinnacle boss kills. Two investment tiers are covered throughout - the standard Endgame Variant (Mid Investment) and the more expensive Uber Endgame Variant (High Investment). Sections that differ between the two will say so clearly.
You'll be playing the Invoker Ascendancy, though the build technically runs on any class. Invoker earns its spot for three reasons. First, the Sunder my Enemies... node gives you Elemental Penetration on Critical Hits, which effectively lets you ignore enemy Elemental Resistances when you crit. Second, Lead me through Grace... hands you a large Spirit pool that scales directly off the Evasion and Energy Shield on your Body Armor, fueling all your Spirit Gem slots. Third, Invoker starts near passive clusters that naturally stack Energy Shield, Evasion, and Critical Hit Chance, which is exactly what Lightning Spear needs.
Strengths and Weaknesses
- Extremely fast map clear
- Strong enough single target damage to kill pinnacle bosses
- Full Chaos Damage immunity via Chaos Inoculation
- Solid layered defenses across Energy Shield, Evasion, and Deflection
- Plays the original Lightning Spear fantasy that makes the skill satisfying
- Requires a Weapon Set swap to generate Frenzy Charges through Bear Tech - feels awkward at first
- You must have Flat Life Regeneration on at least one piece of gear or Berserk will drain your life and kill you
How the Build Works
Four systems run in parallel to make this build function. Getting familiar with how they connect before you start building out your gear and passives will help everything click faster.
Lightning Spear Clear
Lightning Spear does your map clearing. The chain works like this:
- You throw Lightning Spear into a pack. The Embitter support gem lets it Freeze enemies on hit.
- Frozen enemies shatter, activating Herald of Ice and triggering explosions that tear through nearby mobs.
- You're still dealing enough Lightning Damage to Shock enemies, which turns on Herald of Thunder for extra clear on top of that.
- Every 20 seconds, you use Thunderous Leap to refresh the Bhatair's Vengeance buff. That buff keeps your Cold Damage high enough to Freeze consistently.
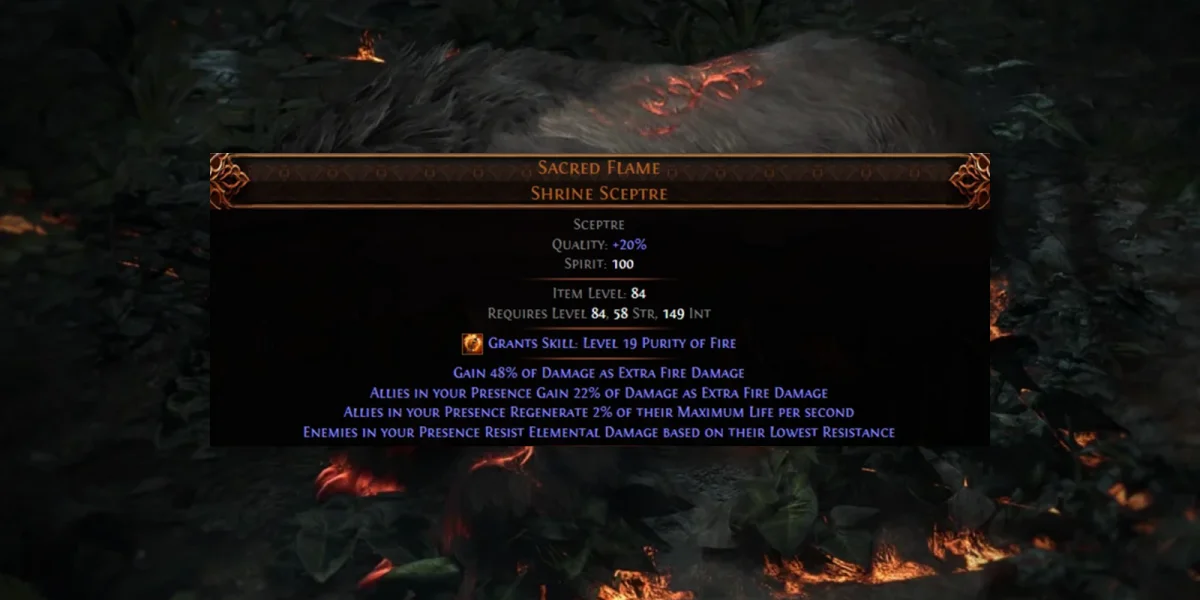
In the Uber Endgame Variant, Sacred Flame converts its Fire Damage to Cold Damage through Embitter, so your Freeze procs stay reliable without any extra effort.
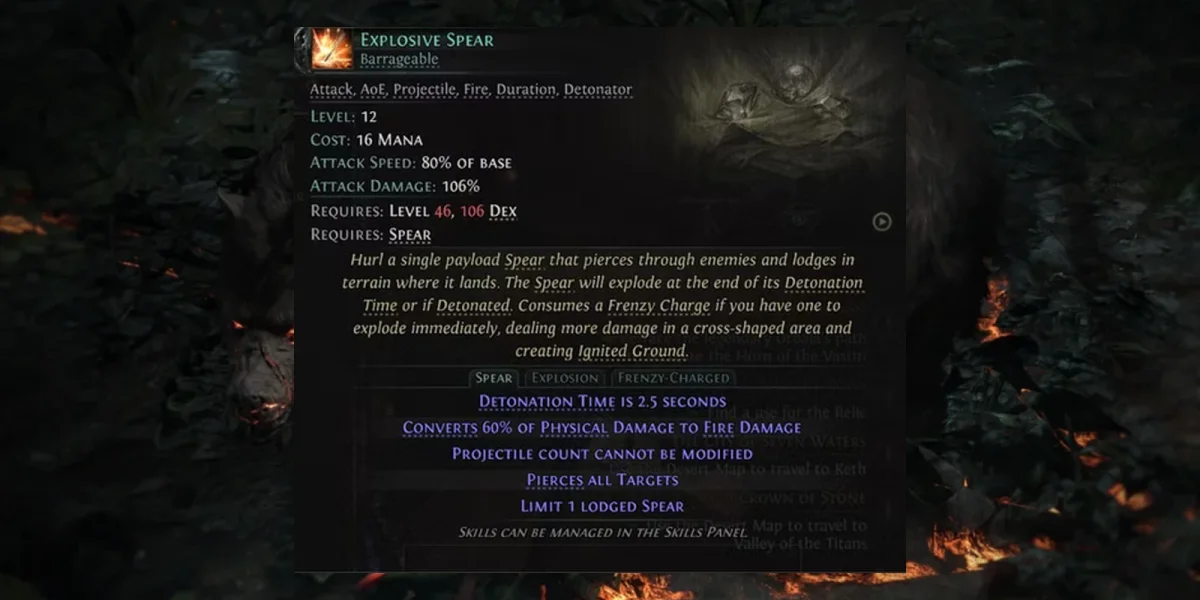
Explosive Spear Bossing
Explosive Spear is your primary tool for killing bosses, built entirely around Frenzy Charges. Once you've loaded up on Frenzy Charges using the method described below, you throw Explosive Spear at the boss's feet. It detonates instantly and deals millions of damage in a single cast. Without Frenzy Charges, it's unremarkable. With them, it kills pinnacle bosses in a single cast.
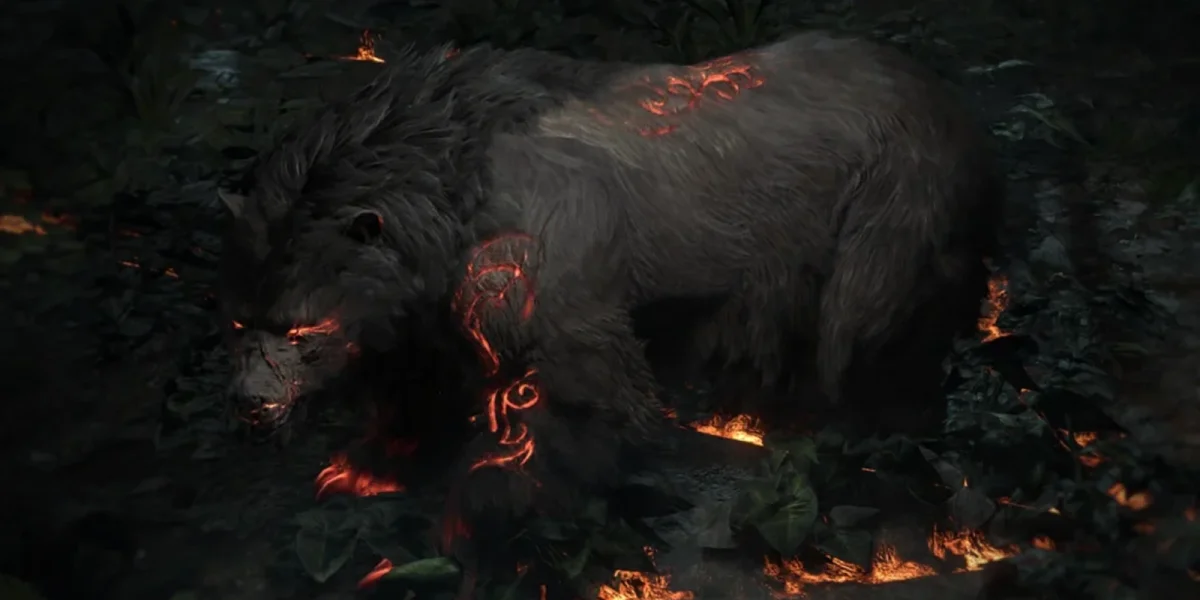
Frenzy Charge Generation (The Bear Tech)
This is the most involved part of the build. Frenzy Charges directly amp both Lightning Spear and Explosive Spear, so you need a reliable way to generate them. There are two routes.
This runs off Weapon Set 2. When you swap to Set 2 and use Fury of the Mountain, you enter Bear Form. In Bear Form, every 15 Rage you spend produces an Endurance Charge. You burn through Rage as fast as possible using Rageforged I, Brambleslam, and Branching Fissures II. Those Endurance Charges then convert into Frenzy Charges through Resonance.
In practice: swap to Weapon Set 2, generate your Frenzy Charges, then swap back to Weapon Set 1 and spend them. Use Fury of the Mountain at the start of a boss fight, or during mapping whenever Route 1 hasn't given you enough charges.
The Amor Mandragora Talisman on Weapon Set 2 speeds this up. Spending Rage grants Druidic Prowess, which gives 10% Skill Speed per stack up to 3 stacks (30% total). More Skill Speed means faster Rage spending and faster charge generation. It's also very cheap to acquire.
Rage Buffs
Eternal Rage keeps you at maximum Rage permanently, translating to 30% More Damage at all times. Berserk pushes that to 52% More Damage. Flat Life Regeneration on at least one gear piece is required when running Berserk or it will kill you.
Thunderous Leap paired with Embitter and Bhatair's Vengeance converts Freezing enemies into 1% of Damage as Cold Damage per Rage, which feeds back into your Freeze rate and keeps Herald of Ice ticking.
Defenses
Three systems stack on top of each other to keep you alive.
Energy Shield
Ghost Dance recovers roughly 1,000 Energy Shield on Hit. Meditate, unlocked through the Invoker Ascendancy, lets you hold a button to actively recover Energy Shield and can overflow it to 1.5x its base value. That overflow is especially valuable when you're running Headhunter in the Uber variant. Patient Barrier and Spectral Ward from the passive tree add further ES on top.
The Subterfuge Mask passive node is one of the most efficient defensive picks on the entire tree. A pure Energy Shield Helmet with 400 ES effectively becomes 400 ES plus 800 Evasion Rating once you take that node.
Evasion
Wind Dancer boosts your Evasion Rating and generates Gale Force when you take a hit. Gale Force creates a knockback explosion that can Freeze nearby enemies and trigger Herald of Ice, giving you a defensive reaction even when you're getting hit hard. Passive nodes Enhanced Reflexes, Beastial Skin, and The Wild Cat pad this out further.
Deflection
The build sits at 68% Deflection, which provides 40% Damage Reduction. Proficiency in the passive tree covers both Deflection and Dexterity.
Chaos Inoculation
Chaos Inoculation from the passive tree makes you fully immune to Chaos Damage and Bleed. No workarounds needed.
Defensive Stats at Full Setup
The following values apply to the Uber Endgame variant with Meditate active:
| Stat | Value |
|---|---|
| Energy Shield | 8,300 |
| Evasion | 70% |
| Deflection | 68% (40% Damage Reduction) |
| Energy Shield Recovered on Hit | ~1,000 |
Ascendancy Node Order
Take your Ascendancy nodes in this order:
- Lead me through Grace... - Grab this first. It grants Spirit based on the Evasion and Energy Shield on your Body Armor, and it powers every Spirit Gem slot you'll use for the rest of the build.
- Sunder my Enemies... - Lets you ignore enemy Elemental Resistances when you land a Critical Hit.
- Faith is a Choice - Gives you Energy Shield Recharge whenever you need it.
- I am the Blizzard... - Adds a Cold Damage boost that makes Herald of Ice proc more often.
Skill Gems
Main Clear
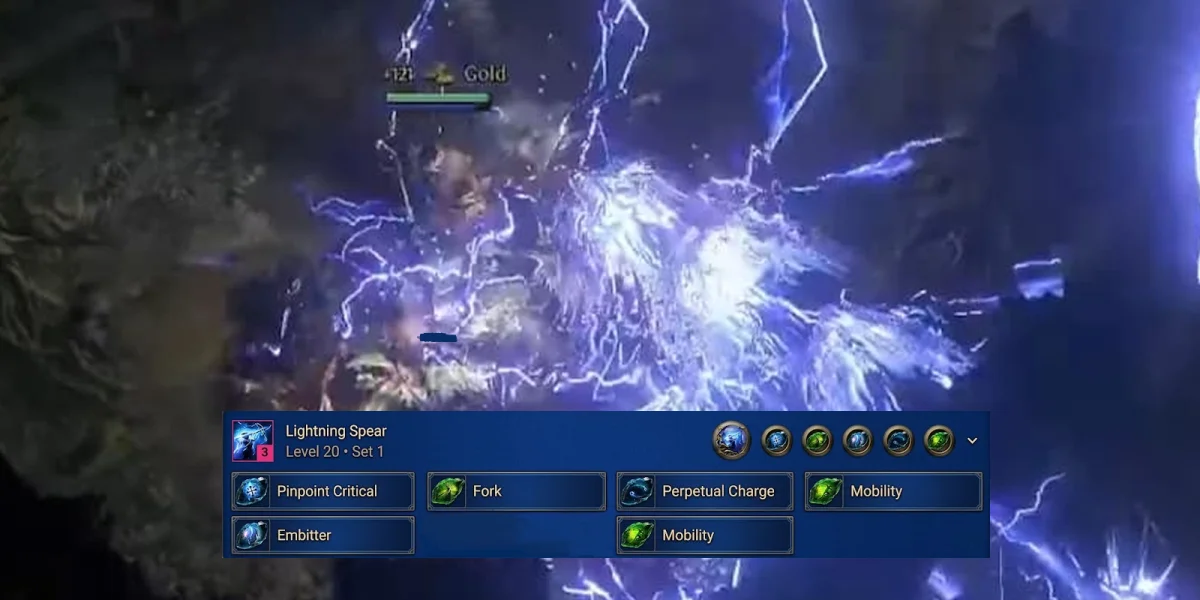
Lightning Spear is your primary clear skill. Embitter is the support that enables Freezing, which starts the whole Herald of Ice chain. Full gem links for Lightning Spear are listed on the build tracker page.
Heralds
Herald of Ice activates when you Freeze enemies and creates shatter explosions. Run it with Uul-Netol's Embrace to enable Armor Break on those explosions, which feeds back into your Frenzy Charge generation loop.
Herald of Thunder activates when you Shock enemies. It runs passively alongside Herald of Ice and adds supplemental clear damage without any extra input.
Bossing
Explosive Spear is your boss skill. Use it after loading Frenzy Charges. Throw it at the boss's feet and it detonates immediately for massive burst damage.
Mobility
Thunderous Leap refreshes Bhatair's Vengeance every 20 seconds to maintain your Cold Damage uptime. On bosses, it also creates Shocked Ground as a bonus.
Weapon Set 2 Skills
Fury of the Mountain activates Bear Form for Frenzy Charge generation. Rageforged I, Brambleslam, and Branching Fissures II burn your Rage in Bear Form as fast as possible to produce Endurance Charges, which Resonance converts into Frenzy Charges.
Buff Gems
Eternal Rage maintains max Rage at all times (30% More Damage). Berserk amplifies that to 52% More Damage. You need Flat Life Regeneration on at least one gear piece before running Berserk.
Defensive Gems
Ghost Dance gives you Energy Shield recovery on Hit. Wind Dancer increases your Evasion and creates defensive Gale Force explosions when you take hits. Meditate lets you actively recover and overflow your Energy Shield whenever you need it.
Free Spirit Slots via Sacred Flame
Any Spirit Gems placed in Sacred Flame's sockets cost zero Spirit. Use those free slots for gems like Precision II, Cool Headed, and Clarity II to pick up passive buffs without touching your Spirit budget.
Uber Variant Only
Garukhan's Resolve is an expensive support gem that increases Critical Hit Chance. It's only recommended for the high investment version of the build.
Support Gem Stat Requirements
| Stat | Requirement |
|---|---|
| Strength | 80 |
| Dexterity | 60 |
| Intelligence | 85 |
Gear
Weapon Set 1
Spear (Main Hand)
Go for the highest DPS Spear you can find. Flat Elemental Damage matters more here than percentage increases, and any element works. A Tri Flat Damage Spear, Physical, or Increased Elemental Damage with Attacks are all fine. You want at least +4% Critical Hit Chance alongside either +Level of Projectile Skills or +Level of Attack Skills. Chance to Gain Onslaught or a Critical Damage Bonus affix are good bonuses on top of that.
Sockets: Farrul's Rune of the Hunt and Fenumus' Rune of Agony. The Farrul's Rune boosts Rare and Boss DPS; the Fenumus' Rune supports the Armor Break interaction with Uul-Netol's Embrace.
Scepter (Off Hand)
Sacred Flame is your top pick for the Gain Extra Damage bonus and its free Spirit Gem slots. If you can't get Sacred Flame, Guiding Palm of the Eye, Guiding Palm of the Heart, Guiding Palm of the Mind, or Palm of the Dreamer are all acceptable alternatives.
Socket: Fox Idol. No other Rune benefits this slot for the build.
Weapon Set 2
Talisman (Main Hand)
You want the Amor Mandragora. Spending Rage grants Druidic Prowess: 10% Increased Skill Speed per stack up to 3 stacks (30% total). This speeds up Frenzy Charge generation and the item is cheap.
Sockets: Guatelitzi's Soul Core of Endurance and Opiloti's Soul Core of Assault for extra charge generation.
Body Armor
An EV/ES Hybrid Body Armor is your strongest option here. It feeds both your defensive layers and your Spirit pool through Lead me through Grace. Go for the highest combined Evasion and Energy Shield values you can afford. Increased Spirit Reservation Efficiency as a desecration affix is a major upgrade since it cuts the Spirit cost of all your Spirit Gems, but expect to pay a premium for it.
Socket: Greater Iron Rune.
For the Uber Endgame Variant, you're targeting at least 11% Reservation Efficiency. The example setup uses a piece with 1,493 Evasion and 571 Energy Shield, paired with Dialla's Desire, to land at 245 Spirit with 27 Spirit left over after all reservations.
Helmet
Use a pure Energy Shield Helmet. Thanks to the Subterfuge Mask passive node, a 400 ES Helmet also provides 800 Evasion Rating, making it one of the best value defensive nodes on the tree.
Boots
Any EV/ES, EV, or ES Boots work fine. Look for Movement Speed, Deflection, Rarity, Attributes, and whatever Resistances you still need. If you're already capped beyond the limit on Resistances, socket Farrul's Rune of the Chase.
Amulet
Any Amulet works early on. Gold Amulet or an Attribute Amulet are the preferred bases. Look for % Maximum Energy Shield, % Increased Evasion Rating, Global Defenses, Rarity, Critical Hit Chance, Attributes, and Resistances.
Anoint with Jack of All Trades if you have a balanced Attribute spread. If you're short on Critical Hit Chance, Stormcharged is the better anointment. Note that +Level of Melee Skills is a big DPS increase if you can handle the higher Mana cost it brings.
Rings
Use Rings to close Resistance gaps and cover any missing Attribute requirements. For damage, target two to three sources of Flat Added Damage to Attacks - Cold, Physical, and Lightning are the preferred types. Flat damage pulls ahead of percentage increases here. Also look for Rarity on your rings. You need at least one Unset Ring to fit all the Skill Gems the build requires.
Belt
Mid Investment: Run Shavronne's Satchel paired with an Instant Recovery Life Flask.
Uber Endgame: Headhunter is the top mapping belt and the pick for this variant. It pairs well with Meditate and Ghost Dance keeping your Energy Shield topped up during mapping.
Jewels
Budget Jewels
Any combination of the following works: Increased Damage with Spears, Increased Attack Speed with Spears, Lightning Damage, Increased Elemental Damage, Increased Critical Hit Chance, Increased Critical Damage Bonus, Increased Attack Speed, Increased Attack Damage, and Increased Projectile Damage.
Unique Jewels
Heart of the Well can roll Gain Extra Damage as Cold, Fire, Lightning, or Chaos. A roll with two lines of Gain Extra Damage is a significant DPS gain, but it comes at a steep cost.
Time-Lost Sapphire should be rolled with Critical Hit Chance and placed next to the Stupefy passive node. That placement lets every nearby node grant additional bonuses, and there are a lot of strong Notables in that area of the tree. It's not required from day one, but it's a smart pickup once you can afford it.
Megalomaniac (Uber Variant only): aim for one Offensive and one Defensive Notable. Defensive Notables include Pocket Sand, The Wild Cat, Afterimage, Inner Faith, Patient Barrier, Chakra of Breathing, Enhanced Barrier, Spiral into Depression, Illuminated Crown, Calibration, and Storm Driven. Offensive Notables include Javelin, Catalysis, Stormcharged, Harness the Elements, Stormbreaker, Overwhelming Strike, Sundering, Exploit, Death from Afar, and Coming Calamity. Other viable Notables exist and can be substituted based on what you find.
Passive Tree
Defensive Nodes
Core defensive picks: Flow Like Water (Attack Speed), Mindful Awareness (Evasion and Energy Shield), Immaterial and Shimmering (EV/ES and Movement Speed), Spectral Ward (Energy Shield), Chaos Inoculation (Chaos and Bleed immunity), Abasement (Stun Threshold), Patient Barrier (Energy Shield and Intelligence), The Wild Cat (Evasion and Deflection), High Alert (Stun Threshold and Evasion), and Subterfuge Mask (converts Helmet ES into Evasion Rating). Take Shimmering Mirage optionally if you're getting Frozen often. Take Enhanced Reflexes, Beastial Skin, and Proficiency as needed for Evasion, Deflection, and Dexterity.
Offensive Nodes
Core offensive picks: Crashing Wave (Critical Hit Chance), Resonance (converts Endurance Charges to Frenzy Charges), Acceleration (Skill Speed and Movement Speed), Precise Point and Roll and Strike (Spear DPS), Essence of the Mountain (Freeze Buildup and Cold Damage), Heartbreaking, Struck Through, and Heartstopping (Critical Hit Chance and Critical Damage Bonus), Stupefy and Dizzying Hits (DPS and Critical boost - also improves Time-Lost Sapphire value), The Fabled Stag (extends Charge duration and boosts Time-Lost Sapphire), and From Nothing with Dance with Death (foundation for multiple surrounding nodes).
Weapon Set 1 Passives (Critical Hit)
Moment of Truth, True Strike, For the Jugular, and Deadly Force all add Critical Hit Chance and Critical Damage Bonus. Killer Instinct and Tenfold Attacks cover Attack Damage and Attack Speed. Careful Assassin adds more Critical Hit Chance. Blinding Strike provides Attack Damage and Chance to Blind. Imbibed Power adds Attack Damage but requires Lavianga's Spirits for permanent flask uptime.
Weapon Set 2 Passives (Bear Form)
Flow State (Skill Speed in Bear Form), Conservative Casting (Mana efficiency in Bear Form), Agile Succession and small surrounding nodes (Attack Speed), and Frenetic, Savagery, and Fervour (increases Maximum Frenzy Charges).
Act Reward Choices
| Location | Permanent Bonus |
|---|---|
| Valley of the Titans | +30% Increased Charm Duration |
| The Venom Crypts | +25% Increased Stun Threshold |
| Halls of the Dead | +5% Lightning, Cold, and Fire Resistance each |
| Goddess of Justice | +30% Increased Mana Recovery from Flasks |
| The Seven Pillars | +5% to All Elemental Resistances or 15% Increased Global Defenses (interchangeable) |
Atlas Strategy
For map farming, prioritize the Temple mechanic. When Temple isn't available, Abyss is the next best farming target. The full Atlas Tree allocation is subject to ongoing testing and isn't covered in detail here.
Build Variants Compared
| Feature | Mid Investment | Uber Endgame (High Investment) |
|---|---|---|
| Belt | Shavronne's Satchel + Instant Recovery Life Flask | Headhunter |
| Support Gem | Not required | Garukhan's Resolve for Critical Hit Chance |
| Body Armor | No Spirit Reservation Efficiency required | At least 11% Spirit Reservation Efficiency (example: 1,493 EV / 571 ES) + Dialla's Desire |
| Spirit | Standard budget | 245 total with 27 left over after reservations |
| Lightning Spear | Standard clear skill | Amped by Frenzy Charges for clearing as well as bossing |
| Boss capability | Clears pinnacle bosses | Clears pinnacle bosses with room to spare |
Common Mistakes
Full skill gem links, the complete passive tree, and the Atlas Tree allocation are available on the build tracker page.