
Just when players thought they had mastered the Overwatch meta, BAM! Another patch dropped. The year 2025 was characterized by a relentless pace of evolution, featuring groundbreaking changes that reshaped the competitive landscape. Understanding these shifts wasn't just helpful; it became the critical factor separating the climbers from the stagnant in the ranked ladder.
The development team's philosophy centered on keeping the game fresh and dynamic through a planned 9-week seasonal cadence, often introducing new heroes every other season alongside maps, modes, and regular balance updates. This approach aimed to reward diverse strategies and playstyles. Beyond the scheduled updates, the developers demonstrated a commitment to managing hero balance proactively, making swift adjustments via hotfixes when necessary to keep the game feeling fair and fun. This philosophy also involved balancing the unique fantasy of each hero with the overall health of the game, often responding directly to community feedback and identified "pain points".
Simply feeling these changes wasn't enough for serious competitors. True ranked climbers sought to understand and exploit them. Knowing the specific numbers behind a nerf or the strategic intent behind a buff unlocked new avenues for outplaying opponents. This guide dives deep into the hero changes of 2025, providing the insider knowledge needed to thrive in Overwatch's ever-shifting battlefield.
The year saw several major turning points. The seismic global changes introduced in Season 9 fundamentally altered core mechanics like health, damage application, and healing. The arrival of Freja, a high-skill bounty hunter, injected new mobility and precision into the Damage role. Significant reworks breathed new life (and created new challenges) for established heroes like the aerial ace Pharah and the disruptive Wrecking Ball. Furthermore, the introduction of systems like Hero Perks (though sometimes limited to specific modes) and the highly impactful Hero Bans in Competitive Play added layers of strategic depth that directly influenced hero viability and balance considerations.
The sheer volume and frequency of adjustments – spanning major seasonal updates, mid-season patches, and rapid hotfixes – signaled a development team in constant iteration. This relentless cycle appeared driven by both a desire to maintain dynamism and the inherent difficulty in finding a stable equilibrium, particularly after the foundational restructuring of Season 9. Consequently, the ability to adapt quickly became a crucial competitive skill in itself, rewarding players who could rapidly learn, internalize, and leverage the constant stream of changes.
The Ground Rules Changed: Season 9's Foundational Impact
Season 9 wasn't just another patch; it was a fundamental rewrite of Overwatch's core gameplay rules. The developers explicitly stated these changes were a direct response to community feedback regarding persistent "pain points". Chief among these were concerns about excessive burst damage making fights feel too short and unpredictable, and overly potent healing making targets feel unkillable. The goal was to make damage feel more consistent and reduce the feeling of helplessness when reliant on Supports for basic sustain.
Global Health Increase:
To combat the lethality of burst damage, every hero received a significant health increase. The formula was tiered: heroes with 150-175 HP gained 25 HP, those with 200-300 HP gained 50 HP, and Tanks (starting at 300+ HP) received 75-100 extra HP. This universal buff aimed to increase the Time-To-Kill (TTK), making instant deletions less frequent and giving players more time to react. A direct consequence was that healing became relatively weaker, as restoring a larger health pool naturally takes longer.
Global Projectile Size Increase:
Counterbalancing the health increase, almost all projectiles in the game became larger. The increase varied based on projectile type and speed – precise hitscan shots received a larger boost than rapid-fire or shotgun spreads, while slower travel-time projectiles got the biggest increase. The stated intention was to make landing shots feel more consistent and rewarding, theoretically keeping the average TTK similar to pre-S9 levels despite the higher health pools. However, this change was later fine-tuned mid-season, reducing the size increase for the fastest projectiles to address issues like unintended body-blocking of headshots.
Universal Self-Heal Passive:
Role Passive Changes:
| Role | Passive Change | Effect |
|---|---|---|
| Damage (DPS) | New passive replacing reload speed bonus | Dealing damage reduces enemy healing received by 20% for 2 seconds (later nerfed to 15%) |
| Support | Self-heal improvement | Activation delay halved, kicks in after just 2.5 seconds of not taking damage |
| Tank | Steadfast return for some heroes | Knockback resistance returned for heroes like Reinhardt, alongside existing tank passives |
Other Global Changes:
Minor adjustments included an increase to Quick Melee damage (30 to 40) and a 10% increase to the cost of all Ultimate abilities.
Impact & Reception Analysis:
The S9 changes were met with a polarized reaction. Many players, particularly those who struggled with aim consistency, appreciated the larger projectiles making shooting feel better. Conversely, others argued it lowered the skill ceiling, made heroes feel more homogenous, and failed to address the root causes of frustration, such as powerful sustain abilities on certain heroes. The universal self-heal passive drew significant criticism upon its initial reveal, with players fearing it would devalue teamwork and the Support role. Despite the online debates, data indicated an increase in player engagement post-S9, especially a shift towards the Competitive game mode, although the exact cause (S9 changes vs. rank reset vs. other factors) remained debatable. The developers acknowledged the mixed feedback but maintained the changes were directionally correct, emphasizing the need for subsequent fine-tuning through hero-specific adjustments.
Tank Role Deep Dive: Frontline Fortunes & Failures
Tanks found themselves in a peculiar position after the Season 9 overhaul. While benefiting from the largest raw health increases, they also faced more consistent incoming damage due to larger projectiles and the persistent threat of the DPS healing reduction passive. Developers acknowledged that tanks sometimes felt less tanky despite the HP buffs, prompting a shift towards more individualized adjustments focused on enhancing each tank's unique strengths and "hero fantasy". This followed a wave of significant tank nerfs in late 2024 that had already altered the landscape.
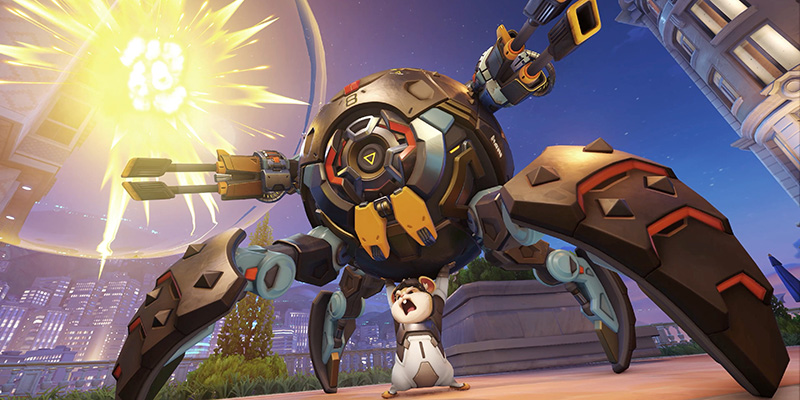
Wrecking Ball (Season 10 Rework Focus)
Wrecking Ball underwent the most significant transformation among tanks in early 2025, receiving a targeted rework in Season 10 aimed at addressing long-standing community feedback and better integrating him into the 5v5 environment.
- Grappling Claw (S10): Retract function added (hold Jump/Primary Fire to pull towards anchor point); 1-second cooldown if canceled before ramming speed (full CD if interrupted by Hack/Hinder/Stun); max duration timer only triggers upon reaching ramming speed.
- Adaptive Shield (S10): Can be reactivated within a window to redistribute up to 300 Overhealth to nearby allies (capped at 75 per ally); enemy/ally detection radius for initial shield gain increased (10m -> 13m).
- Minefield (S10): Individual mine health increased (50 -> 60).
- Previous Changes: S9 HP/Armor buffs; Late 2024 nerfs (base shield health removed, Adaptive Shield Overhealth gain reduced, Piledriver CD increased); 6v6 specific nerfs (HP decreased, Roll impact bonus health reduced).
Ability Breakdown & Intent:
The Season 10 changes were substantial. The developers' stated goals were threefold: provide Wrecking Ball a direct way to support his team beyond disruption, make the hero more approachable for newer players, and add new avenues for skill expression while improving quality of life around the grapple. The grapple retract adds a new movement dimension, the 1-second cooldown forgives minor grapple errors, and the Adaptive Shield change introduces team utility.
New Playstyles:
The rework nudges Wrecking Ball towards a more team-enabling dive tank role. The core disruptive dive style remains, but now includes the option to share Adaptive Shield's Overhealth, bolstering accompanying divers like Tracer or Genji. This requires Ball to engage, generate shields near enemies, and then quickly reposition near allies to share the health pool. The grapple retract mechanic opens up possibilities for faster repositioning, escaping body blocks more easily, executing new rollout techniques, and potentially enabling more aggressive aerial maneuvers like the "Toronto kick" mentioned by players. The reduced cooldown for non-fireball grapples makes misclicks or environmental snags less punishing, encouraging more experimentation.
Adjusted Counters & Synergies:
Wrecking Ball remains highly vulnerable to crowd control effects like Hack, Hinder, and stuns, which still trigger the full Grappling Claw cooldown. Freja's Frost Bolts perk was also noted as a potential counter, slowing him enough to prevent fireball. While the 1-second cooldown option helps mitigate failed grapples, consistent body blocking might still be an issue, though less crippling. The shield sharing significantly enhances synergy with mobile dive DPS (Tracer, Genji, Sombra) who can stay within the distribution radius and benefit from the temporary health. Supports like Kiriko (Suzu cleanse) or Lucio (Speed Boost) remain valuable partners.
Practice Drills:
- Grapple Retract: Practice pulling to specific ledges or points rapidly. Drill mid-air retractions for sharp direction changes. Use retract to dodge simulated projectiles or escape tight situations. Experiment with new rollout paths using the retract mechanic.
- Shield Sharing: Practice the engage-shield-disengage-share sequence in custom games. Focus on maximizing initial shield gain near enemies and reactivating near allies within the 13m radius before the shield expires. Coordinate with dive DPS bots/players.
Pro/Community Insights:
Player reaction to the S10 rework was mixed. There was considerable excitement surrounding the grapple changes, particularly the retract mechanic and the reduced cooldown for non-fireball attempts, seen as adding depth and QoL. However, skepticism surrounded the Adaptive Shield sharing. Concerns were raised about its practical application, the potential need for Ball to sacrifice his own crucial survivability to help teammates, and whether the amount of Overhealth shared would be impactful enough. Many felt the changes didn't fully address Ball's core weaknesses to CC and body blocking, while some worried the reduced grapple penalty might lower the hero's skill floor.
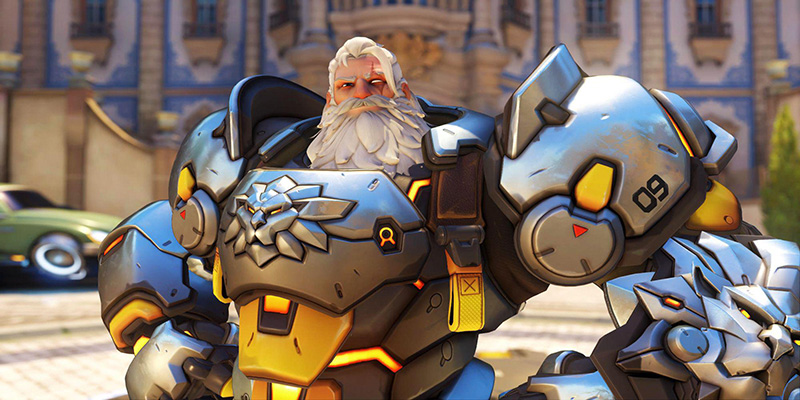
Reinhardt
The venerable German knight saw consistent attention throughout early 2025, receiving buffs aimed at bolstering his presence on the frontline.
- Core Stats/Abilities (S9/Mid-S9/S10): HP/Armor increased; Rocket Hammer damage increased (85 -> 100); Charge wall impact damage increased (225 -> 275); Fire Strike damage increased (100 -> 120); Earthshatter knockdown duration increased (2.75s -> 3s) and range increased (20m -> 25m).
- Perks (Mid-S15): Crusader's Resolve passive regeneration trigger rate increased (50% -> 75%); Shield Slam cooldown reduced (8s -> 6s).
- Previous Changes (Late 2024): Steadfast passive returned (30% knockback resist); Barrier Field health increased (1500 -> 2000); Charge cooldown increased (7s -> 10s) and steering reduced; Fire Strike charges reduced (2 -> 1); Earthshatter range reduced (25m -> 20m - later reverted in S10).
Analysis:
The series of buffs in 2025 clearly aimed to increase Reinhardt's survivability, close-range damage output, and the impact of his ultimate, aligning with the developer goal of building on hero fantasy (e.g., strong shield, powerful hammer). The S10 Earthshatter buffs were particularly significant, making it a much more potent initiation or follow-up tool with its increased range and stun duration. Mid-S15 perk adjustments further improved his sustain and shield pressure capabilities. These changes positioned him well in brawl-favored metas, reflected in his high win rate reported on Overbuff during the period. The earlier reduction to one Fire Strike charge was somewhat offset by the mid-S9 damage increase, making each shot count more.
Playstyle:
Reinhardt remains the quintessential close-range brawler. The increased health, armor, and hammer damage solidify his role in close-quarters combat. Careful management of the longer Charge cooldown is crucial; it's less of a frequent mobility tool and more of a high-commitment engage or pin. Fire Strike serves as a key poke and damage tool, especially after its mid-S9 buff. Earthshatter, with its S10 enhancements, becomes a primary win condition, capable of catching enemies from further away and holding them down longer.
Counters/Synergies:
Despite buffs, Reinhardt still struggles against sustained poke damage and enemies controlling high ground. His increased durability helps, but he relies on his team to enable his approach. He excels against other brawl tanks and close-range compositions. Key synergies include Lucio for speed boost, Baptiste for Immortality Field and Amplification Matrix (boosting Fire Strikes/Shatter), Mei for wall setups and slows, and Kiriko for Suzu cleanses. He also benefits from Stadium mode items designed to increase damage to barriers, helping him win the shield war.
Roadhog
Following his major rework in late 2024, Roadhog received numerous adjustments in 2025 focused on tuning his survivability and hook combo effectiveness.
- Survivability (Mid-S9 Hotfix / March 25 Hotfix): Take a Breather damage reduction increased (40% -> 50%); Take a Breather maximum healing increased (400 -> 450).
- Hook Combo (Mid-S9): Chain Hook pull distance decreased (enemy ends 3m away, down from 4m); Pig Pen vertical knockback on activation reduced.
- Ultimate (March 25 Hotfix): Whole Hog ultimate cost reduced by 12%.
- Perks (Mid-S15 / Earlier): Hog Toss (Pig Pen throw range increased), Pig Pen damage increase component added; Scrap Hook (Hook hits reload ammo), Invigorate (Take a Breather speed boost), Hogdrogen Exposure (Take a Breather heals nearby allies) added.
- Previous Rework (Late 2024): Pig Pen ability removed; Take a Breather moved to Ability 2, cooldown-based, heal reduced, DR increased; Chain Hook cooldown increased (6s -> 8s); Scrap Gun primary fire changed (pellets/damage up, crit x2), secondary fire air burst added; Whole Hog duration reduced.
Analysis:
The post-rework tuning aimed to make Roadhog more resilient and his signature hook combo more reliable. The buffs to Take a Breather's healing and damage reduction made him significantly harder to kill during its animation. The Mid-Season 9 adjustments to Chain Hook and Pig Pen were specifically targeted at improving the consistency of landing a lethal follow-up shot after hooking an enemy. Reducing the ultimate cost for Whole Hog made it a more frequently available tool for zoning or securing kills. His perks introduced added utility, offering options for mobility, team support, and ammo management. Despite these buffs, Roadhog still lacks the proactive team-wide damage mitigation offered by shield tanks, contributing to his lower win rate compared to some other tanks on Overbuff.
Playstyle:
Roadhog remains primarily a threat based on his Chain Hook, aiming to secure picks on out-of-position enemies. The Mid-S9 changes make the hook -> primary fire combo more consistent and lethal. Take a Breather is now a powerful defensive cooldown, used to survive burst damage or reposition under pressure (especially with the Invigorate perk). Whole Hog serves best as a zoning tool to push enemies off objectives or a way to finish off low-health targets caught in close quarters.
Practice Drills:
- Hook Accuracy: Consistent practice landing hooks on various targets at different ranges and angles.
- Hook Combo: Drill the timing of the primary fire follow-up after the Mid-S9 hook pull distance change to ensure maximum damage.
- Take a Breather Usage: Practice timing TAB to mitigate key enemy abilities or burst damage effectively. Experiment with the Invigorate perk for aggressive repositioning or escape.
Other Tank Adjustments
| Tank | Key Changes | Meta Position |
|---|---|---|
| Mauga | Nerfs to Cardiac Overdrive utility and Cage Fight durability; later buffs to Cardiac Overdrive self-use and Overrun's stomp damage | Generally placed in lower tiers |
| Zarya | Energy degeneration rate increase; benefited from S9 beam width increase | S-Tier due to strong carry potential, especially with Energy Lance perk |
| Winston | Significant S9 buffs to HP, Tesla damage, and Primal damage; later Primal Rage ultimate cost increase | S-Tier, particularly strong in dive compositions |
| Junker Queen | Buffs to Rampage wound damage (S9) and Carnage impact damage (S10); Deep Wounds perk extension | A or B tier with strong KDA and Elimination stats |
| Doomfist | Buffs to Rocket Punch and Meteor Strike's minimum damage; QoL improvements | Generally remained in lower tiers |
| D.Va | Self Destruct buffs (damage and radius); specific Stadium item buff against beams | A or S tier with high KDA/Elims and noted peel potential |
| Sigma | Shield health buff (S9) and Experimental Barrier deployment speed increase (S10) | A or S Tier with powerful perks |
| Orisa | Armor buff (S9) and Terra Surge charge rate buff (Mid-S9) | Generally considered a lower-tier tank pick |
| Hazard | No specific balance changes mentioned beyond perk additions | Remained in lower tiers |
Damage Role Rundown: Dealing with the 2025 Differences
The Damage role experienced a significant shift in identity and impact following the Season 9 changes. The new role passive, reducing enemy healing received, gave DPS players a powerful tool to confirm kills, especially against high-sustain targets. Combined with the universal self-heal passive, DPS heroes gained more independence and flanking potential. The global projectile size increase had varied effects, benefiting some heroes more than others, while the overall health increase changed crucial damage breakpoints. The introduction of Freja and the Pharah rework further diversified the role's playstyles and strategic options.
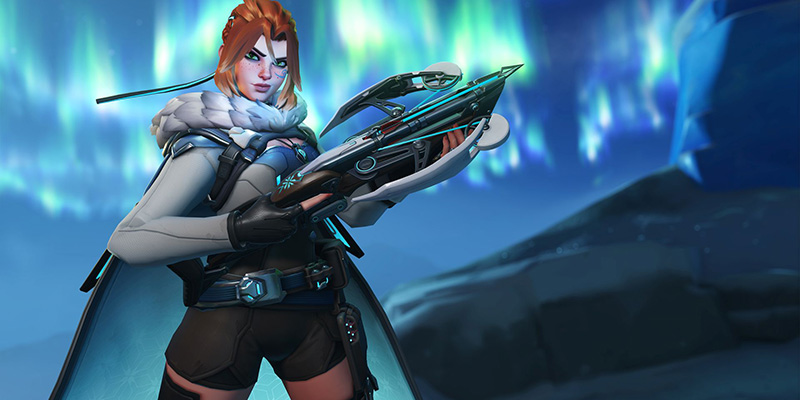
New Hero Spotlight - Freja (Season 16 Release)
Season 16 heralded the arrival of Freja, Overwatch's 43rd hero, a Danish bounty hunter bringing high mobility and precision crossbow gameplay to the Damage roster.
- Role: Damage (Hero 43)
- Origin: Denmark; Former Overwatch Search & Rescue, now Bounty Hunter
- Weapon: Revdraw Crossbow
- Primary Fire: Rapid-fire bolts (30 dmg, ~5/s, 12 ammo, spread)
- Secondary Fire (Take Aim): Single explosive bolt (40 direct + 90-30 AoE, 1s delay, 1 ammo, self-slow/hover)
- Abilities:
- Quick Dash (Ability 1): 8m directional dash, 2 charges, 3.5s CD (originally 4.5s), instantly reloads Take Aim
- Updraft (Ability 2): ~10m vertical launch, 10s CD (originally 12s)
- Ultimate: Bola Shot: Fires AoE projectile; 25 impact + 90 DoT + 100-60 explosion; Pulls enemies on hit, applies Hinder/Slow
- Passives: Standard DPS Role Passive (Healing Reduction); Bounty Hunting (Gain 25% ult charge per 3 final blows)
- Perks (Examples): Frost Bolts (Slow on 3 primary hits); Tracking Instinct (See critical health enemies); Ready To Hunt (Free Quick Dash after Updraft); Relentless Barrage (Take Aim hit refunds 4 primary ammo)
- Balance (April 25 Hotfix): Quick Dash CD reduced (4.5s -> 3.5s); Updraft CD reduced (12s -> 10s)
Kit Breakdown:
Freja's kit revolves around her versatile crossbow and high mobility. Her primary fire offers consistent pressure with rapid bolts, though accuracy degrades with sustained fire due to spread. The core of her damage output lies in 'Take Aim', her secondary fire. This explosive bolt deals significant direct and AoE damage after a short delay, but using it drastically slows Freja's momentum, creating a brief hover effect. This hover can be used for aerial positioning but also makes her vulnerable. Crucially, her Quick Dash (two charges on a short cooldown) instantly reloads Take Aim, enabling potential burst sequences. Updraft provides vertical mobility for accessing high ground or escaping. Her ultimate, Bola Shot, is a powerful setup tool, grouping enemies, dealing damage over time, and applying crowd control. Her unique Bounty Hunting passive rewards securing final blows with substantial ultimate charge. The initial hotfix buffs reducing the cooldowns on Quick Dash and Updraft suggest she needed more frequent access to her mobility and Take Aim reloads shortly after launch.
Role & Playstyle:
Designated as a high-skill hero, Freja operates as a mobile, mid-to-long-range projectile marksman with no damage falloff. Her gameplay emphasizes precision aiming, strategic positioning, and effective cooldown management to pursue and eliminate targets. Players need to master leading shots with both fire modes. Two primary playstyles emerge based on perk choices:
- Hit and Run (Frost Bolts/Relentless Barrage): Focuses on flanking, using Quick Dash for mobility and Take Aim reloads, applying slows with primary fire, and maintaining pressure with ammo refunds from Take Aim hits.
- Rain Down From Above (Tracking Instinct/Ready To Hunt): Utilizes high ground gained via Updraft and Quick Dash, leverages Tracking Instinct to identify low-health targets, and chains mobility with Take Aim shots (potentially four in quick succession with the free dash from Updraft) for high burst damage.
Regardless of perks, players often treat Take Aim as the primary damage source, using mobility tools strategically to enable its use. The Take Aim hover allows for unique aerial angles and stalling tactics, though it carries risk.
Practice Drills:
- Projectile Aim: Practice leading targets consistently with both primary and secondary fire at various ranges.
- Combo Execution: Drill the primary -> Take Aim burst combo and the Ready To Hunt mobility/shooting chain.
- Cooldown Management: Focus on using Quick Dash efficiently for both Take Aim reloads and repositioning/dodging.
- Bola Placement: Practice landing Bola Shot to maximize enemy grouping and follow-up potential.
- Mobility: Master chaining Updraft and Quick Dashes for fast rollouts, escapes, and reaching advantageous positions.
Initial Impressions/Meta Impact:
Freja was immediately recognized for her high skill ceiling and fun, dynamic gameplay loop. Her mobility drew comparisons to Pharah, Echo, and Tracer. While possessing strong dueling potential, concerns were raised about her survivability, as her primary damage ability (Take Aim) is directly linked to using her mobility cooldowns (Quick Dash reload). Her lack of falloff damage makes her a persistent threat from range. She was quickly identified as a potential ban target in the new Hero Ban system. The rapid cooldown buffs post-launch indicated initial tuning was needed to make her feel fluid and impactful.
Freja's design introduces a unique flavor of mobile marksmanship to Overwatch. Rather than relying on hitscan precision like Widowmaker or Ashe, or the potential one-shot of Hanzo, she demands mastery over projectile aim, intricate cooldown cycling, and positional awareness. Her core gameplay loop involves a rhythmic dance between repositioning with mobility, delivering burst damage with Take Aim (enabled by Quick Dash reloads), and sustaining pressure with primary fire. This intricate dependency between damage and mobility means her effectiveness hinges heavily on the player's ability to execute this cycle flawlessly while managing risk, offering a rewarding experience for those who can master her demanding kit.
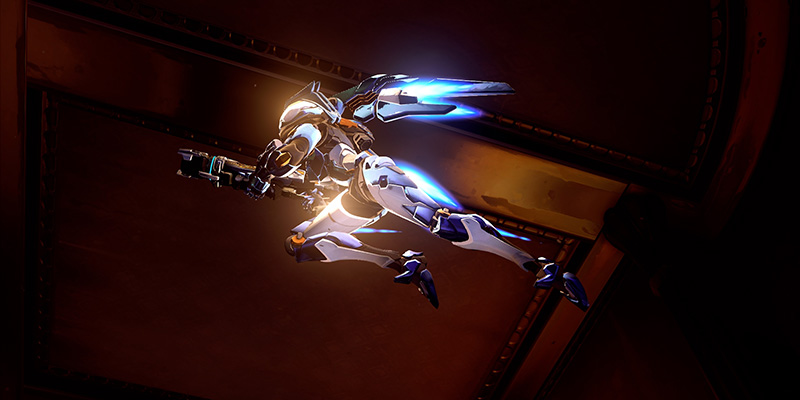
Rework Analysis - Pharah (Season 9)
Season 9 brought a dramatic rework for Pharah, fundamentally altering her flight mechanics and playstyle to address long-standing balance concerns and her heavy reliance on a Mercy pocket.
- Goals: Empower individual plays, lessen Mercy reliance, shift from vertical to horizontal mobility, introduce flight downtime.
- Rocket Launcher: Faster recovery (0.85s -> 0.8s), faster projectile speed (35 -> 40 m/s), reduced self-damage (50% -> 25%).
- Jet Dash (New Ability): Secondary Fire activates a quick horizontal boost (8s cooldown).
- Jump Jet: Now restores 50% Hover Jets fuel (can overfill), vertical boost height reduced by 20%, cooldown increased (10s -> 14s).
- Concussive Blast: Cooldown decreased (9s -> 7s), now deals 30 damage, explosion radius reduced (8m -> 6m), knockback reduced by 10%.
- Barrage (Ultimate): Now instantly refills Hover Jets fuel.
- Hover Jets (Passive Rework): Speed boost increased (20% -> 40%), fuel now only recharges when touching the ground, can be activated without fuel to slow descent.
- Base Stats: Health increased (200 -> 250) as part of S9 global changes.
- Perks (Examples): Drift Thrusters (Move during Barrage), Concussive Implosion (Pull instead of push), Fuel Stores (Jet Dash grants fuel/increases max fuel).
Ability Breakdown & Intent:
The Season 9 changes fundamentally reshaped Pharah's kit. The developers aimed to move her away from the passive, high-altitude "Pharmercy" poke style, which was often oppressive in lower ranks but ineffective at higher levels. By forcing her to land to refuel Hover Jets but giving her the horizontal Jet Dash and faster aerial movement, the intent was to create a more dynamic, closer-range, and independent playstyle. Reduced rocket self-damage encourages more aggressive rocket jumping, while Concussive Blast gaining damage adds offensive utility.
New Playstyles:
The rework successfully shifted Pharah from an aerial artillery piece into a mobile duelist and flanker. Her gameplay now involves actively hunting isolated targets, using her enhanced mobility (Jet Dash, faster Hover Jets) to close distances or escape, and engaging in closer-range rocket duels. Players compared her new rhythm to that of Genji or Echo, emphasizing proactive engagements and target elimination. This "Shotgun Pharah" style requires careful management of fuel, as landing is now mandatory for recharge, creating distinct windows of vulnerability and opportunity. Sneaky ground flanks followed by aerial assaults became a viable tactic. Overall, players reported feeling more agency and finding the new style more fun and engaging.
Modified Combos/Timing:
The core combo shifts towards closer ranges: landing a direct rocket hit followed by the now-damaging Concussive Blast can provide significant burst. Jet Dash is used for rapid horizontal repositioning between shots, closing gaps for kills, or quickly dodging threats. Fuel management is paramount; players must learn the rhythm of expending fuel for aerial maneuvers and finding safe opportunities to land and recharge. The longer Jump Jet cooldown (14s) makes its use more strategic, often saved for initiating dives (with its fuel refill) or escaping critical danger. Safer rocket jumps allow for more aggressive self-propulsion.
Adjusted Counters & Synergies:
The rework achieved its goal of lessening Pharah's dependence on Mercy. She can now function more effectively as a solo hero. However, her closer engagement range and forced landings make her potentially more vulnerable to hitscan heroes like Cassidy, Ashe, and Widowmaker, especially given her large hitbox. The periods spent grounded recharging fuel are key windows for enemies to punish her. Synergistically, she pairs less automatically with Mercy but potentially works better within brawl compositions that create close-range chaos or alongside dive tanks who draw focus, allowing her to flank.
Practice Drills:
- Mobility & Fuel: Practice fluid movement using Jet Dash for quick peeks, dodges, and repositioning. Drill fuel management cycles – engaging, landing safely, recharging, and re-engaging.
- Close-Range Combat: Focus on landing direct rockets and Concussive Blasts in close-quarters fights. Practice rocket jumping for aggressive vertical movement.
- Cooldown Management: Adapt to the longer Jump Jet cooldown, using it strategically. Master the timing of Concussive Blast for both damage and displacement.
Cassidy
The iconic cowboy received several adjustments throughout early 2025, aiming to bolster his effectiveness at mid-range and increase his kill potential.
- Core Stats/Abilities (S9 / March 25 Hotfix): Health increased (225 -> 275); Peacekeeper primary fire falloff range increased (20m -> 25m); Peacekeeper secondary fire (Fan the Hammer) damage per shot increased (45 -> 50); Deadeye initial damage rate increased (130 -> 150) and ramp-up damage rate increased (260 -> 300).
- Stadium Mode: Stadium Cash gain rate reduced (50% -> 40%) due to overperformance. Concerns raised about auto-aim perks in this mode.
Analysis:
Cassidy's buffs focused on enhancing his performance in several key areas. The increased health from Season 9 provided more survivability. The March 25th hotfix was significant: increasing primary fire falloff range allowed him to deal maximum damage from further away, improving his dueling potential against other mid-range heroes. Buffing Fan the Hammer's damage made it a more reliable close-range burst option for finishing off low-health targets or deterring divers, especially relevant against the higher health pools introduced in S9. The Deadeye buffs made his ultimate significantly more lethal once locked onto targets, reducing the time needed to secure kills. His nerf in the Stadium mode suggests that specific perks or item combinations made him particularly potent in that environment. In standard play, Overbuff stats showed him with a high pick rate but a win rate slightly below 50%, suggesting widespread use but perhaps not optimal dominance. Tier list placements varied between A and B tier.
Playstyle:
Cassidy remains a solid mid-range hitscan specialist. The falloff buff allows for slightly safer positioning while maintaining high damage output. Fan the Hammer becomes a more potent tool in close quarters, useful for bursting down tanks or confirming kills on squishies after landing a body shot. Deadeye, while still requiring careful positioning and timing to avoid interruption, is now more likely to secure kills once activated due to the faster damage ramp-up.
Other Damage Role Adjustments
| Hero | Key Changes | Meta Position |
|---|---|---|
| Sojourn | Minor Railgun secondary fire projectile size reduction; Power Slide cooldown increase and duration decrease | S-Tier with high mobility, consistent primary fire, and one-shot potential |
| Soldier: 76 | Projectile size adjustments; concerns about Stadium mode performance | Varied placements (A-Tier to C-Tier), suggesting map or meta dependency |
| Echo | Health pool partially shifted to shields; S9 buffs to Focusing Beam width and Duplicate health cap | S or A tier; received 6v6 specific nerfs |
| Widowmaker | Multiple HP buffs; increase to effective scoped range; Mythic weapon release | A or C tiers, highly map-dependent |
| Genji | Slight Dragonblade swing recovery time reduction; perk improvements | Solid A-Tier pick |
| Mei | HP buff; ammo capacity and Cryo-Freeze healing buffs; perk adjustments | A or B tiers |
| Reaper | HP buff; Death Blossom damage buff and ultimate cost reduction; perk adjustments | B or C tiers, but high elimination stats |
| Sombra | Numerous adjustments to Virus damage and EMP cost; perk improvements | Lower tiers (D or B), frequent competitive bans |
| Torbjörn | Turret damage buff; base turret stat adjustments with Craftsman perk buff | S-Tier with exceptionally strong perks and high win rate |
| Tracer | HP buff; falloff range reduction; Recall cooldown increase; perk buffs | Top-tier pick (S or A) with strong perks |
| Symmetra | Shield HP and beam width buffs; primary fire damage scaling buffs; inconsistent balance adjustments | Highest win rate on Overbuff, generally B-Tier |
| Bastion | HP buff; Self-Repair perk resource meter addition | S or B tiers depending on the list |
| Hanzo | Storm Arrows buffs; projectile size adjustments | Generally placed in lower tiers (C or B) |
| Junkrat | HP buff; projectile size reduction; Concussion Mine cooldown and damage buffs | B-Tier, potentially underrated |
| Venture | Damage redistribution nerfs; Tectonic Shock knockback nerf | B-Tier |
Support Role Summary: Sustaining Through the Shifts
The Support role navigated a complex period in 2025. The Season 9 changes, particularly the universal self-heal and the potent DPS passive reducing healing effectiveness, forced adaptations. Supports couldn't rely solely on raw healing output; utility, survivability, and enabling teammates became even more crucial. Developers noted that prior to S9, Supports often felt overly tethered to keeping their tank alive, and the changes aimed to broaden their impact. Balance adjustments focused on tuning healing numbers, cooldowns, and the power of utility abilities and perks.
Ana
Ana remained a cornerstone of the Support role, demonstrating resilience and high impact throughout the changes.
Core Stats/Abilities (S9 / Mid-S9 / March 25 Hotfix):
- Health increased (200 -> 250)
- Biotic Grenade explosion damage and healing increased (60 -> 90)
- Biotic Grenade cooldown increased (12s -> 14s non-6v6, 10s -> 12s 6v6)
- Shrike (Self-Nano Boost perk) duration reduced (8s -> 6s)
Perks (Patch 16):
- Groggy (Sleep Dart perk) initial slow reduced (75% -> 50%), now also deals 50 damage over the duration
- Biotic Bounce (Nade perk) second bounce damage and healing reduced (50 -> 25)
Analysis:
Despite a cooldown increase on her Biotic Grenade, its raw power was significantly buffed mid-Season 9, solidifying it as one of the most impactful abilities in the game. This, combined with her reliable healing, potent Sleep Dart, and game-changing Nano Boost ultimate, kept her firmly in the S-Tier. Her high pick rate across all ranks underscored her meta relevance. The Patch 16 perk adjustments slightly toned down Biotic Bounce but added damage to her Sleep Dart via the Groggy perk, making it even more punishing for divers. Her ability to both enable her team and shut down opponents made her a versatile and highly valued pick.
Playstyle:
Ana functions best as a backline sniper-healer. Her primary role is sustaining tanks and key DPS players while looking for opportunities to land impactful Biotic Grenades (both offensively to deny enemy healing and defensively to boost allied healing) and Sleep Darts on high-value targets or flankers. Positioning is critical to maintain sightlines for healing and damage while staying safe from enemy pressure. Nano Boost coordination with teammates remains a key aspect of her play.
Counters/Synergies:
Ana is vulnerable to coordinated dives, especially if her Sleep Dart and Biotic Grenade are on cooldown. Heroes like Winston, D.Va, Genji, and Tracer can pressure her effectively. She excels against compositions reliant on heavy healing (countered by Nade) and can shut down key ultimates with Sleep Dart. She synergizes extremely well with dive tanks like Winston or Doomfist (Nano Boost targets) and high-impact DPS ultimates like Dragonblade or Tactical Visor. Kiriko is a valuable partner, able to cleanse anti-nade effects with Suzu.
Practice Drills:
- Sleep Dart Accuracy: Practice hitting Sleep Darts consistently on mobile targets like Tracer, Genji, or diving tanks.
- Biotic Grenade Placement: Drill landing grenades that simultaneously hit allies and enemies for maximum value. Practice offensive nades over walls or barriers.
- Positioning: Experiment with different positions on each map to find safe spots with good sightlines for both healing allies and pressuring enemies.
Lifeweaver
Lifeweaver received consistent buffs throughout the first half of 2025, aiming to increase his healing output and overall impact.
Core Stats/Abilities (S9 / Mid-S9 / S10):
- Health increased (175 -> 225)
- Heal Blossom maximum heal amount increased (70 -> 80), maximum charge time increased (1s -> 1.15s)
- Rejuvenating Dash self-heal increased (50 -> 60)
- Tree of Life pulse healing increased (75 -> 90)
Perks (Patch 16):
- Thorn Volley projectile speed increased (80 -> 100 m/s)
- Lifeweaving (Heal Blossom perk) bonus healing increased (30 -> 40)
Analysis:
The developers focused heavily on boosting Lifeweaver's healing capabilities. The Heal Blossom changes mid-S9 aimed to increase burst healing potential, even with a slightly longer charge time. Further buffs in S10 to his dash heal and ultimate healing solidified his potential as a high-throughput healer. The Patch 16 perk adjustments made his Thorn Volley damage more reliable and further boosted his healing potential via the Lifeweaving perk. Despite these numerous buffs, he was generally still considered a low-tier pick (often C or D tier). However, his stats showed very high raw healing numbers and excellent survivability (high KDA, low deaths per 10 min), suggesting his utility with Life Grip and Petal Platform might be undervalued or difficult to leverage effectively in typical ranked environments.
Playstyle:
Lifeweaver's playstyle centers around providing high volumes of healing primarily through his Heal Blossom and Tree of Life ultimate. His unique utility comes from Life Grip, which can save teammates from fatal damage or poor positioning, and Petal Platform, which offers vertical mobility and temporary high ground for himself or allies. Effective Lifeweaver play requires strong situational awareness to use Life Grip proactively and strategically place Petal Platforms.
Counters/Synergies:
Lifeweaver can be vulnerable if caught out of position, particularly when Rejuvenating Dash is on cooldown. Life Grip, while powerful, can be countered by crowd control effects or clever enemy body blocking, and misplaced Grips can sometimes hinder allies. He synergizes well with less mobile heroes who benefit most from his repositioning tools (Life Grip, Petal Platform), such as Bastion, Cassidy, or Ana. His Tree of Life provides substantial AoE healing, making it strong in sustained team fights or against damage-over-time ultimates.
Practice Drills:
- Life Grip: Practice identifying critical moments to use Life Grip to save allies. Drill reaction time and target accuracy. Communicate Grip intentions if possible.
- Petal Platform: Experiment with platform placements for enabling allies (e.g., giving a hitscan high ground) or for personal escape/repositioning.
- Heal Blossom: Practice charge timing to maximize healing output, balancing quick bursts with fully charged heals.
- Positioning: Find positions that allow safe healing while keeping key allies within Life Grip range.
Other Support Adjustments
- Juno: Received an ultimate cost increase for Orbital Ray early in the year. Patch 16 saw significant perk changes, removing Hyper Boost and reworking others. Remained a high-tier pick (A-Tier), valued for her mobility and healing/damage potential. Showed high healing output stats.
- Kiriko: Had her Kunai base projectile size reduced in S9, making headshots slightly harder. Despite this, she remained a dominant S-Tier support due to her high survivability (Swift Step, Suzu), impactful ultimate (Kitsune Rush), and strong perks allowing simultaneous damage and healing. Her high pick rate reflected her meta strength.
- Lúcio: Received Soundwave buffs in S9 (damage, knockback, lockout duration). S10 saw a slight nerf to his primary fire damage but another buff to Soundwave damage, shifting power towards his boop utility. Patch 16 adjusted his perks, adding Beat Drop (Amp It Up active during Sound Barrier). Maintained a high win rate and A-Tier status. The primary fire nerf was debated among players.
- Moira: Benefited from S9 buffs to her Biotic Grasp damage beam (DPS and acquisition radius). S10 slightly reduced the damage beam DPS but increased Coalescence self-healing. Remained a popular pick with high survivability (high KDA). Generally placed in B-Tier. Her Long Fade perk was noted as fun.
- Illari: Received buffs mid-S9 reducing her primary fire recovery and charge time. S10 partially reverted the primary fire buff but increased her secondary fire healing beam's HPS. Mid-S15 saw a buff to her Summer Solstice ultimate perk. Showed a rising win rate and placed in B or C tiers. Her Outburst perk offered niche utility.
- Baptiste: Mid-S9 saw a slight buff reducing Immortality Field's minimum health threshold. Patch 16 increased his Biotic Launcher's healing but reduced max ammo, and changed his Assault Burst perk. Considered difficult to balance due to high damage potential alongside healing. Placed in A or B tiers.
- Brigitte: Received consistent small buffs: S9 increased health and Flail damage; Mid-S9 reduced Repair Pack cooldown and Rally cost; Mid-S15 buffed her Barrier Restoration perk. These cumulative buffs contributed to a high win rate and A or B tier placement.
- Mercy: S9 saw adjustments reducing Guardian Angel cancel duration but increasing her passive self-heal based on healing dealt. Patch 16 replaced a perk with Angelic Resurrection, granting Overhealth after a successful Resurrect. Remained a high pick rate hero but often considered weak and placed in B or C tiers. Received a Mythic weapon in Season 16.
- Zenyatta: Received HP/Shield buffs in S9. Mid-S9 patches appeared to nerf Discord Orb (damage amp reduction, range/duration nerfs). Patch 16 added a hover QoL to his Ascendance perk and buffed the Duality perk. Maintained a high win rate and KDA, placed in A or B tiers. Received a Mythic skin in Season 15.
The Mid-Year Meta: Tiers, Trends, and Tactics (Mid-2025)
By the middle of 2025, following the launch of Season 16, the Overwatch competitive meta had absorbed the seismic Season 9 changes, the introduction of Hero Perks (even if primarily featured in modes like Stadium initially, their concepts influenced balance discussions), the arrival of the high-skill DPS Freja, and the strategic complexity of Hero Bans. The landscape was dynamic, rewarding adaptability and a deep understanding of hero interactions.
Updated Tier List (Mid-2025 Estimate):
This tier list synthesizes data from provided lists, Overbuff statistics, competitive play observations, and analyst commentary up to roughly May 2025. Tiers reflect general effectiveness in competitive play, acknowledging that specific maps, team compositions, and hero bans can significantly alter viability.
| Hero | Role | Tier | Brief Justification/Key Strength |
|---|---|---|---|
| S-Tier - Dominant, meta-defining picks effective in most situations. | |||
| Sojourn | Damage | S | Top-tier DPS. High mobility, lethal Railgun one-shot potential, strong perks. Nerfs seen as insufficient. |
| Zarya | Tank | S | High win rate, strong solo carry potential with perks (Energy Lance), benefits from S9 changes. |
| Winston | Tank | S | High win rate, strong dive enabler, benefits greatly from bans removing counters, good perks. |
| Ana | Support | S | Best support due to impactful Nade/Sleep, strong Nano Boost, and overturned perks. |
| Kiriko | Support | S | High survivability (TP/Suzu), impactful ultimate, strong perks enabling damage/healing simultaneously. |
| Torbjörn | Damage | S | Unprecedented meta strength due to powerful turret perks, strong burst with Overload. |
| A-Tier - Strong, reliable picks viable in most compositions, slightly less dominant than S-Tier. | |||
| D.Va | Tank | A | High KDA/Elims, strong peel, impactful ultimate buffs, good survivability. |
| Sigma | Tank | A | Strong defensive/offensive capabilities, impactful ultimate, good perks. |
| Tracer | Damage | A | High mobility flanker, strong perks enhance survivability and ultimate potential. |
| Genji | Damage | A | Mobile flanker, impactful ultimate, improved perks increase consistency. |
| Ashe | Damage | A | Reliable mid-long range hitscan, versatile ultimate (B.O.B.), strong perks. |
| Cassidy | Damage | A | Solid mid-range hitscan, buffed falloff/Fan/Deadeye increase lethality. |
| Pharah | Damage | A | Rework increased agency and mobility, strong duelist potential if mastered, map dependent. |
| Echo | Damage | A | Versatile flying DPS, impactful ultimate, strong burst potential. |
| Lúcio | Support | A | High win rate, essential for brawl/dive speed, impactful Sound Barrier, strong utility. |
| Juno | Support | A | High healing output, good mobility, strong ultimate. |
| Baptiste | Support | A | High healing/damage potential, Immortality Field utility, impactful ultimate. |
| Brigitte | Support | A | High win rate, strong anti-dive capabilities, cumulative buffs increased effectiveness. |
| B-Tier - Viable picks, often map/composition dependent or requiring higher skill/coordination. | |||
| Reinhardt | Tank | B | Buffed significantly, strong in brawl, but can struggle against poke/high ground. |
| Junker Queen | Tank | B | Buffs increased wound/burst potential, strong stats but maybe less versatile than higher tiers. |
| Wrecking Ball | Tank | B | Rework adds utility but core counters remain, high skill ceiling, map dependent. |
| Ramattra | Tank | B | Versatile tank form switching, strong ultimate, decent stats. |
| Doomfist | Tank | B | Buffs increased impact but still niche/counterable, high skill ceiling. |
| Freja | Damage | B | New hero, high skill ceiling, strong potential but likely still being optimized/countered. |
| Mei | Damage | B | Strong utility (slow/wall), buffs increased sustain/ammo, good in brawl. |
| Reaper | Damage | B | Buffs increased ult impact/damage, strong close-range, good vs tanks. |
| Symmetra | Damage | B | Highest win rate but niche, requires coordination, recent nerfs pulled back power. |
| Venture | Damage | B | Recent nerfs adjusted damage profile, unique burrow mechanic, potentially strong on certain maps. |
| Bastion | Damage | B | High damage output, survivability perks, can be vulnerable/situational. |
| Junkrat | Damage | B | Buffs increased mine impact, strong burst/area denial, potentially underrated. |
| Moira | Support | B | High survivability/healing output, good duelist, lacks utility compared to top tiers. |
| Zenyatta | Support | B | High damage potential (Discord), strong ultimate, recent nerfs/adjustments balanced power. |
| C-Tier - Niche picks, generally outclassed or requiring specific strategies/maps to be effective. | |||
| Orisa | Tank | C | Received buffs but often struggles against coordinated teams, lacks impact compared to others. |
| Roadhog | Tank | C | Buffs improved consistency/survivability but lacks team mitigation, easily countered. |
| Hazard | Tank | C | No recent buffs mentioned, generally considered weak. |
| Widowmaker | Damage | C | HP/Range buffs help, but S9 changes made one-shots harder, very map/aim dependent. |
| Hanzo | Damage | C | Buffs to Storm Arrow, but projectile changes/HP increases make one-shots inconsistent. |
| Soldier: 76 | Damage | C | Reliable hitscan but potentially outclassed by Sojourn/Ashe/Cassidy in terms of impact. |
| Illari | Support | C | Received buffs/adjustments but may lack the utility or consistent impact of higher tiers. |
| Mercy | Support | C | High pick rate but often seen as weak, rework shifted Pharah away, lacks playmaking potential. |
| D-Tier - Generally considered underpowered or highly situational. | |||
| Mauga | Tank | D | Significant balance struggles, multiple nerfs/reverts, lacks clear strengths. |
| Sombra | Damage | D | Frequent target of frustration/bans, but generally low impact/tier placement after adjustments. |
| Lifeweaver | Support | D | Received many buffs but unique utility difficult to maximize, low impact outside of saves. |
Evolving Team Compositions:
The meta saw several viable composition archetypes, heavily influenced by map choice and, crucially, Hero Bans:
- Dive Dominance: With strong enablers like Winston and D.Va, dive compositions featuring mobile DPS (Genji, Tracer, Sojourn, potentially Freja) and flexible supports (Kiriko, Lucio, Ana) were highly effective, especially when key counters could be banned out. Ana remained pivotal, both enabling dives with Nano Boost and shutting down enemy dives with Sleep Dart and Biotic Grenade.
- Resilient Brawl: Reinhardt and Zarya anchored powerful brawl compositions. These often included close-range DPS like Mei or Reaper, supported by Lucio (speed), Baptiste (sustain/damage amp), or Moira (high healing/survivability). Increased health pools from S9 initially favored these durable comps.
- Poke/Hybrid Flexibility: Sigma remained a strong anchor for poke-oriented strategies. Depending on the map and bans, hitscan heroes like Ashe and Cassidy, or snipers like Widowmaker, found opportunities. Freja added another dimension to mid-long range pressure. Supports like Ana, Zenyatta, or Kiriko could fit well here.
- The X-Factor: Hero Bans: The introduction of Hero Bans in Season 16 was arguably the biggest strategic shakeup. Teams could no longer rely solely on running the absolute "best" composition. Instead, they needed adaptability and wider hero pools. Bans could target globally strong meta picks (like Sojourn, Zarya, Ana), specific map powerhouses (like Widowmaker on Junkertown), or direct counters to a team's intended strategy (e.g., banning Sombra and Cassidy to enable Wrecking Ball or Doomfist dives). This forced dynamic drafting and rewarded strategic thinking before the match even began.
Adapting Your Play:
Thriving in the mid-2025 meta required more than just mechanical skill:
- Hero Pool Depth: Relying on a single hero became increasingly risky due to bans and frequent balance shifts. Developing proficiency with 2-3 heroes within a chosen role was essential for flexibility.
- Leverage Passives: Consciously applying the DPS healing reduction passive to key targets became crucial for securing eliminations. Utilizing the universal self-heal passive allowed for better sustain management, enabling smarter positioning and minimizing downtime.
- Strategic Communication: Effective communication, especially during the pre-match ban phase, was vital for coordinating picks and counter-strategies. In-game callouts, particularly focusing targets affected by the DPS passive, amplified team effectiveness.
- Master the Fundamentals: Despite the evolving meta, core Overwatch skills remained paramount: strong positioning, intelligent cooldown management, consistent aim, and overall game sense were the bedrock of success.
Before You Queue - Mid-2025 Checklist:
- Quickly review the latest patch notes – the meta shifts rapidly!
- Ensure comfort on at least 2-3 heroes for the selected role.
- Communicate actively during the Hero Ban phase – suggest bans that enable the team's strategy or disable key enemy threats.
- Prioritize targets and call out enemies affected by the DPS healing reduction passive.
- Utilize the universal self-heal passive to recover from chip damage and maintain uptime.
Sleeper OP Alert: Underrated Heroes to Watch (Mid-2025)
Beyond the consistently high-tier heroes dominating pick rates and discussion, several characters showed potential to be "Sleeper OP" – heroes punching above their perceived weight or tier placement. These characters might have received subtle buffs, benefited indirectly from meta shifts, or possessed niche strengths amplified by the Hero Ban system.
Potential Candidates & Reasoning:
Despite receiving nerfs later in Season 16 that partially reverted earlier buffs, Symmetra consistently boasted the highest win rate across all ranks according to Overbuff stats during this period. While her pick rate remained low, indicating niche usage, this discrepancy often points to a hero who is incredibly powerful in the right situations or in the hands of dedicated specialists. The Mid-Season 9 buffs to her turrets and Teleporter likely still held significant value in coordinated play or on specific map points (like chokes on defense) where her area denial and team repositioning utility shine. Furthermore, the S9 global health increases may have given her slightly longer windows to ramp up her primary beam's formidable damage against tanks. Her strength lies in specific map control and coordinated team plays, making her devastating when those conditions are met.
Quietly accumulating buffs over several patches – increased Flail damage in S9, reduced Repair Pack cooldown and Rally cost mid-S9, and an improved Barrier Restoration perk mid-S15 – Brigitte emerged with a very high win rate. While not always flashy, these incremental improvements bolstered her survivability, healing uptime, and utility. In a meta potentially featuring strong dive heroes like Winston, Tracer, and Genji, her inherent anti-dive capabilities (Whip Shot displacement, Shield Bash stun, AoE healing) become increasingly valuable. This ability to effectively counter popular strategies without receiving major headline-grabbing changes positioned her as a potentially underestimated powerhouse.
While often recognized as strong, Winston's potential was arguably amplified to "sleeper OP" levels specifically due to the introduction of Hero Bans. Possessing a very high win rate and receiving direct buffs in S9, his true dominance could be unlocked when teams strategically banned his primary counters (like Reaper, Bastion, or Roadhog). With fewer checks available, a well-executed Winston dive became significantly harder to stop, potentially dominating matches in a way that pick/win rates alone might not fully capture without the context of bans enabling him.
Often overlooked in high-level meta discussions, Junkrat received a helpful buff to his Concussion Mine damage and cooldown mid-S9. More significantly, the S9 global health increases indirectly benefited his damage profile. With one-shots becoming rarer, Junkrat's high burst damage from combos (trap/mine + primary) and consistent area denial spam became more effective at overwhelming opponents' larger health pools. His ability to break shields and control tight spaces remained valuable, and some commentators noted him as potentially underrated.
Conclusion: Master the Momentum, Climb the Ranks
The first half of 2025 was a period of intense transformation for Overwatch. The foundational overhaul of Season 9 reset core gameplay mechanics, prioritizing damage consistency and individual sustain while introducing the strategic wrinkle of the DPS healing reduction passive. Subsequent patches focused on refining this new baseline, tuning hero abilities, introducing impactful reworks for Pharah and Wrecking Ball, and welcoming the new high-skill DPS Freja. Capping off this evolution, the introduction of Hero Bans in Season 16 added a crucial layer of pre-match strategy, demanding greater adaptability and deeper hero pools from competitive players.
The constant flux underscored a key takeaway: mastery in Overwatch during this period required more than just mechanical prowess. The ability to rapidly learn, adapt, and understand the implications of balance changes became a critical skill differentiator. Players who embraced flexibility, studied the shifting meta, and communicated effectively, particularly during the ban phase, found themselves better equipped to navigate the dynamic competitive landscape.
As Overwatch continues to evolve, this period serves as a testament to the game's commitment to dynamism. While stability might be elusive, the constant iteration keeps the challenge fresh. For dedicated players, the path forward lies in embracing the chaos, continuously learning, and leveraging knowledge – like that detailed in this guide – to turn the tide of battle and consistently climb the ranks.